
1. Introducción
Gracias por la compraasing the Soundsation MIOMIX 404FXM 6-Channel Mixer. This versatile mixer is designed for a wide range of audio applications, including home recording, live performances, and podcasting. It combines professional audio quality with portability, featuring low-noise preamplifiers, digital effects, a USB media player/recorder, and Bluetooth connectivity. This manual provides essential information for safe operation, setup, and optimal use of your MIOMIX 404FXM mixer.
2. Instrucciones de seguridad
ADVERTENCIA: Para reducir el riesgo de incendio o descarga eléctrica, no exponga este equipo a la lluvia ni a la humedad.
- Lea estas instrucciones cuidadosamente antes de operar la unidad.
- Conserve este manual para futuras consultas.
- Preste atención a todas las advertencias y siga todas las instrucciones.
- No utilice este aparato cerca del agua.
- Limpiar únicamente con un paño seco.
- No obstruya las aberturas de ventilación. Instale el producto según las instrucciones del fabricante.
- No lo instale cerca de fuentes de calor como radiadores, rejillas de calefacción, estufas u otros aparatos (incluidos ampificadores) que producen calor.
- No anule la función de seguridad del enchufe polarizado o con conexión a tierra. Un enchufe polarizado tiene dos clavijas, una más ancha que la otra. Un enchufe con conexión a tierra tiene dos clavijas y una tercera clavija de conexión a tierra. La clavija ancha o la tercera clavija se proporcionan para su seguridad. Si el enchufe proporcionado no encaja en su tomacorriente, consulte a un electricista para que reemplace el tomacorriente obsoleto.
- Proteja el cable de alimentación para que no sea pisado ni aplastado, especialmente en los enchufes, receptáculos y en el punto donde sale del aparato.
- Utilice únicamente accesorios especificados por el fabricante.
- Desenchufe este aparato durante tormentas eléctricas o cuando no lo utilice durante períodos prolongados.
- Encargue todas las tareas de mantenimiento a personal técnico cualificado. Se requiere realizar el mantenimiento cuando el aparato haya sufrido algún daño, como por ejemplo si el cable de alimentación o el enchufe están dañados, si se ha derramado líquido o han caído objetos en el interior del aparato, si el aparato ha estado expuesto a la lluvia o la humedad, si no funciona con normalidad o si se ha caído.
3. Contenido del paquete
Compruebe que todos los artículos enumerados a continuación estén incluidos en el paquete:
- Soundsation MIOMIX 404FXM Mixer
- Adaptador de corriente
- Manual de usuario
4. Características del producto
- 6-channel mixer with digital multi-effect processor.
- Integrated USB player/recorder supporting WAV, MP3, WMA, and FLAC formats.
- Wireless Bluetooth audio streaming.
- 4 Mic/Line channels with low-noise preamps and Combo connectors.
- Selectable Hi-Z inputs for guitars and other high-impedance instruments.
- Alimentación Phantom de +48 V para micrófonos de condensador.
- Peak indicators on input channels.
- 1 stereo line channel with 6.3mm jacks and +4/-10 dB pad adapter.
- 2-band EQ on channels 1-4.
- 24-bit/48 kHz digital effects processor with 16 presets (Reverb, Delay, Echo, Chorus, etc.) and TAP-Tempo function.
- USB player level control.
- Salida de auriculares con control de nivel.
- XLR main outputs with volume control.
- Stereo VU Meter with 2 x 6 LED bars.
5. Controles y Funciones
5.1 Panel frontal sobreview

Image: Front panel of the Soundsation MIOMIX 404FXM mixer, showing all input channels, EQ controls, effect section, USB/Bluetooth media player, and main output controls.
Input Channels (MIC/INST 1-4)
- MIC/INST Input (Combo Jack): Connect XLR microphones or 1/4" instrument/line cables.
- Alimentación fantasma de +48 V: Activates phantom power for condenser microphones. Use with caution.
- Interruptor de alta impedancia: Engages high impedance input for direct connection of guitars or basses.
- Perilla de GANANCIA: Ajusta la sensibilidad de entrada del micrófono o instrumento conectado.
- Perilla ALTA: Adjusts the high-frequency equalization (treble).
- Perilla BAJA: Adjusts the low-frequency equalization (bass).
- Perilla de efectos: Controls the amount of signal sent to the internal digital effects processor.
- Perilla PAN: Adjusts the stereo position (left/right) of the channel.
- Perilla VOL: Ajusta el volumen de salida del canal individual.
- LED PK (pico): Se ilumina cuando la señal de entrada es demasiado alta, lo que indica un posible recorte.
Stereo Line Input (CH 5-6)
- L/Mono, R Inputs (1/4" Jacks): Connect stereo line-level devices (keyboards, CD players, DJ consoles, etc.). The L/Mono input can be used alone for a mono signal.
- +4/-10dB Switch: Adjusts input sensitivity for different line-level devices.
- Perilla PAN: Ajusta la posición estéreo del canal.
- Perilla VOL: Adjusts the output volume of the stereo channel.
- LED PK (pico): Illuminates when the input signal is too high.
USB & Bluetooth Media Player
- Puerto USB: Connect a USB drive for playing audio files or recording.
- Pantalla de visualización: Muestra el modo actual, la información de la pista y la configuración.
- Up/Rewind Button: Navigates up in menus or rewinds current track.
- Down/Forward Button: Navigates down in menus or fast-forwards current track.
- Play/Pause/Enter Button: Plays/pauses audio or confirms menu selections.
- Botón MENÚ: Accesses media player menu options (BT streaming, music player, audio recorder, selection).
- MP3 PLAYER LVL Knob: Controls the output level of the USB/Bluetooth media player.
Digital Effects Processor (24-bit/48 kHz)
- Visualización de efectos: Shows the selected effect number and parameter values.
- Perilla de PROGRAMA: Rotates to select one of the 16 built-in digital effects. Press to confirm selection.
- Botón TOQUE TEMPO: Tap multiple times to set the tempo for time-based effects (e.g., Delay).
- Perilla de NIVEL: Adjusts the overall wet/dry mix of the effects.
Output & Monitoring Section
- PHONES Jack (1/4"): Conecte los auriculares para monitorizar.
- PHONES LVL Knob: Ajusta el volumen de la salida de auriculares.
- MAIN OUT L/R (XLR): Balanced XLR outputs for connecting to powered speakers, amplificadores o dispositivos de grabación.
- Perilla de SALIDA PRINCIPAL: Controla el volumen de salida general de la mezcla principal.
- VU Meter (LED): Displays the stereo output level of the main mix.
5.2 Panel Trasero Sobreview
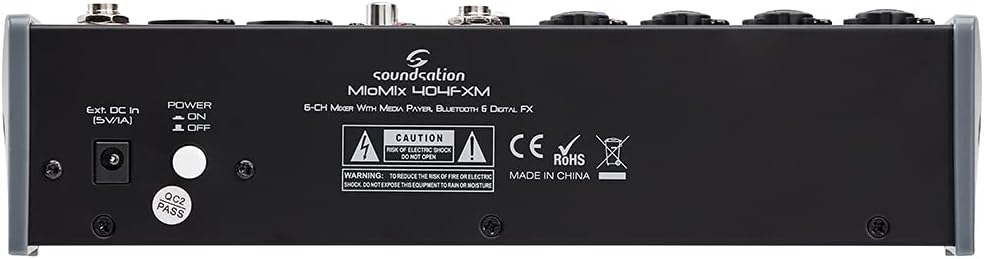
Image: Rear panel of the Soundsation MIOMIX 404FXM mixer, showing the power input, power switch, and main output connections.
- Ext. DC In (5V/1A): Power input for connecting the provided external power adapter.
- Interruptor de encendido/apagado: Turns the mixer's power on or off.
- REC OUT L/R (RCA): Unbalanced RCA outputs for connecting to recording devices.
6. Configuración
- Desembalaje del mezclador: Carefully remove the MIOMIX 404FXM from its packaging.
- Colocación: Coloque la batidora sobre una superficie estable y plana, asegurando una ventilación adecuada alrededor de la unidad.
- Conexión de energía: Ensure the mixer's POWER switch is in the OFF position. Connect the provided power adapter to the "Ext. DC In (5V/1A)" port on the rear panel, then plug the adapter into a suitable power outlet.
- Encendido inicial: Flip the POWER switch to the ON position. The mixer's indicators should light up, and the display should activate.
- Conectar salidas: Connect the MAIN OUT XLR outputs to your powered speakers, amplifier, or audio interface. Connect headphones to the PHONES jack for monitoring.
- Conectar entradas: Connect your microphones, instruments, and line-level devices to the appropriate input channels.
7. Instrucciones de funcionamiento
7.1 Conexión de fuentes de audio
- Micrófonos: Connect dynamic microphones via XLR cables to the MIC/INST Combo jacks. For condenser microphones, connect via XLR and activate the +48V Phantom Power switch for the respective channel.
- Instruments (Guitars/Basses): Connect directly using a 1/4" TS cable to the MIC/INST Combo jack and engage the Hi-Z switch for that channel.
- Line-Level Devices (Keyboards, CD Players): Connect using 1/4" TS cables to the MIC/INST Combo jacks (for mono) or to the CH 5-6 L/Mono and R inputs (for stereo). Adjust the +4/-10dB switch on CH 5-6 as needed.
7.2 Adjusting Channel Levels and EQ
- Set all GAIN, VOL, and MAIN OUT knobs to their minimum positions before starting.
- Speak into the microphone or play your instrument. Slowly increase the GAIN knob for the respective channel until the PK LED flashes only occasionally during the loudest parts.
- Adjust the HIGH and LOW EQ knobs to shape the tone of your sound.
- Use the PAN knob to position the sound in the stereo field.
- Slowly increase the channel's VOL knob to blend it into the overall mix.
7.3 Using the USB Media Player/Recorder
- Reproducción: Insert a USB drive containing WAV, MP3, WMA, or FLAC files into the USB port. The display will show the file list. Use the Up/Down buttons to navigate and Play/Pause/Enter to select and play. Adjust the MP3 PLAYER LVL knob to control its volume in the mix.
- Grabación: In the media player menu (accessed via MENU button), select the 'Audio Recorder' function. Ensure your USB drive has enough free space. Press Play/Pause/Enter to start and stop recording. The mixer records the main stereo mix.
7.4 Conectividad Bluetooth
- Press the MENU button on the media player and select 'BT Streaming'. The display will show 'Bluetooth' and indicate it's searching.
- On your smartphone or Bluetooth device, search for available devices and select 'MIOMIX 404FXM'.
- Once paired, you can stream audio from your device to the mixer. Control the volume using your device and the MP3 PLAYER LVL knob on the mixer.
7.5 Applying Digital Effects
- Turn the FX knob on the desired input channel to send signal to the effects processor.
- Rotate the PROGRAM knob to browse through the 16 available effects. Press the PROGRAM knob to select an effect.
- Adjust the LEVEL knob in the FX section to control the overall amount of effect applied to the mix.
- For time-based effects, use the TAP TEMPO button to synchronize the effect to your music.
7.6 Monitoring and Main Output
- Auriculares: Connect headphones to the PHONES jack and adjust the PHONES LVL knob for comfortable monitoring.
- Salida principal: Slowly increase the MAIN OUT knob to send the mixed audio to your connected speakers or amplifier. Monitor the VU Meter to ensure levels are not clipping (avoiding red LEDs).
8. Mantenimiento
- Limpieza: Utilice un paño suave y seco para limpiar la superficie de la batidora. No utilice limpiadores líquidos ni disolventes.
- Almacenamiento: Cuando no utilice la batidora durante períodos prolongados, guarde la batidora en un lugar fresco y seco, lejos de la luz solar directa y de temperaturas extremas.
- Ventilación: Asegúrese de que las aberturas de ventilación no estén bloqueadas para evitar el sobrecalentamiento.
9. Solución de problemas
- Sin salida de sonido:
- Verifique todas las conexiones eléctricas y asegúrese de que el mezclador esté encendido.
- Verify that all channel VOL knobs, MAIN OUT knob, and PHONES LVL knob are turned up.
- Ensure your speakers/ampEl ificador está encendido y conectado correctamente.
- Check input source connections and ensure GAIN knobs are set appropriately.
- Sonido distorsionado:
- Reduzca la perilla GAIN para el canal de entrada.
- Check if the PK LED is constantly lit; if so, reduce the input level.
- Lower the MAIN OUT volume if the VU Meter is consistently in the red.
- La energía fantasma no funciona:
- Ensure the +48V switch is engaged for the specific channel.
- Verify that you are using an XLR cable, as phantom power is only supplied via XLR.
- Bluetooth no se conecta:
- Ensure the mixer's media player is in 'BT Streaming' mode.
- Make sure your device's Bluetooth is enabled and it's searching for devices.
- Intente desvincular y volver a vincular el dispositivo.
- Problemas de reproducción/grabación USB:
- Asegúrese de que la unidad USB esté formateada correctamente (generalmente se recomienda FAT32).
- Compruebe que el audio files are in a supported format (WAV, MP3, WMA, FLAC).
- For recording, ensure the USB drive has sufficient free space.
10. Especificaciones
| Característica | Especificación |
|---|---|
| Fabricante | Sonido |
| Número de modelo | E923E |
| Número de canales | 6 |
| Peso del artículo | 1900 gramos |
| Tecnología de conectividad | USB, Bluetooth |
| Fuente de poder | Cable eléctrico |
| Tipo de conector de salida | XLR |
| Entrada de audio | XLR, conector de 1/4" |
| Volumentage | 48 voltios (alimentación fantasma) |
| Efectos digitales | 16 Presets, 24-bit/48 kHz |
| Formatos de audio USB compatibles | WAV, MP3, WMA, FLAC |
11. Garantía y soporte
Soundsation products are designed and manufactured to the highest quality standards. For information regarding warranty coverage, service, or technical support, please refer to the warranty card included with your product or visit the official Soundsation webSitio. Conserve su recibo de compra como comprobante de compra para cualquier reclamación de garantía.