
1. Producto terminadoview
The binbok JoyPad Controller is a wireless replacement controller designed for the Nintendo Switch and Switch OLED consoles. It offers enhanced gaming features including adjustable LED lighting, a programmable back map button, turbo functionality, dual vibration, and 6-axis motion control. This manual provides instructions for setup, operation, and maintenance of your controller.

Image 1.1: binbok JoyPad Controller (Green & Blue) in combined mode.

Image 1.2: Ergonomic design of the binbok JoyPad controllers.
2. Contenido del paquete
- 1x Left binbok JoyPad Controller
- 1x Right binbok JoyPad Controller
- 1x cable de carga USB-C
- 1x Manual de usuario
3. Configuración
3.1 Carga de los controladores
Before first use, ensure the controllers are fully charged. Each controller has a built-in 500 mAh battery.
- Connect the USB-C charging cable to the charging port on each controller.
- Connect the other end of the cable to a USB power source (e.g., Nintendo Switch dock, computer USB port, or USB wall adapter).
- The LED indicators on the controllers will show charging status. A full charge typically takes 2-3 hours.
- Once fully charged, the controllers provide approximately 8-10 hours of playtime.

Imagen 3.1: Especificaciones de la batería e información de carga.
3.2 Emparejamiento con Nintendo Switch
The binbok JoyPad controllers can be used in handheld mode (attached to the console) or wireless mode.
3.2.1 Modo portátil
- Slide the Left JoyPad controller down the left rail of the Nintendo Switch console until it clicks into place.
- Slide the Right JoyPad controller down the right rail of the Nintendo Switch console until it clicks into place.
- The console will automatically recognize the controllers.
3.2.2 Modo inalámbrico
- Desde el menú HOME de Nintendo Switch, selecciona “Controles” > “Cambiar agarre/orden”.
- On each binbok JoyPad controller, press and hold the SYNC button (small round button on the side rail) for a few seconds until the player indicator lights begin to flash.
- Once paired, the player indicator lights will remain solid, and the controllers will be recognized by the Switch.
- To wake up the Switch wirelessly, press the HOME button on the Right JoyPad. If only one controller connects, you may need to manually connect the other in the controller settings.
4. Instrucciones de funcionamiento
4.1 modos de iluminación LED
The binbok JoyPad controllers feature adjustable LED lights with 8 different colors and 3 lighting modes.
- Modo de un solo color: Muestra un color estático.
- Rainbow Light Mode: Cycles through multiple colors.
- Breathing Color Changing Mode: Los colores aparecen y desaparecen.
To change modes or brightness, refer to the specific button combinations in the included quick start guide or experiment with the LED button on the controller.

Image 4.1: Adjustable LED lighting features.
4.2 Función Turbo
The Turbo function allows for rapid, repeated button presses with a single hold. There are 3 adjustable Turbo levels.
- Presione el Botón turbo (T) and the desired action button (X, Y, A, B, L, R, ZL, ZR) simultaneously to activate Turbo for that button.
- Presione el Botón turbo and the action button again to adjust the Turbo speed (low, medium, high).
- Presione el Botón turbo and the action button a third time to deactivate Turbo for that button.
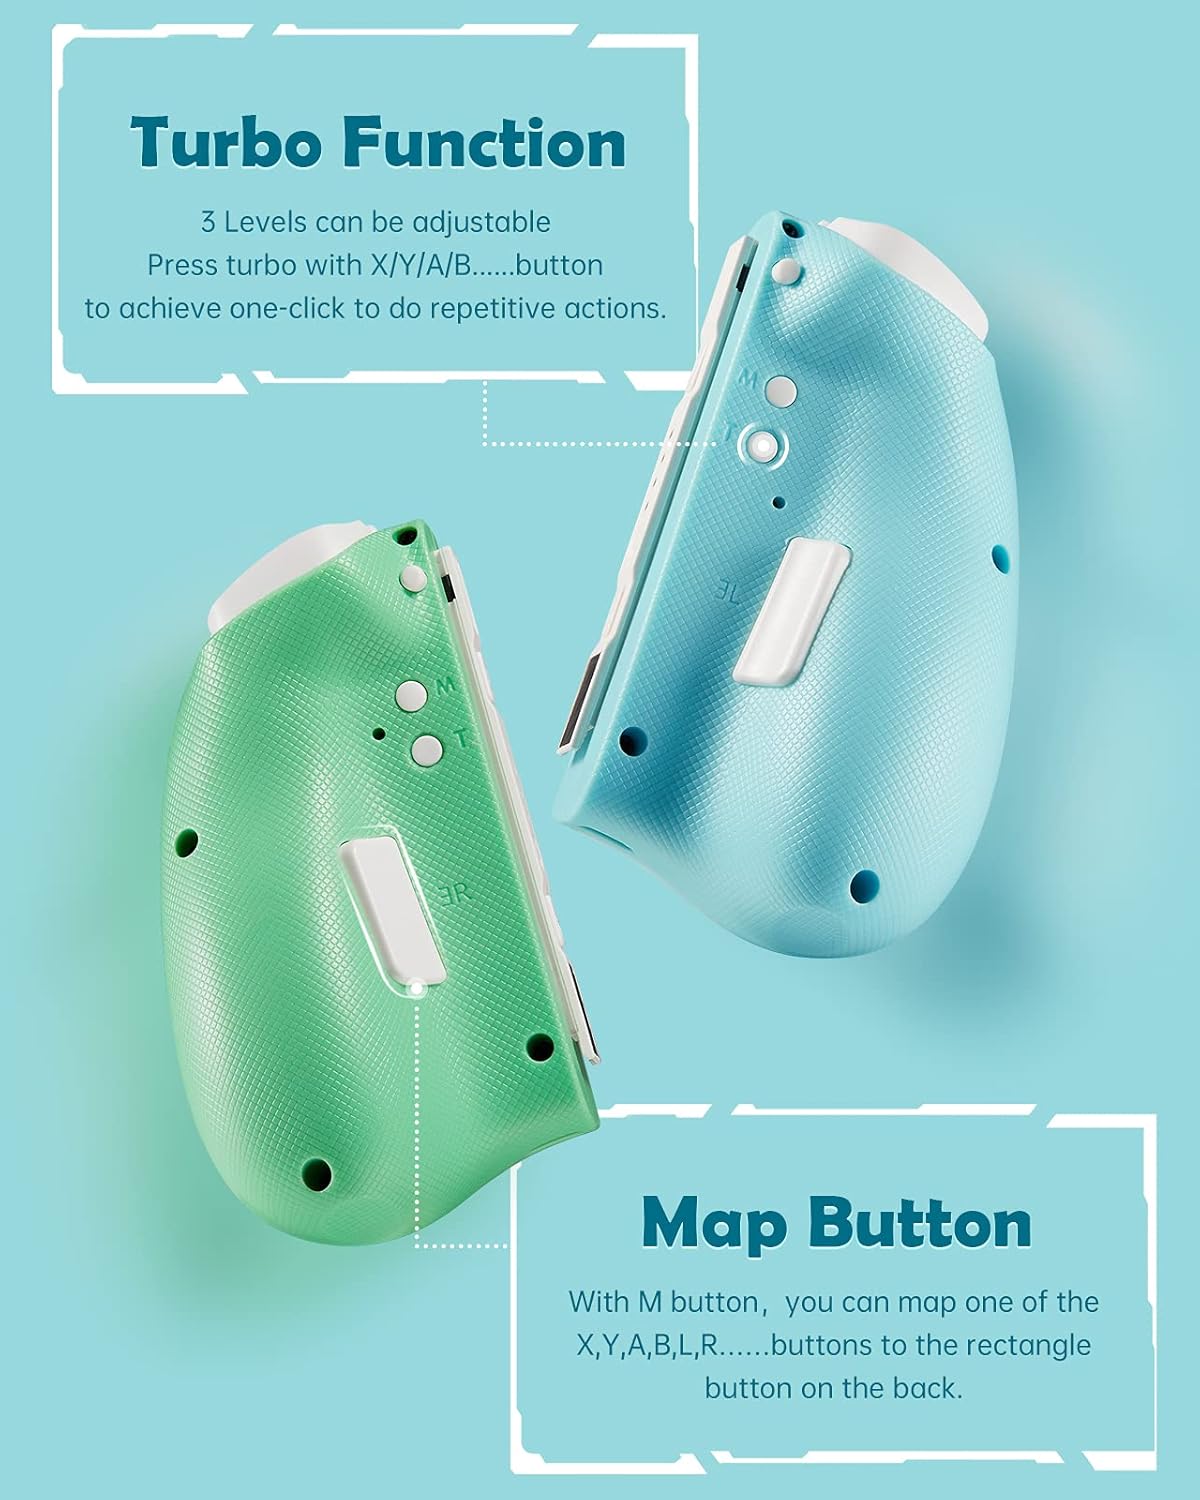
Image 4.2: Location of Turbo and Map buttons.
4.3 Back Map Button
Each controller features a programmable back button (M) that can be mapped to replicate other action buttons.
- Mantenga pulsado el Botón M and the desired action button (X, Y, A, B, L, R, ZL, ZR) simultaneously for a few seconds.
- The controller will vibrate to confirm the mapping. The M button will now perform the function of the mapped action button.
- To clear the mapping, press and hold the Botón M again until the controller vibrates.
4.4 Vibración dual ajustable
The controllers are equipped with dual vibration motors offering 3 adjustable levels of intensity for immersive feedback.
Para ajustar la intensidad de la vibración, mantenga presionado el botón Botón turbo y el Botón menos (-) (on the Left JoyPad) or Botón más (+) (on the Right JoyPad) simultaneously. Repeat to cycle through the vibration levels (low, medium, high, off).

Image 4.3: Adjustable vibration levels.
4.5 Control de movimiento (giroscopio de 6 ejes)
The built-in 6-axis gyroscope detects detailed movements, providing precise motion control in compatible games. This allows for intuitive control based on the physical orientation and movement of the controllers.

Image 4.4: 6-Axis Gyro motion control capabilities.
5. Mantenimiento
- Limpieza: Use a soft, dry cloth to clean the controllers. Avoid using liquids or abrasive cleaners.
- Almacenamiento: Guarde los controladores en un lugar fresco y seco, alejado de la luz solar directa y de temperaturas extremas.
- Cuidado de la batería: To prolong battery life, avoid fully discharging the controllers frequently. Charge them regularly, even if not in use for extended periods.
- Evite las gotas: Protect the controllers from drops and impacts, which can damage internal components.
6. Solución de problemas
- Los controladores no se conectan:
- Ensure controllers are charged.
- Verify the pairing process (Section 3.2).
- Reinicia la consola Nintendo Switch.
- Try re-syncing the controllers from the Switch HOME Menu > Controllers > Change Grip/Order.
- Retraso de entrada o botones que no responden:
- Ensure there are no obstructions or strong wireless interference between the controllers and the Switch.
- Check battery levels. Low battery can affect performance.
- Update your Nintendo Switch system software to the latest version.
- Deriva del joystick:
- Calibrate the joysticks from the Nintendo Switch system settings: HOME Menu > System Settings > Controllers and Sensors > Calibrate Control Sticks.
- Si el problema persiste, póngase en contacto con el servicio de atención al cliente.
- Las luces LED no funcionan:
- Ensure the controllers are powered on and connected.
- Refer to Section 4.1 for instructions on changing LED modes and brightness.
7. Especificaciones
| Número de modelo | YS37 |
| Marca | binbok |
| Conectividad | Inalámbrico |
| Capacidad de la batería | 500 mAh per controller (x2) |
| Tiempo de carga | Aprox. 2-3 horas |
| Tiempo de juego | Aprox. 8-10 horas |
| Dimensiones | 1 x 1 x 1 cm (each controller, approximate) |
| Peso | 226.8 g (total, approximate) |
| Características | Adjustable LED, Back Map Button, Turbo, Dual Vibration, 6-Axis Gyro |
8. Garantía y soporte
binbok products are designed for quality and reliability. For warranty information, technical support, or any inquiries regarding your JoyPad Controller, please refer to the contact information provided with your product packaging or visit the official binbok websitio.
Conserve su comprobante de compra para reclamos de garantía.