1. Introducción
Thank you for choosing the Allsmartlife 2x2 LED Flat Panel Ceiling Light. This manual provides essential information for the safe and efficient installation, operation, and maintenance of your new lighting fixture. Please read these instructions thoroughly before installation and retain them for future reference.

Image 1.1: Allsmartlife 2x2 LED Flat Panel Ceiling Light (4-Pack)
2. Información de seguridad
ADVERTENCIA: Riesgo de descarga eléctrica. Desconecte la alimentación antes de realizar cualquier instalación o mantenimiento.
- Asegúrese de que todas las conexiones eléctricas cumplan con los códigos y ordenanzas locales, así como con el Código Eléctrico Nacional (NEC).
- Consulte a un electricista calificado si no está seguro acerca del proceso de instalación.
- Do not install near heat sources or in areas with excessive moisture.
- Este producto está diseñado únicamente para uso en interiores.
- No intente modificar el dispositivo. Cualquier modificación podría anular la garantía y crear riesgos de seguridad.
- Handle the light panel with care to avoid damage.
3. Características del producto
- Brightness Upgrade: Enhanced to 60W/7200 lumens, offering 30% more brightness than traditional 40W panel lights.
- Regulable de 0 a 10 V: Compatible with 0-10V dimmer switches for stable and smooth dimming from 0% to 100%.
- 5CCT Seleccionable: Offers five color temperature options: 3000K (Warm White), 3500K (Neutral White), 4500K (Bright White), 5000K (Daylight White), and 6000K (Cool White).
- Protección ocular: CRI > 85+ for even light distribution, soft lighting, no flicker, and no buzzing sound, reducing eye fatigue.
- Diseño ultrafino: Back-lit panel with a 1.2-inch thickness and sealed housing for efficient dust and heat dissipation.
- Múltiples opciones de instalación: Supports surface mounted, drop mounted, and recessed mounted installations.
- Certificaciones: UL and ETL certified for quality assurance.
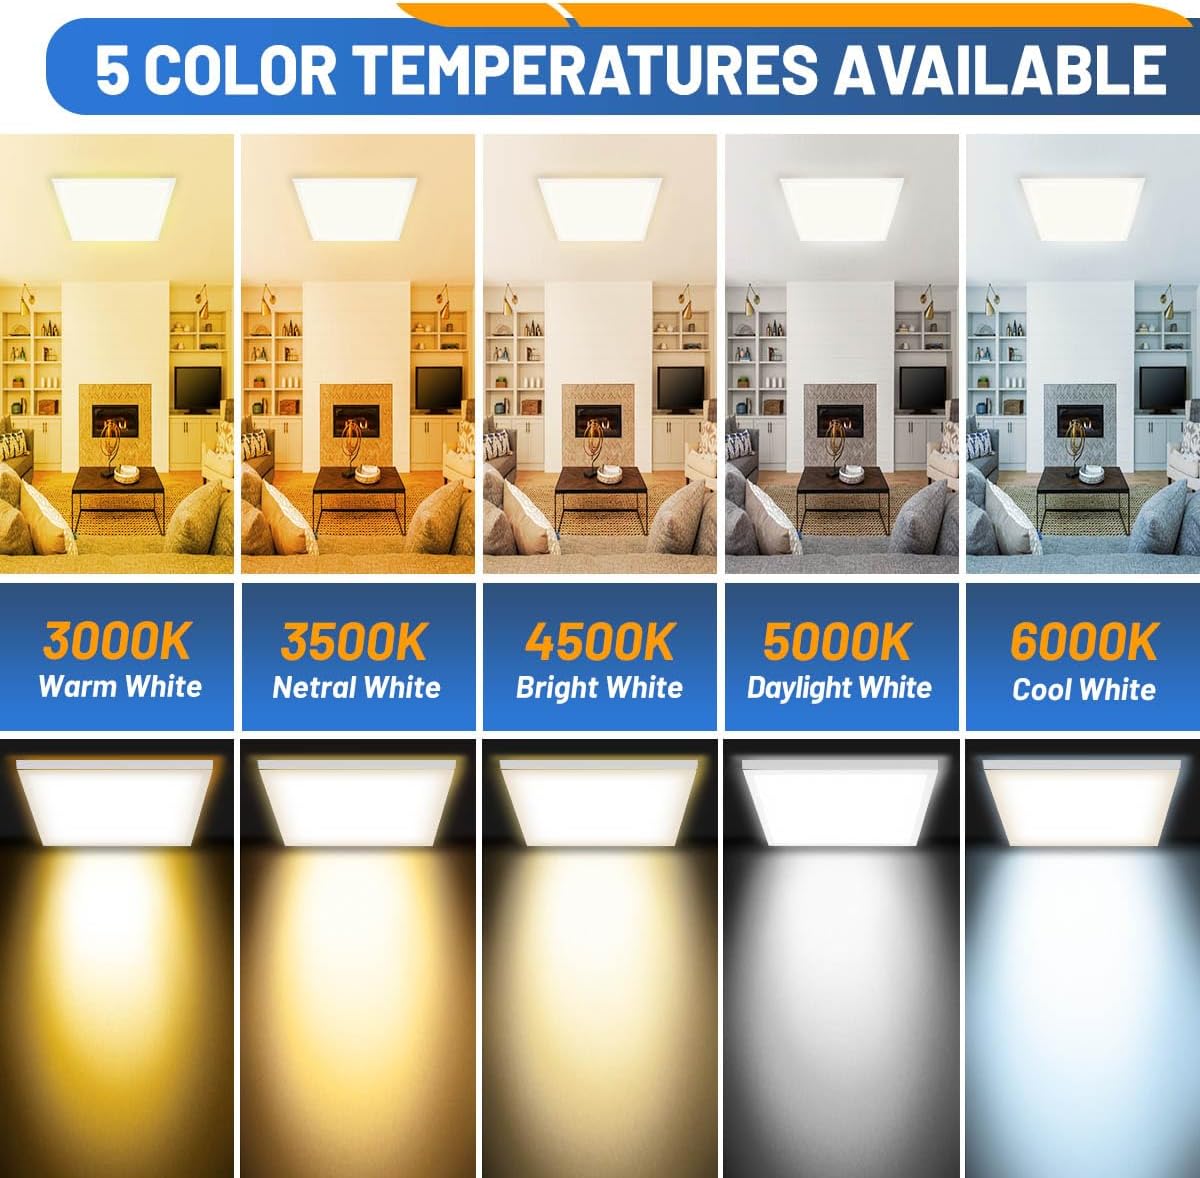
Image 3.1: Illustration of the 5 selectable color temperatures (3000K, 3500K, 4500K, 5000K, 6000K).

Image 3.2: Visual representation of 0-10V dimming capability from 0% to 100% brightness.

Image 3.3: Comparison highlighting the 60W/7200LM brightness upgrade and energy efficiency compared to traditional lighting.
4. Contenido del paquete
The Allsmartlife 2x2 LED Flat Panel Light kit includes:
- LED Flat Panel Light(s) (Quantity depends on pack size, e.g., 4 for a 4-pack)
- Installation accessories (brackets for T-Grid mount)
- Manual de instrucciones
Note: Suspension accessories for drop mount and surface frame for surface mount are sold separately.
5. Especificaciones
| Característica | Detalle |
|---|---|
| Marca | Allsmartlife |
| Número de modelo | ASL Back-Lit LED Flat Panel Light |
| Dimensiones | 24" de largo x 23.99" de ancho x 1.2" de alto |
| Color | Blanco |
| Material | Aluminio, Plástico |
| Quétage | 60W (Adjustable: 60W/50W/40W/30W/25W) |
| Brillo | 7200 lúmenes (máx.) |
| Eficiencia | 125 lúmenes por vatio |
| Temperatura de color (CCT) | 3000K, 3500K, 4500K, 5000K, 6000K (seleccionable) |
| Regulable | Yes, 0-10V Dimming |
| Volumentage | 100-277V AC |
| Tipo de fuente de luz | CONDUJO |
| Tipo de instalación | Flush Mount, Surface Mount, Drop Mount |
| Certificaciones | UL, ETL Certified |
| Uso en interiores y exteriores | Interior |

Image 5.1: Detailed dimensions and adjustable features of the 2x2FT LED Flat Panel Light.
6. Configuración e instalación
Antes de comenzar la instalación, asegúrese de que la fuente de alimentación esté apagada en el disyuntor para evitar descargas eléctricas.
6.1. Flush Mount (Recessed Grid-Ceiling)
- Turn off the power and carefully remove the existing ceiling tile or prepare the opening in the grid ceiling.
- Connect the electrical wires (Live, Neutral, Ground) from the ceiling to the light fixture's wiring. Ensure secure connections.
- Place the LED panel light into the ceiling grid opening.
- Encienda la alimentación para probar la luz.

Image 6.1: Step-by-step guide for flush mount installation in a recessed grid ceiling.
6.2. Drop Mount (Suspended)
Requires suspension accessories (sold separately).
- Install the suspension wires' basis points securely on the ceiling.
- Connect the electrical wires (Live, Neutral, Ground) from the ceiling to the light fixture's wiring.
- Attach the hooks of the suspension wires through the fixed rings on the back of the LED panel.
- Adjust the suspension wires to the desired height.
- Encienda la alimentación para probar la luz.

Image 6.2: Step-by-step guide for drop mount installation using suspension wires.
6.3. Montaje en superficie
Requires a surface mount frame (sold separately).
- Assemble the surface mount frame and securely mount it onto the ceiling using screws.
- Connect the electrical wires (Live, Neutral, Ground) from the ceiling to the light fixture's wiring.
- Place the LED panel light body horizontally into the mounting plate of the surface frame.
- Secure the light panel within the frame.
- Encienda la alimentación para probar la luz.

Image 6.3: Step-by-step guide for surface mount installation using a surface frame.
7. Instrucciones de funcionamiento
7.1. Ajuste de la temperatura de color (CCT)
The LED panel features a 5CCT selectable switch, typically located on the back or side of the fixture. Before final installation or with power off, select your desired color temperature:
- 3000K: Blanco cálido
- 3500K: Blanco neutro
- 4500K: Blanco brillante
- 5000K: Luz blanca diurna
- 6000K: Blanco frío
Once selected, the light will operate at this CCT when powered on.
7.2. Función de atenuación
This LED panel light is compatible with 0-10V dimmer switches. Connect the light fixture to a compatible 0-10V dimmer switch (sold separately) according to the dimmer's instructions and local electrical codes. The dimmer allows for smooth brightness adjustment from 0% to 100%.
Note: Ensure the dimmer switch is specifically designed for 0-10V LED dimming to avoid damage or improper operation.
8. Mantenimiento
The Allsmartlife LED Flat Panel Light requires minimal maintenance.
- Limpieza: Asegúrese de que la alimentación esté apagada antes de limpiar. Utilice un paño suave, seco o ligeramente húmedo.amp cloth to wipe the surface of the panel. Do not use abrasive cleaners, solvents, or cleaners containing ammonia, as these may damage the finish or electrical components.
- Inspección: Periodically inspect the fixture for any signs of damage or loose connections. If any issues are found, disconnect power and consult a qualified electrician or contact customer support.
- No hay piezas que el usuario pueda reparar: El panel LED no contiene piezas que el usuario pueda reparar. No intente abrir ni reparar la luminaria.
9. Solución de problemas
| Problema | Posible causa | Solución |
|---|---|---|
| La luz no se enciende. | No hay suministro de energía. Conexión de cableado suelta. Interruptor defectuoso. | Verifique el disyuntor y el interruptor de pared. Verifique que todas las conexiones del cableado estén seguras (primero asegúrese de que la energía esté apagada). Pruebe el interruptor con otro dispositivo o reemplácelo. |
| La luz parpadea o zumba. | Interruptor de regulación incompatible. Cableado suelto. Volumentage fluctuaciones. | Ensure a 0-10V compatible dimmer is used. Verifique las conexiones del cableado. Consulte a un electricista para comprobar la estabilidad del suministro eléctrico. |
| Light is not dimming properly. | Interruptor de regulación incompatible. Incorrect dimmer wiring. | Verify the dimmer is a 0-10V type. Recheck dimmer wiring according to its instructions. |
| Temperatura de color incorrecta. | El interruptor CCT está configurado incorrectamente. | Turn off power, access the CCT switch on the fixture, and select the desired color temperature. |
If troubleshooting steps do not resolve the issue, please contact Allsmartlife customer support.
10. Garantía y soporte
10.1. Información de garantía
The Allsmartlife 2x2 LED Flat Panel Light comes with a 5 año de garantía a partir de la fecha de compra. Esta garantía cubre defectos de materiales y mano de obra en condiciones normales de uso.
La garantía no cubre:
- Daños causados por instalación incorrecta, mal uso, abuso o negligencia.
- Daños causados por reparaciones o modificaciones no autorizadas.
- Daños causados por desastres naturales o casos fortuitos.
Conserve su comprobante de compra para reclamos de garantía.
10.2. Atención al cliente
For technical assistance, warranty claims, or any questions regarding your Allsmartlife product, please contact our customer support team. We are committed to resolving any issues proactively within 12 hours.
Contact information can typically be found on the product packaging or the official Allsmartlife website. You may also refer to your purchase platform for seller contact details.
11. Aplicaciones recomendadas
This versatile LED panel light is ideal for a variety of commercial and residential settings, including:
- Offices and Conference Halls
- Studies and Reading Areas
- Supermercados y tiendas minoristas
- Hotels and Hospitality Spaces
- Production Work Areas
- Garajes y sótanos

Imagen 11.1: Examples of common installation environments such as meeting rooms, offices, and kitchens.