
1. Introducción
This manual provides essential instructions for the installation, operation, and maintenance of your Hikvision 8MP AcuSense WDR Mini Bullet Network Camera, model DS-2CD2083G2-IU. Please read this manual thoroughly before using the product and retain it for future reference.
Producto terminadoview
The Hikvision DS-2CD2083G2-IU is a high-performance 8-megapixel (4K) network camera designed for advanced surveillance. It features AcuSense technology for accurate human and vehicle target classification, Wide Dynamic Range (WDR) for clear imaging against strong backlight, and a fixed 2.8mm lens for a wide field of view. Its IP67 rating ensures robust outdoor performance, and the integrated microphone allows for audio monitoring.
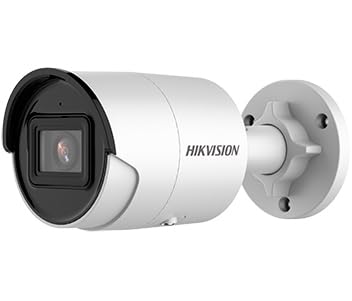
Figure 1: Hikvision 8MP AcuSense WDR Mini Bullet Network Camera (DS-2CD2083G2-IU)
This image displays the Hikvision 8MP AcuSense WDR Mini Bullet Network Camera, highlighting its compact bullet-style design suitable for various installation environments.
Características principales
- 8 Megapixel (4K) Resolution: Delivers high-quality, detailed video.
- Tecnología AcuSense: Reduces false alarms by accurately classifying human and vehicle targets.
- Amplio rango dinámico (WDR): Ensures clear images even in scenes with strong contrast.
- Fixed 2.8mm Lens: Proporciona una amplia viewángulo de ing.
- Iluminación infrarroja (IR): Night vision up to 40 meters.
- Clasificación de resistencia a la intemperie IP67: Adecuado para uso en exteriores en diversas condiciones climáticas.
- Micrófono incorporado: Enables audio monitoring.
- Lector de tarjetas integrado: Supports local storage (microSD card not included).
2. Información de seguridad
Tenga en cuenta las siguientes precauciones de seguridad para evitar lesiones o daños al producto:
- Ensure the power supply meets the camera's requirements (6.5 Watts).
- No exponga la cámara a temperaturas extremas, humedad o ambientes corrosivos.
- Avoid pointing the lens directly at strong light sources, as this may damage the sensor.
- La instalación debe ser realizada por personal calificado de acuerdo con los códigos eléctricos locales.
- Utilice únicamente los accesorios especificados por el fabricante.
- Limpie la lente de la cámara con un paño suave y seco. Evite productos químicos agresivos.
3. Configuración e instalación
3.1 Desembalaje
Carefully unpack the camera and check for any signs of damage. Ensure all components are present. (Typical components include: camera unit, mounting template, screws, waterproof connector, quick start guide).
3.2 Instalación física
The camera is designed for ceiling mounting. Select a suitable location that provides the desired field of view and is within reach of network and power cables. Due to its IP67 rating, it is suitable for outdoor environments.
- Use the provided mounting template to mark drill holes on the ceiling.
- Perfore los agujeros necesarios e inserte tacos de pared si es necesario.
- Fije la base de la cámara a la superficie de montaje utilizando los tornillos suministrados.
- Ajuste el ángulo de la cámara para una cobertura óptima.
3.3 Conexión de red y alimentación
This is an IP network camera. It requires a network connection and power. Power over Ethernet (PoE) is typically supported, simplifying installation by delivering both power and data over a single Ethernet cable. If PoE is not used, a separate 12V DC power adapter (not included) will be required.
- Connect an Ethernet cable from your network switch/router to the camera's RJ45 port. Use the waterproof connector for outdoor installations.
- Si no utiliza PoE, conecte un adaptador de alimentación de CC de 12 V a la entrada de alimentación de la cámara.
- Once connected, the camera will power on. Allow a few minutes for it to boot up.
3.4 Configuración inicial
Acceder a la cámara web interfaz a través de un web browser using its default IP address (refer to the quick start guide or use Hikvision's SADP tool to discover the IP address). You will be prompted to set a strong password for security. Follow the on-screen instructions to configure network settings, date/time, and other basic parameters.
4. Instrucciones de funcionamiento
4.1 en vivo View y Grabación
After initial setup, you can view the live feed from the camera through its web interface, a Network Video Recorder (NVR), or Hikvision's client software (e.g., iVMS-4200) or mobile app (Hik-Connect). Configure recording schedules and methods (continuous, motion-triggered) via the camera's settings or NVR.
4.2 AcuSense Smart Features
The AcuSense technology allows the camera to distinguish between humans, vehicles, and other moving objects, significantly reducing false alarms caused by animals, rain, or falling leaves. Configure these detection rules in the camera's event settings to receive more accurate alerts.
- Detección de movimiento 2.0: Set up detection zones and sensitivity for human and vehicle events.
- Detección de intrusiones: Define virtual boundaries, and the camera will trigger an alarm if a human or vehicle crosses them.
- Detección de cruce de línea: Similar to intrusion, but for a specific line.
4.3 Amplio rango dinámico (WDR)
WDR compensates for extreme lighting conditions, such as strong backlight, to ensure that both bright and dark areas of the image are clearly visible. This feature is typically enabled by default but can be adjusted in the image settings.
4.4 Infrared (IR) Night Vision
The camera automatically switches to IR mode in low-light conditions, providing clear black-and-white video up to 40 meters. Ensure no obstructions block the IR LEDs for optimal night vision performance.
4.5 Monitoreo de audio
With its built-in microphone, the camera can capture audio from the surveillance area. Audio settings, including gain control, can be configured in the camera's web interface. Ensure local regulations regarding audio recording are followed.
5. Mantenimiento
- Limpieza: Limpie periódicamente la lente y la carcasa de la cámara con un paño suave y húmedo.amp Paño. No utilice limpiadores abrasivos.
- Actualizaciones de firmware: Consulte periódicamente el sitio web oficial de Hikvision. website for firmware updates. Keeping the firmware updated ensures optimal performance, new features, and security enhancements.
- Inspección de cables: For outdoor installations, periodically inspect cables and connections for wear or damage, especially the waterproof connectors.
- Gestión de contraseñas: Regularly change your camera's password to maintain security.
6. Solución de problemas
| Problema | Posible causa | Solución |
|---|---|---|
| No image/camera offline | No power, network cable disconnected, incorrect IP address. | Check power supply and network cable. Verify IP address using SADP tool. Restart camera. |
| Mala calidad de imagen | Dirty lens, incorrect focus (if adjustable), poor lighting, network bandwidth issues. | Clean the lens. Ensure adequate lighting. Check network connection speed. Adjust image settings (WDR, exposure). |
| Falsas alarmas por detección de movimiento | Sensitivity too high, environmental factors (trees, animals), AcuSense not configured. | Adjust motion detection sensitivity. Configure AcuSense human/vehicle detection. Adjust detection zones. |
| No se puede acceder web interfaz | Incorrect IP address, network connectivity issue, browser compatibility. | Verify IP address. Ensure camera and PC are on the same network segment. Try a different browser. |
Si el problema persiste después de intentar estas soluciones, comuníquese con el soporte técnico de Hikvision.
7. Especificaciones
| Característica | Detalle |
|---|---|
| Número de modelo | DS-2CD2083G2-IU |
| Sensor de imagen | CMOS |
| Resolución máxima | 8 MP (4K) |
| Lente | Lente fija 2.8mm |
| Rango IR | Hasta 40 metros |
| Amplio rango dinámico (WDR) | Apoyado |
| acuSense | Human and Vehicle Target Classification |
| Audio | Micrófono incorporado |
| Almacenamiento local | Integrated Card Reader (MicroSD slot) |
| Clasificación a prueba de intemperie | IP67 |
| Consumo de energía | 6.5 vatios |
| Dimensiones (L x An x Al) | 15 x 15 x 8 cm (aproximadamente) |
| Tipo de montaje | Montaje en el techo |
| Tipo de alerta | Motion Only (configurable for human/vehicle) |
8. Garantía y soporte
Los productos Hikvision suelen incluir una garantía limitada del fabricante. Consulte la tarjeta de garantía incluida con su producto o visite el sitio web oficial de Hikvision. webSitio para conocer los términos y condiciones de garantía detallados específicos de su región.
For technical support, firmware downloads, or further assistance, please visit the official Hikvision support portal or contact their customer service department. Ensure you have your product model number (DS-2CD2083G2-IU) and serial number ready when contacting support.
Hikvision oficial Websitio: www.hikvision.com