Hora estimada de llegada (ETA) ETA251590000
ETA Falco Smart Robot Vacuum Cleaner with Mopping Function User Manual
Modelo: ETA251590000
1. Introducción
Thank you for choosing the ETA Falco Smart Robot Vacuum Cleaner with Mopping Function. This manual provides essential information for the safe and efficient operation, maintenance, and troubleshooting of your device. Please read this manual thoroughly before using the product and keep it for future reference.
Información importante de seguridad
- Asegúrese siempre de que el robot esté colocado sobre una superficie estable y nivelada.
- Mantenga el dispositivo alejado del agua y la humedad.
- Do not allow children or unauthorized persons to operate the robot.
- Use only the original charging adapter and accessories provided.
- Before cleaning or maintenance, ensure the robot is powered off and unplugged from the charging station.
- Avoid operating the robot near open flames or flammable materials.
2. Producto terminadoview
Componentes y controles
Familiarize yourself with the main parts and controls of your ETA Falco Smart robot vacuum cleaner.
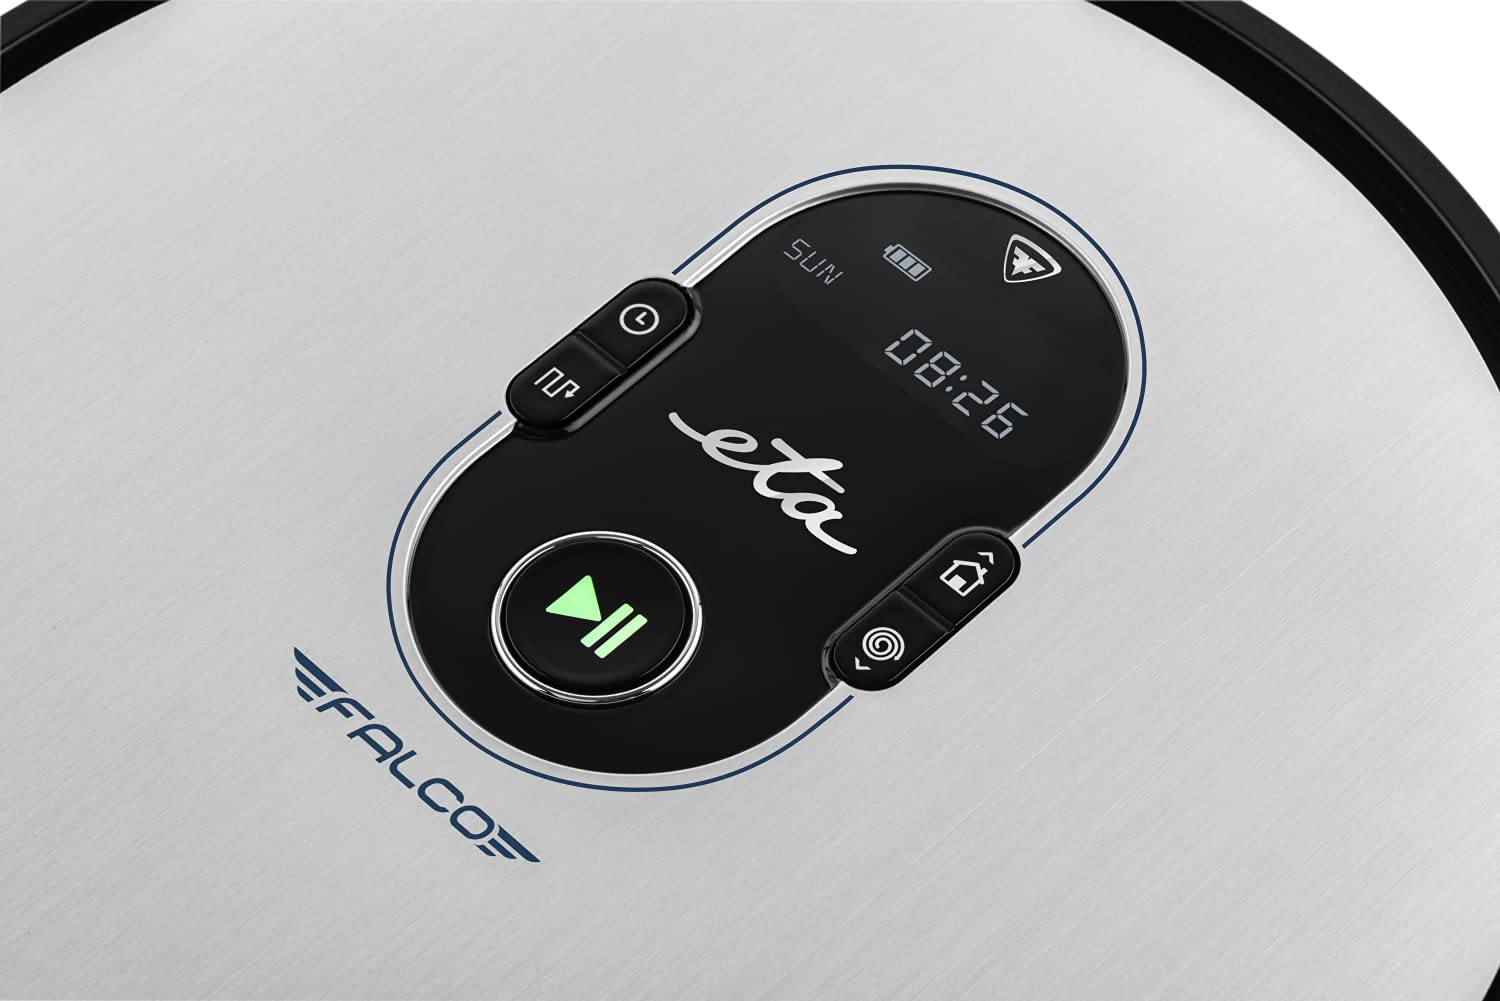
Imagen 2.1: Top panel controls. This image shows the main control panel on the top of the robot, including buttons for power, scheduling, and return to charging station, along with a digital display.

Imagen 2.2: Envés view. This image displays the bottom of the robot, highlighting the main brush, two side brushes, and the mop attachment.

Imagen 2.3: Underside diagram. This diagram labels the key components on the robot's underside, including the side brushes, main brush, and mop attachment.
3. Contenido del paquete
Al desembalar, asegúrese de que estén presentes todos los elementos siguientes:
- ETA Falco Smart Robot Vacuum Cleaner
- Estación de carga
- Adaptador de carga
- Mando a distancia
- 2x Spare Side Brushes
- Special Rotary and Lamella Brush
- 2x Cleaning Cloths (Mop Pads)
- Filtro HEPA de repuesto
- Mop Attachment with 300 ml Water Tank
- Muro virtual
4. Configuración
4.1 Carga inicial
- Coloque la estación de carga contra una pared en un área abierta, asegurándose de que no haya obstáculos a 1 metro a los lados y 2 metros al frente.
- Connect the charging adapter to the charging station and plug it into a power outlet.
- Place the robot vacuum cleaner on the charging station. Ensure the charging contacts align. The robot will begin charging automatically. A full charge takes approximately 5 hours.
4.2 Instalación de cepillos laterales
Attach the side brushes to the designated posts on the underside of the robot by pressing them down until they click into place. Ensure the 'L' and 'R' markings on the brushes match the corresponding markings on the robot.
4.3 Connecting to the ETA SMART App
The ETA SMART app enhances the functionality of your robot. Download the app from your smartphone's app store. Follow the in-app instructions to connect your robot to your home Wi-Fi network and pair it with the app.
4.4 Setting up the Virtual Wall
The virtual wall creates an invisible barrier to restrict the robot's access to certain areas. Place the virtual wall device on the floor where you want to create a boundary. Ensure the infrared beam is directed towards the area you wish to block. The robot will detect this beam and avoid crossing it.

Imagen 4.1: Robot with charging station and virtual wall. This image shows the robot positioned near its charging station, with a virtual wall device placed nearby to illustrate its function.
5. Instrucciones de funcionamiento
5.1 Modos de limpieza
The ETA Falco Smart offers four distinct cleaning modes:
- INTELIGENTE: General cleaning mode for optimal coverage.
- CLÁSICO: Patrón de limpieza estándar.
- BORDE: Limpia a lo largo de paredes y bordes de muebles.
- LUGAR: Concentrated cleaning in a specific area.
You can select these modes via the ETA SMART app or the remote control.
5.2 Programación de la limpieza
Use the ETA SMART app to set a cleaning schedule for your robot. You can program specific times and days for the robot to automatically start cleaning.
5.3 controles manuales
You can manually control the robot's movement and functions using the remote control or the ETA SMART app. The app also allows you to monitor cleaning activity, battery charge, and view cleaning routes.

Imagen 5.1: ETA Smart App features. This image displays the ETA Smart App interface on a smartphone, highlighting features such as remote control, cleaning history, activity monitoring, battery status, cleaning modes (SMART, CLASSIC, EDGE, SPOT), cleaning schedule, mopping intensity control, and suction power adjustment.
5.4 Función de fregado
- Fill the 300 ml water tank with clean water. Do not use detergents or cleaning solutions that are not approved for robot vacuums.
- Attach a clean mop pad to the mop attachment.
- Slide the mop attachment into the designated slot on the underside of the robot.
- Inicia un ciclo de limpieza. El robot aspirará y fregará simultáneamente.
6. Mantenimiento
El mantenimiento regular garantiza un rendimiento óptimo y prolonga la vida útil de su robot aspirador.
6.1 Limpieza del depósito de polvo y del filtro
- Presione el botón de liberación del depósito de polvo y retire el depósito de polvo.
- Open the dust bin and empty its contents into a trash can.
- Remove the HEPA filter and primary filter. Tap them gently to remove dust. If washable, rinse under running water and allow to air dry completely before reinserting.
- Wipe the inside of the dust bin with a dry cloth.
- Reassemble the filters and dust bin, then reinsert into the robot.
6.2 Limpieza del cepillo principal
- Dé la vuelta al robot.
- Retire la cubierta del cepillo principal presionando las pestañas de liberación.
- Levante el cepillo principal.
- Utilice la herramienta de limpieza (si está incluida) o tijeras para quitar el pelo y los residuos enredados alrededor del cepillo.
- Clean the brush compartment.
- Vuelva a insertar el cepillo principal y asegure la cubierta.
6.3 Limpieza de los cepillos laterales
Periodically check the side brushes for tangled hair or debris. If necessary, remove them by gently pulling upwards and clean them. Replace worn or damaged brushes with the spare ones provided.
6.4 Limpieza de la mopa y el tanque de agua
After each mopping session, remove the mop pad and wash it thoroughly. Empty any remaining water from the water tank and rinse it. Allow both to air dry completely before storing or reusing.
6.5 Limpieza de sensores
Wipe the anti-drop sensors, bumper sensors, and charging contacts on the robot and charging station with a clean, dry cloth to ensure proper function.
7. Solución de problemas
Si su aspiradora robot encuentra algún problema, consulte los siguientes problemas y soluciones comunes:
| Problema | Posible causa | Solución |
|---|---|---|
| robot no enciende | Batería baja; interruptor de encendido apagado | Cargue el robot; asegúrese de que el interruptor de encendido esté encendido |
| El robot no se carga | Contactos de carga sucios; estación de carga desconectada | Limpie los contactos de carga; asegúrese de que la estación de carga esté enchufada |
| Pobre rendimiento de limpieza | Dust bin full; Brushes tangled; Filter clogged | Empty dust bin; Clean brushes; Clean/replace filter |
| El robot se queda atascado con frecuencia | Obstáculos en el suelo; sensores sucios | Clear floor of cables/small items; Clean sensors |
| Virtual wall not working | Virtual wall batteries low; Incorrect placement | Replace batteries; Adjust virtual wall position |
Si el problema persiste después de probar estas soluciones, comuníquese con el servicio de atención al cliente.
8. Especificaciones
Technical specifications for the ETA Falco Smart Robot Vacuum Cleaner (Model ETA251590000):
| Característica | Detalle |
|---|---|
| Fabricante | Hora estimada de llegada (ETA) |
| Dimensiones del producto (L x An x Al) | 32.5 x 33.5 x 7.5 cm |
| Peso | 250 gramos |
| Número de modelo del artículo | ETA251590000 (T2261) |
| Color del modelo | Azul |
| Material | Plástico |
| Tipo de energía | Funciona con pilas |
| Volumentage | 3 Volts (14.4V Li-ion battery, 2400 mAh) |
| Número de artículos en el paquete | 1 |
| Características especiales | Pet brush compatibility, Smart App control, Floating brush system, HEPA filter, Virtual wall |
| Componentes incluidos | Battery, Filter, Charging station, Adapter, Remote control, Side brushes, Rotary brush, Cleaning cloths, Mop attachment, Virtual wall |
| Composición de la batería | Iones de litio |
| Duración de la batería | Hasta 120 minutos |
| Tiempo de carga | Aproximadamente 5 horas |
| Recomendación de superficie | Laminado |
| Tipo de controlador | Control de aplicaciones |
| Disponibilidad de repuestos | Información no disponible sobre repuestos |
9. Garantía y soporte
For warranty information, product support, or to inquire about spare parts, please refer to the warranty card included with your purchase or visit the official ETA webSitio. Conserve su comprobante de compra para reclamaciones de garantía.