1. Introducción
Thank you for choosing the hetaida No-Touch Forehead Thermometer. This device is designed for accurate and instant temperature readings for individuals of all ages, including adults, children, and infants. Its non-contact design ensures hygienic and convenient use. This manual provides essential information for proper operation and maintenance of your thermometer.
Uso previsto: This infrared thermometer is intended for intermittent measurement of human body temperature from the forehead and for measuring object surface temperature.
2. Información de seguridad
- No sumerja el termómetro en agua u otros líquidos.
- Mantenga el dispositivo fuera del alcance de los niños.
- Evite dejar caer el termómetro o someterlo a impactos fuertes.
- Do not use the thermometer if the operating temperature exceeds the specified range (15°C-40°C).
- Forehead temperature should not be used for direct comparison with ear, armpit, oral, or rectal temperatures due to different definition ranges.
3. Producto terminadoview
The hetaida No-Touch Forehead Thermometer features a user-friendly design with clear controls and an LCD display.
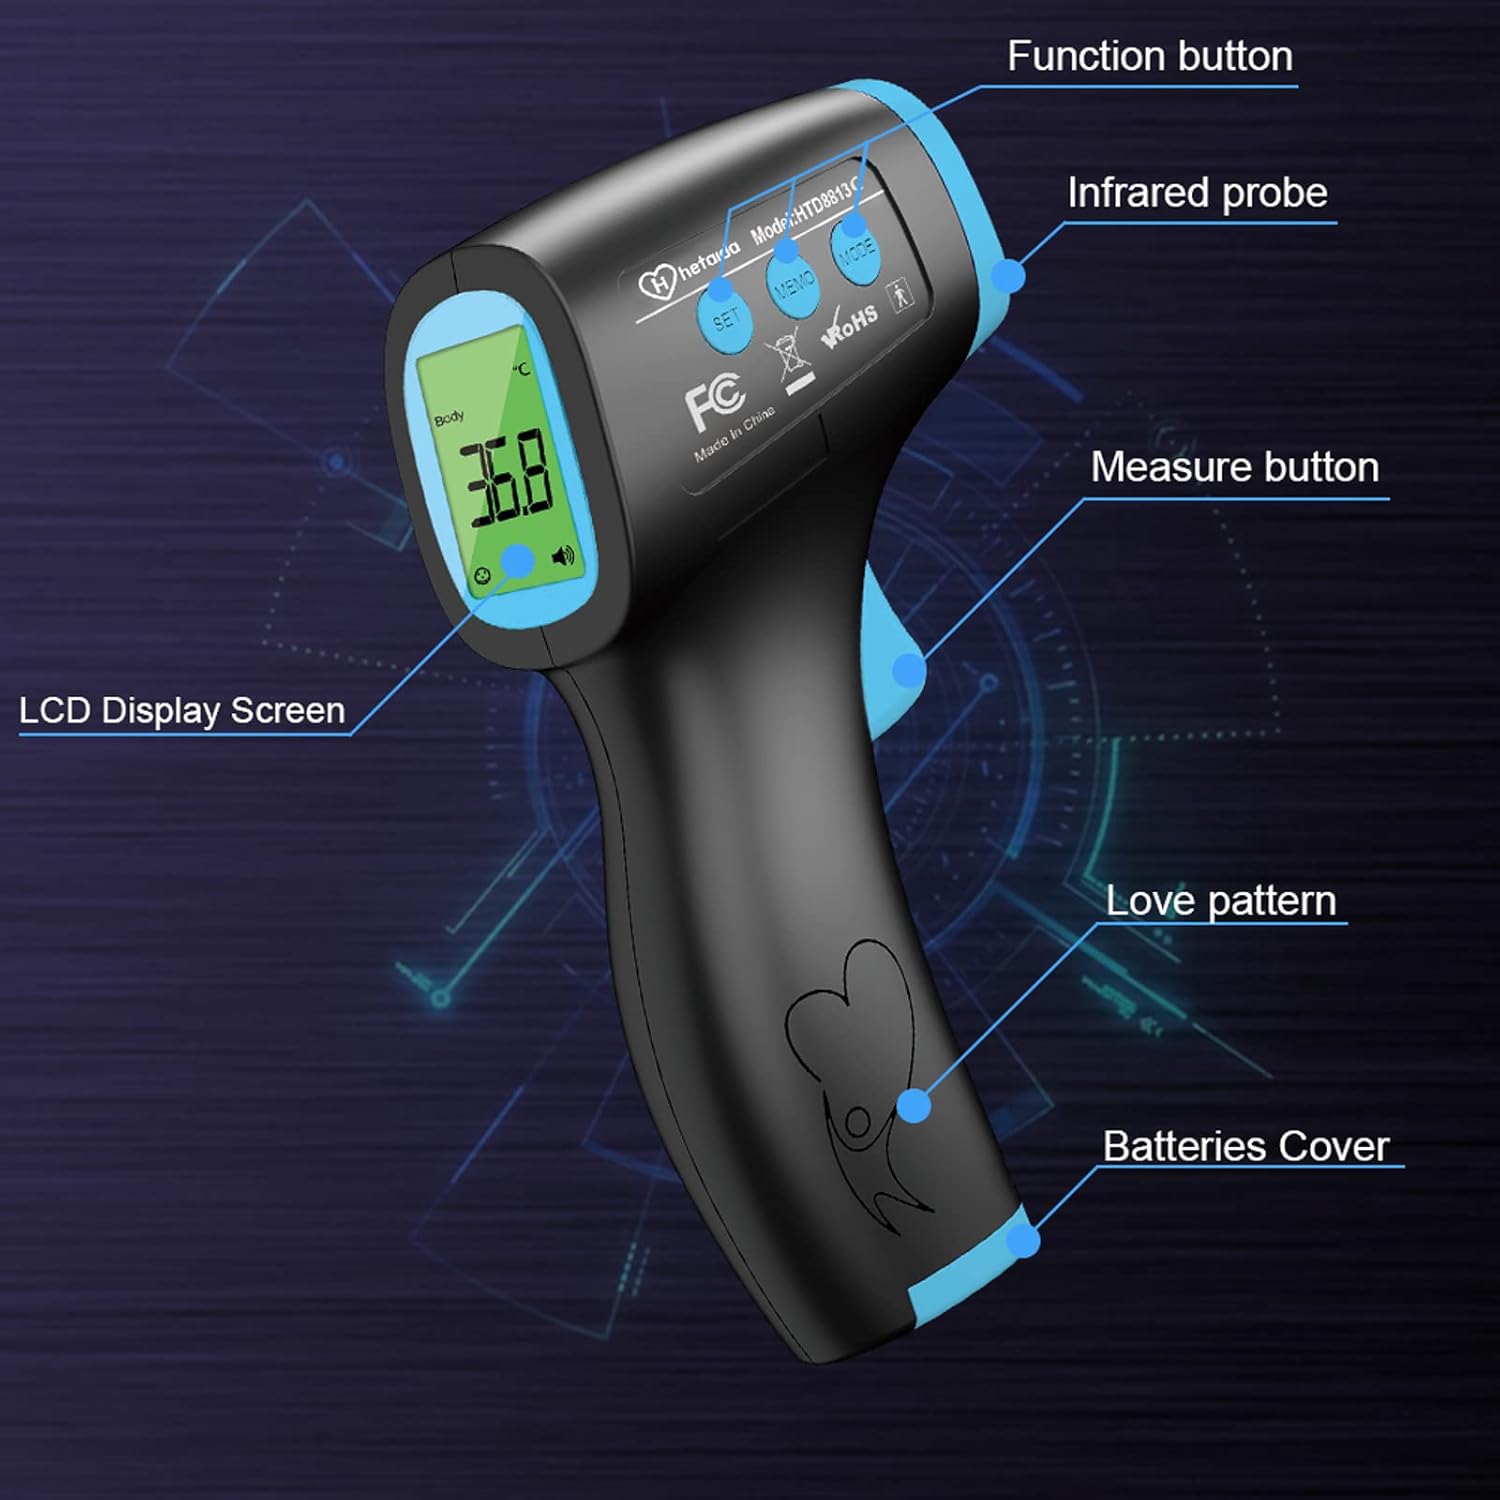
Figure 3.1: Thermometer Components (Function button, Infrared probe, Measure button, LCD Display Screen, Love pattern, Batteries Cover).

Figura 3.2: detallada view of Thermometer Components (MODE Button, MEMO Button, SET Button, IR Sensor, ON/Scan Button, Battery Cover, Comfortable Grip).
Qué incluye:
- hetaida No-Touch Forehead Thermometer (Model HTD8813)
- Pilas AAA (x2)
- Manual de usuario
- Guía rápida del usuario

Figure 3.3: Thermometer and included AAA batteries.
4. Configuración
4.1 Instalación de la batería
- Locate the battery cover at the bottom of the thermometer's handle.
- Deslice la tapa de la batería para abrirla.
- Insert two AAA batteries, ensuring the positive (+) and negative (-) poles are correctly aligned as indicated inside the compartment.
- Cierre bien la tapa de la batería.

Figura 4.1: Pasos para la instalación de la batería.
4.2 Acclimation
When moving the thermometer to a new environment with a different ambient temperature, allow it to acclimate to the room temperature for at least 30 minutes before use. This ensures accurate readings.
Video 4.1: Demonstrates how to get a more accurate forehead temperature, including acclimation and proper measurement technique.
5. Instrucciones de funcionamiento
5.1 Encendido / Apagado
- To power on, press the 'Measure' button. The thermometer will perform a self-test and display the last reading.
- The thermometer will automatically power off after 18 seconds of inactivity to save battery power.
5.2 Modos de medición
The thermometer supports two measurement modes: Body mode and Object mode.
- Modo de cuerpo: For measuring human body temperature (adults, children, infants).
- Modo de objeto: For measuring the temperature of surfaces, liquids (e.g., baby milk, bath water), or room temperature.
To switch between modes, press the 'MODE' button.

Figura 5.1: Examples of Object Mode measurements (Room, Food, Milk).

Figure 5.2: Thermometer usage for Body Mode (adults and children) and Surface Mode (water, milk, chamber).
5.3 Taking a Measurement (Body Mode)
- Ensure the forehead is clean and clear of hair, sweat, or cosmetics.
- Point the thermometer at the center of the forehead, maintaining a distance of 1-5 cm (ideally about 1 cm).
- Press the 'Measure' button. The reading will appear on the LCD screen within 1 second.

Figure 5.3: Non-contact measurement with 1-second reading.

Figure 5.4: Recommended measurement distance of 1-5 cm.

Figure 5.5: Silent mode for undisturbed measurements.
5.4 Cambio de unidad de temperatura (°C/°F)
Para cambiar entre Celsius (°C) y Fahrenheit (°F):
- Press and hold the 'SET' button to enter the setting mode.
- On the screen, it will show 'F1' for changing the unit.
- Press 'MODE' or 'MEMO' to toggle between °C and °F.
- Press 'SET' to confirm your selection.

Figura 5.6: Cambio entre Celsius y Fahrenheit.

Figure 5.7: Button sequence for unit conversion.
5.5 Fever Alarm and Backlight Indication
The LCD backlight changes color to indicate different temperature levels:
- Verde: Normal temperature (35.5°C - 37.3°C / 95.9°F - 99.1°F)
- Amarillo: Slight fever (37.4°C - 38.0°C / 99.3°F - 100.4°F)
- Rojo: High fever (38.1°C - 43.0°C / 100.6°F - 109.4°F)

Figure 5.8: Three-color backlight indication for temperature ranges.

Figure 5.9: Visual representation of temperature ranges and corresponding backlight colors.
5.6 Función de memoria
The thermometer can store up to 50 sets of temperature data for query. To access memory, press the 'MEMO' button.

Figure 5.10: Storage of 50 temperature recordings.
6. Mantenimiento y cuidado
- Limpieza: Limpie la superficie del termómetro con un paño suave y húmedo.amp cloth. For disinfection, use an alcohol swab (70% isopropyl alcohol). Do not use abrasive cleaners or immerse the device in water.
- Almacenamiento: Guarde el termómetro en un lugar fresco y seco, alejado de la luz solar directa y de temperaturas extremas.
- Reemplazo de batería: Reemplace las baterías cuando aparezca el indicador de batería baja en la pantalla.
7. Solución de problemas
| Problema | Posible causa | Solución |
|---|---|---|
Ask a question about this manualAsk about setup, troubleshooting, compatibility, parts, safety, or missing instructions. Manuals+ will review the question and use this page’s manual context to help answer it. |