OMISOON DH-QN12
Manual del usuario del calentador de ventilador eléctrico PTC OMISOON de 2000 W
Model: DH-QN12 | Brand: OMISOON
Instrucciones de seguridad importantes
Lea atentamente todas las instrucciones antes de usar este aparato y consérvelas para futuras consultas. Si no las sigue, podría sufrir una descarga eléctrica, un incendio o lesiones graves.
- Conecte siempre el calentador directamente a una toma de corriente. Nunca lo utilice con un cable alargador ni una toma de corriente reubicable.
- No utilice el calentador en baños, áreas de lavandería o lugares interiores similares donde pueda haber agua.
- No cubra el calentador. Esto puede causar sobrecalentamiento y un incendio.
- Mantenga los materiales combustibles, como muebles, almohadas, ropa de cama, papeles, ropa y cortinas a al menos 1 metro (3 pies) del frente y los lados del calentador.
- Este calentador se calienta cuando está en uso. Para evitar quemaduras, no permita que la piel expuesta toque superficies calientes.
- Es necesaria una estrecha supervisión cuando cualquier aparato es utilizado por o cerca de niños o inválidos.
- Desenchufe el calentador cuando no esté en uso.
- No opere ningún calentador con un cable o enchufe dañado, o después de que el calentador funcione mal o se haya caído o dañado de cualquier manera.
- No inserte ni permita que objetos extraños entren en ninguna abertura de ventilación o escape ya que esto puede provocar una descarga eléctrica o un incendio, o dañar el calentador.
- Para evitar un posible incendio, no bloquee las entradas ni los escapes de aire de ninguna manera. No lo utilice en superficies blandas, como una cama, donde las aberturas pueden bloquearse.
- The heater has an internal tip-over switch that automatically shuts off the heater if it is tipped over.
- The heater has an overheat protection system that automatically shuts off the heater if its internal temperature exceeds a standard value.
- Before use, remove the film from the display screen.
Producto terminadoview
Características principales:
- Calefacción cerámica PTC: Provides instant heating with a maximum output of 2000W.
- Modos múltiples: Offers Low Heat (900W), High Heat (2000W), ECO Mode, and Fan Mode.
- Termostato digital: Adjustable temperature range from 15°C to 35°C, with 1°C increments.
- Oscilación de 90°: Distribuye el calor uniformemente en un área más amplia.
- Temporizador de 24 horas: Establezca el tiempo de funcionamiento entre 1 y 24 horas.
- Mando a distancia: Manejo cómodo a distancia.
- Características de seguridad: Protección contra sobrecalentamiento y antivuelco.
- Adjustable Control Panel: HD display with touch control, panel height can be adjusted.
- Funcionamiento con bajo nivel de ruido: Operates at approximately 40-60 dB.
- Diseño portátil: Compact size (17 x 17 x 48 cm) and lightweight (2 kg) for easy movement.
Componentes:
- Unidad principal del calentador
- Mando a distancia
- Power Cord (1.5m length)

Image: The OMISOON 2000W PTC Electric Fan Heater, showing its sleek black tower design, the digital display on top, and the remote control. Warm air is depicted flowing from the front grille.
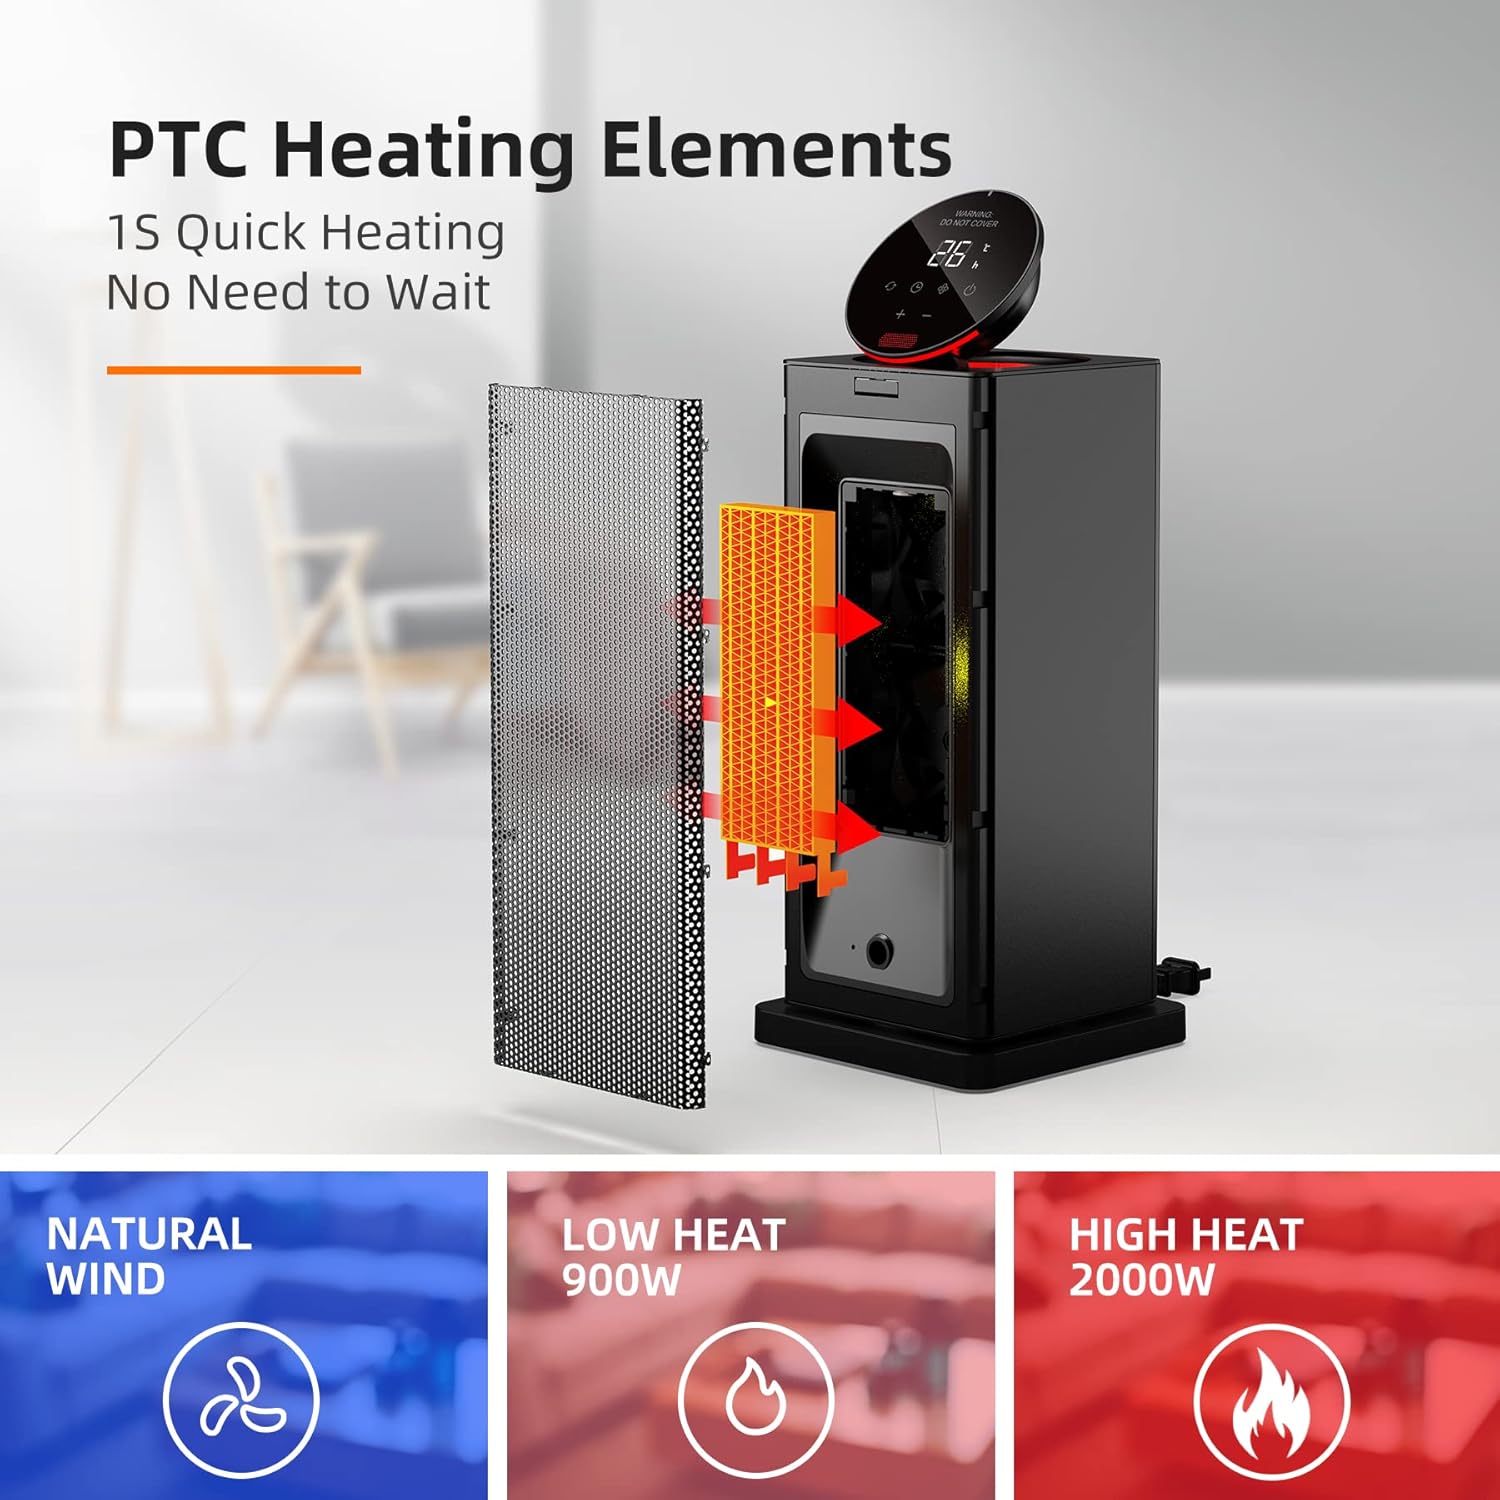
Imagen: Una explosión view diagram illustrating the PTC heating elements inside the heater, emphasizing 1-second quick heating. Below, icons represent Natural Wind, Low Heat (900W), and High Heat (2000W) modes.
Configuración
- Desembalaje: Retire con cuidado el calentador y todos los accesorios del embalaje.
- Colocación: Place the heater on a firm, level surface. Ensure there is at least 1 meter (3 feet) of clear space around the heater from any combustible materials.
- Conexión de energía: Plug the power cord directly into a standard 220-240V ~ 50Hz wall outlet. Do not use extension cords or power strips.
- Encendido inicial: Press the master switch located at the back or bottom of the unit after plugging in the power. This prepares the unit for operation.
- Display Film: If present, gently remove the protective film from the digital display screen.
Instrucciones de funcionamiento
Panel de control y control remoto:
The heater can be operated using the touch-sensitive control panel on top of the unit or the included remote control. The control panel's height can be manually adjusted for convenience.

Imagen: Un primer plano view of the heater's digital control panel, showing temperature display (e.g., 26°C) and touch buttons for power, mode, oscillation, timer, and temperature adjustment.

Image: The top of the heater with its control panel open, revealing a compartment for the remote control. The remote control itself is shown with buttons for Mode Switching, ON/OFF, Timer, Swing, and Temperature/Hour Increase/Decrease.
Encendido/apagado:
- Ensure the master switch (usually at the back or bottom) is in the ON position.
- Presione el Botón de encendido () on the control panel or remote control to turn the heater ON or OFF.
Selección de modo:
Presione el Botón de modo () para recorrer los modos de calefacción disponibles:
- Calor bajo (900W): Para un calentamiento suave.
- Alto calor (2000W): Para un calentamiento rápido y potente.
- Modo ecologico: The heater automatically adjusts its power output (900W/2000W) to maintain the set temperature, optimizing energy consumption. It will restart if the room temperature drops below the set temperature.
- Modo de ventilador: Funciona como ventilador sin calentar.
Ajuste de temperatura:
- En los modos de calefacción, utilice el "+" y "-" buttons on the control panel or remote to adjust the desired temperature.
- The temperature can be set between 15°C and 35°C in 1°C increments.
Función de oscilación:
- Presione el Botón de oscilación () on the control panel or remote to activate or deactivate the 90° oscillation feature.
- This feature helps distribute warm air more widely across the room.

Image: The heater shown oscillating 90 degrees, with warm air spreading across a room where a person and a dog are relaxing, illustrating the wide heat distribution.
Función de temporizador:
- Presione el Botón del temporizador () en el panel de control o en el control remoto.
- Utilice el "+" y "-" buttons to set the desired operating time from 1 to 24 hours.
- El calentador se apagará automáticamente una vez transcurrido el tiempo establecido.
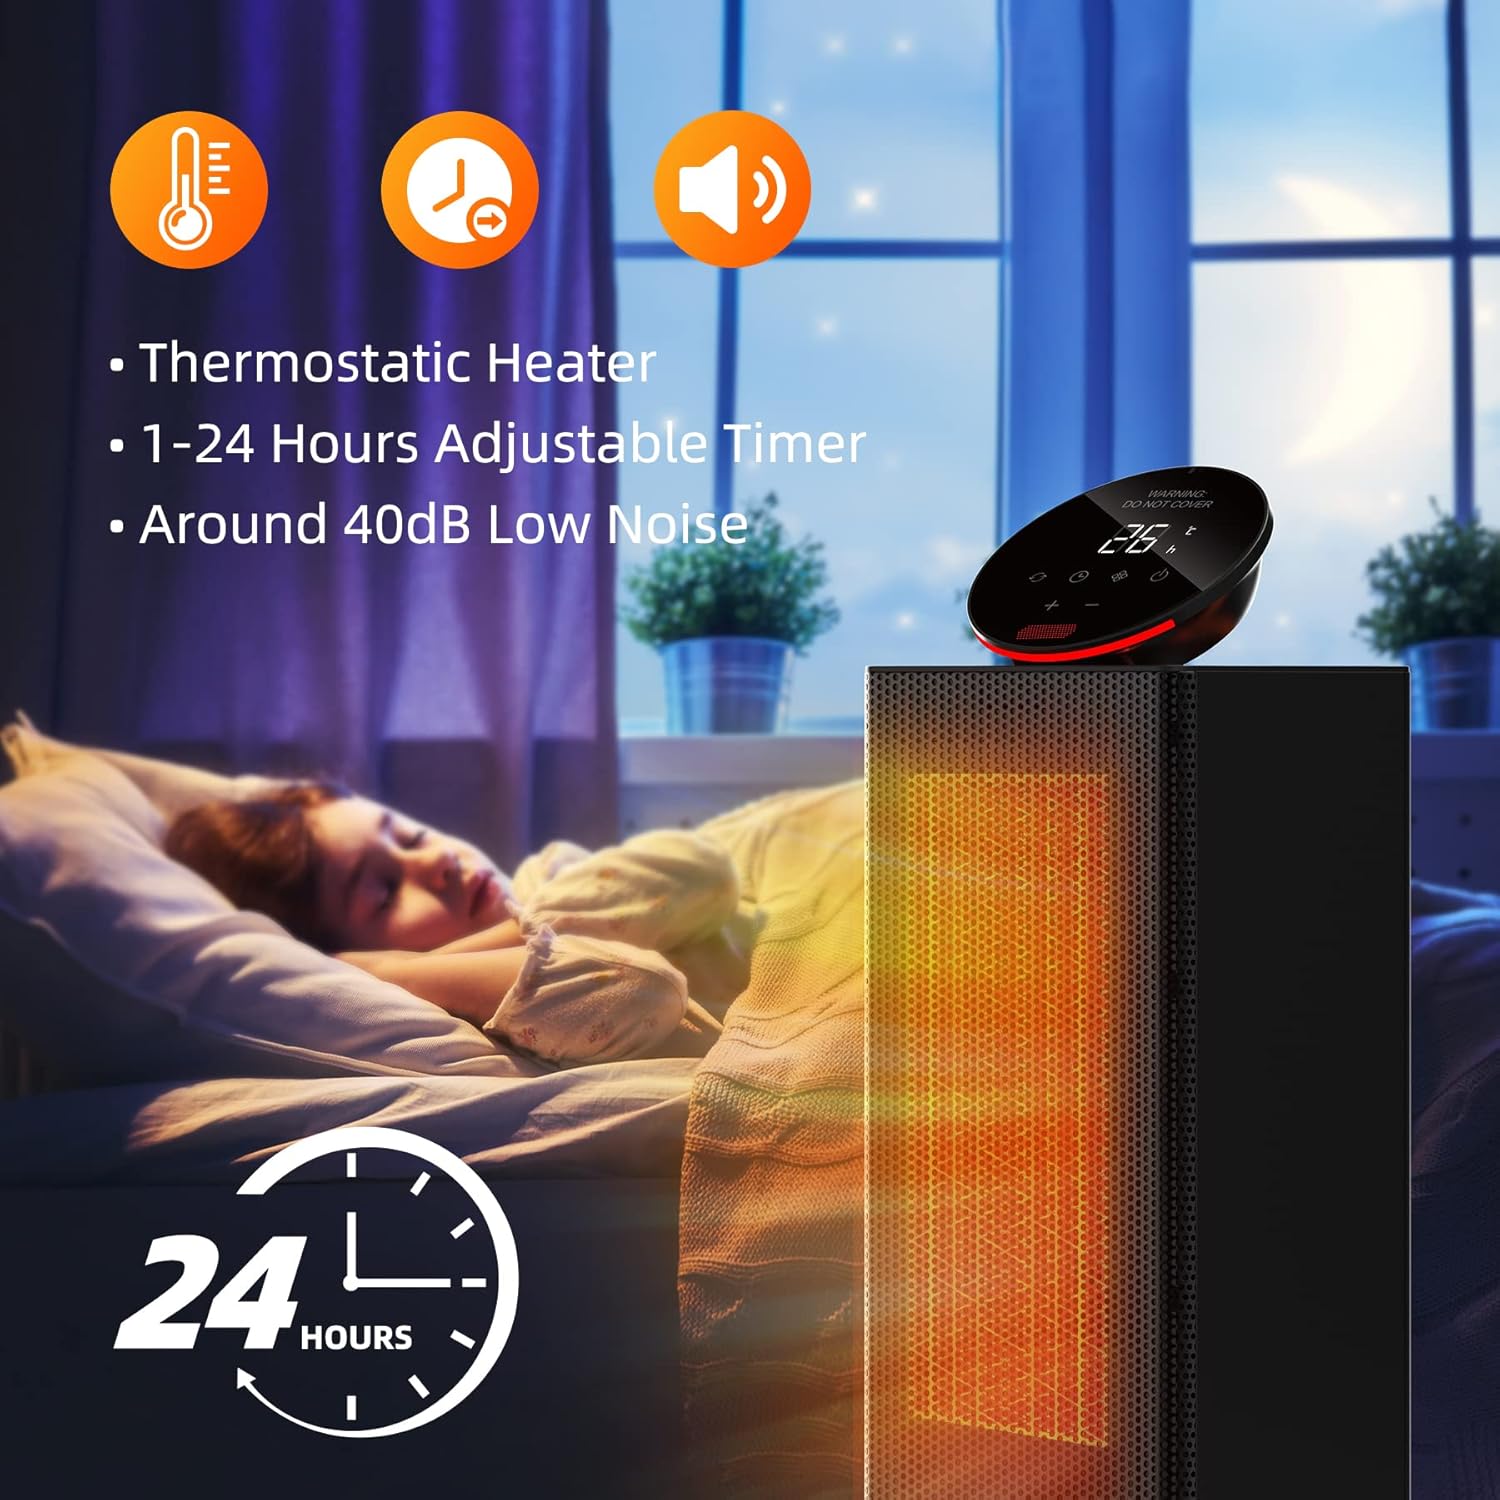
Image: The heater shown in a bedroom setting with a sleeping child, highlighting its thermostatic control, 1-24 hours adjustable timer, and low noise operation (around 40dB).
Mantenimiento
El mantenimiento regular garantiza un rendimiento óptimo y la longevidad de su calentador.
- Limpieza:
- Desenchufe siempre el calentador y déjelo enfriar completamente antes de limpiarlo.
- Utilice un paño suave y seco.amp Paño para limpiar las superficies exteriores del calentador.
- No utilice limpiadores abrasivos ni disolventes ya que pueden dañar la superficie.
- The heater features a removable filter. Clean the filter regularly to ensure efficient airflow. Refer to the product diagram for filter location and removal instructions.
- Almacenamiento:
- Cuando no esté en uso, guarde el calentador en un lugar fresco y seco.
- Se recomienda guardar el calentador en su embalaje original para protegerlo del polvo y daños.
Solución de problemas
Si tiene problemas con su calentador, consulte los siguientes problemas y soluciones comunes:
| Problema | Posible causa | Solución |
|---|---|---|
| El calentador no enciende. |
|
|
| El calentador no produce calor. |
|
|
| La oscilación no funciona. |
|
|
| El control remoto no funciona. |
|
|

Image: Diagrams illustrating the safety features: tip-over protection (heater automatically turns off when tilted) and overheat protection (heater automatically turns off if internal temperature exceeds safe limits).
Presupuesto
| Atributo | Valor |
|---|---|
| Marca | OMISOON |
| Número de modelo | DH-QN12 |
| Color | Negro |
| Dimensiones del producto (L x An x Al) | 17 x 17 x 48 cm |
| Peso del artículo | 2 kilogramos |
| Fuerza | 2000 Watts (Max) |
| Volumentage | 220-240 Voltios |
| Material | Ceramic (PTC Heating Elements) |
| Función de apagado automático | Sí (protección contra sobrecalentamiento y vuelco) |
| Número de velocidades/modos | 3 (Low, High, ECO + Fan Mode) |
| Nivel de ruido | 40-60 dB |
| Características especiales | Rapid Heating, Removable Filter, Timer, Oscillating, Portable, Adjustable Temperature, Thermostat, Remote Control, Adjustable Speed |
| Longitud del cable | 1.5 metros |
| Uso recomendado | Indoor (Home, Office, Bedroom) |

Image: A diagram showing the precise dimensions of the heater: 17cm width, 17cm depth, and 48cm height.

Image: A person easily carrying the heater, highlighting its lightweight design (1.9kg) and portability. Also shows the general power supply switch at the bottom rear.
Garantía y soporte
For warranty information or technical support, please refer to the contact details provided with your purchase or visit the official OMISOON webSitio. Conserve su recibo de compra como comprobante de compra para cualquier reclamación de garantía.
Nota: La información sobre la disponibilidad de piezas de repuesto no se proporciona en las especificaciones del producto.
Ask a question about this manual
Ask about setup, troubleshooting, compatibility, parts, safety, or missing instructions. Manuals+ will review the question and use this page’s manual context to help answer it.