Kazeila HCT-322
Kazeila HCT-322 Automatic Watering Timer User Manual
Modelo: HCT-322
1. Introducción
Thank you for choosing the Kazeila HCT-322 Automatic Watering Timer. This device is designed to simplify your gardening and irrigation tasks by providing precise and automated watering schedules. Its robust design and user-friendly interface make it ideal for various outdoor and indoor applications, including gardens, lawns, balconies, and farms.
Please read this manual thoroughly before operating the device to ensure proper installation, programming, and maintenance for optimal performance and longevity.
2. Producto terminadoview
2.1. Componentes

Figura 2.1: Frente view of the Kazeila HCT-322 Automatic Watering Timer, showing the large LCD display and control buttons.
- Unidad principal: The core device housing the LCD screen, control buttons, and internal electronics.
- Conector de entrada: Top connector for attaching to a standard faucet or water source.
- Conector de salida: Conector inferior para conectar una manguera de jardín o un sistema de riego.
- Compartimento de la batería: Located at the back (not visible in this image) for power supply.
2.2. Características principales
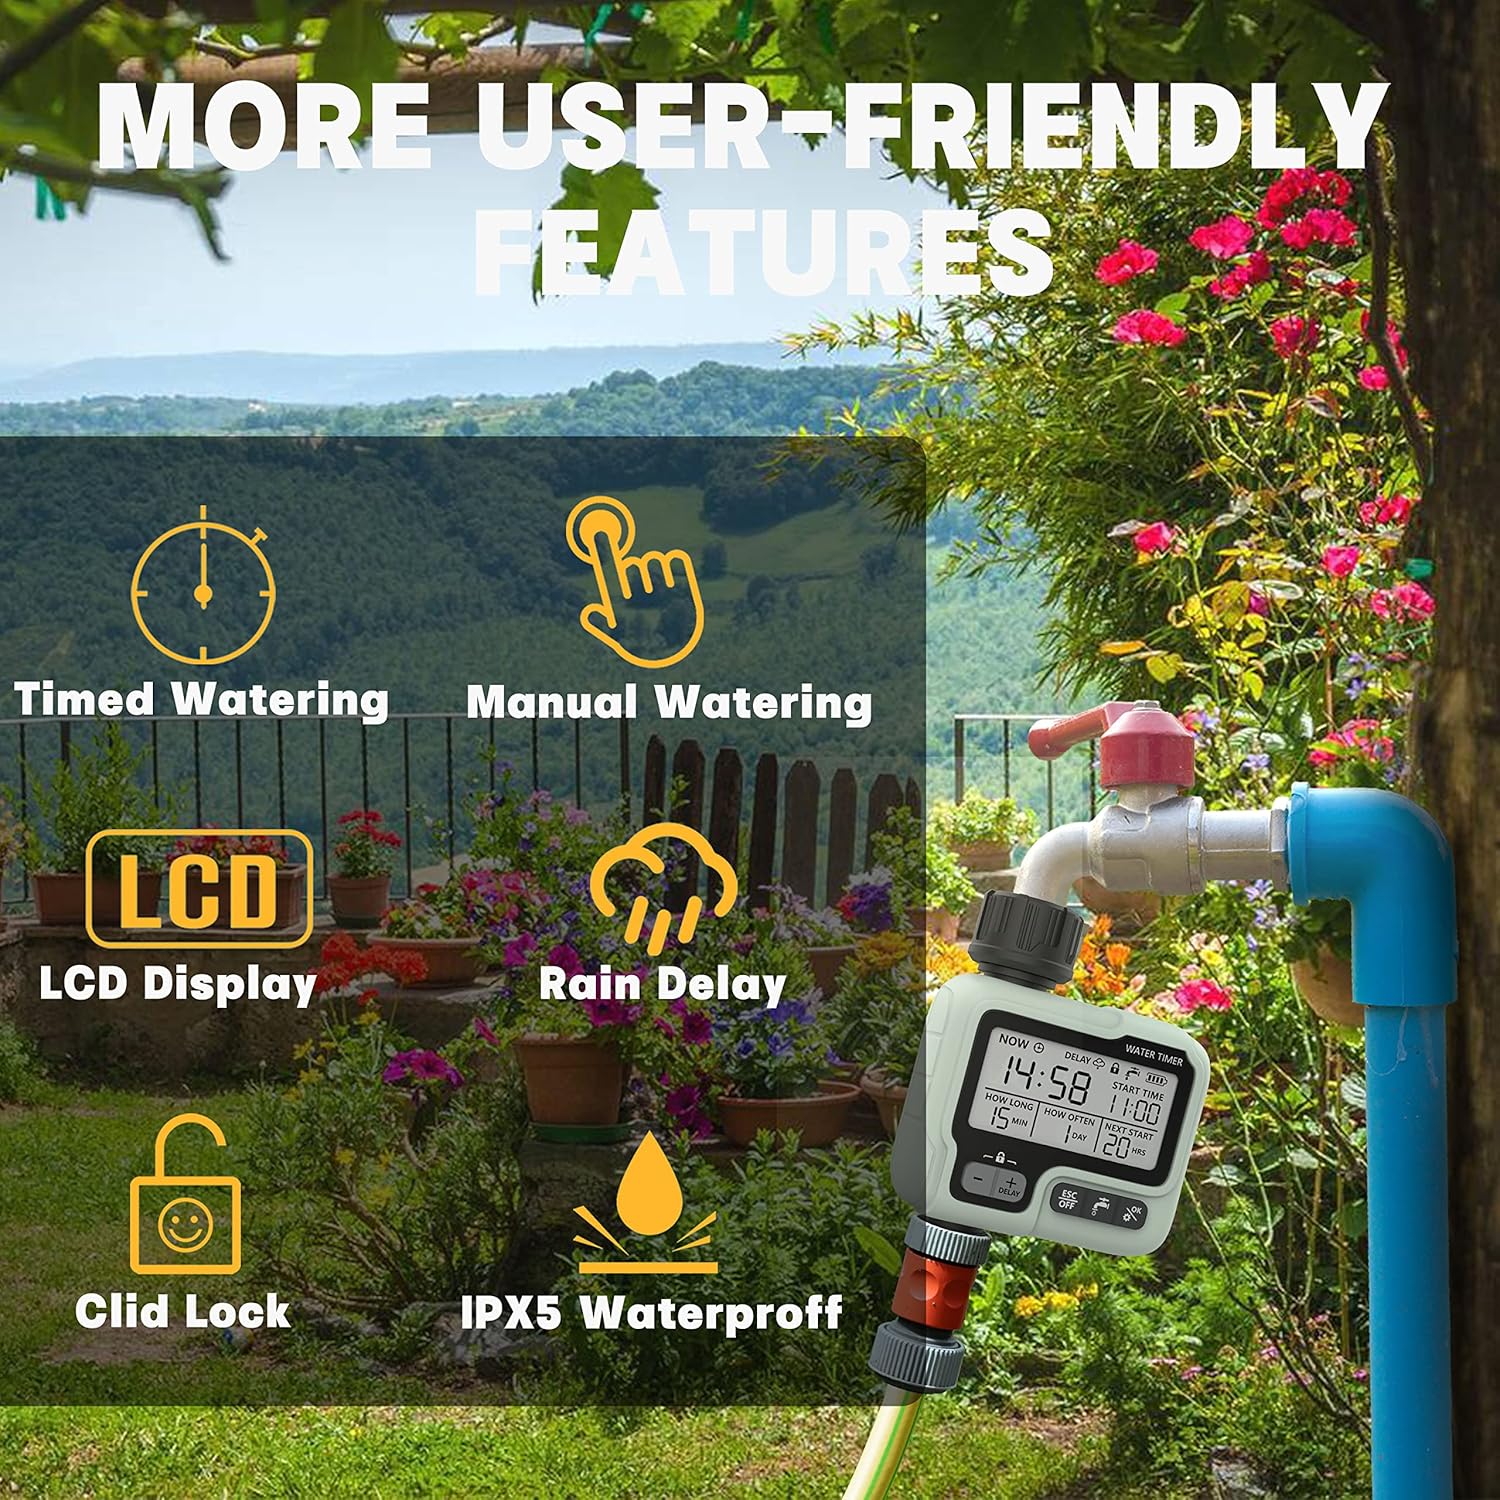
Figura 2.2: Visual representation of the Kazeila HCT-322's user-friendly features.
- Riego automático: Program watering duration from 1 second to 99 minutes and frequency from 1 hour to 15 days.
- Modos múltiples: Supports automatic, manual, and rain delay watering modes.
- Gran pantalla LCD: Clear and easy-to-read screen for current data and settings.
- Modo de bloqueo para niños: Prevents accidental interference or operation.
- Protección de batería baja: Automatically stops watering when battery is low to prevent damage.
- IPX5 a prueba de agua: Designed for outdoor use, resistant to water splashes from any direction.
- Construcción duradera: Made from high-quality plastic and sophisticated electronic components, resistant to corrosion and UV.
- Fácil instalación: Tool-free installation with 5 intuitive control buttons.
3. Configuración
3.1. Instalación de la batería
- Localice el compartimento de la batería en la parte posterior del temporizador.
- Abra la tapa de la batería.
- Insert two new AA alkaline batteries (not included), ensuring correct polarity (+/-).
- Cierre la tapa de la batería de forma segura para mantener la resistencia al agua.
Note: Replace batteries when the low battery indicator appears on the LCD screen. The timer will automatically stop watering to prevent damage when battery power is critically low.
3.2. Conexión del temporizador

Figura 3.1: The watering timer connected to a standard outdoor faucet and a garden hose.
- Ensure your faucet is turned off.
- Screw the inlet connector (top of the timer) onto your outdoor faucet. Hand-tighten only; do not overtighten.
- Attach your garden hose or irrigation system to the outlet connector (bottom of the timer). Hand-tighten only.
- Turn on your faucet. The timer is now ready for programming.
Tip: Use thread seal tape on connections if leaks occur, though the timer is designed for a tight seal.
4. Instrucciones de funcionamiento
4.1. Pantalla LCD y botones
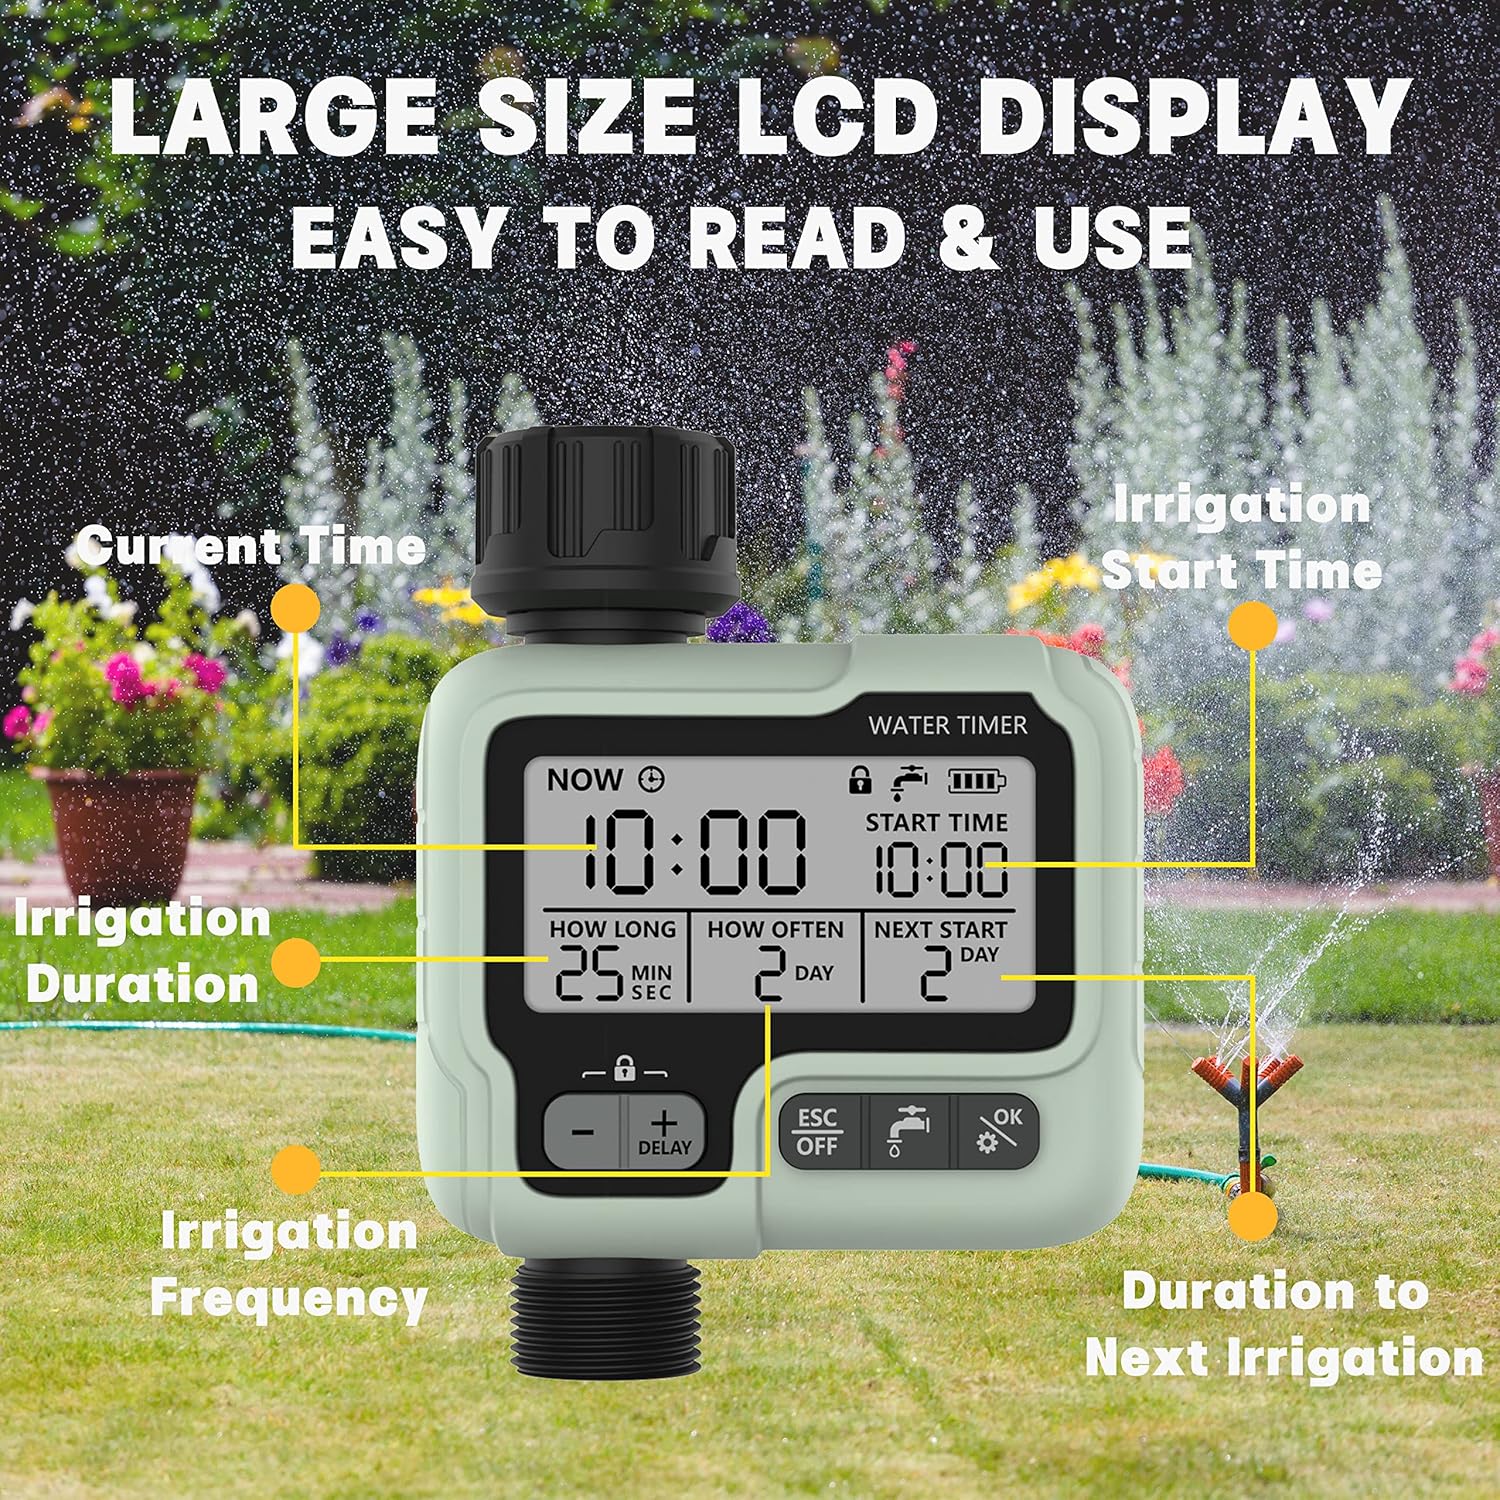
Figura 4.1: Detallado view of the LCD display and its various indicators.
The large LCD display shows all necessary information for programming and operation. The timer features 5 control buttons:
- Botones +/-: Used to adjust values (time, duration, frequency).
- Botón DELAY: Activates the rain delay function (often combined with + button).
- ESC/OFF Button: Exits current setting mode or turns off watering.
- Watering Icon Button: Activa el riego manual.
- OK/Gear Icon Button: Confirms settings or enters programming mode.
4.2. Configuración de la hora actual
- Presione el OK/Gear button to enter time setting mode. The "NOW" time will flash.
- Utilice el +/- buttons to adjust the current hour.
- Prensa OK/Gear to confirm the hour and move to minutes.
- Utilice el +/- buttons to adjust the current minutes.
- Prensa OK/Gear para confirmar y salir de la configuración de la hora.
4.3. Modo de riego automático

Figura 4.2: Programming options for watering duration and frequency.
This mode allows you to set a precise watering schedule.
- Presione el OK/Gear button repeatedly until "START TIME" flashes.
- Utilice el +/- buttons to set the desired start hour for watering. Press OK/Gear Para confirmar.
- Utilice el +/- buttons to set the desired start minutes. Press OK/Gear Para confirmar.
- "HOW LONG" (watering duration) will flash. Use +/- buttons to set the duration from 1 second to 99 minutes. Press OK/Gear Para confirmar.
- "HOW OFTEN" (watering frequency) will flash. Use +/- buttons to set the frequency from 1 hour to 15 days. Press OK/Gear Para confirmar.
- The timer is now programmed and will begin watering according to your schedule.
4.4. Modo de riego manual
Manual watering allows for immediate, unscheduled watering without affecting your programmed schedule.
- Presione el Watering Icon button. The display will show "MANUAL" or a similar indicator.
- Utilice el +/- buttons to set the desired duration for manual watering.
- Prensa OK/Gear para iniciar el riego manual.
- Para detener el riego manual, presione el botón ESC/APAGADO botón.
4.5. Función de retraso por lluvia
The rain delay function allows you to pause your watering schedule for a set period, conserving water during rainy weather.
- Mantenga pulsado el DEMORA button (often combined with the + button).
- Utilice el +/- buttons to select the desired delay period (e.g., 24 hours, 48 hours, 72 hours).
- Prensa OK/Gear to activate the rain delay. The timer will resume its programmed schedule after the delay period ends.
- To cancel the rain delay, press the DEMORA botón de nuevo o el ESC/APAGADO botón.
4.6. Child Lock Mode
Para evitar cambios accidentales en su configuración, active el bloqueo para niños.
- Para activar: Mantenga presionado el +/- buttons simultaneously for a few seconds until a lock icon appears on the display.
- Para desactivar: Mantenga pulsado el botón +/- buttons simultaneously again until the lock icon disappears.
5. Mantenimiento
- Reemplazo de batería: Replace batteries promptly when the low battery indicator appears. Remove batteries if the timer will not be used for an extended period.
- Limpieza: Limpie el temporizador con un paño suave yamp Paño. No utilice limpiadores abrasivos ni sumerja la unidad en agua.
- Almacenamiento de invierno: Before freezing temperatures, disconnect the timer from the faucet and hose. Drain any remaining water and store the unit indoors in a dry, frost-free location.
- Pantalla de filtro: Periodically check the filter screen inside the inlet connector for debris. Clean it if necessary to ensure proper water flow.
6. Solución de problemas
| Problema | Posible causa | Solución |
|---|---|---|
| El temporizador no riega. |
|
|
| Fugas de agua en las conexiones. |
|
|
| La pantalla está en blanco o tenue. |
|
|
7. Especificaciones
| Característica | Detalle |
|---|---|
| Marca | Kazeila |
| Número de modelo | HCT-322 |
| Material | Plástico |
| Dimensiones (L x An x Al) | 4.9 x 12.6 x 9.8 cm (1.9 x 5.0 x 3.9 pulgadas) |
| Peso | 385 g (13.6 onzas) |
| Clasificación de impermeabilidad | IPX5 |
| Duración del riego | 1 segundo a 99 minutos |
| Frecuencia de riego | 1 hora a 15 días |
| Fuente de poder | 2 pilas AA (no incluidas) |
8. Garantía y soporte
For warranty information, technical support, or any inquiries regarding your Kazeila HCT-322 Automatic Watering Timer, please refer to the official Kazeila webSitio web o contacte directamente con su servicio de atención al cliente. Los datos de contacto suelen encontrarse en el empaque del producto o en la página web oficial del fabricante.
Conserve su comprobante de compra para reclamos de garantía.
Documentos relacionados - HCT-322
 |
Kazeila Artificial Olive Tree: Easy Assembly Guide Follow these simple steps to assemble your Kazeila Artificial Olive Tree. Learn how to unpack, connect sections, and style branches for a realistic home or office decor piece. |
 |
Manual de usuario e información de garantía del temporizador de agua Johgee HCT-355 Guía completa del programador de riego Johgee HCT-355, que incluye configuración, programación, funciones, mantenimiento, solución de problemas y detalles de la garantía. Aprenda a usar este programador de riego flexible y preciso para césped, jardines y más. |
 |
HCT-322 Water Timer User Manual Comprehensive user manual for the HCT-322 Water Timer, detailing installation, setup, operation, additional features like delay watering and child lock, troubleshooting, and warranty information for automated garden irrigation. |
 |
Manual de usuario y guía del temporizador de agua VEVOR HCT-378 Manual de usuario completo del temporizador de riego VEVOR HCT-378, que detalla la instalación, la programación, funciones como el riego manual, el modo de retardo, el bloqueo infantil y la solución de problemas. Aprenda a gestionar eficientemente el riego de su jardín. |
 |
Manual del usuario del temporizador de agua VEVOR HCT-378: Guía de instalación y programación Descubra cómo instalar, programar y solucionar problemas del temporizador de riego VEVOR HCT-378 con este completo manual de usuario. Aprenda sobre sus funciones, la configuración de horarios de riego, el riego manual, el bloqueo para niños y los modos de ahorro de energía para un riego eficiente del jardín. |
 |
Temporizador de riego inteligente Carbone AB221 con pantalla - Especificaciones técnicas Especificaciones técnicas detalladas y características del temporizador de riego inteligente Carbone AB221. Cuenta con dos modos, manual e inteligente, pantalla de cuenta regresiva, temporizador por lluvia e indicador de batería para un riego eficiente del jardín. |