
1. Introducción
El Weber Genesis Smart SX-335 LP SS Liquid Propane Grill is designed to provide a comprehensive outdoor cooking experience. This manual provides essential information for the safe and efficient operation, maintenance, and troubleshooting of your new grill.

Figura 1: La Weber Genesis Smart SX-335 LP SS Liquid Propane Grill. This image shows the full grill unit with its stainless steel finish and black cabinet.
2. Información importante de seguridad
ADVERTENCIA: El no seguir estas instrucciones podría ocasionar incendio, explosión o quemaduras, lo que podría causar daños a la propiedad, lesiones personales o la muerte.
- Utilice siempre la parrilla al aire libre, en un área bien ventilada.
- No almacene ni utilice gasolina u otros vapores y líquidos inflamables cerca de este o cualquier otro aparato.
- Mantenga el área del aparato limpia y libre de materiales combustibles, gasolina y otros vapores y líquidos inflamables.
- No obstruya el flujo de aire de combustión y ventilación.
- Keep any electrical supply cord and fuel supply hose away from heated surfaces.
- Compruebe siempre que no haya fugas de gas antes de cada uso.
- Nunca deje la parrilla desatendida mientras cocina.
- Mantenga a los niños y las mascotas alejados de la parrilla en todo momento.
- Utilice guantes protectores al manipular componentes calientes.
3. ¿Qué hay en la caja?
Su Weber Genesis Smart SX-335 LP SS grill package includes the following components:
- Weber Genesis Smart SX-335 LP SS Gas Grill Unit
- Cooking Grates (porcelain-enameled cast iron)
- Flavorizer Bars
- Grease Management System (including drip tray and catch pan)
- Side Burner (integrated)
- Weber Connect Smart Grilling Hub (integrated)
- Propane Tank (sold separately, but required for operation)
- Manual de instrucciones

Figura 2: La Weber Genesis Smart SX-335 LP SS grill with its lid closed, showcasing el acabado de acero inoxidable y el panel de control.
4. Configuración
4.1 Asamblea
Assembly of your Weber Genesis Smart SX-335 LP SS grill is required. For detailed, step-by-step interactive 3D instructions, download the free BILT app on your mobile device. This app provides visual guidance for each step of the assembly process.
Video 1: BILT App - Step by Step Interactive Assembly Instructions. This video demonstrates the interactive 3D assembly guide available through the BILT app for the Webparrilla er Genesis.
Ensure all parts are accounted for before beginning assembly. It is recommended to have a second person assist with assembly due to the size and weight of some components.
4.2 Connecting the Liquid Propane Tank
- Asegúrese de que todas las perillas de control del quemador estén en la posición APAGADO.
- Open the cabinet doors located beneath the grill.
- Place the liquid propane tank securely in the designated tank holder.
- Connect the regulator hose from the grill to the propane tank valve. Hand-tighten the connection firmly.
- Abra lentamente y por completo la válvula del tanque de propano.
- Check for any gas leaks using a soapy water solution on all connections. Bubbles indicate a leak. If a leak is detected, close the tank valve, tighten connections, and re-test. If the leak persists, do not use the grill and contact customer service.

Figure 3: A hand connecting the liquid propane tank to the grill's regulator hose inside the cabinet.
The grill cabinet features a hook that indicates the propane level by weight, helping you monitor remaining fuel.
4.3 Arranque inicial
Before first use, operate the grill on high heat for 15 minutes with the lid closed to burn off any manufacturing residues. This process is called "seasoning" the grill.
5. Instrucciones de funcionamiento
5.1 Encendido de los quemadores principales
- Abra la tapa de la parrilla.
- Asegúrese de que la válvula del tanque de propano esté completamente abierta.
- Turn the leftmost main burner control knob to the START/HIGH position.
- Inmediatamente presione y mantenga presionado el botón de encendido electrónico hasta que el quemador se encienda.
- Once the first burner is lit, turn on adjacent burners to the desired heat setting.
- If ignition does not occur within 5 seconds, turn the burner control(s) OFF, wait 5 minutes, and repeat the lighting procedure.

Figura 4: Primer plano de la Weber Genesis grill's control knobs, showing the ignition button and burner controls.
5.2 Temperature Control and Smart Features
El Weber Genesis Smart SX-335 LP SS features integrated Weber Connect smart technology for precise temperature monitoring. The digital display on the side table shows real-time food temperatures from connected probes.
- Weber Connect App: Descargar el Weber Connect app to your smartphone for remote monitoring, temperature alerts, and flip & serve notifications.
- Capacidad de la sonda: The grill supports up to 2 temperature probes for monitoring different food items simultaneously.
- Encendido de la pantalla: The grill display can be powered by plugging it into an electrical outlet or by using a USB-certified, 10,000mAh rechargeable power bank (sold separately) clipped under the side table.

Figura 5: La Weber Connect smart display on the grill's side table, showing temperature readings, alongside a smartphone displaying the Weber Connect app with temperature alerts.
5.3 Using the Sear Zone
The extra-large sear zone is designed for high-heat searing to achieve perfect grill marks and lock in juices. To activate the sear zone, turn the dedicated sear zone burner knob to the HIGH position. Allow it to preheat for 5-10 minutes before placing food directly over it.
5.4 Uso del quemador lateral
The integrated side burner allows you to sauté vegetables, boil corn, or heat up sauces while grilling. To light the side burner, open its cover, turn the control knob to the START/HIGH position, and press the electronic ignition button until it ignites.

Figura 6: La Weber Genesis grill with the side burner cover open, revealing the burner grate.
5.5 Weber Crafted Outdoor Kitchen Collection
Expand your culinary possibilities with the Weber Crafted Outdoor Kitchen Collection. By replacing a cooking grate with custom-fit grillware (sold separately), you can sear, roast, bake, steam, and stir-fry. The grill locker provides convenient storage for these accessories.

Figura 7: La Weber Crafted grillware frame installed in the grill, ready to accommodate various inserts.

Figure 8: A person stir-frying vegetables and rice in a wok insert on the Webparrilla er Genesis.
5.6 Cooking Techniques
- Calor directo: Use direct heat for searing, grilling smaller items, or cooking foods that require quick cooking.
- Calor indirecto: For larger cuts of meat, poultry, or delicate items, use indirect heat. Turn off the burners directly beneath the food and use adjacent burners to maintain the desired temperature. The expandable top cooking grate provides additional space for indirect cooking.

Figure 9: Two whole chickens cooking on the main grates, with temperature probes inserted, demonstrating indirect cooking.

Figure 10: Grilled shrimp, mixed vegetables in a basket, and toasted bread on the upper warming rack, illustrating diverse cooking options.
6. Mantenimiento
6.1 Limpieza de las rejillas de cocción
After each use, while the grates are still warm, use a grill brush to scrape off any food residue. For a deeper clean, remove the grates and wash them with warm, soapy water.
6.2 Sistema de gestión de grasa
The improved grease management system simplifies cleaning. Simply pull the grease tray out from the front of the grill and scrape away accumulated grease and debris. Replace the disposable catch pan as needed.
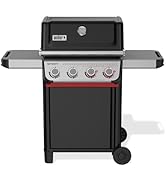
Figure 11: A hand demonstrating the removal and cleaning of the grease management system's pull-out tray.
6.3 Cubierta de parrilla
Protect your grill from the elements by using a weather-resistant grill cover when not in use. This helps prolong the life and appearance of your grill.
7. Solución de problemas
| Problema | Posible causa | Solución |
|---|---|---|
| El quemador no se enciende | No hay flujo de gas, quemador obstruido, encendedor defectuoso. | Check propane tank connection and fuel level. Clean burner ports. Check igniter electrode. |
| Calentamiento desigual | Clogged burner ports, low fuel, wind. | Clean burner ports. Ensure adequate fuel. Position grill away from strong winds. |
| Llama baja o sin llama | Low fuel, regulator bypass, gas leak. | Check fuel level. Reset regulator by turning off all gas, disconnecting, waiting 1 minute, and reconnecting. Check for leaks. |
| Weber Connect display not working | No power, battery low (if using power bank). | Ensure plugged into outlet or power bank is charged and connected. |
For further assistance, refer to the full troubleshooting guide in your printed manual or contact Weber Servicio al Cliente.
8. Especificaciones
| Característica | Detalle |
|---|---|
| Marca | Weber |
| Nombre del modelo | Genesis Smart SX-335 LP SS |
| Número de modelo del artículo | 35600001 |
| Dimensiones del producto | 35.5" de profundidad x 31" de ancho x 30.75" de alto |
| Peso del artículo | 209 libras |
| Color | Acero inoxidable |
| Tipo de combustible | Propano líquido (LP) |
| Recuento del quemador principal | 3 |
| Potencia de calefacción | 13000 unidades térmicas británicas (BTU) |
| Área de superficie de cocción | 787 pulgadas cuadradas |
| Característica especial | Grease Management System, Weber Connect Smart Technology, Sear Zone, Side Burner, Expandable Top Cooking Grate, Grill Locker |
| Material | Acero inoxidable |
| Requiere ensamblaje | Sí |
9. Garantía y soporte
El Weber Genesis Smart SX-335 LP SS Liquid Propane Grill comes with a Garantía limitada de 12 años. For detailed warranty information, please refer to the warranty card included with your product or visit the official Weber websitio.
For customer support, technical assistance, or to order replacement parts, please visit the Weber Store on Amazon o contactar Weber directly through their official channels.
Ask a question about this manual
Ask about setup, troubleshooting, compatibility, parts, safety, or missing instructions. Manuals+ will review the question and use this page’s manual context to help answer it.