
1. Introducción
Gracias por la compraasing the ICQN 20 Liter Electric Oven. This compact and versatile appliance is designed to assist you with various cooking tasks, from baking and roasting to grilling. To ensure safe and efficient operation, please read this manual thoroughly before first use and keep it for future reference.
This manual provides detailed instructions on the oven's features, setup, operation, maintenance, and troubleshooting.
2. Instrucciones de seguridad
Tenga en cuenta las siguientes precauciones de seguridad para evitar lesiones personales o daños al aparato:
- Seguridad eléctrica: Asegúrese del volumentage indicated on the appliance matches your local power supply. Do not immerse the appliance, cord, or plug in water or other liquids. Always unplug the oven when not in use, before cleaning, or during maintenance.
- Advertencia de calor: The oven surfaces become very hot during operation. Use oven mitts or gloves when handling hot parts, food, or accessories. Do not touch hot surfaces directly.
- Colocación: Place the oven on a stable, heat-resistant surface, away from walls and other appliances to allow for proper ventilation. Do not place near flammable materials.
- Supervisión: Es necesaria una estrecha supervisión cuando cualquier aparato sea utilizado por niños o cerca de ellos.
- Ventilación: Do not block any ventilation openings. Ensure adequate space around the oven for air circulation.
- Uso previsto: Este aparato es sólo para uso doméstico. No lo utilice al aire libre ni con fines comerciales.
- Cable/enchufe dañado: Do not operate the oven with a damaged cord or plug. Contact qualified service personnel for repair.
- Objetos extraños: No introduzca ningún objeto en las ranuras o aberturas de ventilación del horno.
3. Producto terminadoview
The ICQN 20 Liter Electric Oven features a compact design with intuitive controls and essential accessories for various cooking needs.

Figura 3.1: Frente view of the ICQN 20 Liter Electric Oven, showing the main unit with food cooking inside.
Componentes y controles
- Perilla de control de temperatura: Se utiliza para establecer la temperatura de cocción deseada (80°C a 250°C).
- Perilla selectora de funciones: Used to select one of the five cooking modes or the defrost function.
- Perilla del temporizador: Used to set the cooking time (0-90 minutes) or continuous operation.
- Puerta de doble cristal: Proporciona aislamiento y permite viewing de los alimentos durante la cocción.
- Elementos calefactores: Ubicado en la parte superior e inferior de la cavidad del horno.
- Ventilador de convección: Circulates hot air for even cooking (available in specific functions).
- Luz interna: Ilumina el interior del horno.
- Pies antideslizantes: Ensures stability on the countertop.

Figura 3.2: detallada view of the control panel, illustrating the function selector, timer, and temperature knobs.
Accesorios incluidos
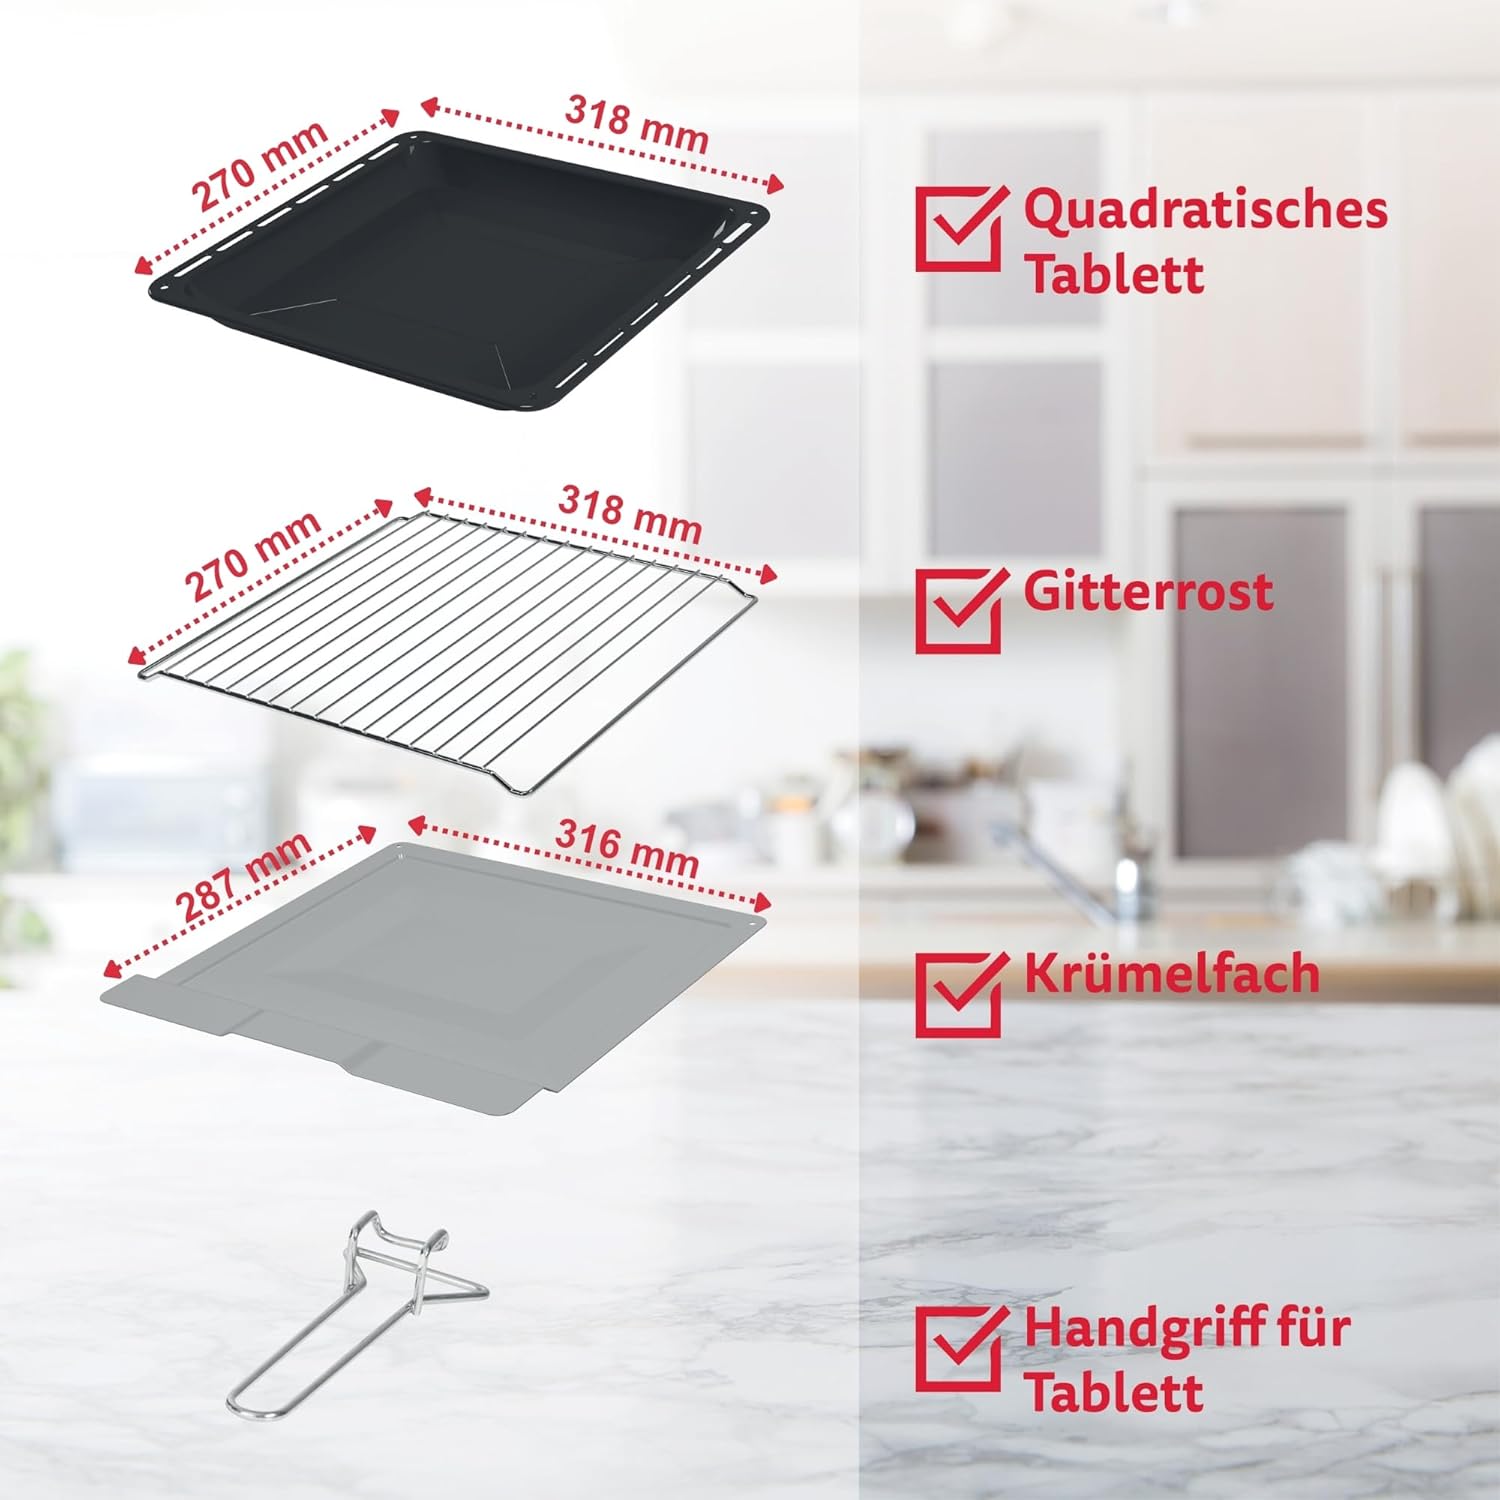
Figure 3.3: The standard accessories provided with the oven.
- Bandeja de hornear: For baking, roasting, and collecting drips. Dimensions: 31.8 x 26.6 cm.
- Rejilla para parrilla: For grilling, toasting, or placing dishes. Dimensions: 31.8 x 27 cm.
- Bandeja para migas extraíble: Located at the bottom, collects crumbs and food debris for easy cleaning. Dimensions: 31.6 x 28.7 cm.
- Asa de la bandeja: Para la inserción y extracción segura de bandejas y rejillas calientes.
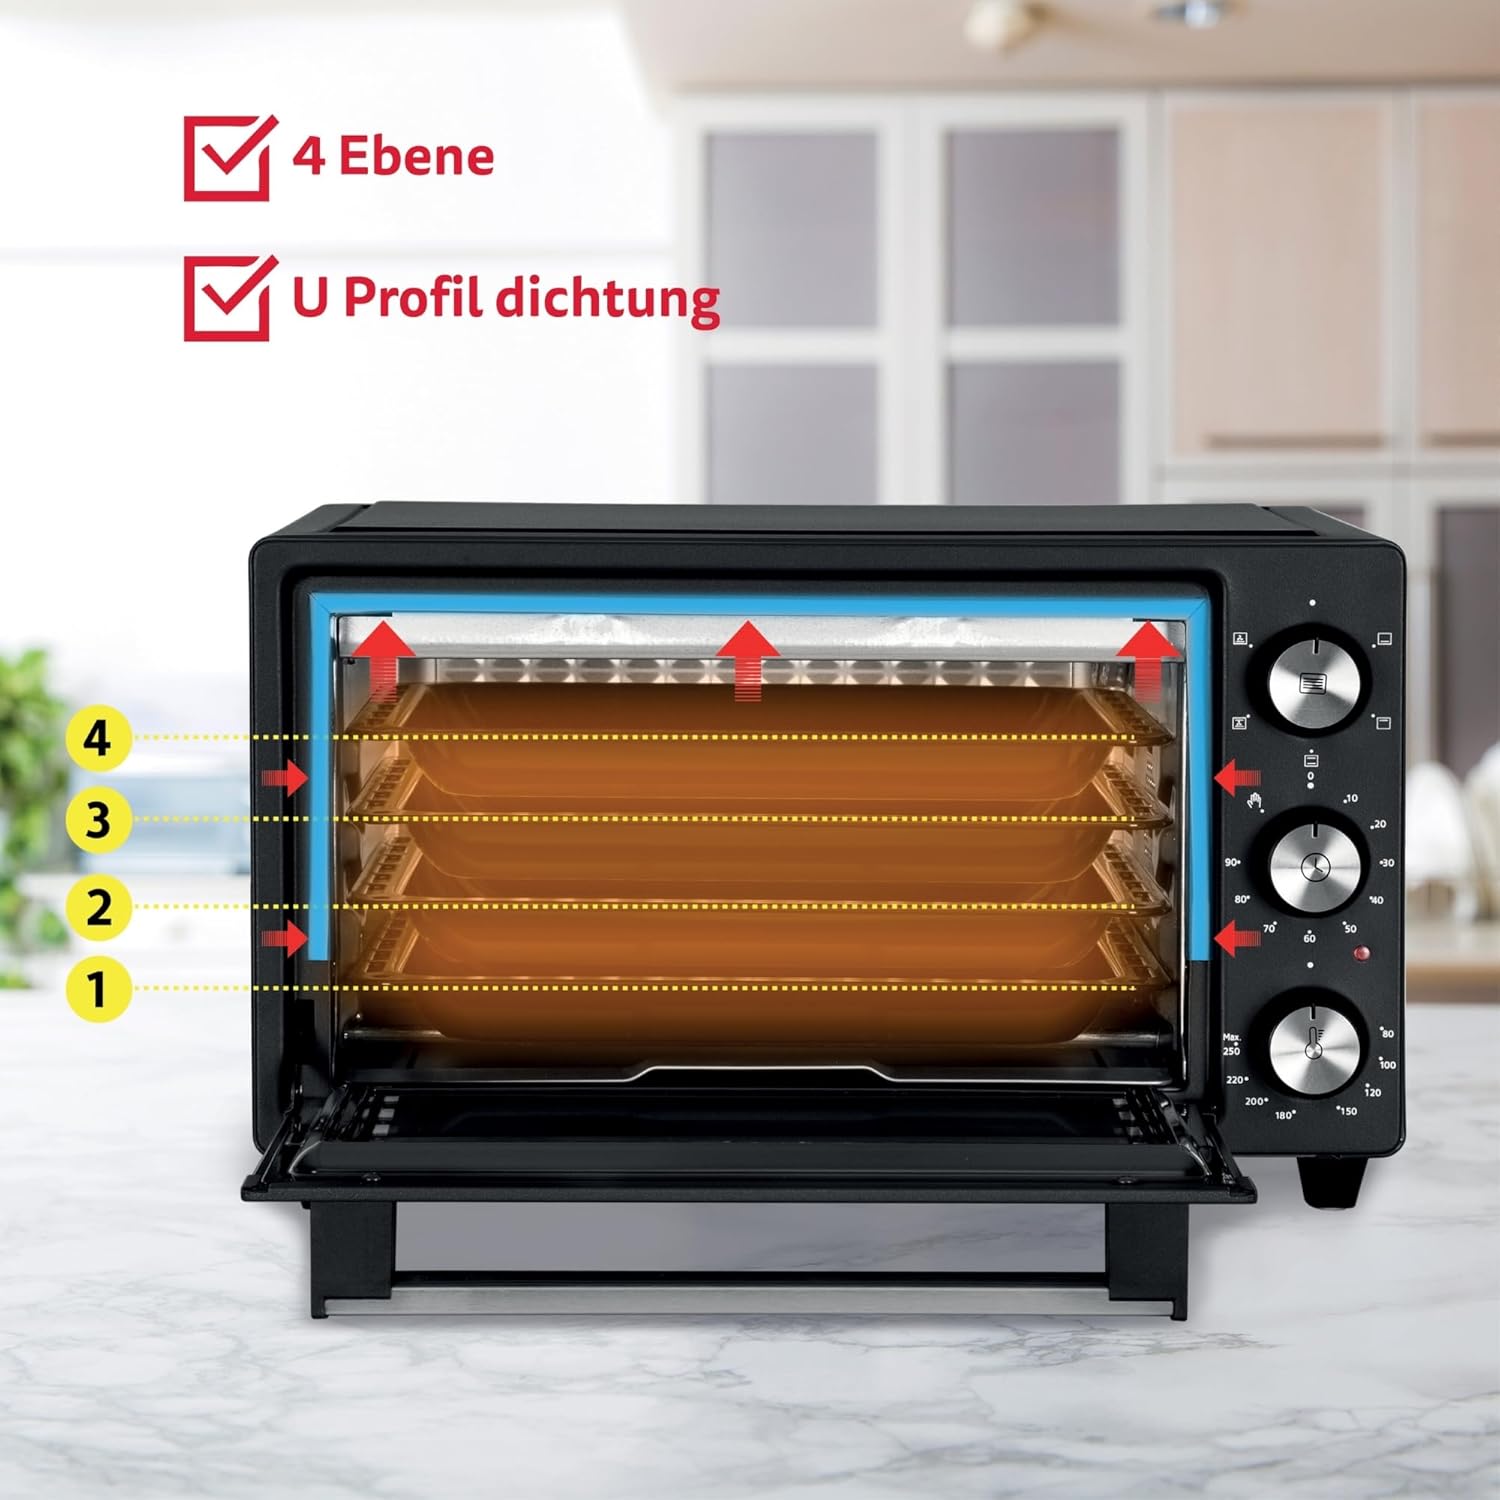
Figure 3.4: The oven interior features four distinct insertion levels for flexible cooking.
4. Configuración
- Desembalaje: Retire con cuidado el horno y todos los accesorios del embalaje. Conserve el embalaje para su posterior transporte si fuera necesario.
- Colocación: Place the oven on a flat, stable, and heat-resistant surface. Ensure there is at least 10-15 cm of clear space on all sides (back, top, and sides) for proper ventilation. Do not place the oven directly against a wall or under cabinets that are not heat-resistant.
- Limpieza inicial: Antes del primer uso, limpie el interior y el exterior del horno con un paño húmedo.amp cloth. Wash the baking tray, grill rack, and crumb tray with warm, soapy water, then rinse and dry thoroughly.
- Quema del primer uso: To eliminate any manufacturing odors, operate the empty oven for approximately 15 minutes at the maximum temperature (250°C) using the Top and Bottom Heating function. Ensure the room is well-ventilated during this process. A slight odor or smoke is normal during this initial burn-off.
5. Instrucciones de funcionamiento
Precalentamiento
For best cooking results, it is recommended to pre-heat the oven to the desired temperature before placing food inside. This typically takes 5-10 minutes, depending on the selected temperature.
Funciones de cocción
The oven offers 5 cooking functions, selected using the Function Selector Knob:

Figure 5.1: Visual representation of the oven's heating functions.
- Calefacción superior: Activates only the upper heating elements. Ideal for browning, grilling, or finishing dishes.
- Calefacción inferior: Activates only the lower heating elements. Suitable for gentle cooking, reheating, or crisping the bottom of dishes.
- Calefacción superior e inferior: Activates both upper and lower heating elements. Standard function for baking cakes, bread, and roasting meats.
- Top Heating + Convection: Combines upper heating with the convection fan. Good for achieving a crispy top while circulating heat.
- Top and Bottom Heating + Convection: Activates both heating elements and the convection fan. Provides fast and even cooking, ideal for pizza, roasted vegetables, and multiple items on different racks.
Additionally, the oven features a Función de descongelación, which uses the convection fan without heat to gently thaw frozen foods.
Ajuste de temperatura
Turn the Temperature Control Knob to set the desired temperature between 80°C and 250°C. The oven will begin heating once a function and time are selected.
Usando el temporizador
Turn the Timer Knob clockwise to set the desired cooking time, up to 90 minutes. The oven will automatically switch off and emit a bell sound when the set time has elapsed. For continuous operation, turn the timer knob counter-clockwise to the 'Stay On' position (indicated by a hand icon or similar). In this mode, the oven will remain on until manually switched off.
Posiciones del rack
The oven has four insertion levels. Choose the appropriate level based on the food type and desired cooking outcome. For example, use higher levels for grilling and lower levels for baking items that require more bottom heat.
6. Mantenimiento y limpieza
La limpieza regular garantiza un rendimiento óptimo y prolonga la vida útil del horno. Desenchufe siempre el horno y deje que se enfríe completamente antes de limpiarlo.
- Limpieza interior: Limpie el interior con publicidad.amp cloth and mild detergent. For stubborn stains, use a non-abrasive oven cleaner suitable for mini ovens. Avoid harsh chemicals or abrasive pads that can damage surfaces.
- Limpieza exterior: Limpie las superficies exteriores con adamp Paño. No utilice limpiadores abrasivos.
- Bandeja para migas: The removable crumb tray should be emptied and cleaned regularly. Pull it out from the bottom front of the oven, wash with warm, soapy water, rinse, and dry thoroughly before reinserting.
- Accesorios: Wash the baking tray, grill rack, and tray handle with warm, soapy water. They are generally not dishwasher safe unless specified.
- Puerta de vidrio: Limpie la puerta de doble vidrio con un limpiador de vidrios o adamp cloth. Avoid scratching the glass.
7. Solución de problemas
If you encounter issues with your ICQN Electric Oven, refer to the following common problems and solutions:
| Problema | Posible causa | Solución |
|---|---|---|
| El horno no enciende. | No enchufado; sin energíatage; toma de corriente defectuosa. | Asegúrese de que el horno esté bien enchufado a una toma de corriente que funcione. Revise el disyuntor. |
| El horno no calienta. | Temperature or function not set; timer not engaged. | Ensure both the temperature and function knobs are set correctly. Turn the timer knob past 0 to activate heating. |
| Los alimentos se cocinan de manera desigual. | Incorrect rack position; overcrowding; pre-heating insufficient. | Adjust rack position. Avoid overcrowding the oven. Always pre-heat the oven to the desired temperature. Consider using convection functions for more even heat distribution. |
| Oven takes too long to reach temperature. | Normal for initial heating; external factors. | Allow sufficient time for pre-heating. Ensure the oven door is properly closed and the seal is intact. |
| Humo u olor durante el primer uso. | Quema de residuos de fabricación. | This is normal for the first use. Ensure good ventilation. It should dissipate after the initial burn-off. |
Si después de comprobar estos puntos el problema persiste, póngase en contacto con el servicio de atención al cliente.
8. Especificaciones

Figure 8.1: Key dimensions and technical specifications of the oven.
| Característica | Especificación |
|---|---|
| Marca | ICQN |
| Modelo | IQ M2051R02N 1AA |
| Color | Anthracite (Black) |
| Capacidad | 20 litros |
| Fuerza | 1500 W |
| Volumentage | 230 V |
| Rango de temperatura | 80°C - 250°C |
| Minutero | 0-90 minutes with 'Stay On' function |
| Funciones de cocción | 5 (Top, Bottom, Top+Bottom, Top+Convection, Top+Bottom+Convection) + Defrost |
| Dimensiones externas (An x Pr x Al) | 43.5 x 38 x 26.5 cm |
| Dimensiones internas (An x Pr x Al) | 32 x 30.5 x 21 cm |
| Peso | 7 kilogramos |
| Características especiales | Double glass door, 4 insertion heights, removable crumb tray, automatic shut-off. |
9. Garantía y soporte
This ICQN Electric Oven is covered by a standard manufacturer's warranty. Please refer to the warranty card included with your purchase for specific terms and conditions, including the warranty period and coverage details.
For technical assistance, troubleshooting beyond this manual, or warranty claims, please contact ICQN customer support through the retailer where you purchased the product or visit the official ICQN websitio para información de contacto.