
1. Introducción
The Daytech Panic Button Alarm System is designed to provide immediate alert capabilities for various security needs, including home care, business security, and emergency situations. This system features a loud 120dB siren with a flashing strobe light, activated by wireless panic buttons or remote controls. It is suitable for indoor and outdoor use, offering reliable performance with a built-in battery for power outage protección.
2. Contenido del paquete
Verifique que todos los componentes estén presentes en su paquete:
- 1 x Strobe Siren Alarm Receiver
- 5 x Remote Panic Buttons
- 2 x Call Buttons (Square type)
- Adaptador de corriente para sirena
- Herrajes de montaje (tornillos, anclajes)
- Manual de usuario (este documento)
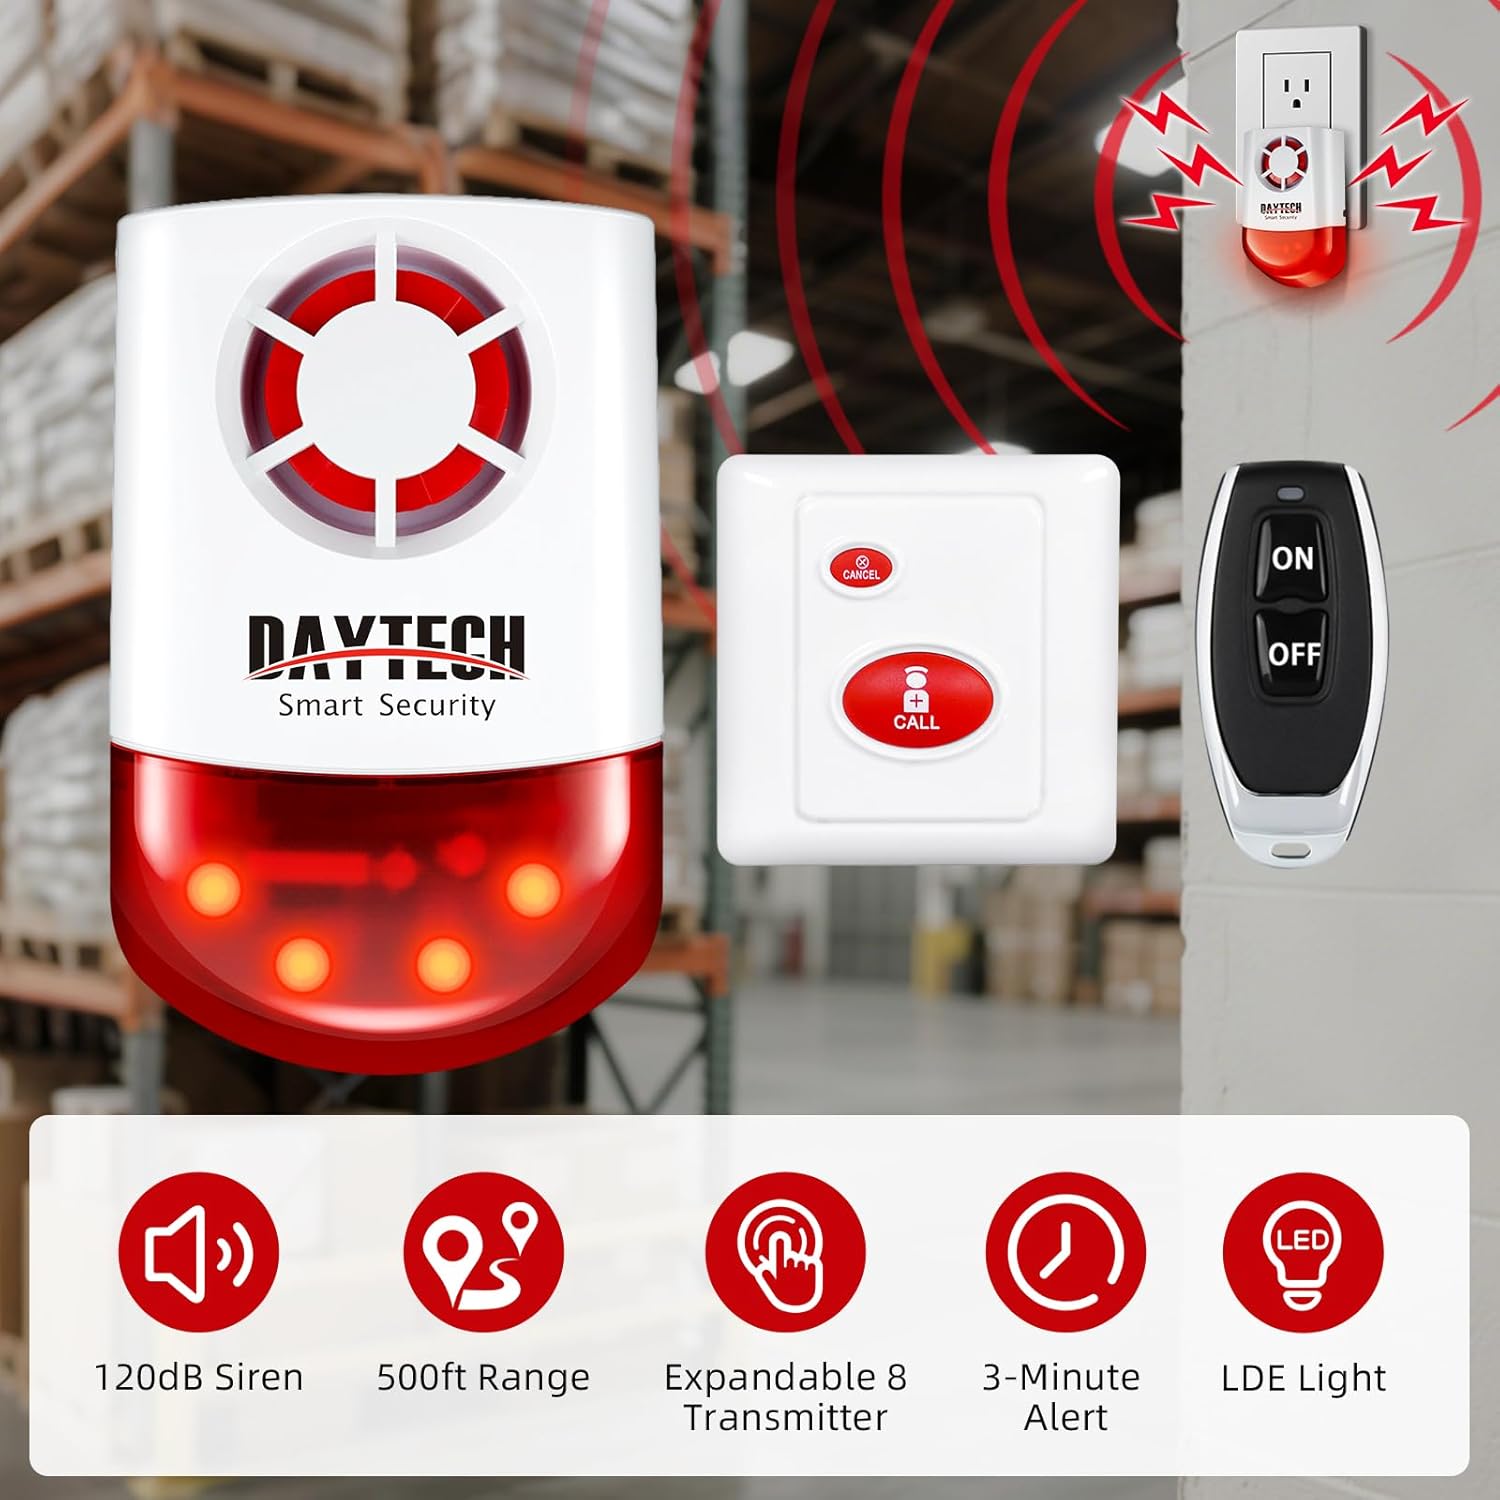
Imagen: Más alláview of the Daytech Panic Button Alarm System components, showing the siren, a square call button, and a remote control.
3. Características principales
- Wireless Outdoor/Indoor Siren: Produces a 120dB sound and flashing strobe light upon activation.
- Rango extendido: Call buttons and receiver operate up to 330 feet in open areas, 130 feet with obstacles. Remote controls have an operating range of 65 feet to the receiver.
- Poder Outagy Protección: Features a built-in battery providing approximately 10 hours of standby time, ensuring continuous operation during power interruptions.
- Waterproof Panic Button: The panic buttons are waterproof, allowing installation in areas like washing rooms or near bedsides.
- Cancel/OFF Function: Allows users to deactivate the alarm using a dedicated cancel button on the call unit or the OFF button on the remote.
- Fácil configuración: Units are pre-paired from the factory for immediate use.
- Sistema ampliable: One siren can be paired with up to 8 transmitters (including call buttons and remote controls).
4. Instrucciones de configuración
4.1 Encendido inicial
- Desempaque todos los componentes de la caja.
- Plug the siren alarm receiver into a standard electrical outlet. The unit will emit a short sound to indicate it is powered on.
- The system is pre-paired for immediate use. Test the system by pressing a panic button or remote to ensure the siren activates.

Image: The Daytech siren alarm plugged into a wall outlet, indicating power connection.
4.2 Pairing Additional Transmitters (Call Buttons/Remotes)
The siren can be paired with up to 8 transmitters. Follow these steps to pair new devices:
- Locate the "Set Button" on the back of the siren receiver.
- Press and hold the "Set Button" until the siren emits a short beep, indicating it is in pairing mode.
- Within 10 seconds, press the "CALL" button on the new call button or the "ON" button on the new remote control.
- The siren will emit another beep to confirm successful pairing.
- Repita este procedimiento para cualquier transmisor adicional.
- To exit pairing mode, wait 10 seconds without pressing any transmitter, or press the "Set Button" again.
Video: Instructions on how to pair the alarm to a wireless call or cancel switch.

Image: Close-up of the back of the siren unit, highlighting the "Set Button" for pairing.
4.3 Mounting the Call Buttons
The call buttons can be fixed to a wall or placed on a flat surface.
- For wall mounting, use the provided screws and anchors. Ensure the button is easily accessible in an emergency.
- The waterproof design allows installation in bathrooms or other areas where moisture may be present.

Image: A panic button being tested with water spray, demonstrating its waterproof feature.
5. Instrucciones de funcionamiento
5.1 Activación de la alarma
- Usando un botón de llamada: Press the large "CALL" button on the square call unit. This will send a signal to the siren, activating the alarm sound and flashing lights.
- Usando un control remoto: Press the "ON" button on the remote control. This will activate the siren.

Image: A hand pressing the call button, illustrating alarm activation.
5.2 Deactivating the Alarm
- Usando un botón de llamada: Press the small "CANCEL" button on the square call unit. This will silence the siren.
- Usando un control remoto: Press the "OFF" button on the remote control. This will deactivate the siren.

Image: A hand pressing the "OFF" key on a remote control to cancel the alarm.
5.3 Energía OutagFuncionalidad electrónica
The siren receiver includes a built-in battery that provides approximately 10 hours of standby power. In the event of a power outage, the system will automatically switch to battery power, ensuring continued operation.
Image: Illustration showing the siren alarm operating on its built-in battery during a power outage, with a 10-hour standby time.
6. Mantenimiento
6.1 Battery Renewal for Call Units
The call units (panic buttons) are powered by a 1*23A 12V battery. When the battery is low, the unit's performance may degrade.
- Carefully open the call unit casing utilizando un pequeño destornillador de punta plana o una herramienta similar.
- Remove the old 1*23A 12V battery.
- Insert a new 1*23A 12V battery, ensuring correct polarity.
- Cierra la casing de forma segura.
Video: Detailed instructions on how to renew batteries in the call units.
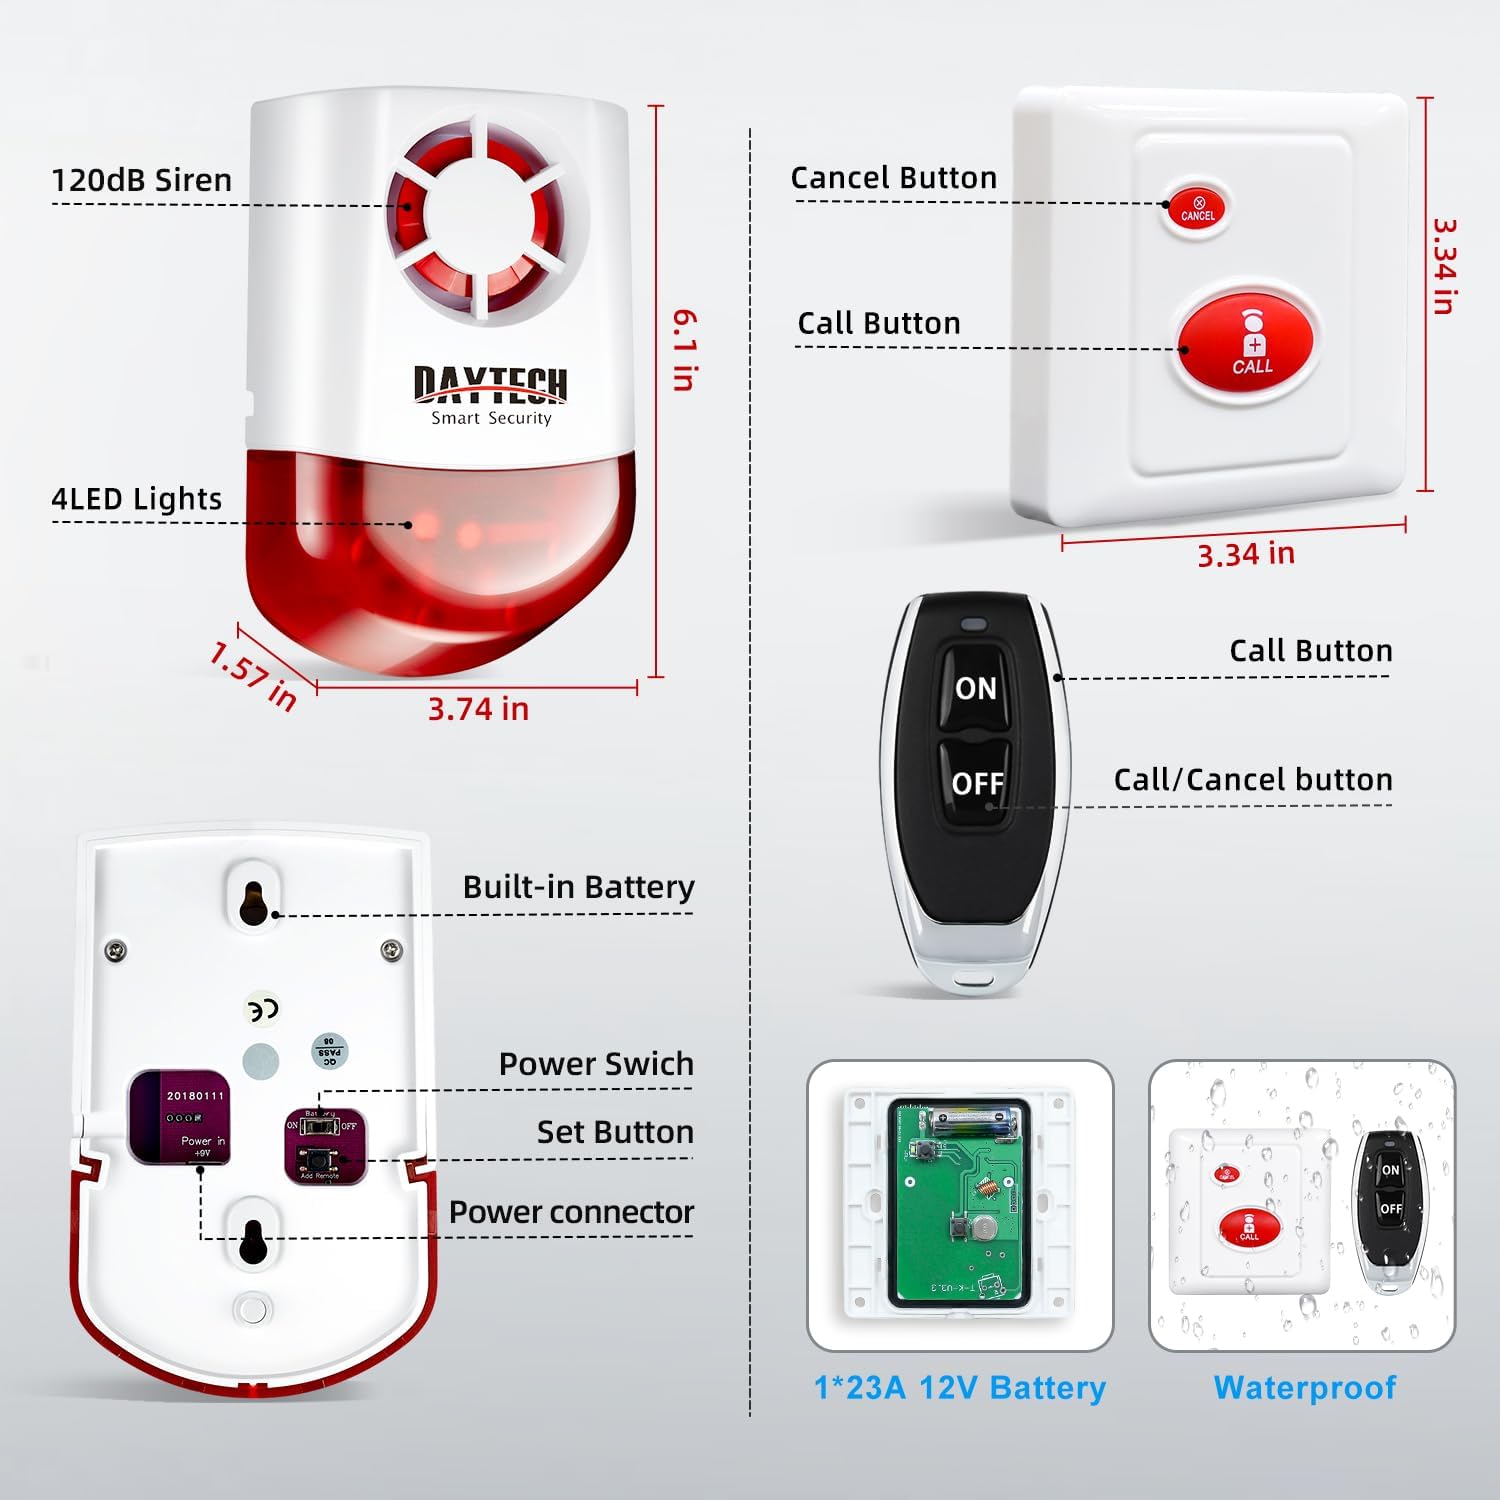
Image: Diagram illustrating the internal components of the call button and the 1*23A 12V battery.
6.2 Limpieza
Wipe the surfaces of the siren and transmitters with a soft, dry cloth. Avoid using abrasive cleaners or solvents.
7. Solución de problemas
| Problema | Posible causa | Solución |
|---|---|---|
| Siren does not activate when button is pressed. |
|
|
| Alarm sounds weak or intermittently. |
|
|
| Alarm cannot be cancelled. |
|
|
8. Especificaciones
- Marca: Daytech
- Número de modelo: Model 1 (JH003 8-2)
- Fuente de energía: Battery Powered (Siren has built-in battery for backup)
- Método de control: Remoto
- Nivel de ruido: 120 decibelios
- Maximum Range (Call Button to Siren): 330 Feet (open areas), 130 Feet (with obstacles)
- Maximum Range (Remote to Siren): 65 pies
- Tipo de montaje: Door Mount (for siren), Wall Mount/Surface (for call buttons)
- Código postal: 762102193270
Image: Detailed diagram showing the dimensions and key features of the siren, call button, and remote control.
9. Garantía y soporte
Daytech products are covered by a manufacturer's warranty. For specific warranty details, technical support, or customer service inquiries, please refer to the contact information provided with your purchase or visit the official Daytech websitio.
Fabricante: Daytech co.,Ltd.