
1. Introducción
This manual provides detailed instructions for the operation and maintenance of your Jectse Bluetooth Speaker Alarm Clock. Please read this manual thoroughly before using the product to ensure proper function and longevity.
The Jectse Bluetooth Speaker Alarm Clock is a multi-functional device featuring a digital clock, dual alarm capabilities, an LED mirror display, FM radio, and Bluetooth connectivity for audio playback. It also supports music playback via a memory card.
2. Producto terminadoview
2.1. Características principales
- Conectividad Bluetooth 5.0: Transmita audio de forma inalámbrica desde dispositivos compatibles.
- Reloj despertador doble: Configure dos alarmas independientes para diferentes horas de despertarse.
- LED Mirror Display: Clear digital time display that also functions as a mirror.
- Radio FM: Digitally tuned FM radio (87.5MHz-108MHz) for news, music, and weather.
- Reproducción de tarjeta de memoria: Supports music playback from a memory card (up to 32GB, not included).
- Batería recargable incorporada: 1600mAh lithium battery for portable use.
- Diseño compacto: Product dimensions are approximately 116 x 51 x 33mm (4.6 x 2 x 1.3 inches).
2.2. Contenido del paquete
- 1 x Jectse Alarm Clock Speaker
- 1 x cable de carga micro USB
- 1 x Manual de usuario (este documento)
2.3. Diagrama del producto
Consulte la imagen a continuación para obtener una descripción general.view de los componentes y controles del dispositivo.
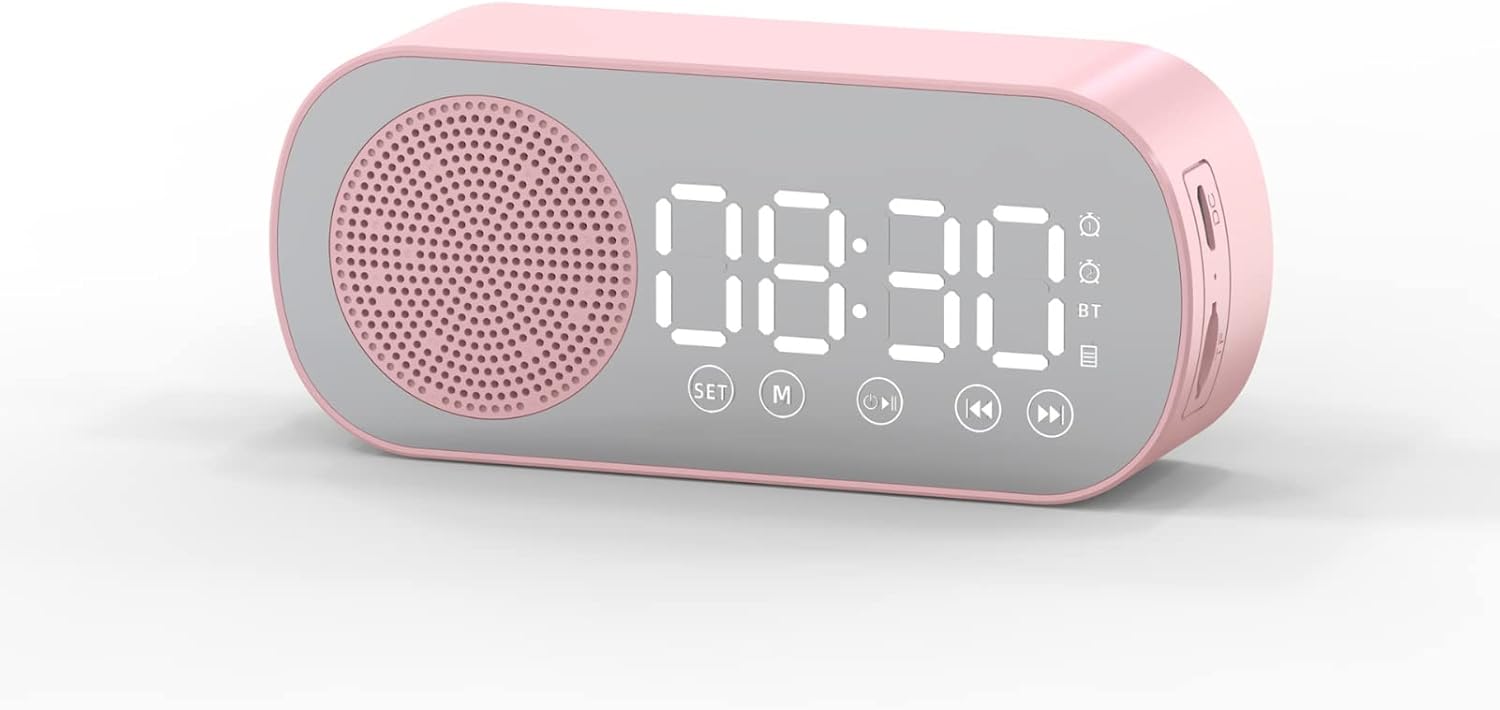
Figura 1: Frente view of the Jectse Bluetooth Speaker Alarm Clock, showing the speaker grille, LED display, and control buttons (SET, M, Play/Pause, Previous, Next).

Figura 2: Lado view of the alarm clock with dimensions: 116mm (4.6in) length, 51mm (2in) height, and 33mm (1.3in) depth.
3. Configuración
3.1. Carga inicial
Before first use, fully charge the device. Connect the provided Micro USB charging cable to the charging port on the side of the alarm clock and the other end to a standard USB power adapter (not included).

Figura 3: The alarm clock and its Micro USB charging cable.
The battery indicator on the LED display will show charging status. A full charge typically takes a few hours.
4. Instrucciones de funcionamiento
4.1. Encendido y apagado
Mantenga pulsado el Potencia/Modo (M) Botón para encender o apagar el dispositivo.
4.2. Configuración de la hora
- En el modo de reloj, mantenga presionada la COLOCAR botón hasta que los dígitos de la hora comiencen a parpadear.
- Utilice el Anterior (◀◀) y Next (▶▶) Botones para ajustar la hora.
- Presione el COLOCAR Botón de nuevo para cambiar al ajuste de minutos. Utilice el Anterior (◀◀) y Next (▶▶) Botones para ajustar los minutos.
- Presione el COLOCAR button a third time to confirm and exit time setting mode.
4.3. Configuración de alarmas (función de alarma dual)
The device supports two independent alarms. Follow these steps for each alarm:

Figura 4: The alarm clock illustrating the dual alarm feature with two distinct alarm settings.
- En el modo reloj, presione brevemente el COLOCAR button once to enter Alarm 1 setting mode. The alarm icon and hour digits will flash.
- Utilice el Anterior (◀◀) y Next (▶▶) Botones para ajustar la hora.
- Prensa COLOCAR again to adjust minutes. Use Anterior (◀◀) y Next (▶▶) Para ajustar.
- Prensa COLOCAR a third time to select the alarm sound (e.g., buzzer, FM radio). Use Anterior (◀◀) y Next (▶▶) para recorrer las opciones.
- Prensa COLOCAR a fourth time to confirm Alarm 1 settings.
- To set Alarm 2, repeat steps 1-5, but short press the COLOCAR button twice to enter Alarm 2 setting mode.
- Para habilitar o deshabilitar una alarma, presione brevemente el botón COLOCAR button until the desired alarm icon flashes, then press the Play/Pause (▶▌▌) botón para activarlo o desactivarlo.
Note: The alarm volume is independent of the main speaker volume and may be fixed or adjustable within the alarm settings. If the alarm sound is too loud, check if there's an option to adjust it during the alarm setup process.
4.4. Modo Bluetooth
- Presione el Potencia/Modo (M) button repeatedly until "BT" appears on the display, indicating Bluetooth mode.
- On your mobile device, enable Bluetooth and search for "Jectse Speaker" or a similar device name.
- Seleccione el dispositivo que desea emparejar. Un sonido de confirmación indicará que el emparejamiento se realizó correctamente.
- You can now play audio from your device through the speaker. Use the Play/Pause (▶▌▌), Anterior (◀◀), y Next (▶▶) Botones para controlar la reproducción.
4.5. Modo de radio FM

Figura 5: The alarm clock functioning as an FM radio on a bedside table.
- Presione el Potencia/Modo (M) botón repetidamente hasta que aparezca "FM" en la pantalla.
- Presione el Play/Pause (▶▌▌) Botón para escanear y guardar automáticamente las estaciones de FM disponibles.
- Utilice el Anterior (◀◀) y Next (▶▶) Botones para cambiar entre estaciones guardadas.
- For better reception, ensure the device is not obstructed and try repositioning it.
4.6. Reproducción de tarjetas de memoria
Insert a memory card (Micro SD card, up to 32GB, not included) into the designated slot on the device. The device will automatically switch to memory card mode and begin playing audio files. Utilizar el Play/Pause (▶▌▌), Anterior (◀◀), y Next (▶▶) Botones para controlar la reproducción.
4.7. Ajuste del volumen
In any audio playback mode (Bluetooth, FM, Memory Card), press and hold the Anterior (◀◀) button to decrease volume or the Next (▶▶) botón para aumentar el volumen.
4.8. LED Mirror Display

Figura 6: The alarm clock's LED display also functions as a mirror.
The front panel of the device features an LED display that shows the time and other information. When not actively displaying information, the surface can be used as a mirror.

Figura 7: The LED display showing multiple functions and indicators, including time, battery level, and Bluetooth status.
5. Mantenimiento
- Limpieza: Utilice un paño suave y seco para limpiar el dispositivo. No utilice limpiadores abrasivos ni disolventes.
- Almacenamiento: Guarde el dispositivo en un lugar fresco y seco, alejado de la luz solar directa y de temperaturas extremas.
- Cuidado de la batería: Para prolongar la vida útil de la batería, evite descargarla por completo con frecuencia. Cargue el dispositivo regularmente, incluso si no lo usa durante períodos prolongados.
- Exposición al agua: Este dispositivo no es resistente al agua. Evite la exposición al agua o a la humedad alta.
6. Solución de problemas
| Problema | Posible causa | Solución |
|---|---|---|
| El dispositivo no se enciende. | Batería baja. | Cargue el dispositivo con el cable USB proporcionado. |
| No se puede emparejar a través de Bluetooth. | Bluetooth not enabled on device or phone; device not in pairing mode. | Ensure the alarm clock is in Bluetooth mode ("BT" displayed) and your phone's Bluetooth is on and searching. Move devices closer. |
| La recepción de radio FM es mala. | Señal débil; interferencia. | Reposition the device. Avoid placing near other electronic devices that may cause interference. |
| Alarm is too loud/quiet. | Alarm volume not adjusted during setup. | Re-enter alarm setting mode and check if there is an option to adjust alarm volume. Some models may have a fixed alarm volume. |
| La pantalla es difícil de leer. | Lighting conditions; display brightness setting. | Adjust ambient lighting. Check if there is a display brightness setting (refer to specific model instructions if available, not detailed in general description). |
7. Especificaciones
| Característica | Detalle |
|---|---|
| Modelo | Jectsesb81t679n01182 |
| Material | ABS (Acrilonitrilo Butadieno Estireno) |
| Tamaño del producto | Aprox. 116 x 51 x 33 mm (4.6 x 2 x 1.3 pulgadas) |
| Tipo de batería | Batería de litio (incorporada) |
| Capacidad de la batería | 1600 mAh |
| Versión de Bluetooth | 5.0 |
| Modos de juego | Bluetooth, Memory Card (Max 32G, not included) |
| Modos de reloj | Digital Clock, Dual Alarm Clock, FM Radio |
| FM Radio Frecuencia | 87.5MHz-108MHz |
| Tecnología de conectividad | Bluetooth, USB |
| Peso del artículo | 5.3 onzas |
8. Garantía y soporte
Para obtener información sobre la garantía y atención al cliente, consulte la documentación proporcionada al momento de la compra o póngase en contacto con su vendedor. Conserve el recibo de compra como comprobante.