1. Introducción
This manual provides detailed instructions for the safe and effective operation of your Andoer 4K 48MP 60FPS WiFi Camcorder. Please read this manual thoroughly before using the device and retain it for future reference. This camcorder is designed for high-quality video recording and photography, featuring 4K Ultra HD resolution, 48-megapixel photos, a 3-inch IPS touchscreen, and infrared night vision capabilities. It is equipped with WiFi connectivity for easy file transfer and remote control, and comes with essential accessories such as an external microphone and a wide-angle macro lens.

Image 1.1: Andoer 4K Camcorder with included accessories.
2. Contenido del paquete
Verifique que todos los artículos enumerados a continuación estén incluidos en su paquete. Si falta algún artículo o está dañado, comuníquese con su vendedor.

Imagen 2.1: Todos los componentes incluidos en el paquete.
- Videocámara
- Micrófono
- Parabrisas para micrófono
- Cable de audio TRS a TRS de 3.5 mm
- Cable USB
- Empuñadura
- Camera Lens (Wide-angle macro lens)
- Anillo adaptador de lente
- 2 x Lithium-polymer Batteries (2000mAh)
- Mando a distancia
- Camcorder Storage Bag
- Bolsa de almacenamiento de lentes
- Camcorder User Manual
- Manual de usuario del micrófono
3. Producto terminadoview
Familiarize yourself with the various parts and controls of your camcorder.
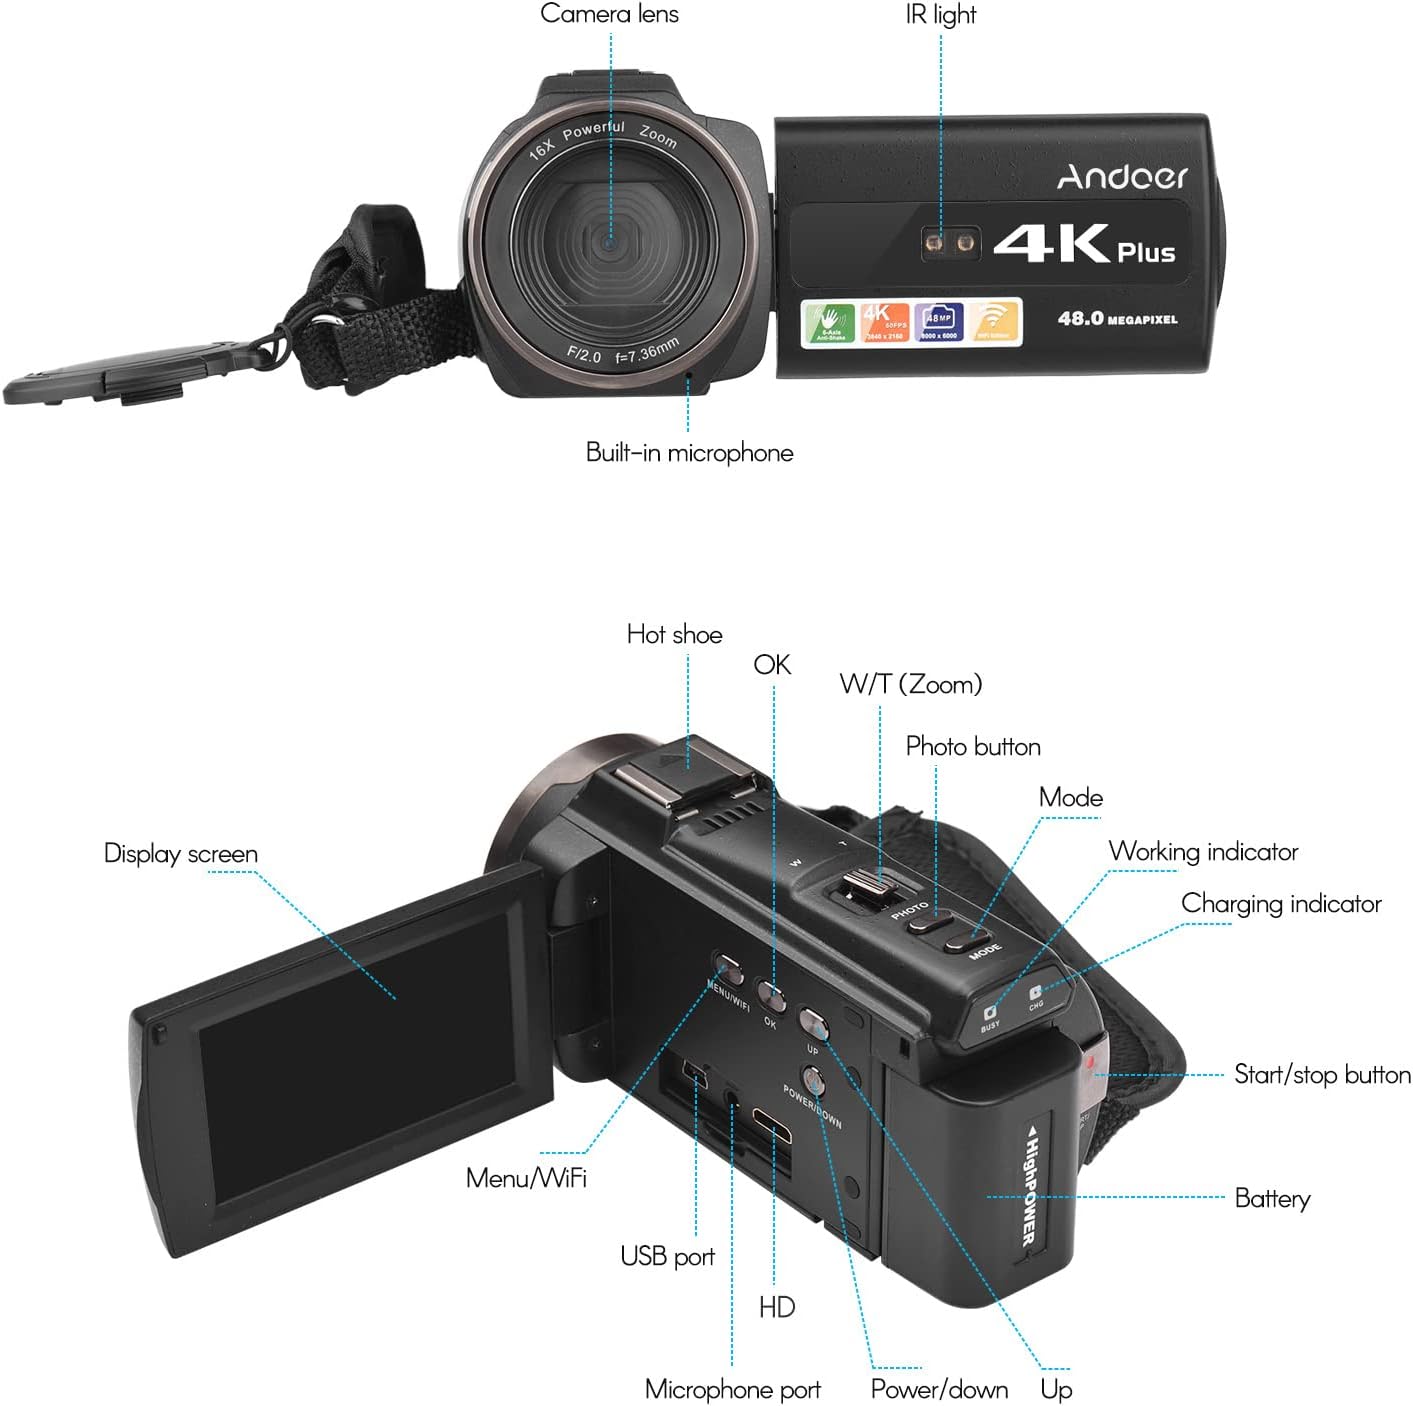
Imagen 3.1: Parte delantera y trasera View of the Camcorder with labeled components.
Componentes clave:
- Lente de la cámara: Componente óptico principal para capturar imágenes y vídeos.
- La luz IR: Emits infrared light for night vision recording.
- Micrófono incorporado: Captures audio. An external microphone can be connected for enhanced sound quality.
- Zapata caliente: Mount for external accessories like the included microphone or an LED video light.
- Display Screen (3" IPS Touch Screen): Para viewing vivir footage, playback, and navigating menus.
- Botones de control: Including Power, Mode, Photo, Zoom (W/T), OK, Menu/WiFi, Up/Down.
- Puertos: USB, HD (HDMI), Microphone port.
- Compartimento de la batería: Alberga la batería recargable.
4. Configuración
4.1 Carga de la batería
Before first use, fully charge the included lithium-polymer batteries. Insert one battery into the camcorder's battery compartment. Connect the camcorder to a power source using the provided USB cable. The charging indicator will illuminate during charging and turn off when fully charged. A full charge typically takes several hours.

Image 4.1: Battery installation and charging indication.
4.2 Inserción de una tarjeta de memoria
The camcorder supports TF (MicroSD) cards up to 128GB. Ensure the card is formatted before first use in the camcorder's settings. Insert the memory card into the designated slot until it clicks into place.
- Use a Class 10 or higher speed rating for optimal performance, especially for 4K video recording.
- The camcorder supports V60 video speed class.
4.3 Attaching the External Microphone
For improved audio quality, attach the external stereo microphone to the hot shoe mount on top of the camcorder. Connect the microphone's 3.5mm audio cable to the microphone input port on the camcorder.
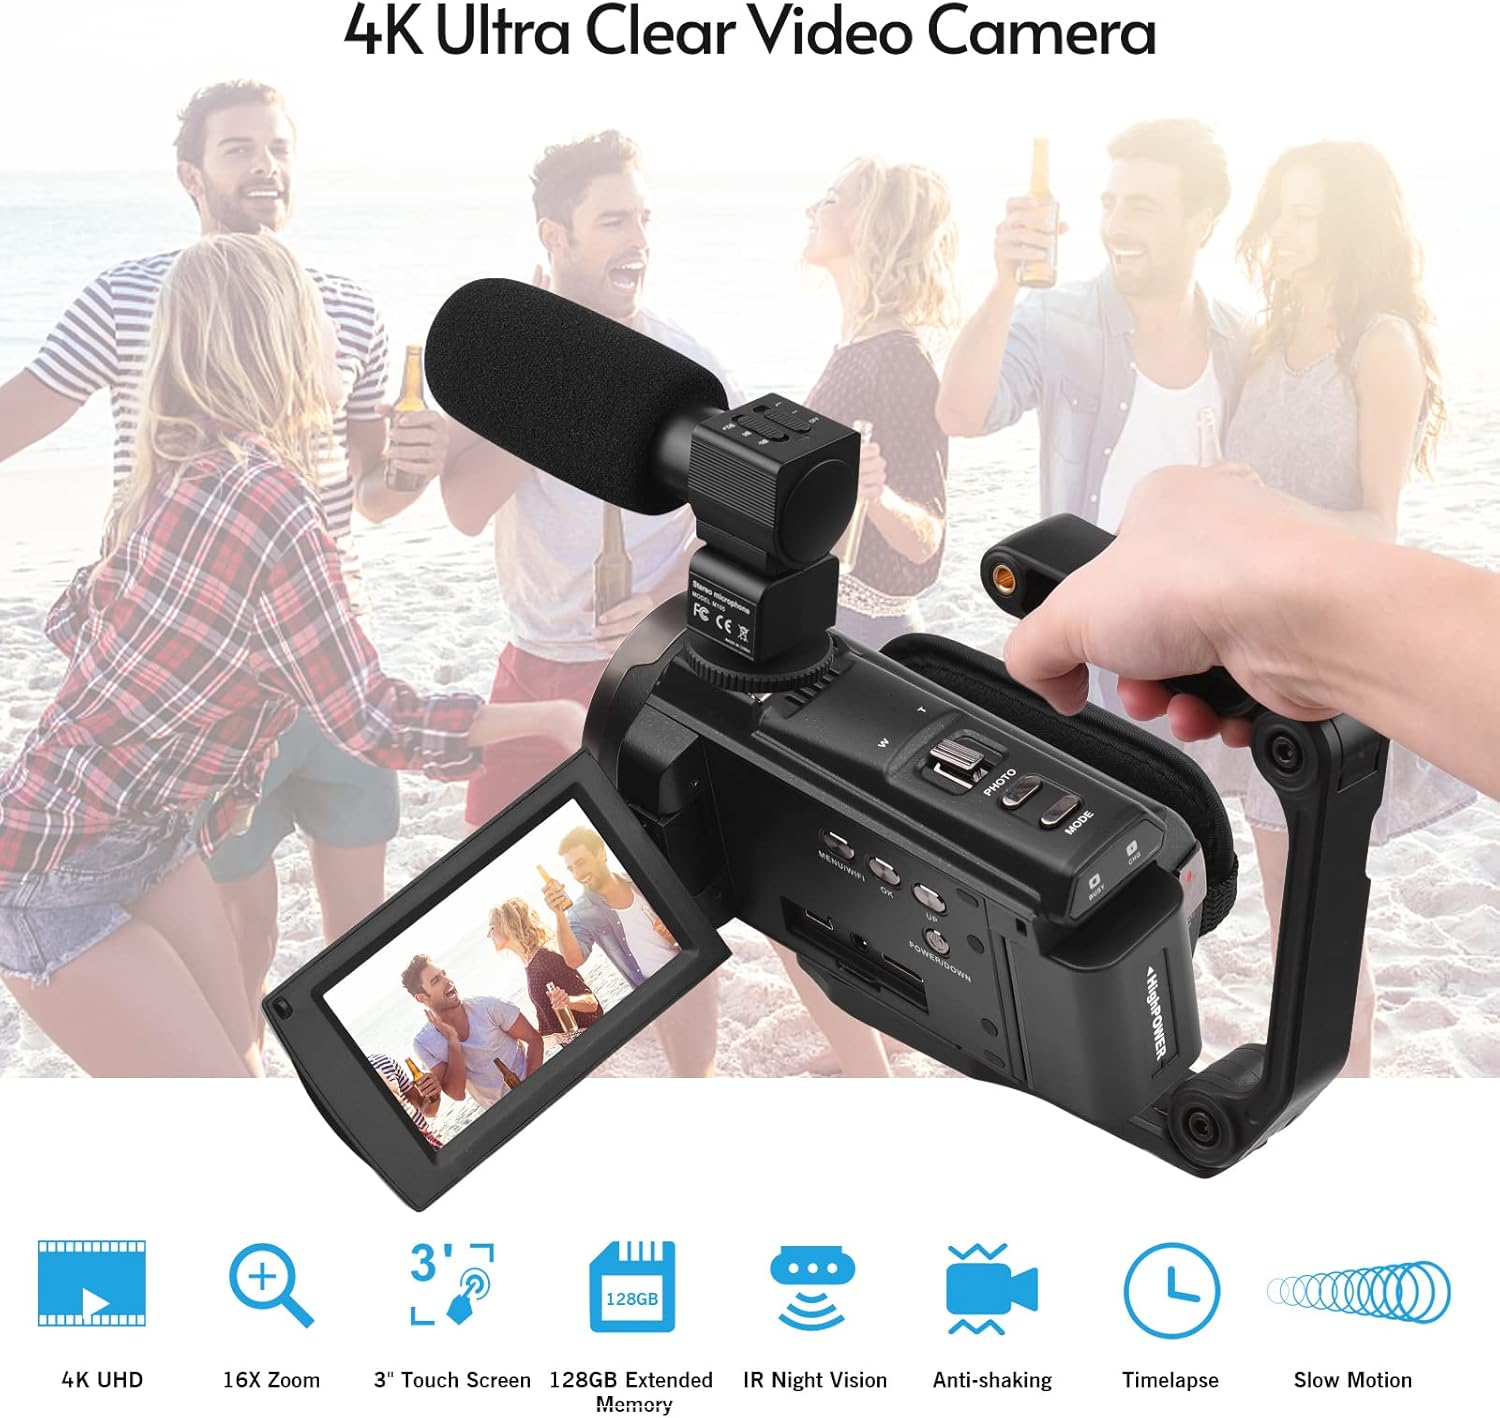
Image 4.2: External microphone attached to the camcorder.
4.4 Attaching the Wide-Angle Macro Lens
To use the wide-angle macro lens, first attach the lens adapter ring to the camcorder's main lens. Then, screw the wide-angle macro lens onto the adapter ring. This lens provides a broader perspective for your shots.

Image 4.3: Wide-angle macro lens for expanded field of view.
4.5 Attaching the Handgrip
The included handgrip can be attached to the bottom of the camcorder via the 1/4" screw hole for more stable handheld recording.
5. Instrucciones de funcionamiento
5.1 Encendido / Apagado
To power on the camcorder, open the display screen and press the Power button. To power off, press and hold the Power button, or close the display screen.
5.2 Grabación de vídeo
- Encienda la videocámara.
- Presione el Modo button to select video recording mode.
- Presione el Iniciar/Detener button to begin recording. The recording indicator will flash.
- Presione el Iniciar/Detener de nuevo para detener la grabación.
The camcorder supports 4K/60FPS video resolution for clear and smooth footage.
5.3 Toma de fotografías
- Encienda la videocámara.
- Presione el Modo button to select photo mode.
- Encuadre su toma utilizando la pantalla de visualización.
- Presione el Foto button to capture a 48-megapixel image.
5.4 Using the 3" IPS Touch Screen
The capacitive touchscreen allows for intuitive navigation of menus and settings. Tap to select options, swipe to scroll, and pinch to zoom (if supported in specific modes).
5.5 Función WiFi
The built-in WiFi allows for wireless transmission of files to a compatible smartphone or tablet via a dedicated app. It also enables remote control of the camcorder from your mobile device.
- Activate WiFi on the camcorder via the menu.
- Download and install the specified app on your mobile device.
- Conecte su dispositivo móvil a la red WiFi de la videocámara.
- Utilice la aplicación para controlar la grabación, view vivir footage, y transferencia files.
5.6 Visión nocturna por infrarrojos
For recording in low-light or dark conditions, activate the IR Night Vision feature. This utilizes infrared light to capture clear black and white footage.

Image 5.1: IR Night Vision in operation.
5.7 Zoom digital
Use the W/T (Wide/Telephoto) button to adjust the 16x digital zoom. Note that digital zoom can reduce image quality compared to optical zoom.
5.8 Estabilización de imagen
The camcorder features 6-axis image stabilization to reduce blur and shakiness in your recordings, especially during handheld use.
5.9 Funciones especiales
- Detección de movimiento: The camcorder can be set to automatically start recording when motion is detected.
- Detección/reconocimiento de rostros: Optimiza el enfoque y la exposición de los rostros en el marco.
- Mando a distancia: Use the included remote control to operate the camcorder from a distance, useful for self-recording or group shots.
- Temporizador automático: Set a delay before capturing a photo or starting a video recording.

Image 5.2: Tripod mounting for self-timer and stable shots.
5.10 Conexión a dispositivos externos
- USB: Conectarse a una computadora para file transferir.
- Alta definición (HDMI): Connect to a TV or monitor to view tus grabaciones en una pantalla más grande.
6. Mantenimiento
- Limpieza: Utilice un paño suave y seco para limpiar el cuerpo de la videocámara. Para la lente, utilice un paño y una solución especiales para limpiar lentes. Evite productos químicos agresivos.
- Almacenamiento: Guarde la videocámara en un lugar fresco y seco, alejada de la luz solar directa y de temperaturas extremas. Retire la batería si la va a guardar durante un período prolongado.
- Cuidado de la batería: Do not expose batteries to high temperatures. Recharge regularly even if not in use to maintain battery health.
- Actualizaciones de firmware: Verifique el fabricante webVisite el sitio periódicamente para ver si hay actualizaciones de firmware disponibles para garantizar un rendimiento óptimo y nuevas funciones.
7. Solución de problemas
| Problema | Posible causa | Solución |
|---|---|---|
| La videocámara no se enciende. | La batería está agotada o no está insertada correctamente. | Ensure battery is fully charged and correctly inserted. Try the second battery. |
| No se pueden grabar vídeos ni tomar fotografías. | La tarjeta de memoria está llena, no está insertada o está dañada. Se seleccionó el modo incorrecto. | Check memory card status, ensure it's inserted and has free space. Format if necessary (backup data first). Select the correct mode. |
| Mala calidad de imagen/video. | Lens is dirty. Low light conditions without IR. Digital zoom used excessively. | Clean the lens. Activate IR Night Vision in dark environments. Avoid excessive digital zoom. Ensure sufficient lighting. |
| Problemas de conexión WiFi. | Incorrect WiFi settings. App not installed or updated. | Ensure WiFi is enabled on camcorder and mobile device. Re-establish connection. Update or reinstall the mobile app. |
| El micrófono no graba audio. | El micrófono no está conectado correctamente o la configuración es incorrecta. | Check microphone cable connection. Verify audio input settings in the camcorder menu. |
8. Especificaciones
| Característica | Detalle |
|---|---|
| Número de modelo | ZOH0150584179474NZ |
| Resolución de vídeo | 4K (3840x2160) a 60 FPS |
| Resolución de la fotografía | 48 megapíxeles (8000x6000) |
| Estabilización de imagen | 6 ejes |
| Pantalla de visualización | Pantalla táctil capacitiva IPS de 3 pulgadas |
| Zoom digital | 16x |
| Conectividad | USB, Wi-Fi, HDMI |
| Soporte para tarjetas de memoria | TF (MicroSD) up to 128GB (Class 10, V60 recommended) |
| Características especiales | IR Night Vision, Motion Detection, Face Detection, Remote Control |
| Batería | 2 x 2000mAh Lithium-polymer |
| Apertura de la lente | f/2.0 |
| Distancia focal mínima | 39 mm |
| Dispositivos compatibles | Tripod, Microphone, TV, Computer, Smartphone |
| Compatibilidad del sistema operativo | Ventanas |
| Dimensiones (paquete) | 18 x 15 x 11 cm |
| Peso (Paquete) | 1.01 kilogramos |
9. Garantía y soporte
Andoer products are designed for reliability and performance. For any technical assistance, troubleshooting beyond this manual, or warranty inquiries, please contact Andoer customer support through their official websitio o su distribuidor.
Conserve su comprobante de compra para reclamos de garantía.