Introducción
This manual provides detailed instructions for the installation, operation, and maintenance of your Gravity 2X 10-Inch 2000 Watt Car Audio Subwoofer. Please read this manual thoroughly before installation and use to ensure optimal performance and longevity of your product.

Imagen: Múltiple views of the Gravity 10-inch car audio subwoofer, highlighting its design and components.
Características del producto
- Gravity Warzone Dual Voice Coil Subwoofer Configuration
- Great Low End Frequency Response / Hard Hitting Bass
- Engineered for incredibly deep, dynamic, and powerful bass
- Competition Grade Pressed Paper Cone / High Roll Foam Surround
- Powerful High Flux motor performance with advanced air Flow Cooling Design

Imagen: Primer plano view of the subwoofer's high roll foam surround, showcasing the durable construction and distinctive green stitching.
Contenido del paquete
Su paquete debe contener los siguientes artículos:
- 2 x Gravity 10-Inch Car Audio Subwoofers
Presupuesto
| Marca | Gravedad |
| Número de modelo | Nuevo Modelo 1 |
| Tipo de altavoz | Altavoz de subgraves |
| Diámetro del subwoofer | 10 pulgadas |
| Configuración de la bobina móvil | Dual Voice Coil (DVC) 4 Ohm |
| Potencia máxima de salida del altavoz | 2000 vatios (par) |
| Material | Pressed Paper Cone / High Roll Foam Surround |
| Color | Negro |
| Tipo de montaje | Soporte para coche |
| Tecnología de conectividad | Cableado |
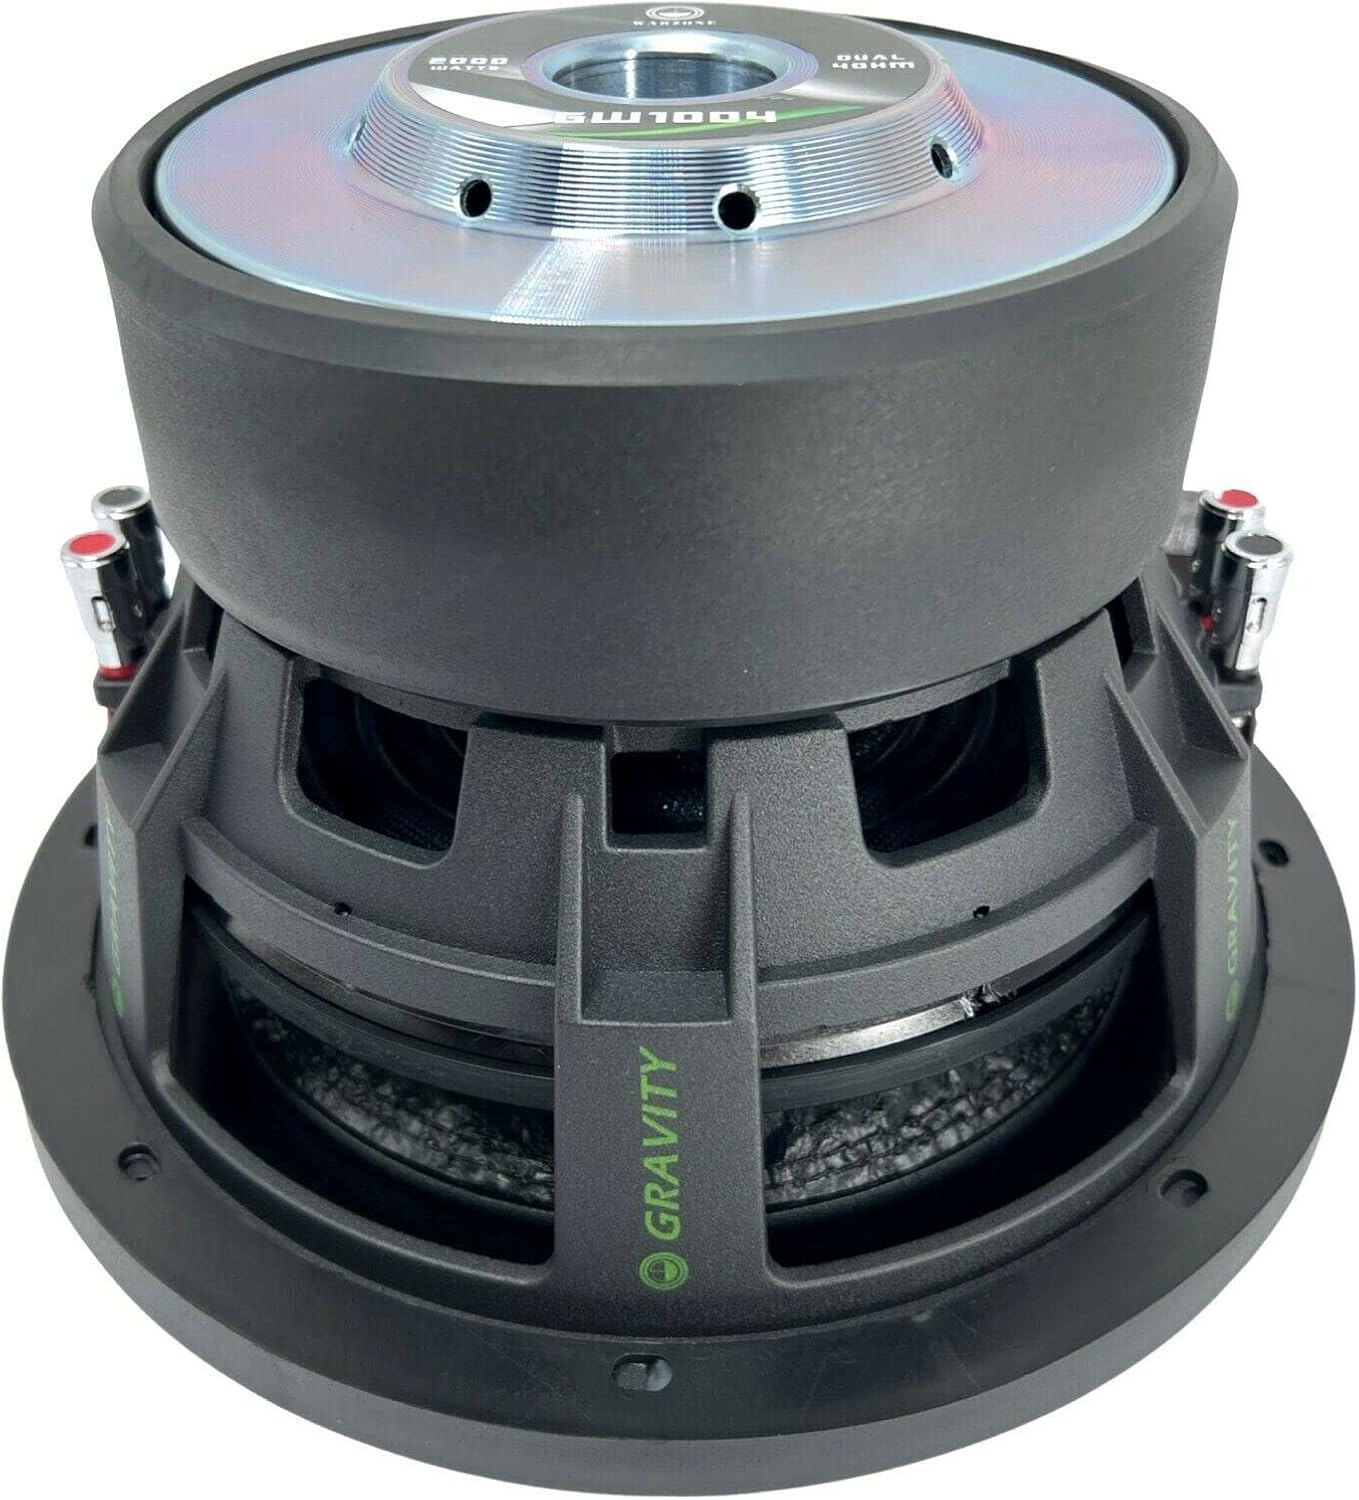
Imagen: Abajo view of the Gravity 10-inch subwoofer, revealing the robust magnet structure and speaker terminals.
Configuración e instalación
Proper installation is crucial for the performance and safety of your subwoofers. It is recommended to have a professional install your car audio system if you are unfamiliar with the process.
Wiring Configurations for Two 4 Ohm DVC Subwoofers
Your Gravity subwoofers feature Dual Voice Coils (DVC) with a 4 Ohm impedance per coil. When wiring two of these subwoofers, several configurations are possible to achieve different final impedances. Always ensure your amplifier is stable at the final impedance load.
1. Series Wiring (8 Ohm Final Impedance per Subwoofer)
For each individual subwoofer, connect the positive terminal of one voice coil to the negative terminal of the other voice coil. This will result in an 8 Ohm impedance for each subwoofer. This configuration is generally safer for amplifiers but delivers less power.
To achieve a final 4 Ohm load for the pair (if wiring the two 8 Ohm subs in parallel):
- For each subwoofer: Connect the positive terminal of Voice Coil 1 to the negative terminal of Voice Coil 2.
- Connect the remaining positive terminal of Subwoofer 1 to the positive terminal of Subwoofer 2.
- Connect the remaining negative terminal of Subwoofer 1 to the negative terminal of Subwoofer 2.
- Conectar el ampla salida positiva del energizador a los terminales positivos combinados y el ampsalida negativa del electrificador a los terminales negativos combinados.
This results in a final impedance of 4 Ohms for the pair.
2. Parallel Wiring (2 Ohm Final Impedance per Subwoofer)
For each individual subwoofer, connect the positive terminals of both voice coils together, and connect the negative terminals of both voice coils together. This will result in a 2 Ohm impedance for each subwoofer. This configuration draws more power from the ampmás duradero.
To achieve a final 1 Ohm load for the pair (if wiring the two 2 Ohm subs in parallel):
- For each subwoofer: Connect the positive terminal of Voice Coil 1 to the positive terminal of Voice Coil 2.
- For each subwoofer: Connect the negative terminal of Voice Coil 1 to the negative terminal of Voice Coil 2.
- Conectar el amplifier's positive output to the combined positive terminals of Subwoofer 1 and Subwoofer 2.
- Conectar el amplifier's negative output to the combined negative terminals of Subwoofer 1 and Subwoofer 2.
This results in a final impedance of 1 Ohm for the pair. Ensure your ampEl amplificador es estable a 1 ohmio.
Visual Aids for Wiring
The following videos provide visual guidance on subwoofer wiring techniques. While the specific impedance or number of subwoofers in the videos may vary, the fundamental principles of connecting voice coils and subwoofers remain applicable.
Wiring Configuration for 1 DVC 4 Ohm Subwoofer
Video: Demonstrates wiring configurations for a single Dual Voice Coil (DVC) 4 Ohm subwoofer. This is directly applicable to wiring one of your Gravity subwoofers.
Wiring Configuration for 2 DVC 1 Ohm Subwoofers
Video: Illustrates wiring configurations for two Dual Voice Coil (DVC) 1 Ohm subwoofers. While the impedance differs from your product, the techniques for connecting multiple DVC subwoofers can be adapted.
Caja y montaje
Ensure your subwoofer is mounted securely in an appropriate enclosure. The enclosure should be designed to match the subwoofer's specifications for optimal sound quality and to prevent damage. Refer to the subwoofer's technical specifications for recommended enclosure volumes and port tuning frequencies.
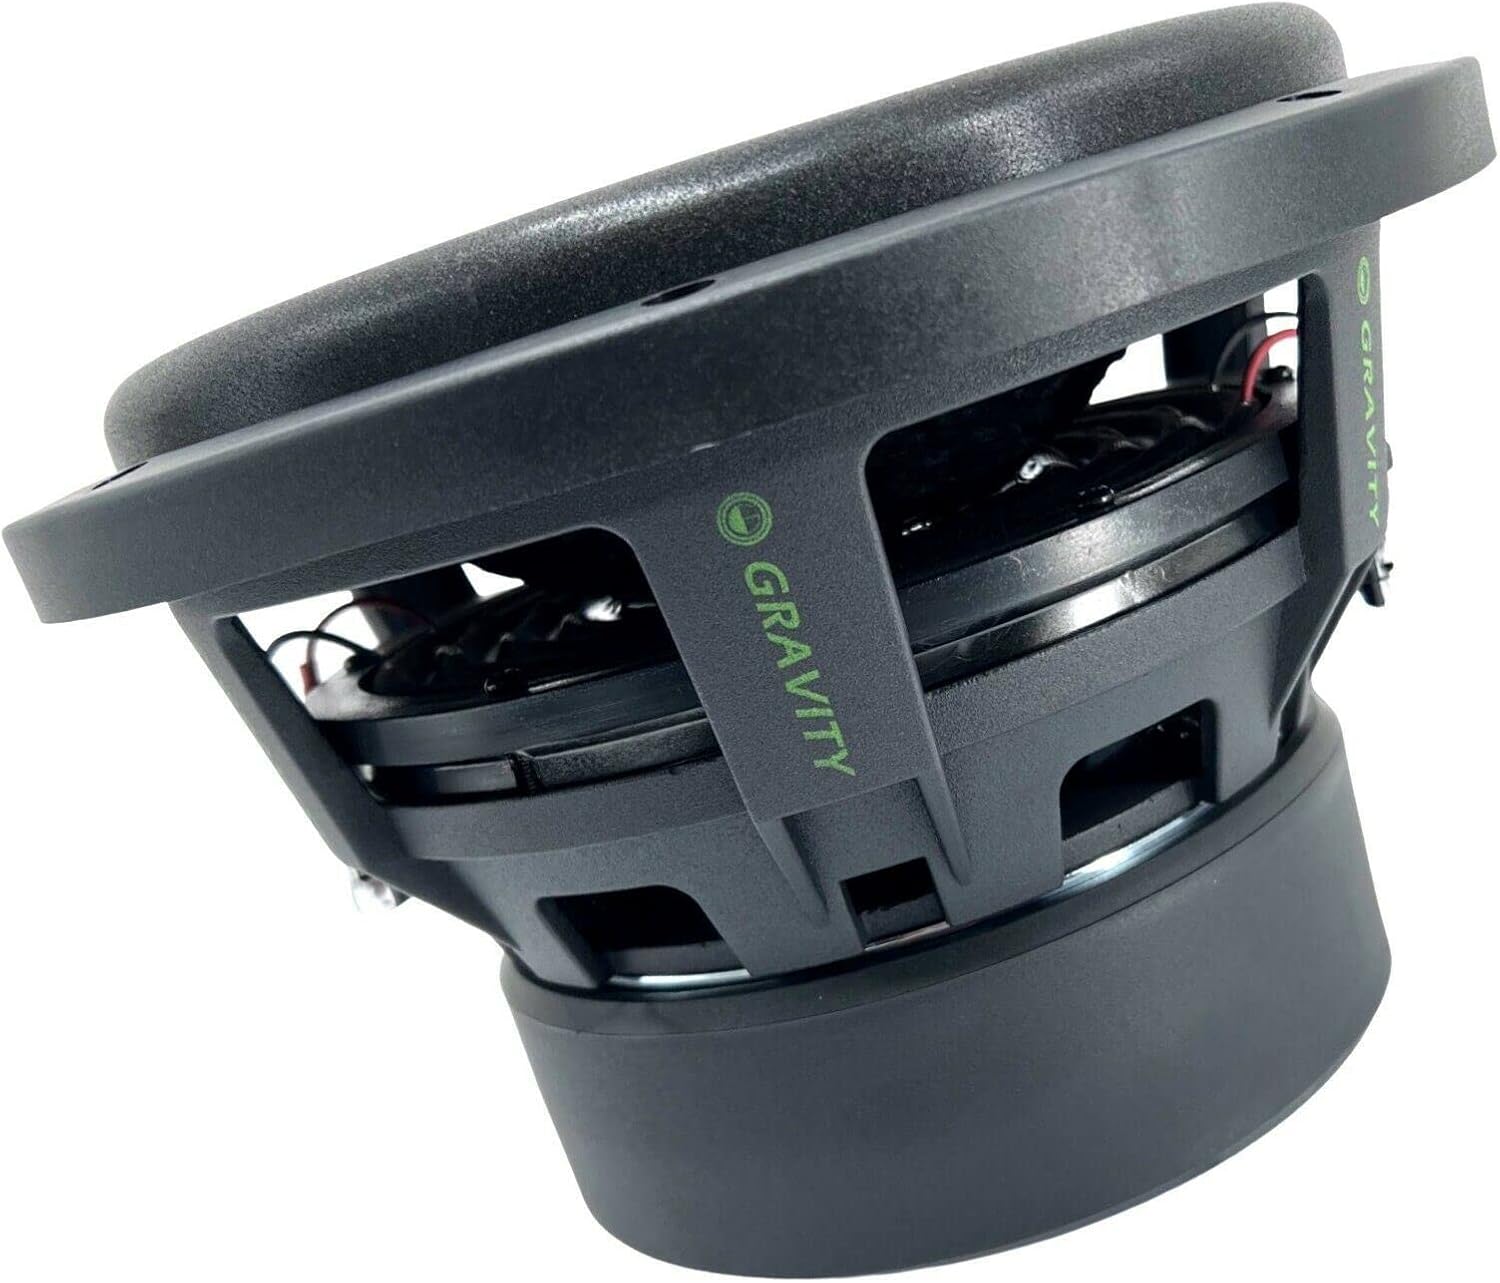
Imagen: Side profile of the Gravity 10-inch subwoofer, illustrating its compact design suitable for various car audio installations.
Instrucciones de funcionamiento
Una vez instalado, asegúrese de que su amplifier settings (gain, crossover, bass boost) are properly adjusted to prevent damage to the subwoofers and achieve desired sound quality. Start with low gain settings and gradually increase them while listening for distortion.
- Período de rodaje: Allow a break-in period of approximately 10-20 hours of moderate listening before operating the subwoofers at high volumes. This allows the suspension components to loosen up and perform optimally.
- Configuración de cruce: Set your low-pass filter (LPF) on your amplifier or head unit to prevent high frequencies from reaching the subwoofer, typically between 80Hz and 120Hz.
- Ajuste de ganancia: Ajustar el ampGanancia del amplificador para que coincida con el volumen de salidatagde su unidad principal. Evite ajustar la ganancia demasiado alta, ya que esto puede provocar cortes y daños.
- Refuerzo de graves: Use el refuerzo de graves con moderación, si es que lo usa. Un refuerzo de graves excesivo puede causar distorsión y daños.
Mantenimiento
Regular maintenance ensures the longevity and performance of your subwoofers.
- Limpieza: Keep the subwoofer cones and surrounds free from dust and debris. Use a soft, dry cloth for cleaning. Avoid using harsh chemicals.
- Inspección: Periodically inspect the wiring connections for any signs of corrosion or looseness. Ensure all mounting screws are tight.
- Evite abrumar: Do not continuously operate the subwoofers at levels that cause audible distortion. This can lead to voice coil overheating and failure.
Solución de problemas
| Problema | Posible causa | Solución |
|---|---|---|
| No hay sonido del subwoofer | Sin poder para amplificador, cableado suelto, amplifier in protect mode, incorrect head unit settings. | Check power and ground connections to amplificador. Verifique que todos los cables de los altavoces estén bien conectados. amplifier fuses. Ensure head unit is sending signal. |
| Sonido distorsionado | AmpGanancia del amplificador demasiado alta, configuración de crossover incorrecta, subwoofer dañado. | Reducir amplifier gain. Adjust LPF settings. Inspect subwoofer for physical damage. |
| Sobrecalentamiento del subwoofer | Impedance mismatch, overpowering, insufficient ventilation. | Verify correct wiring impedance for your amplifier. Reduce volume/gain. Ensure ampEl ventilador tiene un flujo de aire adecuado. |
Demostraciones de productos
Watch these videos to see subwoofers in action and understand their capabilities. Note that these videos may feature different models or configurations, but they illustrate general performance and installation concepts.
10 inch Car Audio Dual 4 Ohm Shallow Mount Car Subwoofer Overview
Vídeo: Un breve resumenview of a 10-inch Dual 4 Ohm Shallow Mount Car Subwoofer, showcasing its design and features. This video is a preview and provides a quick look at a similar product.
Ultimate Power: XTR10SWD2 Subwoofer Demo | Feel the Power!
Video: Demonstrates the powerful bass output of a 10-inch subwoofer. This video highlights the impact and performance you can expect from a quality car audio subwoofer.
Video of DESTROYER SUBS
Video: Shows various subwoofers in action, demonstrating their bass capabilities and excursion. Provides a general idea of subwoofer performance in a car audio setup.
Garantía y soporte
Your Gravity 2X 10-Inch Car Audio Subwoofer comes with a limited warranty. Please refer to the warranty card included in your package or visit the official Gravity website for detailed terms and conditions. For technical support or service inquiries, please contact Gravity customer service.
Tipo de garantía: Limitado