
DOOMAY 5293UK
Manual de usuario del reloj despertador digital DOOMAY
Modelo: 5293UK
Marca: DOOMAY
1. Introducción
Gracias por la compraasing the DOOMAY Digital Alarm Clock. This compact and versatile alarm clock is designed for convenience and readability, featuring an adjustable LCD display, snooze function, weekend mode, and temperature display. This manual will guide you through the setup, operation, and maintenance of your new alarm clock to ensure optimal performance.
2. Información de seguridad
- Mantenga el dispositivo alejado del agua y de entornos con alta humedad.
- Evite exponer el reloj a la luz solar directa o a temperaturas extremas.
- No intente desmontar ni reparar el dispositivo usted mismo. Para obtener servicio técnico, contacte con personal cualificado.
- Utilice únicamente el tipo de batería especificado (2 baterías AAA).
- Retire las baterías si el dispositivo no se utilizará durante un período prolongado para evitar fugas.
- Mantenga las pilas fuera del alcance de los niños.
3. Contenido del paquete
- DOOMAY Digital Alarm Clock (1 unit)
- Pilas AAA (2 unidades)
- Manual de usuario (este documento)
4. Producto terminadoview
Familiarize yourself with the components and controls of your DOOMAY Digital Alarm Clock.
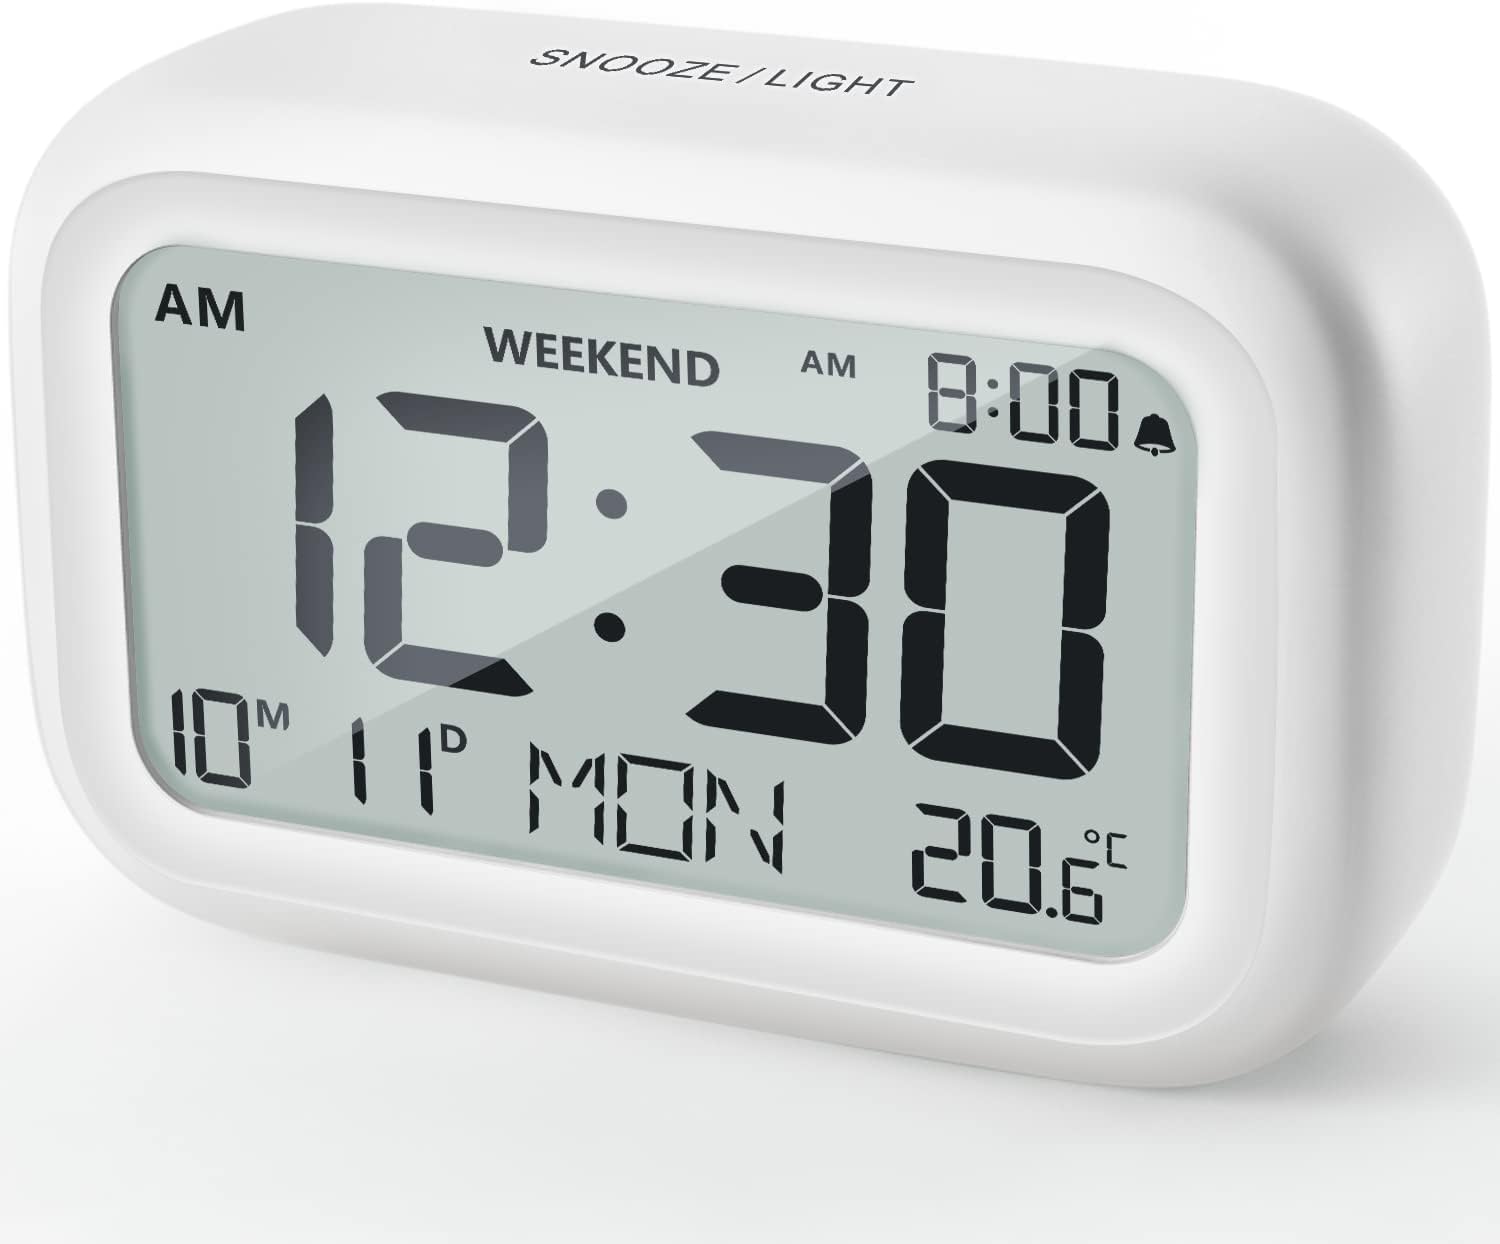
Figura 4.1: Frente View del despertador
This image displays the front of the DOOMAY Digital Alarm Clock, highlighting its large, clear LCD screen. The screen shows the current time (12:30), AM indicator, day of the week (MON), date (10th month, 11th day), and indoor temperature (20.6°C). The top of the clock has a "SNOOZE/LIGHT" button.

Figura 4.2: Características claveview
This diagram illustrates the main functionalities of the alarm clock: 12/24H time display, calendar, alarm setting, adjustable volume, snooze function, backlight, weekend mode, and temperature display. The clock itself is shown on a wooden table, displaying 7:00 AM, Friday, and 28.8 degrees.

Figure 4.3: Back Panel Controls
This image shows the rear of the alarm clock, detailing the various control buttons and the battery compartment. Buttons are clearly labeled for: 12/24H time format, Alarm setting, Weekend mode, Date setting, Minus (-) for decreasing values, Plus (+) for increasing values, and °C/°F for temperature unit selection. The battery compartment is visible, designed for two AAA batteries.
Controles y pantalla:
- Pantalla LCD: Shows time, date, day of week, AM/PM indicator, alarm status, and temperature.
- Botón SNOOZE/LIGHT (arriba): Activates snooze function during alarm; illuminates backlight for 5 seconds.
- 12/24H Button (Back): Alterna entre formatos de hora de 12 y 24 horas.
- ALARM Button (Back): Ingresa al modo de configuración de alarma.
- WEEKEND Button (Back): Activates/deactivates weekend mode.
- DATE Button (Back): Ingresa al modo de configuración de fecha.
- MINUS (-) Button (Back): Decreases values during setting; adjusts alarm volume.
- PLUS (+) Button (Back): Increases values during setting; adjusts alarm volume.
- °C/°F Button (Back): Alterna entre unidades de temperatura Celsius y Fahrenheit.
5. Configuración
5.1 Instalación de la batería
- Abra la tapa del compartimiento de la batería ubicada en la parte posterior del reloj.
- Inserte dos (2) pilas AAA, asegurándose de la polaridad correcta (+ y -).
- Cierre bien la tapa del compartimento de la batería.
- The display will light up, and the clock will be ready for initial setup. A low battery symbol will appear when batteries need replacement. If the display shows "8888" flashing, it's also an indication to change batteries.
5.2 Configuración inicial de hora y fecha
- Establecer hora:
- Presione el 12/24 horas button to switch between 12-hour (with AM/PM) and 24-hour formats.
- Mantenga pulsado el 12/24 horas Mantenga pulsado el botón durante 3 segundos para acceder al modo de ajuste de la hora. Los dígitos de la hora parpadearán.
- Utilice el + or - Botones para ajustar la hora.
- Presione el 12/24 horas Presione el botón nuevamente para confirmar la hora y pasar al ajuste de minutos. Los dígitos de los minutos parpadearán.
- Utilice el + or - Botones para ajustar los minutos.
- Presione el 12/24 horas button one more time to exit time setting.
- Define la fecha:
- Mantenga pulsado el FECHA button for 3 seconds to enter date setting mode. The year digits will flash.
- Utilice el + or - Botones para ajustar el año.
- Presione el FECHA button again to confirm the year and move to month setting.
- Adjust the month using + or -.
- Prensa FECHA again to move to day setting.
- Ajuste el día usando + or -.
- Prensa FECHA one more time to exit date setting. The day of the week will automatically adjust.
6. Instrucciones de funcionamiento
6.1 Configuración de la alarma
- Mantenga pulsado el ALARMA button for 3 seconds. The alarm hour digits will flash.
- Utilice el + or - Botones para configurar la hora de alarma deseada.
- Presione el ALARMA Presione el botón nuevamente para confirmar la hora y pasar al ajuste de minutos. Los dígitos de los minutos de la alarma parpadearán.
- Utilice el + or - Botones para configurar el minuto de alarma deseado.
- Presione el ALARMA button one more time to exit alarm setting. The alarm icon (bell symbol) will appear on the display, indicating the alarm is active.
- To turn the alarm ON/OFF, simply press the ALARMA button once. The bell icon will appear/disappear.
6.2 Función de repetición
When the alarm sounds, gently tap the large DORMITOR / LUZ button on the top of the clock. The alarm will pause for 9 minutes and then sound again. This can be repeated multiple times.

Figure 6.1: Activating Snooze
This image demonstrates how to activate the snooze function by touching the top of the alarm clock. The text highlights that this action provides an additional 9 minutes of sleep after the alarm sounds.
To completely turn off the alarm after it sounds (without snoozing), press any button on the back of the clock.
6.3 Modo fin de semana
The weekend mode allows the alarm to sound only from Monday to Friday, preventing it from ringing on Saturday and Sunday.

Figure 6.2: Weekend Mode Activated
This image shows the alarm clock display with the "WEEKEND" indicator prominently displayed, signifying that the weekend mode is active. The accompanying text clarifies that in this mode, the alarm will only sound from Monday to Friday, ensuring undisturbed weekends.
- Para activar el modo Fin de semana, presione el botón FIN DE SEMANA button once. The "WEEKEND" indicator will appear on the display.
- To deactivate Weekend Mode, press the FIN DE SEMANA button again. The "WEEKEND" indicator will disappear.
6.4 Volumen de alarma ajustable
The alarm clock offers two volume levels: Low (70 dB) and High (85 dB).

Figure 6.3: Alarm Volume Levels
This image visually represents the two available alarm volume settings: L01 (85 dB) for a louder alarm and L02 (70 dB) for a softer alarm. The alarm clock is shown in a bedroom setting, emphasizing its use as a bedside device.
- Mientras esté en el modo de visualización de hora normal, presione el botón + or - buttons to cycle between the two alarm volume levels. The current volume level will be briefly displayed.
6.5 Función de luz de fondo
To illuminate the display in low light conditions, simply tap the DORMITOR / LUZ button on the top of the clock. The backlight will activate for approximately 5 seconds, providing clear visibility of the time and other information.
Figure 6.4: Backlight in Action
This image provides a side-by-side comparison of the alarm clock's display. On the left, the clock is shown in a well-lit environment. On the right, the same clock is shown in a dark setting with its 5-second backlight activated, demonstrating how the display becomes clearly visible at night.
6.6 Visualización de temperatura
The clock displays the indoor temperature. You can switch between Celsius (°C) and Fahrenheit (°F) units.
- To change the temperature unit, press the ° C / ° F botón en la parte posterior del reloj.
7. Mantenimiento
7.1 Limpieza
Limpie el reloj con un paño suave y seco. No utilice limpiadores abrasivos ni disolventes, ya que pueden dañar la superficie.
7.2 Reemplazo de batería
When the low battery indicator appears on the display, or if the display shows "8888" flashing, it is time to replace the batteries. Follow the steps in Section 5.1 Battery Installation to replace the two AAA batteries.
8. Solución de problemas
| Problema | Posible causa | Solución |
|---|---|---|
| La pantalla está en blanco o tenue. | Las baterías están agotadas o instaladas incorrectamente. | Reemplace las baterías con baterías AAA nuevas, asegurándose de la polaridad correcta. |
| La alarma no suena. | Alarm is not activated, or Weekend Mode is ON. | Ensure the alarm icon is displayed. Check if Weekend Mode is active and deactivate if necessary. |
| La función de repetición no funciona. | Not tapping the SNOOZE/LIGHT button correctly. | Ensure a firm, brief tap on the top SNOOZE/LIGHT button when the alarm is sounding. |
| La hora/fecha es incorrecta. | No está configurado correctamente o se quitaron las pilas. | Refer to Section 5.2 Initial Time and Date Setting to re-set. |
9. Especificaciones
| Característica | Detalle |
|---|---|
| Número de modelo | 5293Reino Unido |
| Marca | DOOMAY |
| Dimensiones (L x An x Al) | 10.9 x 3.81 x 6.9 cm (4.29 x 1.5 x 2.72 pulgadas) |
| Peso | 127.01 gramos (0.28 lbs) |
| Material | Acrilonitrilo butadieno estireno (ABS) |
| Fuente de poder | 2 pilas AAA (incluidas) |
| Tipo de pantalla | LCD digital |
| Niveles de volumen de alarma | Low (70 dB), High (85 dB) |
| Duración de la pausa | 9 minutos |
| Duración de la retroiluminación | 5 segundos |
| Unidades de temperatura | Celsius (°C) / Fahrenheit (°F) |
10. Garantía y soporte
DOOMAY products are designed for reliability and performance. For any questions, technical support, or warranty claims, please contact your retailer or visit the official DOOMAY webSitio para obtener ayuda. Conserve su comprobante de compra para fines de garantía.
For further information, you may visit the brand's Amazon store page: DOOMAY Store on Amazon
Ask a question about this manual
Ask about setup, troubleshooting, compatibility, parts, safety, or missing instructions. Manuals+ will review the question and use this page’s manual context to help answer it.