
1. Introducción
Thank you for choosing the USX MOUNT TV Wall Mount. This manual provides essential information for the safe and correct installation, operation, and maintenance of your new TV wall mount. Please read these instructions thoroughly before installation and retain them for future reference.
2. Información de seguridad
ADVERTENCIA: Failure to read and follow these instructions may result in serious personal injury, property damage, or voiding of your warranty. If you have any questions, please contact customer service.
- Asegúrese de que la superficie de montaje pueda soportar de forma segura el peso combinado del soporte y el televisor.
- No exceda la capacidad de carga máxima de 35 kg (77 lbs).
- This product is designed for installation on wood studs or solid concrete walls only. Do not install on drywall alone.
- Utilice siempre un detector de vigas para localizar con precisión las vigas de madera.
- Utilice equipo de seguridad adecuado durante la instalación, incluida protección para los ojos.
- Se recomienda que dos personas realicen la instalación para garantizar la seguridad.
3. Contenido del paquete
Verify that all components are present and undamaged before beginning installation. If any parts are missing or defective, contact customer service.
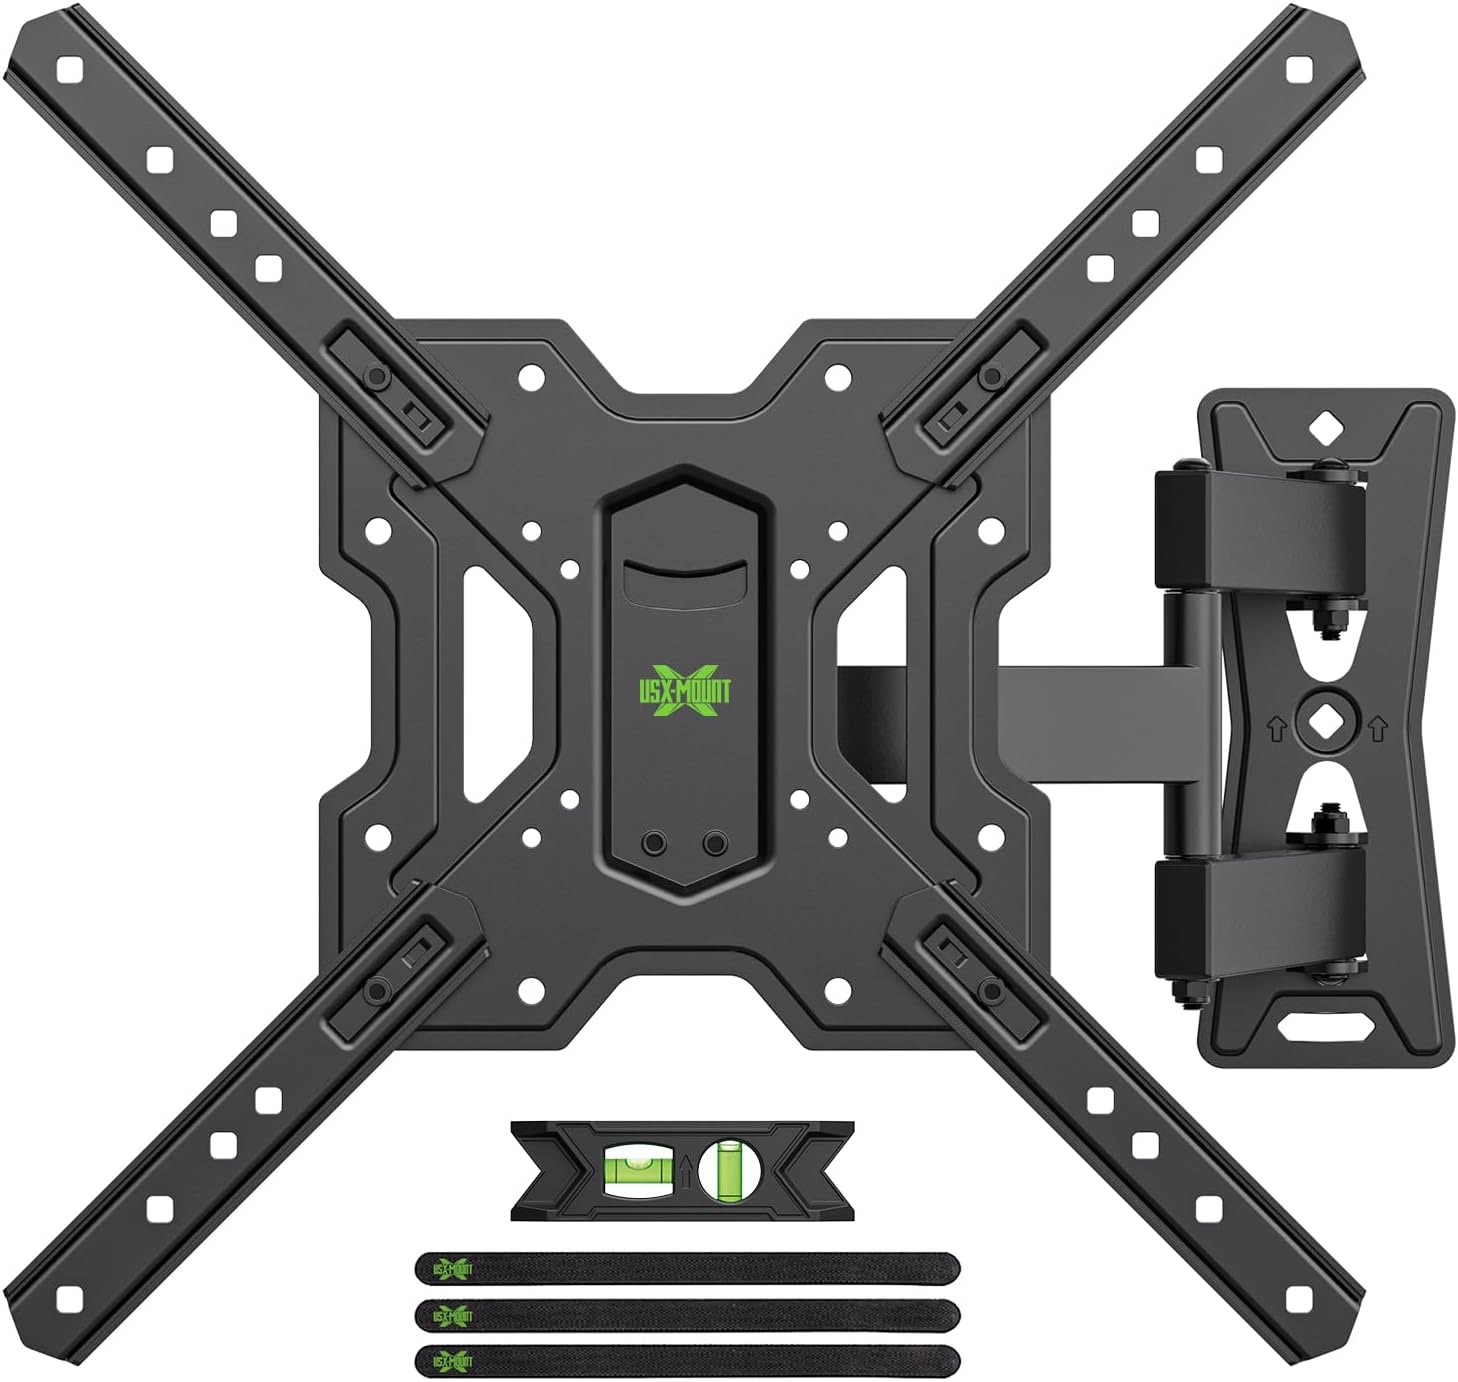
Figura 3.1: Encimaview of the USX MOUNT TV Wall Mount and all included accessories, such as the main mount assembly, VESA extension arms, bubble level, and cable ties.
Hardware incluido:
- Conjunto de placa de pared
- TV Plate (VESA Adapter)
- Varios tornillos, arandelas y espaciadores para la fijación del televisor.
- Lag bolts and concrete anchors for wall attachment
- Nivel de burbuja
- Bridas para cables
- Llave hexagonal
4. Especificaciones
| Característica | Especificación |
|---|---|
| Tamaños de televisores compatibles | 26-55 pulgadas |
| Capacidad de carga máxima | 35 kg (77 libras) |
| Compatibilidad VESA | 75x75mm, 100x100mm, 100x200mm, 200x100mm, 200x200mm, 150x150mm, 200x300mm, 200x400mm, 300x200mm, 300x300mm, 400x200mm, 400x300mm, 400x400mm |
| Ángulo de inclinación | De +5° a -15° |
| Ángulo de giro | ±90° (dependiendo del tamaño del televisor) |
| Ajuste de nivel | ±4° |
| Distancia a la pared | 70 mm (mín.) a 480 mm (máx.) |
| Material | Acero |
| Color | Negro |

Figura 4.1: VESA compatibility chart and maximum load capacity for the mount. Always check your TV's VESA pattern before installation.

Figura 4.2: Visual representation of various VESA mounting patterns supported by the mount, indicating horizontal and vertical screw hole distances.
5. Instrucciones de instalación
Paso 1: Fije la placa de TV al televisor
- Coloque con cuidado el televisor boca abajo sobre una superficie suave y limpia para evitar dañar la pantalla.
- Identifique los orificios de montaje VESA en la parte posterior de su televisor.
- Seleccione los tornillos, arandelas y espaciadores adecuados del kit de hardware provisto que se ajusten a los orificios de montaje de su televisor.
- Attach the TV plate (VESA adapter) to the back of your TV using the selected hardware. Ensure it is securely fastened but do not overtighten.
Paso 2: fije la placa de pared a la pared
IMPORTANTE: Determine your wall type before proceeding. This mount is suitable for wood stud walls and solid concrete walls.

Figura 5.1: Illustration of compatible wall types for installation: wood stud and solid concrete. Ensure your wall matches one of these types.
Para paredes con montantes de madera:
- Use a stud finder to locate the edges and center of the wood stud. Mark the center of the stud.
- Position the wall plate at your desired height and use the integrated bubble level to ensure it is perfectly horizontal. Mark the pilot hole locations.
- Drill pilot holes into the center of the stud at the marked locations. The drill bit size should be 5/32" (4 mm) and the depth approximately 2.36" (60 mm).
- Attach the wall plate to the wall using the provided lag bolts. Tighten securely with a wrench.
Para paredes de hormigón macizo:
- Position the wall plate at your desired height and use the integrated bubble level to ensure it is perfectly horizontal. Mark the pilot hole locations.
- Drill pilot holes into the concrete at the marked locations. The drill bit size should be 3/8" (10 mm) and the depth approximately 2.36" (60 mm).
- Inserte los anclajes de hormigón en los agujeros perforados. Golpéelos suavemente con un martillo hasta que queden al ras de la superficie de la pared.
- Attach the wall plate to the wall using the provided lag bolts. Tighten securely with a wrench.
Paso 3: Cuelgue y fije el televisor a la placa de pared
- With assistance, carefully lift the TV (with the TV plate attached) and hook it onto the wall plate.
- Ensure the TV is properly seated and centered on the wall plate.
- Fije el televisor a la placa de pared con los tornillos de seguridad o los mecanismos de bloqueo incluidos. Esto evita que se desprenda accidentalmente.
Vídeo 5.1: A short demonstration of the installation process, including attaching the TV plate, mounting the wall plate, and hanging the TV. This video also briefly shows the leveling and tilting adjustments.
6. Instrucciones de funcionamiento (Ajustes)
Your USX MOUNT TV Wall Mount offers various adjustments for optimal viewEn.
Ajuste de inclinación:
The mount allows for a tilt range of +5° to -15°. To adjust the tilt:
- Locate the tilt adjustment knobs on the TV plate.
- Loosen the knobs to allow the TV to tilt freely.
- Adjust the TV to your desired vertical angle.
- Tighten the knobs to secure the TV in place.
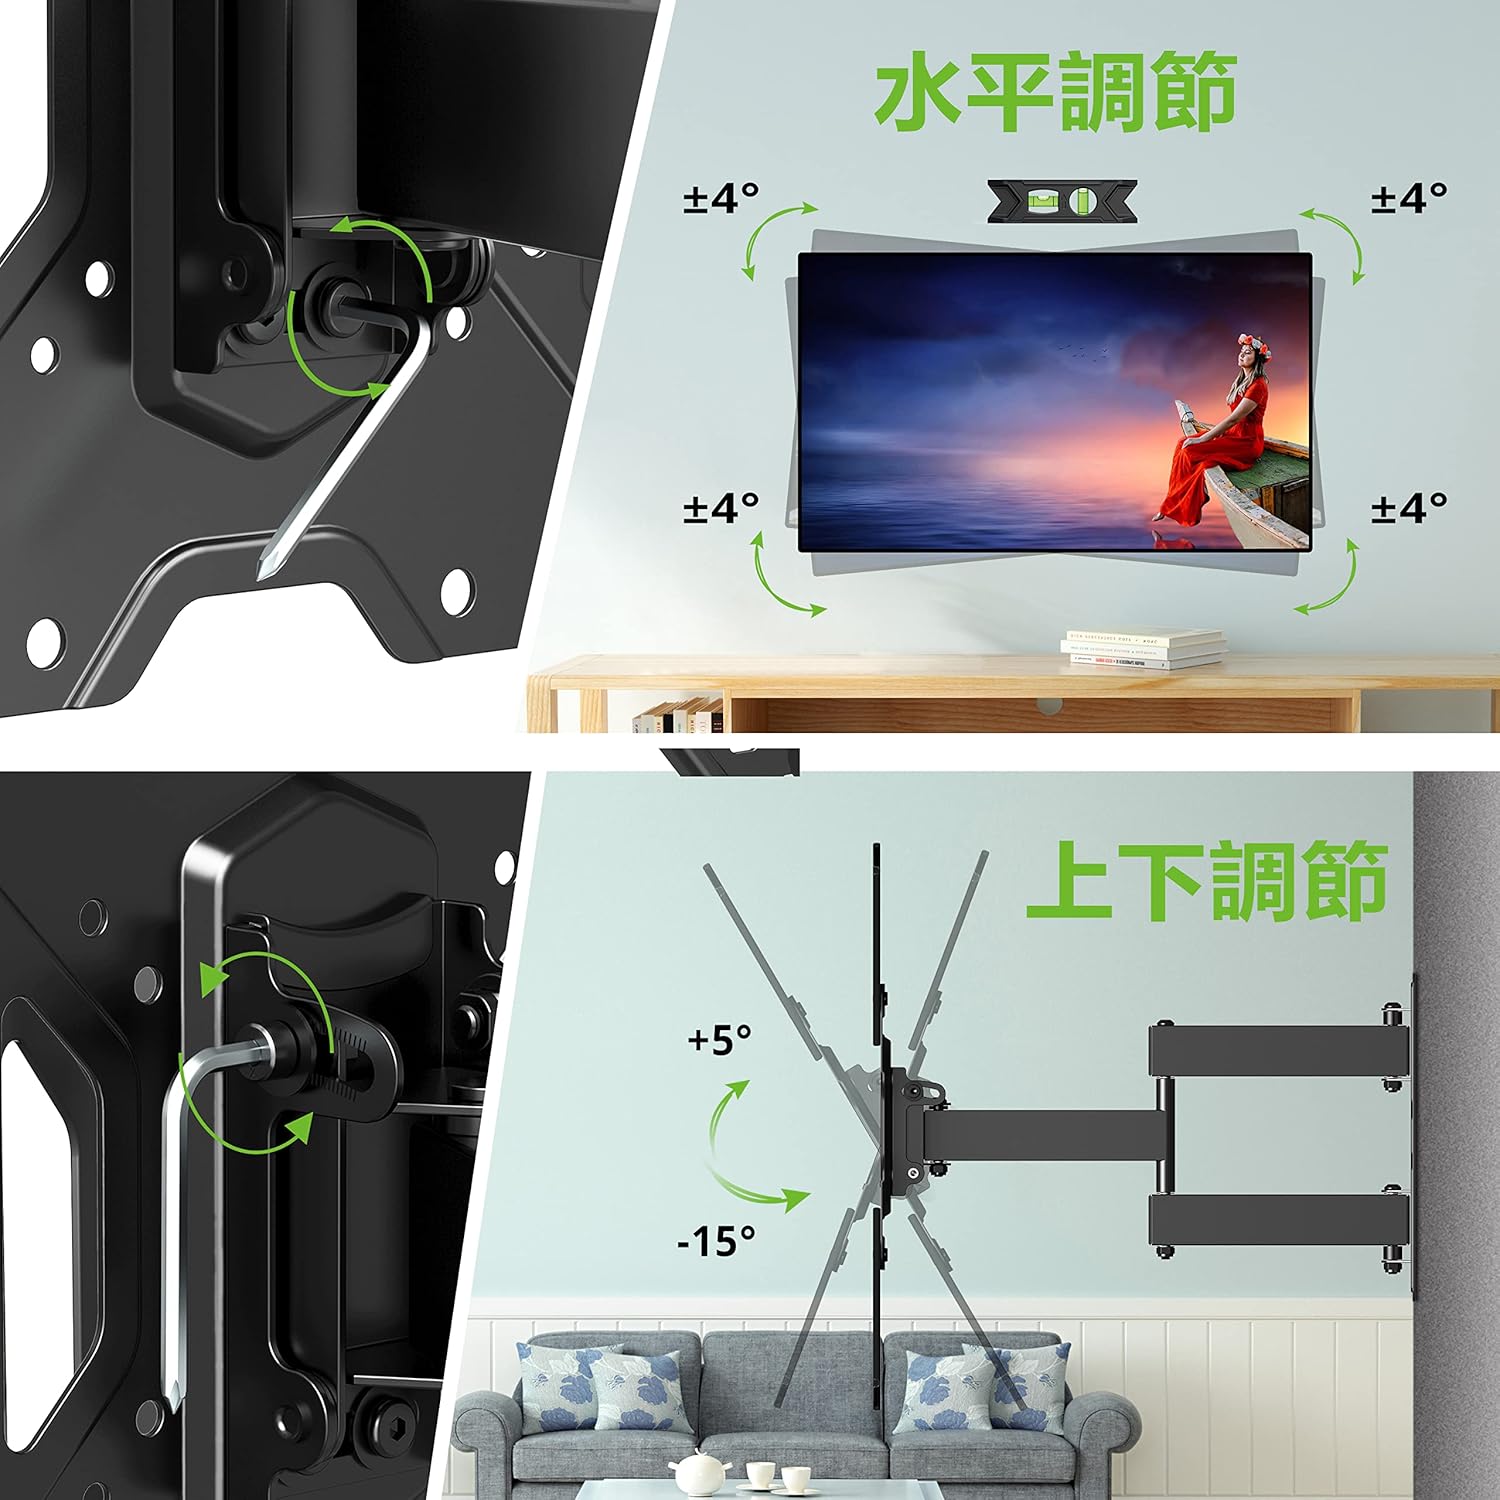
Figura 6.1: Visual guide for adjusting the horizontal level and vertical tilt of the TV. The top panel shows ±4° leveling, and the bottom panel shows +5° to -15° tilt.

Figura 6.2: This image illustrates the adjustable distance from the wall (70mm to 426mm) and the tilt angles (+5° backward, -15° forward) of the TV mount.
Ajuste giratorio:
The mount allows for a swivel of up to ±90° (left/right), depending on the size of your TV. To adjust the swivel:
- Gently push or pull the TV to the desired left or right angle.
- The friction joints will hold the TV in position.

Figura 6.3: This diagram demonstrates the ±90° swivel capability of the TV mount, allowing for flexible viewdesde diferentes ángulos desde varias posiciones en una habitación.
Ajuste de nivel:
The mount allows for a level adjustment of ±4° after installation. To adjust the level:
- Use the provided hex key to loosen the leveling screws on the TV plate.
- Adjust the TV until it is perfectly level using the bubble level.
- Tighten the leveling screws to secure the TV in the desired horizontal position.
7. Mantenimiento
- Revise periódicamente todos los tornillos y pernos para asegurarse de que estén bien apretados. Vuelva a apretarlos si es necesario.
- Limpie el soporte con un paño suave y seco. Evite el uso de limpiadores abrasivos o disolventes.
- Ensure cables are managed neatly using the provided cable ties to prevent strain or damage.
8. Solución de problemas
If you encounter any issues during or after installation, please refer to the following common solutions:
- TV no nivelada: Use the level adjustment feature as described in Section 6.
- El monte se siente suelto: Recheck all wall and TV attachment points and tighten any loose fasteners. Ensure the wall type is appropriate for installation.
- Dificultad para ajustar la inclinación/giro: Ensure all adjustment knobs/screws are sufficiently loosened before attempting to move the TV.
If the problem persists, contact USX MOUNT customer support.
9. Garantía y soporte
USX MOUNT provides a 10-year quality guarantee from the date of purchase. This warranty covers manufacturing defects and ensures the product's structural integrity under normal use.
For any questions, missing parts, or support needs, please contact USX MOUNT customer service. Our team is dedicated to providing assistance and ensuring your satisfaction.
Información del contacto: Please refer to the contact details provided with your purchase or visit the official USX MOUNT websitio.