Introducción
The WALI GSMU001-W Ultrawide Monitor Arm is designed to provide an ergonomic and space-saving solution for mounting your monitor. This gas spring arm supports screens from 13 to 49 inches, weighing up to 33 lbs, and features VESA 75x75mm and 100x100mm compatibility. It also includes two integrated USB 3.0 ports for convenient connectivity, helping to optimize your workspace.
Información de seguridad
- Read all instructions carefully before assembly and use. Failure to do so may result in personal injury or product damage.
- Do not exceed the maximum weight capacity of 33 lbs (15 kg). This product is intended for monitors within the specified weight range.
- Ensure the mounting surface (desk) is stable and capable of supporting the combined weight of the mount and the monitor.
- Mantenga las piezas pequeñas y los materiales de embalaje fuera del alcance de los niños, ya que pueden suponer un peligro de asfixia.
- Use only the hardware provided with the product. Using incompatible hardware may cause instability and potential damage.
- If you have any questions or encounter issues during installation or operation, contact WALI customer support for assistance.
Contenido del paquete
Verifique que todos los componentes estén presentes antes de comenzar el ensamblaje:
- WALI Single Monitor Gas Spring Desk Mount (GSMU001-W)
- Kit de hardware de montaje (tornillos, arandelas, espaciadores, llaves Allen)
- Manual de usuario
Configuración
Paso 1: Elija la opción de montaje (C-Clamp o base de ojal)
The monitor arm offers two installation methods to suit your desk type. Both options are compatible with desk thicknesses between 0.39 inches and 1.8 inches (10mm - 45mm).
For grommet mounting, your desk must have a cable grommet hole with a diameter of at least 2.4 inches (60mm).

Image: Installation Flexibility - C-clamp and grommet installation options.
Refer to the detailed instructions in the included user manual for specific steps on C-clamp or grommet base installation.
Paso 2: Conecte la placa VESA al monitor
Secure the VESA plate to the back of your monitor using the appropriate screws and spacers from the hardware kit. Ensure the plate is firmly attached and aligned with your monitor's VESA mounting holes (75x75mm or 100x100mm).

Image: VESA plate attachment to the monitor.
Paso 3: Monte el monitor en el brazo
Once the VESA plate is attached to your monitor, carefully lift the monitor and slide the VESA plate onto the monitor arm's mounting head. Secure it in place with the provided locking mechanism.

Image: Monitor mounted on the arm.
Step 4: Connect USB Cables (Optional)
The monitor arm base includes two easily accessible USB 3.0 ports. Connect the integrated USB cables from the arm to your computer's USB 3.0 ports to enable this functionality.

Image: High Speed 3.0 USB Port connection.
Video: WALI Single Monitor Stand Mount Arm (GSMU001-W)
Video: Official WALI video demonstrating the features and installation process for the GSMU001-W monitor arm.
Operante
Ajuste de la posición del monitor
The WALI GSMU001-W monitor arm allows for flexible positioning to achieve optimal viewing angles and ergonomic comfort. You can adjust the monitor head for tilt, swivel, and rotation:
- Inclinación: Adjust the monitor +45° to -45° vertically.
- Girar: Rotate the monitor +90° to -90° horizontally.
- Rotación: Gire el monitor 360° para orientación horizontal o vertical.

Image: Angle Adjustment capabilities of the monitor arm.
Ajuste de tensión del resorte de gas
The gas spring mechanism allows for smooth and stable height adjustments. If your monitor sags or is difficult to move, you may need to adjust the gas spring tension:
- To adjust for lighter monitors, turn the adjustment screw clockwise.
- To adjust for heavier monitors, gire el tornillo de ajuste en el sentido contrario a las agujas del reloj.
Use the provided Allen wrench to make small adjustments until the arm holds your monitor securely in any position. Ensure the arm is kept in a horizontal level during adjustment.

Image: Gas Spring Tension Adjustment instructions.
Mantenimiento
To ensure the longevity and optimal performance of your WALI monitor arm, follow these maintenance guidelines:
- Limpieza: Wipe the arm and base with a soft, damp paño. Evite utilizar limpiadores abrasivos o disolventes que puedan dañar el acabado.
- Controles periódicos: Revise periódicamente todos los tornillos y conexiones para asegurarse de que estén bien apretados. Vuelva a apretarlos si es necesario.
- Resorte de gas: If the monitor arm's movement becomes stiff or loose over time, re-adjust the gas spring tension as described in the 'Operating' section.
Solución de problemas
Monitor Sags or Does Not Stay in Position
Solución: The gas spring tension may be too low for your monitor's weight. Refer to the 'Gas Spring Tension Adjustment' section under 'Operating' and turn the adjustment screw counter-clockwise to increase tension until the monitor holds its position.
Monitor is Difficult to Move Up or Down
Solución: The gas spring tension may be too high. Refer to the 'Gas Spring Tension Adjustment' section under 'Operating' and turn the adjustment screw clockwise to decrease tension until the monitor moves smoothly.
Los puertos USB no funcionan
Solución: Ensure the USB cables from the monitor arm base are securely connected to the USB 3.0 ports on your computer. Check your computer's device manager to confirm USB drivers are installed correctly.
Presupuesto
| Número de modelo | GSMU001-W |
| Compatibilidad de tamaño de pantalla | 13 to 49 inches (flat or curved) |
| Capacidad de peso | Hasta 33 libras (15 kg) |
| Compatibilidad VESA | 75 x 75 mm, 100 x 100 mm |
| Espesor del escritorio (C-Clamp) | 0.39" - 1.8" (10 mm - 45 mm) |
| Grosor del escritorio (ojal) | 0.39" - 1.8" (10mm - 45mm), with 2.4" (60mm) diameter hole |
| Rango de inclinación | ±45° |
| Rango giratorio | ±90° |
| Rotación | 360° |
| Altura máxima | 21.7" (55.1 cm) |
| Extensión máxima | 20.2" (51.3 cm) |
| Puertos USB | 2 x USB 3.0 |
| Material | Metal |

Image: Display Compatibility overview.
Image: Product Dimension - Max Height and Extension.
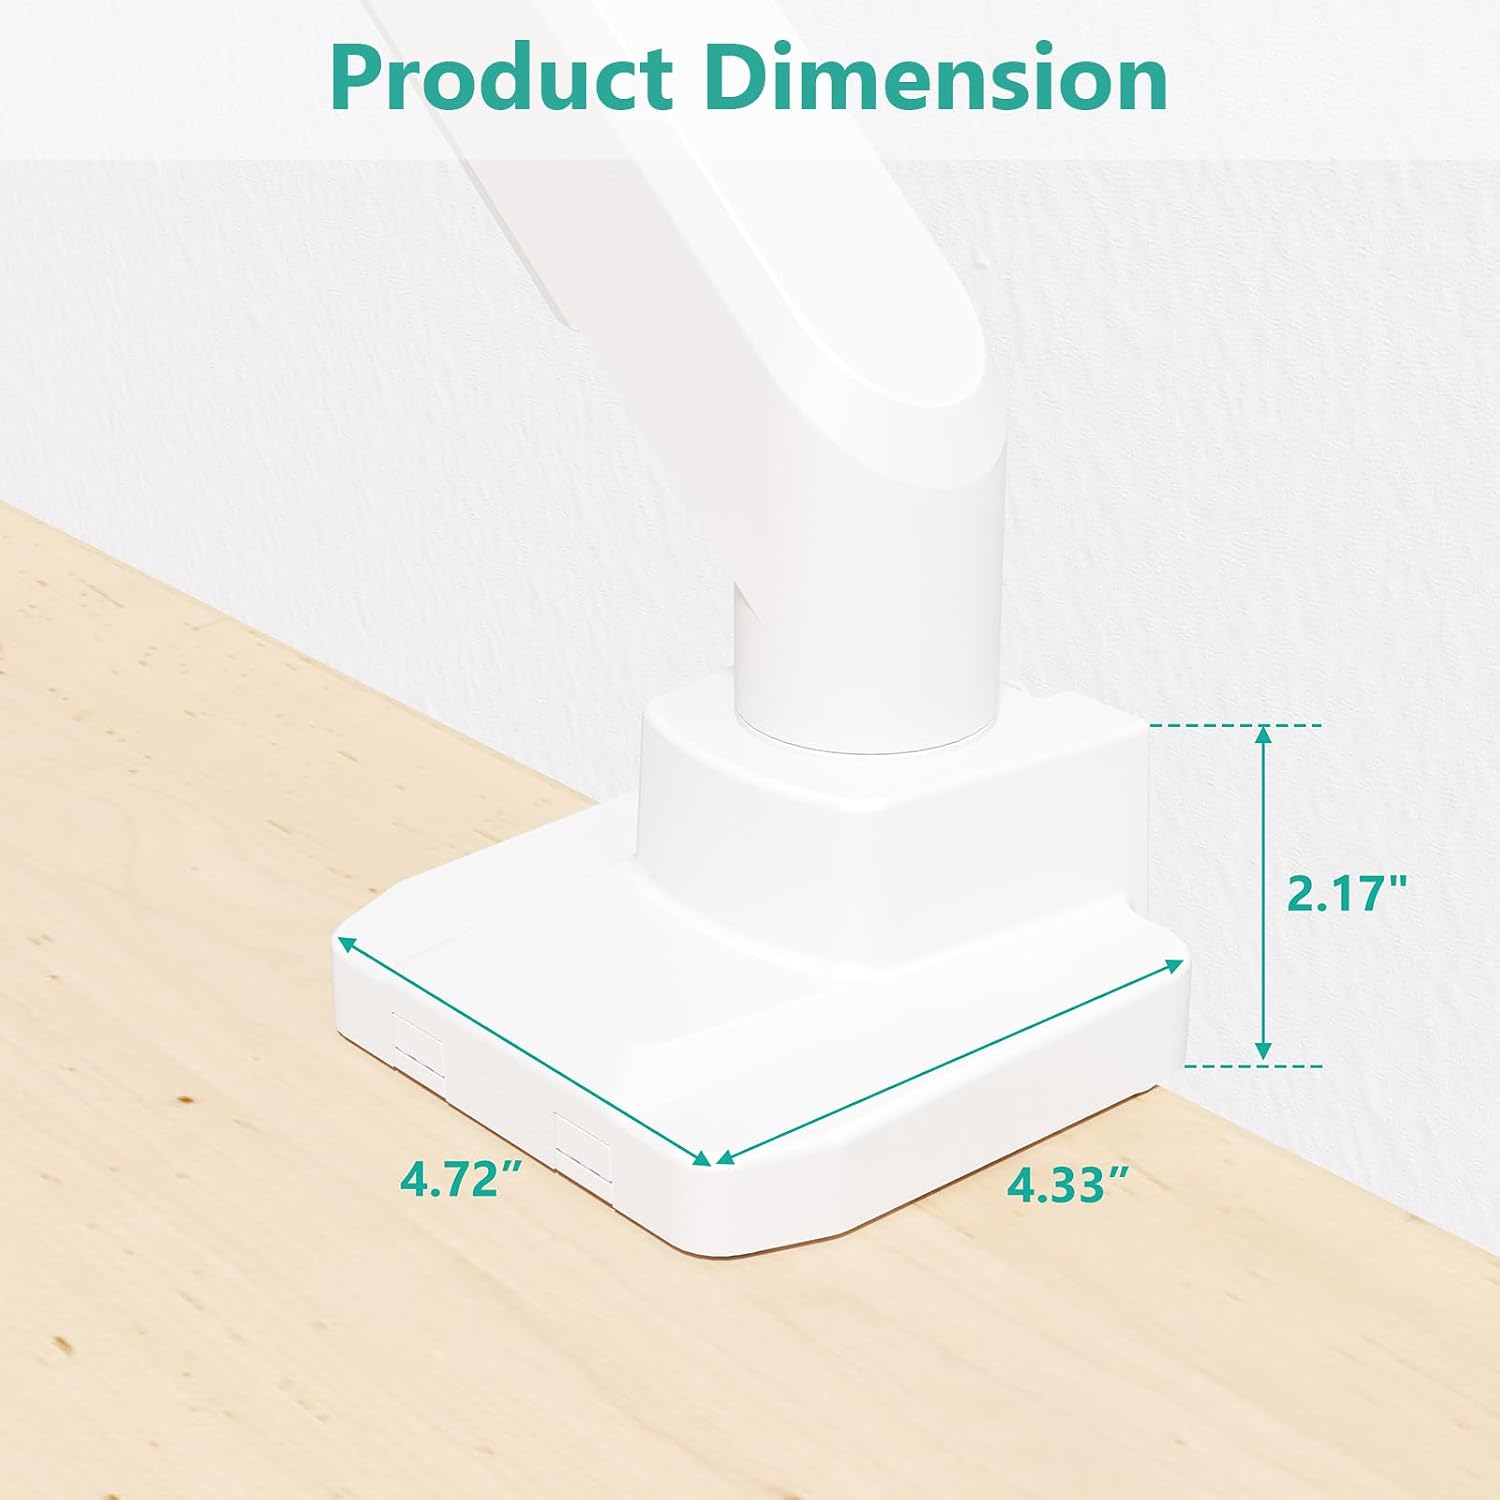
Image: Product Dimension - Base measurements.
Garantía
WALI products are manufactured with quality and durability in mind. For specific warranty details regarding your GSMU001-W monitor arm, please refer to the warranty information provided with your purchase documentation or contact WALI customer support directly. WALI is committed to providing support for its products.
Apoyo
For any questions, technical assistance, or support needs, please contact WALI customer service. Experienced and friendly US-based customer support is available to assist you 7 days a week.
Contact information can typically be found on the WALI official websitio o en el embalaje del producto.