
1. Introducción
Thank you for choosing the Smartwares FSM-12601 Wi-Fi Smoke Detector. This device is designed to provide early warning of smoke and fire, enhancing the safety of your home. Featuring a photoelectric sensor, it offers high sensitivity to detect slow-smoldering fires while minimizing false alarms. With Wi-Fi connectivity, you can receive real-time alerts on your smartphone via the Connected at Home or Smartlife app.

Image: The Smartwares FSM-12601 Wi-Fi Smoke Detector in a home setting.
2. Información importante de seguridad
- Lea atentamente todas las instrucciones antes de la instalación y el uso.
- This smoke detector is designed for residential use.
- No pinte el detector de humo. La pintura puede obstruir las cámaras de detección e impedir que la alarma funcione correctamente.
- Do not install in areas with high humidity, excessive dust, or near cooking fumes.
- Regularly test the smoke detector as described in this manual.
- En caso de alarma, evacue el local inmediatamente y llame a los servicios de emergencia.
3. Contenido del paquete
Asegúrese de que todos los artículos estén presentes en el paquete:
- Smartwares FSM-12601 Wi-Fi Smoke Detector
- Soporte de montaje
- Batería CR123A
- Tornillos de montaje y tacos de pared
- Manual de usuario
4. Producto terminadoview
The Smartwares FSM-12601 features a compact design with a central test/mute button and an integrated LED indicator.

Imagen: Frente view of the smoke detector highlighting the Test/Mute button.
- Botón de prueba/silencio: Presione para probar la alarma o silenciar una falsa alarma.
- Indicador LED: Provides visual status of the device (e.g., normal operation, alarm, low battery, pairing mode).
- Vocero: Emits the 85 dB alarm sound.

Image: Dimensions and key features of the smoke detector.
5. Configuración e instalación
5.1 Instalación de la batería
- Gently twist the back cover of the smoke detector counter-clockwise to open it.
- Insert the provided CR123A battery, ensuring correct polarity (+/-).
- Cierre la cubierta posterior girándola en el sentido de las agujas del reloj hasta que encaje en su lugar.
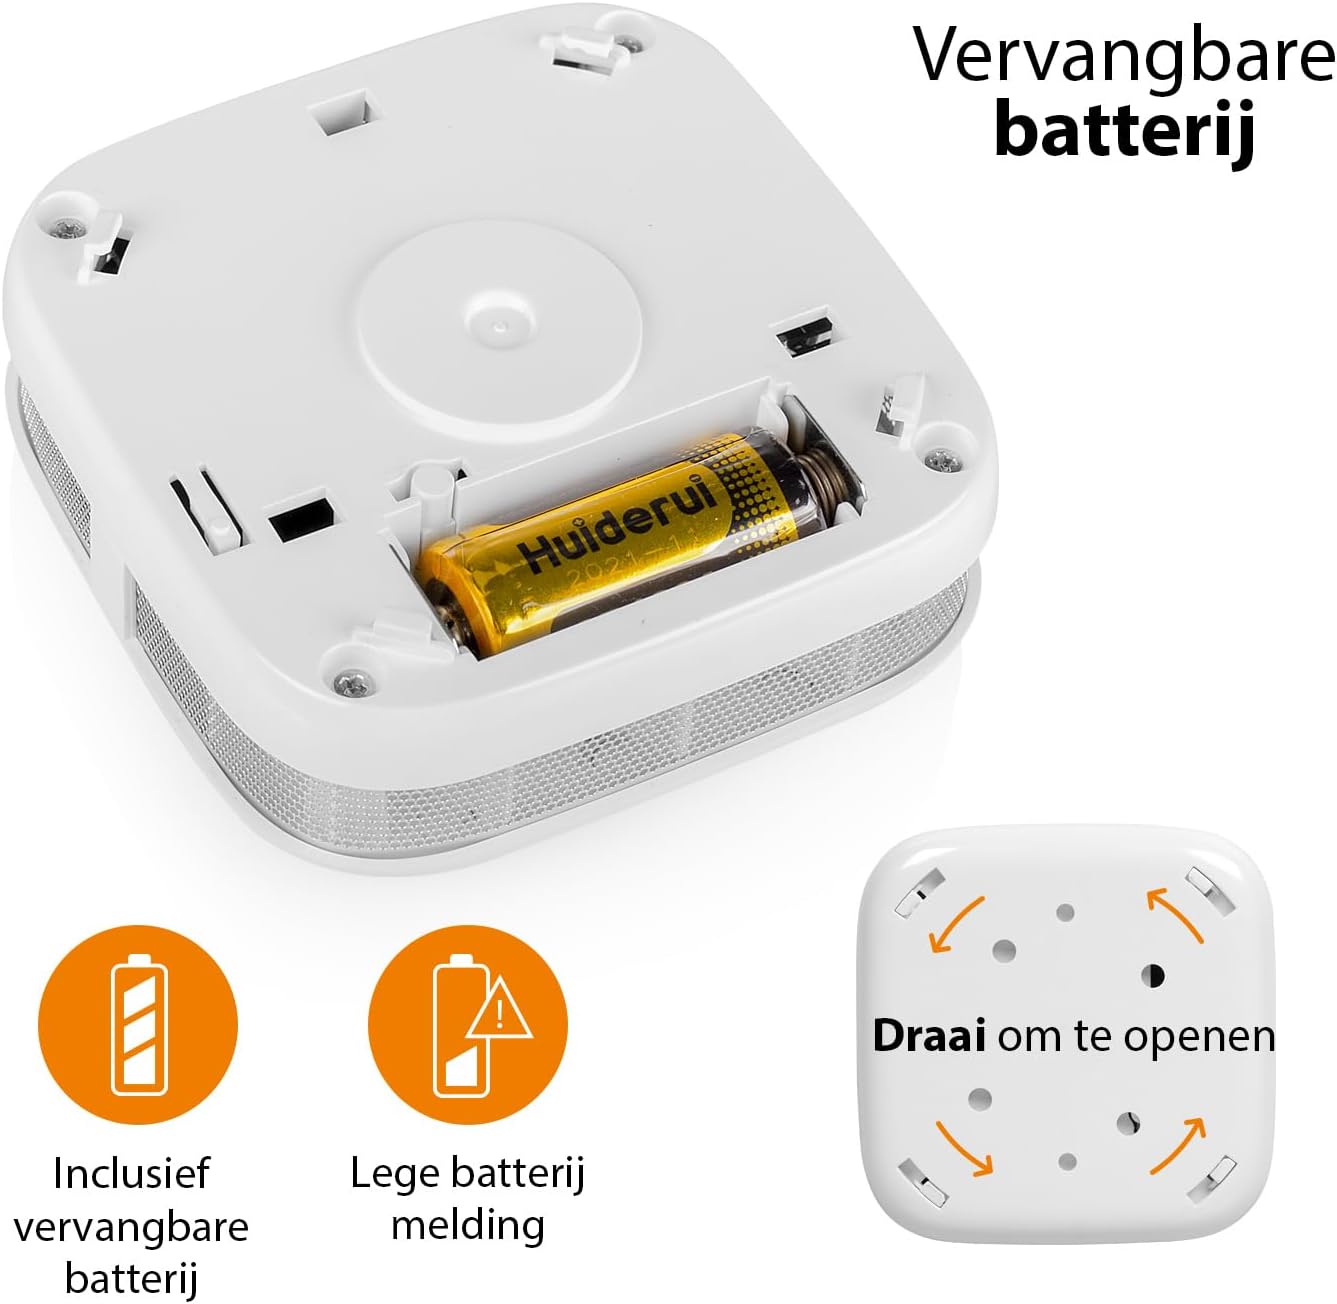
Image: Battery compartment and instructions to open the device.
5.2 Ubicación de montaje
For optimal performance, install the smoke detector on the ceiling in the center of a room or hallway. If ceiling mounting is not possible, install it on a wall, at least 10-30 cm (4-12 inches) from the ceiling. Avoid corners. Install at least one smoke detector on each floor of your home, including basements and attics.
- Avoid installing near windows, doors, or ventilation openings where drafts might interfere with smoke detection.
- Keep away from cooking appliances, fireplaces, and areas with high humidity like bathrooms.
5.3 Instalación física
- Elija una ubicación de montaje adecuada.
- Use the mounting bracket as a template to mark the drill holes on the ceiling or wall.
- Taladre los agujeros e inserte los tacos.
- Fije el soporte de montaje utilizando los tornillos proporcionados.
- Align the smoke detector with the mounting bracket and twist it clockwise until it locks securely into place.
5.4 App Connection (Wi-Fi Pairing)
To enable Wi-Fi features and receive smartphone notifications, connect your smoke detector to the Smartwares "Connected at Home" or "Smartlife" app.
- Download the "Connected at Home" or "Smartlife" app from your smartphone's app store (available for iOS and Android).
- Regístrese o inicie sesión en su cuenta.
- Long press the Test/Mute button on the smoke detector until the red LED indicator starts flashing. This indicates pairing mode.
- Follow the on-screen instructions within the app to add the smoke detector to your Wi-Fi network.
- Once successfully paired, the LED indicator will stop flashing and remain off, or indicate normal operation as per app instructions.

Image: Steps for connecting the smoke detector to the app.

Image: Benefits of connecting the smoke detector to the app.
6. Instrucciones de funcionamiento
6.1 Operación normal
Once installed and connected, the smoke detector is in normal operating mode. The LED indicator will flash briefly every 40-60 seconds to confirm it is functioning correctly.
6.2 Testing the Smoke Detector
Se recomienda probar su detector de humo semanalmente para garantizar un funcionamiento adecuado.
- Press and hold the Test/Mute button for a few seconds.
- The alarm will sound loudly (85 dB), and the LED indicator will flash rapidly.
- Suelte el botón. La alarma debería detenerse.
- Si la alarma no suena, consulte la sección Solución de problemas.
6.3 Mute Function (Hush Mode)
In case of a non-emergency alarm (e.g., cooking fumes), you can temporarily silence the alarm.
- Press the Test/Mute button briefly during an alarm.
- The alarm will silence for approximately 10 minutes. The LED will continue to flash every few seconds to indicate it is in hush mode.
- Después de 10 minutos, si todavía hay humo, la alarma se reactivará.
- If the smoke has cleared, the detector will return to normal operation.
6.4 Estado del indicador LED
- Flashes every 40-60 seconds: Funcionamiento normal.
- Flashes rapidly with alarm sound: Se detectó humo.
- Flashes every few seconds (no alarm): Hush mode active.
- Flashes every 32 seconds (with chirp): Low battery warning. Replace battery immediately.
- Flashes rapidly (during setup): Modo de emparejamiento.
7. Mantenimiento
7.1 Reemplazo de batería
The smoke detector operates on a CR123A battery with an approximate lifespan of one year. When the battery is low, the device will chirp every 32 seconds, and the LED will flash.
- Gire el detector de humo en sentido antihorario para quitarlo de su soporte de montaje.
- Open the back cover by twisting it counter-clockwise.
- Retire la batería CR123A vieja y deséchela de acuerdo con las regulaciones locales.
- Inserte una batería CR123A nueva, observando la polaridad correcta.
- Close the back cover and reattach the detector to its mounting bracket.
- Test the smoke detector immediately after replacing the battery.
7.2 Cleaning the Smoke Detector
Dust and debris can affect the performance of your smoke detector. Clean it at least once a month.
- Remove the smoke detector from its mounting bracket.
- Use a soft brush or a vacuum cleaner with a soft brush attachment to gently clean the exterior casing and the openings around the sensor.
- Do not use water, cleaning solvents, or harsh chemicals.
- Reattach the detector and test it.
8. Solución de problemas
| Problema | Posible causa | Solución |
|---|---|---|
| La alarma no suena durante la prueba. | Dead or low battery; incorrect battery installation; faulty unit. | Replace battery; check battery polarity; if problem persists, contact support. |
| Falsas alarmas frecuentes. | Detector is too close to cooking fumes, steam, or high humidity; excessive dust. | Relocate detector further from sources of false alarms; clean the detector. |
| Chirping sound every 32 seconds. | Advertencia de batería baja. | Replace the CR123A battery immediately. |
| Cannot connect to Wi-Fi app. | Incorrect Wi-Fi password; detector too far from router; incorrect pairing procedure; app issues. | Ensure correct Wi-Fi password; move detector closer to router; repeat pairing steps carefully; check app for updates or known issues. |
| No hay notificaciones en el teléfono inteligente. | App notifications disabled; detector disconnected from Wi-Fi; app not running in background. | Check app notification settings; verify detector's Wi-Fi connection; ensure app is allowed to run in background. |
9. Especificaciones técnicas
| Número de modelo | MEV-12601 |
| Tipo de sensor | Fotoeléctrico |
| Volumen de alarma | 85 dB a 3 metros |
| Fuente de poder | 1x CR123A Lithium battery (included) |
| Duración de la batería | Aproximadamente 1 año |
| Conectividad | Wi-Fi (2.4 GHz) |
| Humedad de funcionamiento | Hasta 95% sin condensación |
| Dimensiones (L x An x Al) | 7.6 x 7.6 x 2.8 cm |
| Peso | 84 gramos |
| Material | Plástico ABS |
10. Información de eliminación
Do not dispose of the device or batteries with household waste. Electronic waste and batteries should be collected separately for environmentally sound disposal. Use the return and collection systems available in your country.
11. Garantía y soporte
Smartwares products come with a standard manufacturer's warranty. For detailed warranty terms, technical support, or service inquiries, please refer to the contact information provided on the Smartwares website or the original purchase documentation.