Coliao STC-1000
Coliao STC-1000 Digital Temperature Controller 12V
Manual de instrucciones
Model: STC-1000 (12V Version)
1. Introducción
Thank you for choosing the Coliao STC-1000 Digital Temperature Controller. This device is designed for precise temperature control, offering both heating and cooling functions. It is suitable for a wide range of applications including aquariums, terrariums, vivariums, chicken incubators, laboratories, and other temperature-controlled systems. This manual provides detailed instructions for installation, operation, and maintenance to ensure optimal performance and longevity of your device.

Imagen 1.1: The STC-1000 controller shown in typical applications such as a greenhouse for plants and an incubator for chicks, demonstrating its versatility in temperature management.
2. Producto terminadoview y componentes
The STC-1000 is a microcomputer digital LED display temperature controller. It features a flame-retardant shell for durability and safety. The package includes the following components:
- 2 x STC-1000 Digital Temperature Controllers (12V version)
- 2 x NTC 10K Waterproof Sensor Probes (1 meter length)
- 1 x Manual de introducción (este documento)

Imagen 2.1: A pair of STC-1000 Digital Temperature Controllers, each accompanied by its NTC waterproof sensor probe, as included in the package.

Imagen 2.2: Un primer plano view of a single STC-1000 controller, highlighting its compact design and the attached NTC sensor probe.
3. Especificaciones
| Característica | Especificación |
|---|---|
| Modelo | STC-1000 |
| Fuente de alimentación | 12 V CC |
| Rango de medición de temperatura | -50℃ a 99℃ |
| Rango de control de temperatura | -50℃ a 110℃ |
| Precisión de la medición | ±0.2℃ |
| Resolución | 0.1℃ |
| Precisión del control | ±1℃ |
| Sensor | Sonda impermeable NTC 10K L=1M |
| Consumo de energía | <3 W |
| Temperatura ambiente | 0℃ a 60℃ |
| Temperatura de almacenamiento | -30℃ a 75℃ |
| Humedad relativa | 20-84% |
| Tamaño de montaje | 71 mm x 29 mm |
| Tamaño del panel frontal | 75 mm x 34.5 mm |
| Tamaño total | 75 mm x 34.5 mm x 85 mm |
| Material | Policarbonato (PC) |
| Tipo de pantalla | CONDUJO |

Imagen 3.1: Detailed dimensions of the STC-1000 controller, showing its length, width, and height in millimeters and inches for installation planning.
4. Configuración y cableado
Nota importante de seguridad: Wiring should only be performed by individuals familiar with electrical connections. Ensure the power supply is disconnected before attempting any wiring. This device operates on DC 12V. Incorrect wiring can damage the unit or pose a safety hazard.
The STC-1000 features a terminal block for connections. Refer to the diagram below for proper wiring. Strictly distinguish the interface of the relay, sensor, and power. The sensor lead and power wire should be kept at a proper distance to avoid interference.
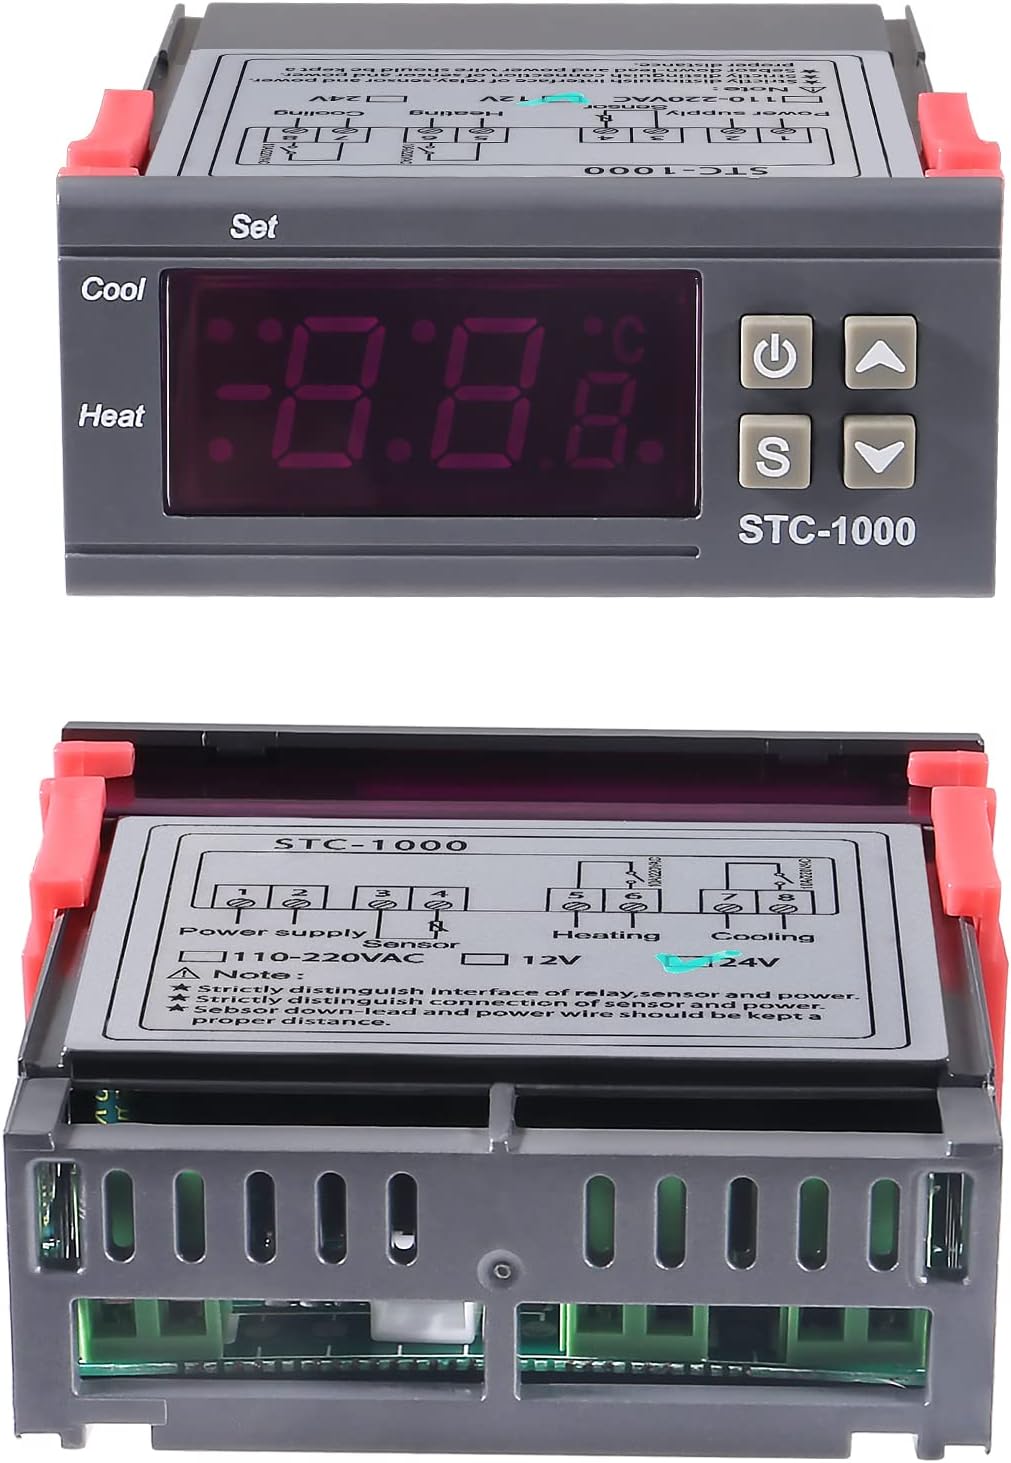
Imagen 4.1: Arriba y abajo views of the STC-1000 controller. The top view shows the display and buttons, while the bottom view reveals the terminal block with a clear wiring diagram for power supply, NTC sensor, heating output, and cooling output connections.
- Power Supply (12V DC): Connect your 12V DC power source to the designated terminals (often pins 1 and 2).
- Sensor NTC: Connect the NTC waterproof sensor probe to the sensor terminals (often pins 3 and 4). The sensor is non-polar, so connection order does not matter.
- Salida de calefacción: Connect your heating device (e.g., heating pad, lamp) to the heating relay output terminals (often pins 5 and 6).
- Salida de enfriamiento: Connect your cooling device (e.g., fan, chiller) to the cooling relay output terminals (often pins 7 and 8).
Asegúrese de que todas las conexiones estén seguras y aisladas para evitar cortocircuitos.
5. Instrucciones de funcionamiento
The STC-1000 features a digital display and four control buttons for easy operation.

Imagen 5.1: Front panel of the STC-1000, clearly labeling the Digital Display Window, Power Switch, UP Button, Setting Button (S), and Down Button.
- Botón de encendido (⏻): Presione para encender/apagar el dispositivo.
- Botón 'S' (Establecer): Used to enter and exit parameter setting mode.
- Arriba (▲) Botón: Aumenta valores o navega a través de las opciones del menú.
- Abajo (▼) Botón: Disminuye valores o navega por las opciones del menú.
5.1. ViewTemperatura actual
Upon powering on, the LED display will show the current temperature measured by the NTC sensor.
5.2. Ajuste de parámetros de temperatura
- Ingrese al modo de configuración: Press and hold the 'S' button for 3 seconds. The display will show "F1".
- Parámetros de navegación: Utilice el Up (▲) y abajo (▼) buttons to cycle through parameters (F1, F2, F3, F4).
- View/Modify Parameter Value: While a parameter (e.g., F1) is displayed, press the 'S' button briefly to view its current value. Use the Up (▲) y abajo (▼) botones para ajustar el valor.
- Guardar y Salir: After setting all desired parameters, press and hold the 'S' button for 3 seconds to save the settings and exit. If no button is pressed for 10 seconds, settings will be saved automatically, and the device will return to normal operation.
5.3. Parameter Functions
- F1: Temperature Setting Value (SV)
- This is the desired temperature you want to maintain.
- Range: -50℃ to 99℃.
- F2: Hysteresis/Difference Value (D)
- This value determines the temperature difference between the set point and when the heating/cooling output activates.
- Example: If SV = 25℃ and D = 2℃:
- Modo de calefacción: Heater turns on at 23℃ (SV - D), turns off at 25℃ (SV).
- Modo de enfriamiento: Cooler turns on at 27℃ (SV + D), turns off at 25℃ (SV).
- Range: 0.3℃ to 10℃.
- F3: Temperature Calibration (C)
- Used to correct any deviation between the displayed temperature and the actual temperature.
- Adjust this value if the sensor reading is consistently inaccurate compared to a known reference thermometer.
- Range: -10℃ to 10℃.
- F4: Delay Start Time (PT)
- Sets a delay before the heating or cooling output activates after the temperature condition is met. This protects compressors in cooling systems.
- Range: 0 to 10 minutes. (0 = no delay)
5.4. Modos de calefacción y refrigeración
The STC-1000 automatically determines whether to operate in heating or cooling mode based on the relationship between the Temperature Setting Value (F1) and the Hysteresis Value (F2).
- Modo de calefacción: If the Start Temperature (F1 - F2) is less than the Stop Temperature (F1), the device operates in heating mode. The heater will activate when the temperature drops below (F1 - F2) and deactivate when it reaches F1.
- Modo de enfriamiento: If the Start Temperature (F1 + F2) is greater than the Stop Temperature (F1), the device operates in cooling mode. The cooler will activate when the temperature rises above (F1 + F2) and deactivate when it reaches F1.
6. Mantenimiento
- Limpieza: Wipe the controller's surface with a soft, dry cloth. Do not use abrasive cleaners or solvents. Ensure no liquids enter the device.
- Cuidado del sensor: The NTC sensor probe is waterproof. However, avoid bending the cable sharply or subjecting it to excessive force. Periodically check the sensor cable for any signs of damage.
- Condiciones ambientales: Ensure the controller is operated within the specified ambient temperature and humidity ranges to prevent damage.
- Fuente de alimentación: Always use a stable 12V DC power supply. Fluctuations can affect performance or damage the unit.
7. Solución de problemas
| Problema | Posible causa | Solución |
|---|---|---|
| Display shows "LLL" or "HHH" | Sensor error (open circuit or short circuit) or temperature out of range. | Check sensor connection. Replace sensor if damaged. Ensure temperature is within -50℃ to 99℃. |
| La pantalla muestra "---" | Sensor not connected or damaged. | Verify sensor connection. Replace sensor if necessary. |
| Controller not turning ON/OFF heating/cooling | Incorrect parameter settings (F1, F2, F4), wiring error, or faulty relay. | Review F1, F2, and F4 settings. Check wiring connections. Test heating/cooling devices independently. |
| Lectura de temperatura inexacta | Sensor calibration needed (F3), sensor placement, or faulty sensor. | Use F3 to calibrate the temperature. Ensure sensor is placed correctly and not affected by external heat sources. Replace sensor if faulty. |
| La pantalla está en blanco | No power or power button is off. | Check 12V DC power supply connection. Press the power button. |
8. Garantía y soporte
Coliao products are manufactured to high-quality standards. This product comes with a standard manufacturer's warranty against defects in materials and workmanship. Please refer to your purchase documentation for specific warranty terms and duration.
For technical support, troubleshooting assistance, or warranty claims, please contact your retailer or the Coliao customer service department through the contact information provided at the point of purchase. Please have your product model number (STC-1000) and purchase date available when contacting support.
Ask a question about this manual
Ask about setup, troubleshooting, compatibility, parts, safety, or missing instructions. Manuals+ will review the question and use this page’s manual context to help answer it.