
1. Producto terminadoview
The RYOBI ONE+ 18V Cordless Electrostatic 1 Gallon Sprayer is designed for applying water-soluble disinfectants, cleaning solutions, and various lawn and garden chemicals. This tool utilizes electrostatic charging technology to enhance coverage and efficiency by positively charging particles, allowing solutions to adhere more effectively to surfaces. The sprayer is powered by any RYOBI ONE+ 18V battery (sold separately) and features a backpack design for comfortable, single-handed operation. It includes an adjustable nozzle for different spray patterns and an on/off switch for electrostatic functionality.

Image 1.1: The RYOBI ONE+ 18V Cordless Electrostatic 1 Gallon Sprayer, showing its compact design and handle.
2. Información de seguridad
ADVERTENCIA: This product contains pressurized liquids and involves chemical exposure. Always handle with care. Read and understand all safety warnings and instructions before operating this tool.
- Wear appropriate protective clothing and eyewear when using the sprayer.
- Keep the sprayer out of reach of children.
- Avoid direct contact with skin and eyes when handling chemicals.
- Deseche las baterías adecuadamente de acuerdo con las regulaciones locales.
- Use only with approved RYOBI ONE+ 18V batteries.
- Maintain and store the sprayer in a cool, dry place away from direct sunlight and extreme temperatures.
- Ensure proper ventilation when spraying indoors.
3. Características del producto
- Electrostatic Spray Technology: Provides maximum coverage and precise application by charging spray particles, causing them to wrap around target surfaces.
- 1 Gallon Tank: Detachable tank with a handle for easy filling and transport.
- Boquilla ajustable 3 en 1: Allows selection between Low, Medium, and High spray patterns.
- On/Off Electrostatic Switch: Enables or disables the electrostatic function as needed for different chemical types.
- Diseño ergonómico de mochila: Facilitates comfortable, single-handed operation and can be configured for right-handed or left-handed users.
- Compatibilidad de la batería: Compatible with all RYOBI ONE+ 18V batteries (battery and charger sold separately).

Image 3.1: Diagram illustrating how electrostatic charging improves spray coverage compared to conventional methods.

Imagen 3.2: Detallada view of the 3-in-1 adjustable nozzle, showing the different spray settings.
4. Instrucciones de configuración
- Desembalaje del pulverizador: Retire con cuidado todos los componentes del embalaje. Inspeccione si presentan daños.
- Instale la batería: Insert a fully charged RYOBI ONE+ 18V battery into the battery compartment until it clicks into place. Ensure the battery is securely seated.
- Llene el tanque:
- Detach the 1-gallon tank from the sprayer unit by unlatching it.
- Desatornille la tapa del tanque.
- Fill the tank with the desired water-soluble disinfectant, cleaning solution, or lawn/garden chemical. Do not overfill.
- Coloque de forma segura la tapa del tanque.

Image 4.1: The detachable 1-gallon tank with its handle, ready for filling.
- Attach the Tank: Reattach the filled tank to the sprayer unit, ensuring it is latched securely. The hose connection should be firm.
- Adjust Straps (if using backpack mode): If using the backpack feature, adjust the shoulder straps for a comfortable and secure fit. The holster can be configured for right or left-handed use.
5. Instrucciones de funcionamiento
- Seleccionar patrón de pulverización: Rotate the 3-in-1 adjustable nozzle to select the desired spray pattern: Low (65 microns, up to 2 ft), Medium (85 microns, up to 5 ft), or High (160 microns, up to 10 ft).
- Activate Electrostatic Function (Optional): Locate the electrostatic ON/OFF switch. For enhanced coverage, switch it to the ON position. If using chemicals not suited for electrostatic application, switch it to OFF.
- Comience a pulverizar: Press the trigger to activate the sprayer. Maintain a consistent distance from the target surface for even application.
- Técnica de pulverización: Move the sprayer steadily across the area to be treated. Overlapping passes ensure complete coverage.
- Monitor Liquid Level: Periodically check the liquid level in the tank to avoid running dry.
- Deje de rociar: Suelte el gatillo para detener el rociado.
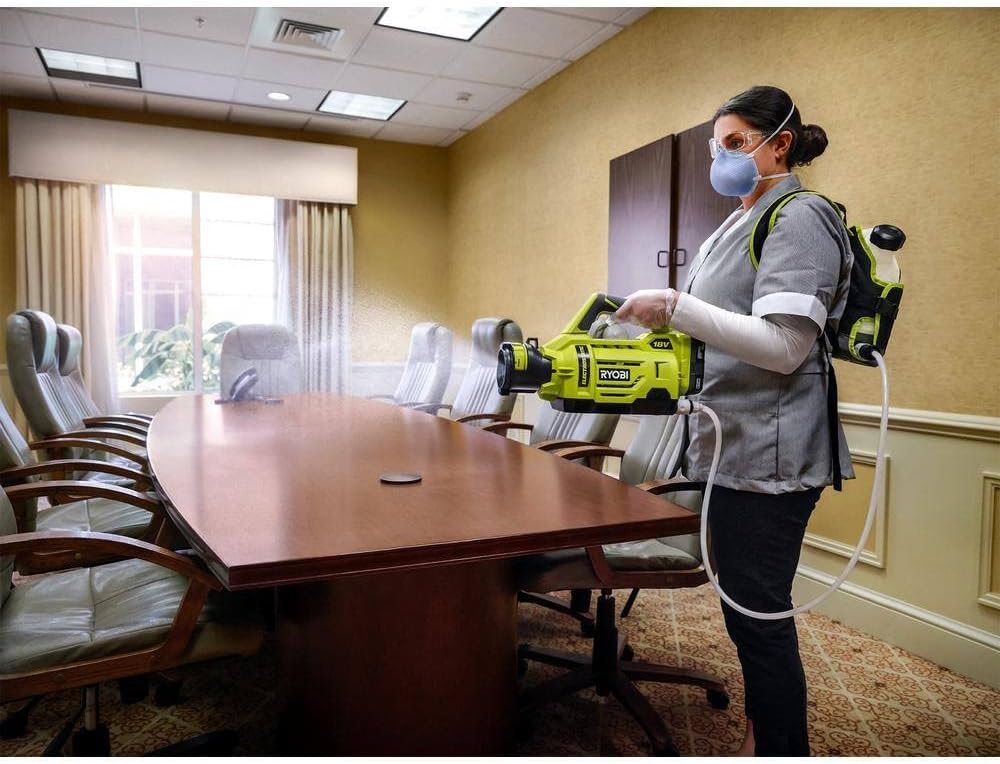
Image 5.1: An individual demonstrating the use of the sprayer in a conference room setting.

Image 5.2: The sprayer being used to apply solution in a hotel room, highlighting its portability.

Image 5.3: An operator using the sprayer in a commercial kitchen environment.

Imagen 5.4: Un primer plano view of the sprayer in action, applying solution to a table surface.
6. Mantenimiento
Regular maintenance ensures optimal performance and extends the life of your sprayer.
- Limpieza del tanque: After each use, especially when changing chemicals, empty any remaining liquid. Rinse the tank thoroughly with clean water.
- Limpieza de la boquilla: If the spray pattern becomes inconsistent or blocked, remove the nozzle and clean it with water. A small brush may be used to clear any obstructions.
- Limpieza del sistema: Periodically run clean water through the sprayer for a few minutes to flush out any chemical residue from the internal components.
- Cuidado de la batería: Remove the battery from the sprayer when not in use. Store batteries in a cool, dry place and charge them as recommended by the battery manufacturer.
- Almacenamiento: Store the sprayer in a dry, protected area, away from freezing temperatures and direct sunlight. Ensure the tank is empty and clean before storage.
7. Solución de problemas
| Problema | Posible causa | Solución |
|---|---|---|
| Sprayer does not turn on or spray. | La batería no está instalada correctamente o está descargada. | Asegúrese de que la batería esté completamente cargada y bien insertada. |
| No liquid is drawn from the tank. | Tank empty, hose kinked, or intake filter blocked. | Refill tank. Check and straighten hose. Clean intake filter. |
| Pulverización débil o inconsistente. | Nozzle clogged, low liquid level, or air in the system. | Clean nozzle. Refill tank. Run sprayer with water to purge air. |
| Electrostatic function not working. | Electrostatic switch is OFF. | Ensure the electrostatic switch is in the ON position. |
| Leakage from tank or connections. | Tank cap loose, tank not properly attached, or damaged seals. | Tighten tank cap. Re-secure tank. Inspect seals for damage and replace if necessary. |
8. Especificaciones
- Marca: RYOBI
- Número de modelo: P2807BTL
- Fuente de energía: Alimentado por batería (RYOBI ONE+ 18V)
- Volumen del tanque: 1 Gallon (approximately 3.78 Liters)
- Material: Plástico
- Peso del artículo: 4.26 kilogramos (aproximadamente 9.39 libras)
- Longitud de la manguera: 1.5 Meters (approximately 4.92 ft)
- Nozzle Settings: Low (65 microns, up to 2 ft), Medium (85 microns, up to 5 ft), High (160 microns, up to 10 ft)
- Código postal: 046396037114
9. Garantía y soporte
For detailed warranty information, please refer to the documentation included with your purchase or visit the official RYOBI webSitio. Los términos de garantía generalmente cubren defectos de materiales y mano de obra durante un período específico a partir de la fecha de compra.
If you require technical assistance, replacement parts, or have questions regarding the operation or maintenance of your RYOBI ONE+ 18V Cordless Electrostatic 1 Gallon Sprayer, please contact RYOBI customer support through their official channels. Ensure you have your model number (P2807BTL) and proof of purchase available when contacting support.


