
Oceanic OCEABHE1500B
OCEANIC 1500W Electric Oil-Filled Radiator Heater
Model: OCEABHE1500B
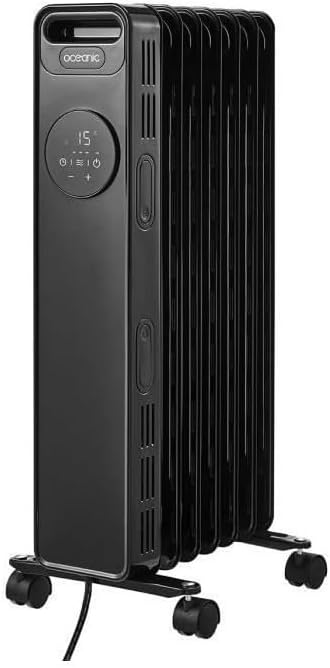
Frente view of the OCEANIC 1500W Electric Oil-Filled Radiator Heater, showcasing su elegante diseño negro y su panel de control integrado.
1. Instrucciones de seguridad importantes
Lea atentamente todas las advertencias e instrucciones de seguridad antes de usar este aparato para evitar incendios, descargas eléctricas, lesiones o daños materiales. Conserve este manual para futuras consultas.
- Conecte siempre el calentador directamente a una toma de corriente. Nunca lo utilice con un cable alargador ni una toma de corriente reubicable.
- No opere ningún calentador con un cable o enchufe dañado, o después de que el calentador funcione mal o se haya caído o dañado de cualquier manera.
- No lo utilice en exteriores. Este calentador está diseñado únicamente para uso en interiores.
- Mantenga los materiales combustibles, como muebles, almohadas, ropa de cama, papeles, ropa y cortinas, al menos a 3 pies (0.9 m) del frente del calentador y lejos de los lados y la parte trasera.
- Es necesario extremar las precauciones cuando cualquier calefactor sea utilizado por o cerca de niños o inválidos y siempre que el calefactor se deje funcionando sin supervisión.
- Para desconectar el calentador, gire los controles a la posición de APAGADO y luego retire el enchufe del tomacorriente.
- No inserte ni permita que objetos extraños entren en ninguna abertura de ventilación o escape ya que esto puede provocar una descarga eléctrica o un incendio, o dañar el calentador.
- This heater includes an anti-tip safety switch and an overheating protection system. If the heater tips over or overheats, it will automatically shut off.
2. Contenido del paquete
Verifique que todos los componentes estén presentes y en buenas condiciones al desembalar.
- OCEANIC 1500W Electric Oil-Filled Radiator Heater (Main Unit)
- Mando a distancia
- Conjuntos de ruedas (2 juegos)
- Manual de instrucciones
3. Configuración
3.1 Fijación de las ruedas
- Coloque con cuidado el calentador boca abajo sobre una superficie suave y no abrasiva para evitar rayarlo.
- Locate the two U-shaped bolts and four wing nuts provided.
- Align the wheel assemblies with the mounting holes at the bottom of the heater.
- Insert the U-shaped bolts through the mounting holes and secure them with the wing nuts. Ensure they are tightened firmly.
- Devuelva el calentador a una posición vertical.

Lado view of the heater, illustrating the proper attachment of the wheel assemblies for mobility.
3.2 Pautas de colocación
Place the heater on a firm, level surface. Ensure there is adequate clearance from walls, furniture, and other objects (minimum 3 feet / 0.9 meters). Do not place the heater directly below a power outlet.

Example of the heater placed in a living space, demonstrating appropriate clearance from furniture and walls.
4. Instrucciones de funcionamiento
4.1 Panel de control terminadoview

Detallado view of the heater's LED display and control buttons, including power, mode, timer, and temperature adjustments.
- Botón de encendido: Enciende y apaga el calentador.
- Botón de modo: Cycles through heating power settings (600W, 900W, 1500W).
- Botones de temperatura (+/-): Ajusta la temperatura deseada.
- Botón del temporizador: Establece el temporizador de funcionamiento (hasta 24 horas).
- Pantalla LED: Shows current temperature, timer settings, and power mode.
4.2 Encendido / Apagado
- Plug the heater into a suitable 220-240V AC power outlet.
- Press the Power Button on the control panel or remote control to turn the heater ON. The LED display will illuminate.
- Para apagar, presione el botón de encendido nuevamente.
4.3 Setting Temperature and Power
- Once ON, use the + or - buttons to set your desired temperature. The heater will automatically maintain this temperature.
- Presione el Modo button to cycle through the three heating power settings: Low (600W), Medium (900W), and High (1500W). Select the appropriate power for your heating needs.
4.4 Uso de la función de temporizador
- Presione el Minutero Botón. La pantalla mostrará '00'.
- Utilice el + or - buttons to set the desired operating duration, from 1 to 24 hours.
- El calentador se apagará automáticamente una vez transcurrido el tiempo establecido.
4.5 Operación del control remoto
The included remote control duplicates the functions of the main control panel, allowing convenient operation from a distance. Ensure the remote has working batteries (not included) and is pointed towards the heater's receiver.
5. Mantenimiento
5.1 Limpieza
- Desenchufe siempre el calentador y déjelo enfriar completamente antes de limpiarlo.
- Limpie las superficies exteriores con un paño suave, damp Paño. No utilice limpiadores abrasivos ni disolventes.
- No sumerja el calentador en agua ni permita que ésta gotee en su interior.
5.2 Almacenamiento
When not in use, store the heater in a cool, dry place. It is recommended to use the integrated cable winder to neatly store the power cord.
6. Solución de problemas
| Problema | Posible causa | Solución |
|---|---|---|
| El calentador no enciende. | No hay suministro de energía. Protección contra sobrecalentamiento activada. Interruptor antivuelco activado. | Compruebe si el enchufe está bien conectado a la toma de corriente. Desenchufe, espere 30 minutos y luego vuelva a enchufarlo. Asegúrese de que el calentador esté sobre una superficie plana y estable. |
| El calentador no produce calor. | Ajuste de temperatura demasiado bajo. Power mode set to low. | Aumente la temperatura deseada. Cycle through power modes to a higher setting (900W or 1500W). |
| El control remoto no funciona. | Las baterías están agotadas o insertadas incorrectamente. Obstrucción entre el control remoto y el calentador. | Reemplace las baterías y asegúrese de la polaridad correcta. Retire cualquier objeto que bloquee la trayectoria de la señal. |
7. Especificaciones
| Característica | Detalle |
|---|---|
| Número de modelo | OCEABHE1500B |
| Potencia de salida | 1500 W (máximo) |
| Heating Power Settings | 600 W, 900 W, 1500 W |
| Elementos | 7 Oil-Filled Elements |
| Termostato | Termostato electrico |
| Mostrar | Pantalla LED |
| Minutero | Hasta 24 horas |
| Control | On-board Panel & Remote Control |
| Características de seguridad | Anti-tip switch, Overheating protection |
| Tipo de montaje | Montaje en suelo (con ruedas) |
| Fuente de poder | Eléctrico con cable |
| Peso del artículo | 9.54 kilogramos |
| Color | Negro |
8. Garantía y soporte
This OCEANIC product is covered by a manufacturer's warranty. For specific warranty terms, duration, and to register your product, please refer to the warranty card included in your package or visit the official OCEANIC website. For technical support, troubleshooting assistance, or to inquire about replacement parts, please contact OCEANIC customer service through their official channels.
Conserve su comprobante de compra para cualquier reclamo de garantía.
Ask a question about this manual
Ask about setup, troubleshooting, compatibility, parts, safety, or missing instructions. Manuals+ will review the question and use this page’s manual context to help answer it.