1. Producto terminadoview
The SGPRO D-333T is a high-quality wireless condenser gooseneck microphone system designed for brass instruments, particularly saxophones and trumpets. This dual-set system offers superior sound capture for live performances and recording sessions.
Key features include a bronze-made gooseneck for easy and steady angle adjustment, a specially designed microphone clip with silicone rubber pads to protect your instrument, and a wide range of UHF channels for interference-free operation. The digital transmitter and receiver circuit ensure stable signal transmission with low latency. The system also provides handy effects and functions such as mute, echo, gain, and volume adjustment, and offers long stamina with regular AA batteries or rechargeable transmitters.

Figure 1: SGPRO D-333T Dual Wireless Saxophone Microphone System
2. Contenido del paquete
Al desembalar, asegúrese de que estén presentes todos los elementos siguientes:
- 1 x unidad receptora
- 2 x Gooseneck Microphones (with integrated Transmitters)
- 2 x Mic Clips for Saxophone Bell
- 1 x Adaptador de corriente para receptor
- 1 x Charging Cable (for transmitters)
- 1 cable conector de 6.5 mm
- 2 x cubiertas de micrófono
- 1 x Manual de usuario (este documento)
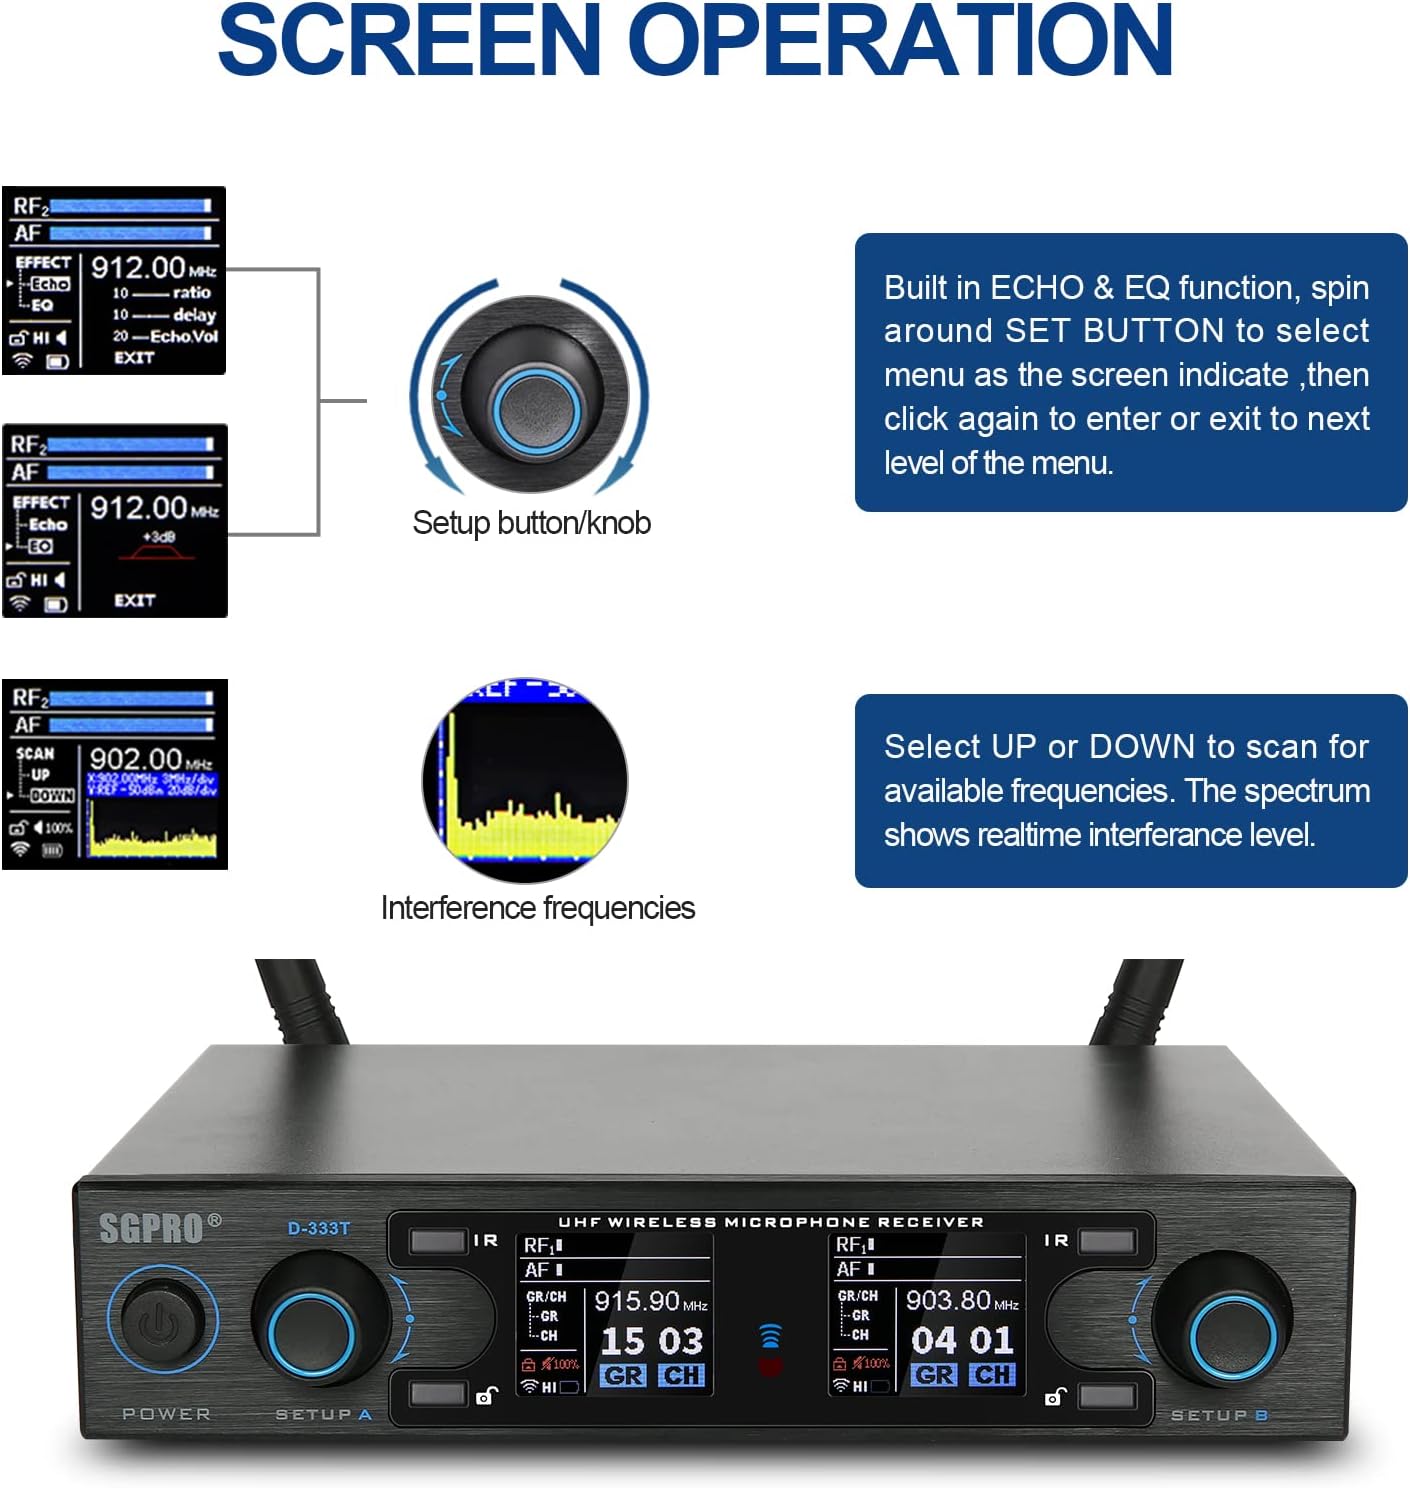
Figura 2: Contenido del paquete
3. Componentes sobreview
3.1 Unidad receptora
The receiver unit is the central hub of your wireless system. It features controls for power, setup/volume, lock/unlock, and an IR window for syncing with the transmitters. The rear panel includes mix out, balanced out (XLR), DC power socket, and USB charge output.

Figure 3: Receiver Unit Details
3.2 Transmitter & Gooseneck Microphone
Each gooseneck microphone is integrated with a transmitter. The transmitter features a mic capsule, 3.5mm input, 15dB gain switch, IR window, indicator light, switch power button, and a charge socket. The mic clip is designed for secure attachment to instrument bells.

Figure 4: Transmitter and Gooseneck Microphone Details
4. Configuración
4.1 Conexión inicial
- Connect the antennas to the ANT-A and ANT-B ports on the rear of the receiver.
- Plug the AC adapter into the DC INPUT on the receiver and connect it to a power outlet.
- Connect the receiver's MIX OUT or BALANCE OUT (XLR) to your mixer, amplificador o sistema de altavoces.
- Turn on the receiver by pressing the POWER button.
4.2 Encendido de los transmisores
Each gooseneck microphone has an integrated transmitter. To power on, locate the red power button on the transmitter unit and press it. The display on the transmitter will illuminate.
4.3 Charging Transmitters
The system includes a charging cable with two lines, allowing you to charge both transmitters simultaneously via the charge socket on each transmitter. The receiver also has a USB charge output for convenience.
4.4 Frequency Change and Pairing (Syncing)
To change the frequency and pair the microphone transmitters with the receiver, follow these steps:
- Boot up the D-333T Receiver.
- Boot up the Saxophone Microphone (Transmitter).
- On the receiver, long press the 'Lock' button to unlock the system.
- Rotate and press the 'SETUP' knob to choose the desired Group (GR) and Channel (CH).
- Once the desired GR/CH is selected, long press the 'IR' button on the receiver to send out the IR signal. The IR light on the front will start flashing.
- Position the IR window on the transmitter (located on the underside, facing the mic when assembled) about an inch away from the receiver's IR light.
- The transmitter will synchronize with the receiver, and the IR light on the receiver will stop flashing once successful.
This process ensures your microphone is operating on the selected frequency and is properly linked to the receiver.
Video 1: SGPRO D333T Dual Wireless Sax Mic Change Frequency & Pairing

Figure 5: Dual Saxophone Setup
5. Instrucciones de funcionamiento
5.1 Conexión del micrófono
The microphone can be attached to your instrument using two methods: the clip-on method or the screw-on method. The specially designed clamp with silicone rubber pads ensures no harm to your instrument's finish.

Figura 6: Métodos de instalación del transmisor
5.2 Adjusting Settings (Echo, EQ, Gain, Volume)
The receiver unit allows for adjustment of various audio effects and settings. Use the 'SETUP' knob to navigate the menu:
- Long press the 'Lock' button to unlock the system.
- Press the 'SETUP' knob to toggle through the main menu options: GR/CH, Scan, Effects.
- Rotate the knob to highlight the desired option (e.g., 'Effects') and press to select.
- Within the 'Effects' menu, you can adjust parameters like Echo (ratio, delay, volume) and EQ. Rotate the knob to change values and press to confirm.
- The system will automatically relock after a period of inactivity.
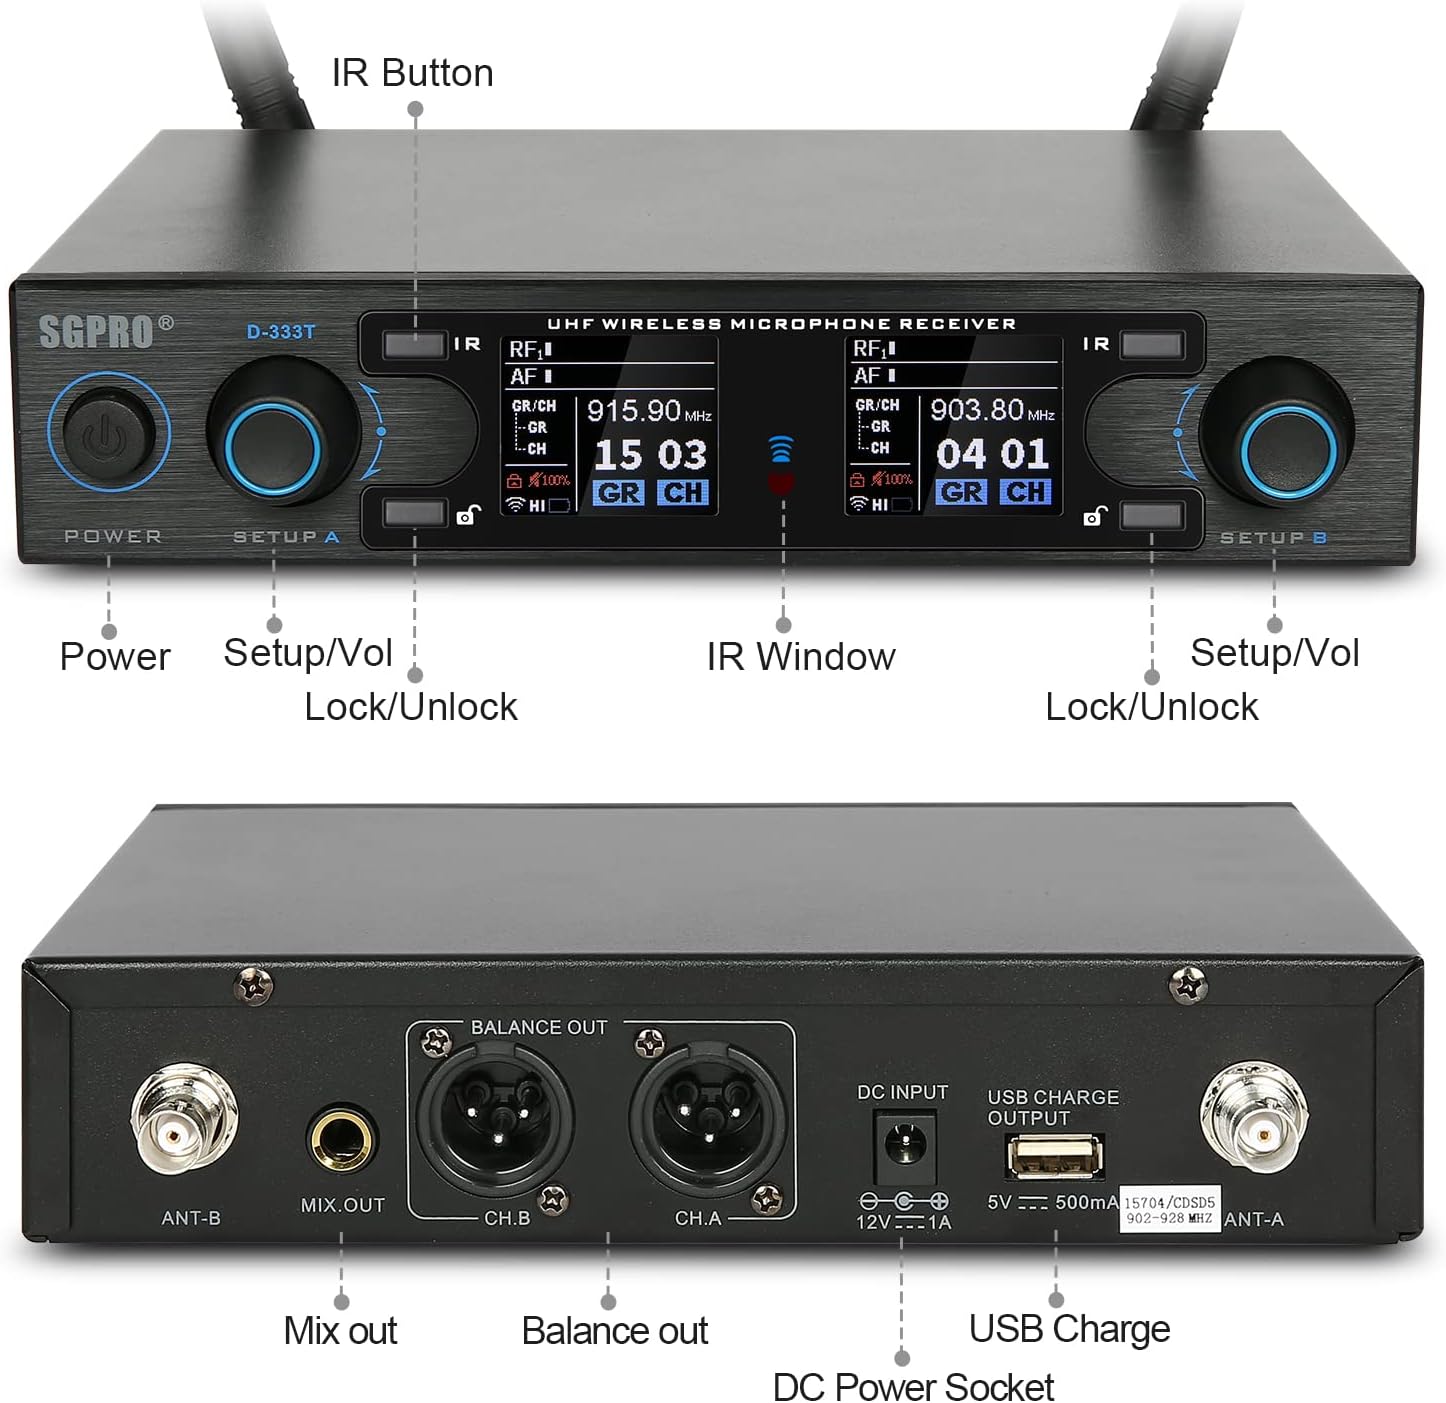
Figure 7: Screen Operation for Settings Adjustment
For a visual guide on the system's features and operation, please refer to the video below:
Video 2: Saxophone Microphone Wireless Dual System D-333T Overview
5.3 Rango de operación
The system offers a wide operating range, allowing for flexibility in various performance environments. The effective range can be up to 262 feet (80 meters) under optimal conditions.

Figura 8: Rango de operación
6. Mantenimiento
6.1 Limpieza
Wipe the receiver and microphone units with a soft, dry cloth. Do not use abrasive cleaners or solvents. Ensure the microphone capsule is free from dust and debris.
6.2 Cuidado de la batería
The transmitters use Lithium Polymer batteries. To prolong battery life:
- Cargue completamente las baterías antes del primer uso.
- Avoid completely draining the batteries regularly.
- Guarde las unidades en un lugar fresco y seco cuando no las utilice durante períodos prolongados.
7. Solución de problemas
7.1 No Sound or Signal Loss
- Comprobar potencia: Ensure both the receiver and transmitters are powered on and have sufficient battery charge.
- Verificar conexiones: Confirm all cables (power, audio output) are securely connected to the receiver and your audio system.
- Sincronización de frecuencia: If you have multiple units or experience signal issues, re-sync the transmitter with the receiver using the IR pairing method described in Section 4.4. Ensure the IR window on the transmitter is properly aligned with the receiver's IR light during sync.
- Conflicto de frecuencia: If using multiple wireless units, ensure each transmitter/receiver pair is on a unique group and channel. Operating two transmitters on the same frequency will cause interference and prevent proper function. If this occurs, turn off all units, then power on one receiver and its matching transmitter, change its frequency, and then repeat for other units.
- Obstrucciones: Wireless signals can be affected by physical obstructions (walls, large metal objects, human bodies) or other wireless devices. Try to maintain a clear line of sight between the transmitter and receiver.
- Rango: Ensure you are within the effective operating range of the system.
7.2 Unwanted Echo Effect
If you experience an unwanted echo effect, it may be enabled in the receiver's settings. Navigate to the 'Effects' menu (as described in Section 5.2) and adjust the 'Echo.Vol' parameter to 0 or a lower desired level.
8. Especificaciones
| Característica | Especificación |
|---|---|
| Nombre del modelo | D-333T |
| Número de modelo del artículo | SG333T |
| Dimensiones (L x An x Al) | 5.5 x 10.33 x 5.5 pulgadas |
| Peso del artículo | 6.6 libras |
| Fuente de poder | Funciona con pilas |
| Número de baterías | Se requieren 2 baterías de polímero de litio (incluidas) |
| Material | Silicone Rubber, Metal, Acrylonitrile Butadiene Styrene |
| Relación señal a ruido | 74 dB |
| Nivel de ruido | 74 dB |
| Número de canales | 90 |
| Rango de frecuencia | 902-928 MHz |
| Tecnología de conectividad | USB |
| Tipo de conector | USB tipo A |
| Patrón polar | Unidireccional |
| Factor de forma del micrófono | Cuello de cisne |
| Usos recomendados | Vivir |
| Características especiales | Clip, Battery Indicator Light, Mute Function, Volume Control, Gooseneck |
| País natal | Porcelana |
| Código Postal | 739240136988 |
9. Garantía y soporte
For detailed warranty information and technical support, please refer to the official SGPRO webSitio web o contacte directamente con el servicio de atención al cliente. Conserve el recibo de compra para cualquier reclamación de garantía.