1. Introducción
Gracias por la compraasing the Ysametp 5G WiFi Bluetooth Projector. This device is designed to provide a high-quality home theater experience with its native 1080p Full HD resolution, 4K support, and integrated Android system. Please read this manual thoroughly before using the projector to ensure proper operation and to maximize its lifespan.
2. Información de seguridad
Tenga en cuenta las siguientes precauciones de seguridad para evitar daños al proyector y garantizar la seguridad del usuario:
- Fuente de alimentación: Utilice únicamente el adaptador de corriente especificado. Asegúrese de que el volumen de la toma de corrientetage coincide con los requisitos del proyector.
- Ventilación: No obstruya las aberturas de ventilación. Asegúrese de que haya suficiente flujo de aire alrededor del proyector para evitar el sobrecalentamiento.
- Colocación: Coloque el proyector sobre una superficie estable y nivelada. Evite exponerlo a la luz solar directa, cerca de fuentes de calor o en entornos con mucha humedad o polvo.
- Limpieza: Desconecte la alimentación antes de limpiar. Utilice un paño suave y seco. No utilice limpiadores líquidos ni en aerosol.
- Protección ocular: No mire directamente a la lente del proyector cuando la lamp Está encendido, ya que la luz brillante puede causar daños en los ojos.
- Refacción: No intente reparar el proyector usted mismo. Encargue cualquier reparación a personal cualificado.
3. Contenido del paquete
Verifique que todos los artículos estén presentes en el paquete:
- Ysametp 5G WiFi Bluetooth Projector (Model DE-M8-E-An)
- Mando a distancia
- Power Cable (AC 220V with Schuko plug)
- Cable HDMI
- Manual de usuario
4. Producto terminadoview
Familiarícese con los componentes e interfaces del proyector.
Frente 4.1 View

Imagen: Frente view of the Ysametp Projector, highlighting the projection lens and side ventilation grilles.
4.2 Interfaces traseras y laterales
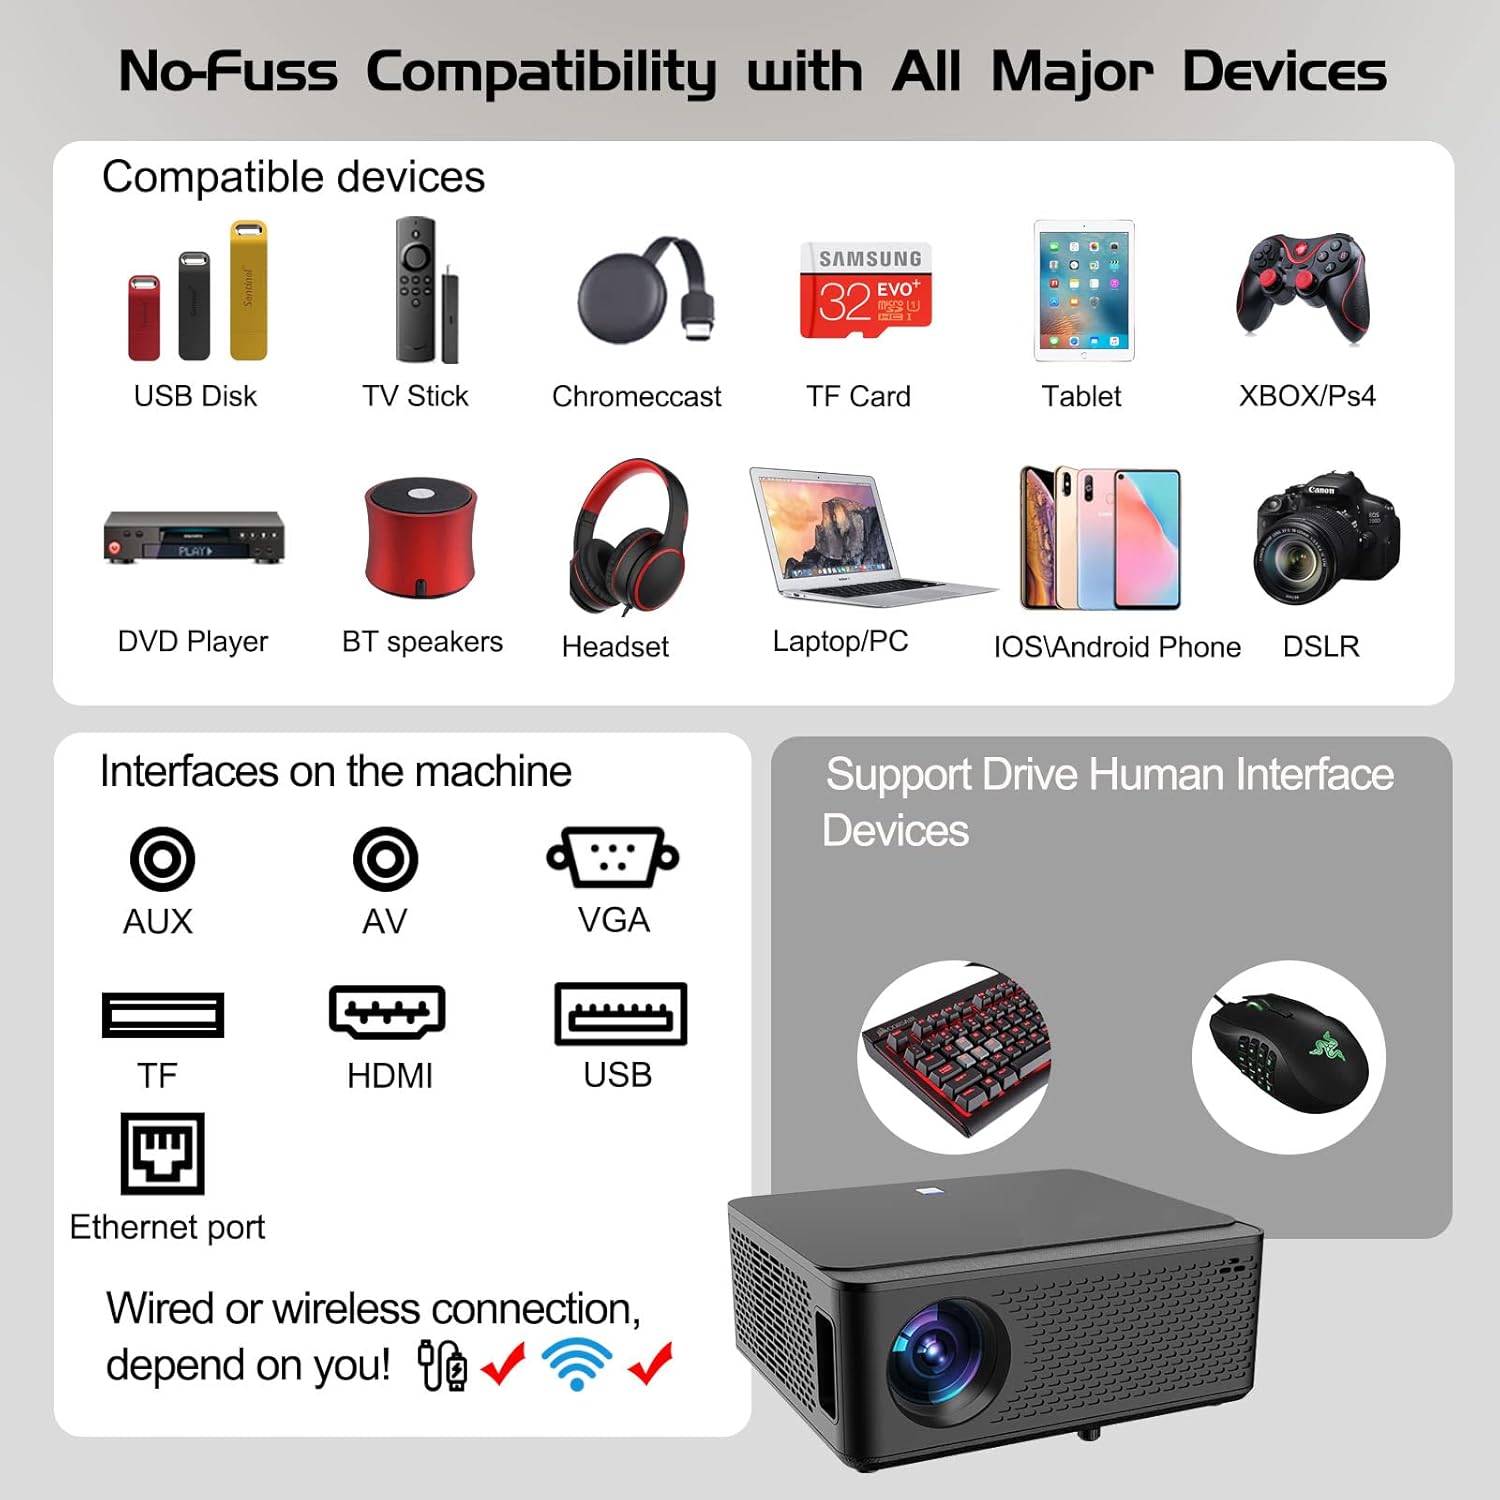
Image: Diagram illustrating the various input and output ports available on the Ysametp Projector, including USB, HDMI, AV, VGA, TF card slot, and Ethernet port.
The projector features a comprehensive set of ports for versatile connectivity:
- Puerto Ethernet: Para conexión a Internet por cable.
- Puerto VGA: For connecting to older computers.
- Puerto USB-A: For connecting USB flash drives or external devices.
- Puerto HDMI: For high-definition audio and video input from various sources.
- Entrada AV: For connecting analog audio/video devices.
- Salida de audio de 3.5 mm: Para conectar altavoces externos o auriculares.
- Ranura para tarjetas TF: For reading media from Micro SD cards.
- Entrada de energía: Para conectar el cable de alimentación de CA.
4.3 Controles superiores
The top of the projector includes a power button for basic on/off functionality. Further controls are available via the remote control and the on-screen display.
4.4 Ajuste de enfoque
A mechanical focus adjustment screw is located on the side of the lens for manual image clarity control.
5. Configuración
5.1 Colocación
Position the projector on a stable surface. The projection distance will determine the screen size. For optimal viewing, asegúrese de que el proyector esté perpendicular a la superficie de proyección.
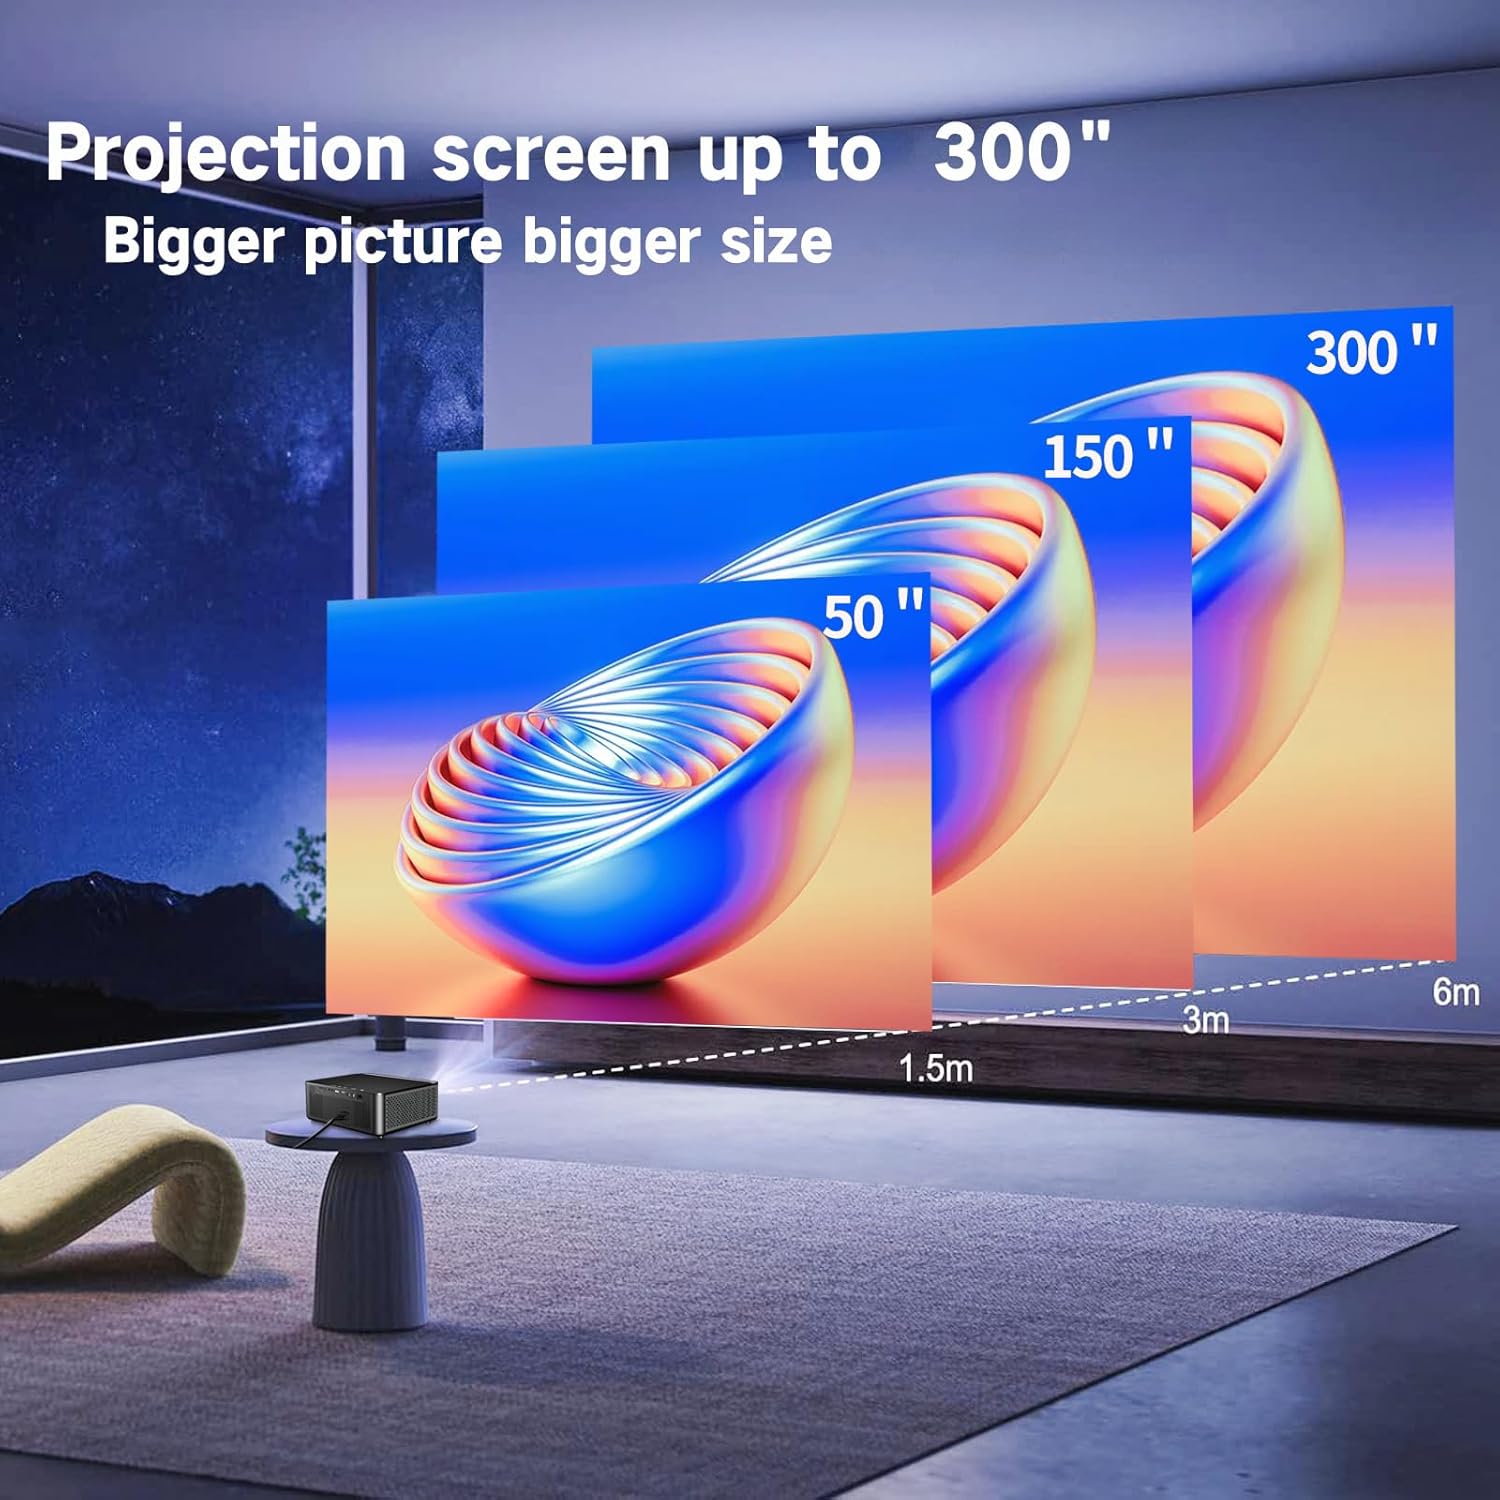
Image: Illustration demonstrating recommended projection distances for achieving screen sizes of 50, 150, and 300 inches.
5.2 Conexión de alimentación
- Conecte el cable de alimentación a la entrada de alimentación del proyector.
- Conecte el otro extremo del cable de alimentación a una toma eléctrica adecuada.
5.3 Encendido inicial
- Presione el botón de encendido en el proyector o el control remoto para encender el dispositivo.
- Allow a few moments for the projector to boot up.
5.4 Enfoque y corrección trapezoidal
After powering on, adjust the image for clarity and proper geometry:
- Enfocar: Rotate the mechanical focus adjustment screw near the lens until the image appears sharp and clear.
- Corrección trapezoidal: If the projected image is trapezoidal (wider at the top or bottom), use the 4D keystone correction feature via the on-screen menu to adjust the image corners until it forms a perfect rectangle.

Image: Diagram showing how 4P/4D keystone correction can be used to adjust the corners of a projected image to achieve a rectangular shape.
6. Instrucciones de funcionamiento
6.1 Conexión de dispositivos externos
El proyector admite varios métodos de conexión:
- HDMI: Connect gaming consoles (PS4, Xbox), laptops, or other HDMI-enabled devices using an HDMI cable.
- USB: Insert a USB flash drive into the USB-A port to play media files directamente.
- Tarjeta TF: Insert a Micro SD (TF) card into the TF card slot to access media.
- VGA/AV: Use these ports for older devices requiring analog connections.
- Bluetooth: Pair Bluetooth speakers or headphones for enhanced audio.

Image: The projector shown with various compatible devices, including laptops, smartphones, gaming consoles, USB drives, and external speakers, demonstrating its versatile connectivity.
6.2 Using the Integrated Android System
The projector comes with an integrated Android system, allowing access to a wide range of applications.

Image: The projector displaying its Android interface, featuring icons for popular streaming services and apps such as Netflix, YouTube, Prime Video, Hulu, Spotify, and TikTok.
- Conexión de red: Connect the projector to your home Wi-Fi network via the settings menu or use an Ethernet cable for a wired connection.
- Acceso a la aplicación: Navigate the Android interface using the remote control. You can download and install applications from the Google Play Store.
- Transmisión: Enjoy content from pre-installed or downloaded streaming services.
6.3 Duplicación de pantalla WiFi 5G
Mirror your smartphone, tablet, or PC screen wirelessly to the projector.

Image: A family enjoying content mirrored from a smartphone onto the large projected screen, illustrating the 5G WiFi Screen Mirroring feature for iOS, Android, and Windows devices.
- Ensure both the projector and your device are connected to the same 5G WiFi network.
- Select the "Screen Mirroring" option on the projector's menu.
- On your smartphone/tablet/PC, activate its screen mirroring function (e.g., "Smart View" for Android, "AirPlay" for iOS, "Cast" for Windows).
- Seleccione el proyector de la lista de dispositivos disponibles para establecer la conexión.
7. Mantenimiento
7.1 Limpieza de la lente
Limpie suavemente la lente del proyector con un paño suave y sin pelusa, especialmente diseñado para superficies ópticas. No utilice limpiadores abrasivos ni aplique demasiada fuerza.
7.2 Limpieza del cuerpo del proyector
Utilice un paño suave y seco para limpiar el exterior del proyector. Evite el uso de productos químicos o disolventes agresivos.
7.3 Optical Engine Protection
The projector features a full-sealed optical engine designed to prevent dust from entering the internal components, reducing the need for frequent internal cleaning and extending the device's lifespan.

Imagen: Un interno view diagram of the projector's full-sealed optical engine, highlighting its design to prevent dust from entering and affecting performance.
7.4 litrosamp Vida
The projector utilizes advanced SmarEco technology to minimize energy consumption and extend the lamp's lifespan up to 60,000 hours, providing long-term reliability.

Imagen: Un diagrama detallado muestraasing the projector's lamp technology, indicating a lifespan of over 30,000 hours.
8. Solución de problemas
Si tiene problemas con su proyector, consulte los siguientes problemas y soluciones comunes:
| Problema | Posible causa | Solución |
|---|---|---|
| No hay imagen en la pantalla. | Cable de alimentación suelto; fuente de entrada incorrecta; dispositivo no conectado. | Check power connections. Select correct input source (HDMI, AV, etc.). Ensure external device is powered on and connected properly. |
| La imagen está borrosa. | Enfoque no ajustado; proyector demasiado lejos/cerca. | Adjust the focus ring on the lens. Ensure projector is within optimal projection distance. |
| La imagen es trapezoidal. | El proyector no está perpendicular a la pantalla. | Use the 4D keystone correction feature in the settings menu to adjust the image shape. |
| No hay sonido. | Volumen demasiado bajo; dispositivo de audio externo no conectado; salida de audio incorrecta seleccionada. | Increase volume. Check external speaker/headphone connection. Ensure correct audio output is selected in settings. |
| No se puede conectar a WiFi. | Contraseña incorrecta; fuera de rango; problema de red. | Verifique la contraseña de Wi-Fi. Acerque el proyector al router. Reinicie el router y el proyector. |
9. Especificaciones
Key technical specifications for the Ysametp 5G WiFi Bluetooth Projector (Model DE-M8-E-An):
- Marca: ysametp
- Número de modelo: DE-M8-E-An
- Color: Negro
- Tipo de producto: Proyector portátil
- Tecnología de conectividad: HDMI, USB, Wi-Fi (5G), Bluetooth
- Características especiales: Integrated WiFi, Android System, 4D Keystone Correction
- Dispositivos compatibles: Game Consoles, Speakers, Laptops, Smartphones, Tablets
- Resolución de pantalla: Nativo 1920 x 1080 (Full HD)
- Resolución máxima de pantalla: 4096 x 2160 (compatible con 4K)
- Tipo de pantalla: DLP
- Dimensiones del producto: 26L x 23W x 11H centímetros
- Factor de forma: Portátil
- Tipo de montaje: Montaje de mesa
- Lamp Esperanza de vida: Hasta 60,000 horas

Image: A visual comparison highlighting the projector's 20,000 Lumens brightness, Native 1080P resolution, and 4K support, contrasting it with a lower specification projector.
10. Garantía y soporte
The Ysametp Projector comes with a 3-year service warranty. For technical support or warranty claims, please contact Ysametp customer service through your purchase platform or the official Ysametp websitio.