
1. Introducción
This manual provides comprehensive instructions for the installation, operation, and maintenance of the TYAN B7126T65V10E4HR Thunder SX TS65-B7126 Storage Server. Please read this manual thoroughly before operating the server to ensure proper functionality and to prevent damage.
2. Información de seguridad
Tenga en cuenta las siguientes precauciones de seguridad para evitar lesiones y daños al equipo:
- Desconecte siempre la alimentación antes de realizar cualquier instalación o mantenimiento.
- Asegure una conexión a tierra adecuada para evitar descargas eléctricas.
- Operate the server in a well-ventilated environment to prevent overheating.
- Do not expose the server to moisture or extreme temperatures.
- Sólo personal calificado debe realizar servicios o reparaciones.
3. Contenido del paquete
Verifique que todos los artículos estén presentes en el paquete:
- TYAN B7126T65V10E4HR Thunder SX TS65-B7126 Storage Server Unit
- Cable(s) de alimentación
- Accessory Kit (screws, cables, etc.)
- Quick Installation Guide (this manual serves as the detailed guide)
4. Producto terminadoview
The TYAN Thunder SX TS65-B7126 is a high-performance storage server designed for demanding data center environments. It features extensive storage capabilities and flexible expansion options.
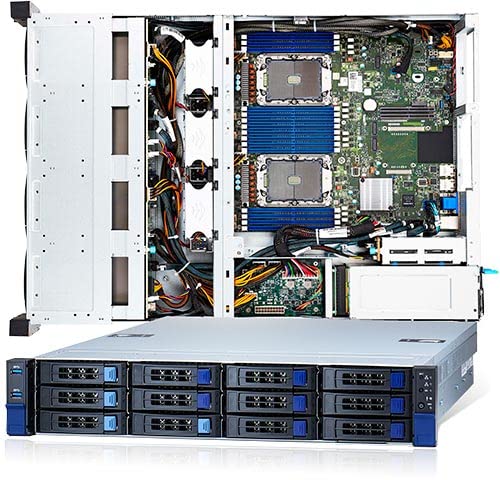
Figura 4.1: Frente view of the TYAN B7126T65V10E4HR Thunder SX TS65-B7126 Storage Server, showing drive bays and front panel controls.
Características principales:
- Memoria: 16 DIMM slots supporting DDR4 3200 memory.
- Almacenamiento frontal: 12 x 3.5" SATA hot-swap, tool-less drive bays, with optional support for 4 NVMe U.2 drives.
- Rear Storage: 2 x 2.5" SATA hot-swap, tool-less drive bays.
- Redes: PCIe 3.0 x16 OCP v2.0 LAN mezzanine slot (Type 1).
- Almacenamiento interno: 1 x NVMe/PCIe 3.0 x2 M.2 2280 slot.
5. Configuración
5.1 Instalación en bastidor
The server is designed for standard 19-inch rack mounting. Secure the server using appropriate rack rails and screws (typically included in the accessory kit) to ensure stability and proper airflow.
5.2 Instalación de la unidad
- 3.5" SATA/NVMe Drives: Open the drive bay latch, slide the drive into the bay until it clicks into place. For NVMe U.2 drives, ensure the correct backplane configuration is in place.
- 2.5" SATA Rear Drives: Locate the rear 2.5" drive bays. Slide the drives into the bays until secured.
- M.2 NVMe Drive: Install the M.2 drive into the dedicated M.2 2280 slot on the motherboard, securing it with the provided screw.
5.3 Instalación de la memoria
Install DDR4 3200 DIMMs into the 16 available slots. Refer to the motherboard manual for specific memory population rules to optimize performance.
5.4 Conexión de alimentación
Connect the power cord(s) to the server's power supply unit(s) and then to a grounded power outlet or PDU. Ensure all power connections are secure.
5.5 arranque inicial
Press the power button on the front panel. Monitor the boot process and access the BIOS/UEFI setup as needed to configure boot devices, RAID arrays, and other system settings.
6. Instrucciones de funcionamiento
6.1 Instalación del sistema operativo
Install your preferred operating system (e.g., Windows Server, Linux distribution) using a bootable USB drive or network installation. Ensure all necessary drivers are installed for optimal hardware performance.
6.2 Configuración de almacenamiento
Configure your storage drives. For SATA drives, you may use the onboard RAID controller or a separate HBA. For NVMe drives, ensure the operating system has the appropriate drivers. Create logical volumes or file systems as required for your application.
6.3 Configuración de red
Configure the network interfaces, including the OCP v2.0 LAN mezzanine card, with appropriate IP addresses, subnet masks, and gateway settings for your network environment.
7. Mantenimiento
7.1 Limpieza
Regularly clean the server's exterior and ensure air vents are free from dust accumulation. Use compressed air to clear dust from internal components, ensuring power is disconnected first.
7.2 actualizaciones de firmware
Revise periódicamente las instrucciones del fabricante. website for updated BIOS/UEFI, BMC, and RAID controller firmware. Apply updates as recommended to improve stability, performance, and security.
7.3 Reemplazo de la unidad
The server features hot-swap drive bays. For failed drives, identify the faulty unit, unmount it from the operating system (if applicable), and carefully remove it. Insert a new, compatible drive, ensuring it seats correctly.
8. Solución de problemas
8.1 Sin energía
- Check power cord connections to the server and power outlet.
- Verify the power supply unit (PSU) status indicators.
- Asegúrese de que la toma de corriente funcione.
8.2 El sistema no arranca
- Check memory modules are properly seated.
- Verify boot device order in BIOS/UEFI.
- Listen for POST (Power-On Self-Test) beep codes and consult the motherboard manual for their meaning.
8.3 Unidad no detectada
- Ensure the drive is fully seated in its bay.
- Check drive status LEDs.
- Verify cabling for non-hot-swap drives.
- Check BIOS/UEFI or RAID controller settings for drive detection.
9. Especificaciones
| Característica | Detalle |
|---|---|
| Modelo | B7126T65V10E4HR Thunder SX TS65-B7126 |
| Fabricante | TYAN |
| Soporte de memoria | 16 DIMM slots, DDR4 3200 |
| Front Drive Bays | 12 x 3.5" SATA (hot-swap, tool-less) w/ opt. 4 NVMe U.2 |
| Rear Drive Bays | 2 x 2.5" SATA (hot-swap, tool-less) |
| Internal M.2 Slot | 1 x NVMe/PCIe 3.0 x2 M.2 2280 |
| LAN Mezzanine Slot | PCIe 3.0 x16 OCP v2.0 (Type 1) |
| ASIN | B0BLGZ15V10E4HR |
| Fecha de primera disponibilidad | 4 de noviembre de 2022 |
10. Garantía y soporte
For warranty information and technical support, please refer to the official TYAN webSitio web o contacte a su distribuidor autorizado. Conserve su comprobante de compra para reclamaciones de garantía.
Recursos en línea: Visit the TYAN official website for the latest drivers, firmware, and additional documentation.