
1. Producto terminadoview
The Phanteks Eclipse G500A DRGB is a high-performance mid-tower chassis designed to accommodate modern PC components with excellent airflow and integrated D-RGB lighting. It features an Ultra-fine Performance Mesh on both the front and top panels, ensuring optimal cooling and dust filtration.

Figure 1: Phanteks Eclipse G500A DRGB Mid Tower Case, Matte White.
Características principales:
- Diseño de alto flujo de aire: Ultra-fine Performance Mesh on front and top panels for superior cooling and dust filtration.
- Iluminación D-RGB integrada: Built-in D-RGB lighting on the front and side, controllable via manual buttons or motherboard synchronization.
- Ventiladores preinstalados: Includes three high-performance M25-140 D-RGB fans.
- Amplio soporte de refrigeración: Supports up to 420mm radiators in the front and 360mm in the top.
- Interior espacioso: Accommodates full-length GPUs and offers vertical GPU mounting options (with optional bracket).
- Almacenamiento flexible: Multiple HDD and SSD locations, including dedicated SSD brackets and stackable HDD bays.
- Modern Front I/O: Features 10Gbps USB-C, 2x USB 3.0, Microphone/Headphone Combo, Power button, and D-RGB controls.
2. Configuración e instalación
This section provides general guidelines for installing components into your Phanteks Eclipse G500A DRGB chassis. Always refer to your component manuals for specific installation instructions.
2.1 Preparación del chasis
Before installing components, ensure the chassis is placed on a stable, flat surface. Remove the side panels by gently pulling them open (they are hinged) to access the interior.
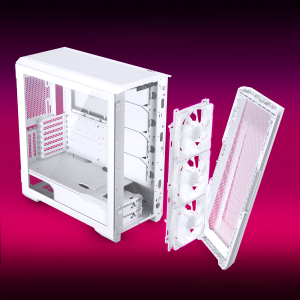
Figure 2: The removable front panel allows for easy installation of fans and radiators.
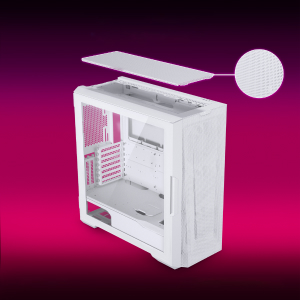
Figure 3: The removable top mesh panel facilitates fan and radiator installation.
2.2 Instalación de la placa base
The G500A supports ATX, micro-ATX, mini-ITX, and E-ATX motherboards (up to 280mm wide). Install the necessary standoffs for your motherboard form factor, then secure the motherboard with screws.
2.3 Instalación de la unidad de fuente de alimentación (PSU)
Install the PSU at the bottom rear of the chassis. The G500A supports PSUs up to 250mm in length (195mm if all 4 bottom HDD positions are used).
2.4 Instalación del dispositivo de almacenamiento
The case offers extensive storage options:
- Unidades SSD de 2.5": Up to 9 dedicated 2.5" drive bays are included.
- Discos duros de 3.5": Two stackable 3.5" HDD bays are included, expandable up to a total of 10 HDD bays.

Figure 4: Multiple storage options for 2.5" and 3.5" drives.
2.5 Instalación de la tarjeta gráfica (GPU)
The G500A supports graphics cards up to 435mm in length. For vertical GPU mounting, an optional bracket (PH-VGPUKT4.0_03) or riser cable is required.
2.6 Instalación del sistema de refrigeración
The chassis supports various fan and radiator configurations:
- Soporte de los fans:
- Front: 3x 120mm or 3x 140mm (3x 140mm pre-installed)
- Superior: 3x 120 mm o 3x 140 mm
- Trasero: 1x 120 mm o 1x 140 mm
- Liquid Cooling Radiator Support:
- Front: Up to 360mm (120mm radiator) or 420mm (140mm radiator)
- Top: Up to 360mm (120mm radiator) or 280mm (140mm radiator)
- Trasero: 120mm
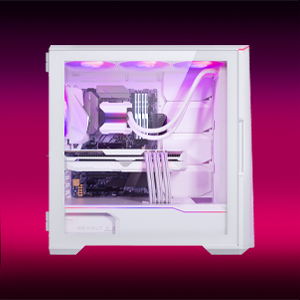
Figure 5: High-end cooling compatibility with various fan and radiator sizes.
2.7 Gestión de cables
The G500A provides ample space and Velcro ties for efficient cable management, ensuring a clean interior and optimal airflow. Cover doors help to conceal cables on the backside of the motherboard tray.
2.8 Vídeos de instalación
Video 1: Detailed PC Build Guide in the Phanteks Eclipse G500A (13:33).
Video 2: Another comprehensive PC assembly guide featuring the Phanteks Eclipse G500A (14:01).
3. Instrucciones de funcionamiento
3.1 Panel de E/S frontal
El panel de E/S frontal proporciona un acceso cómodo a los puertos y controles esenciales:
- Botón de encendido: Para encender o apagar el sistema.
- Puertos USB 3.0 (x2): Para conectar dispositivos USB 3.0.
- USB-C Gen2 Port (x1): For high-speed USB-C connectivity.
- Conector combinado de micrófono y auriculares: Para entrada y salida de audio.
- D-RGB Mode Button: Cycles through pre-programmed D-RGB lighting effects.
- D-RGB Color Button: Changes the color of the D-RGB lighting.

Figure 6: Front I/O panel with USB-C, USB 3.0, audio, and D-RGB controls.
3.2 Control de iluminación D-RGB
The integrated D-RGB lighting can be controlled in two ways:
- Control manual: Use the D-RGB Mode and Color buttons on the front I/O panel to cycle through effects and colors without software.
- Sincronización de la placa base: Connect the D-RGB controller to a compatible motherboard's D-RGB header to enable software control and synchronization with other D-RGB components.

Figure 7: Integrated D-RGB lighting with included M25-140 D-RGB fans.
4. Mantenimiento
El mantenimiento regular ayuda a garantizar un rendimiento óptimo y la longevidad de los componentes de su PC.
- Filtración de polvo: The Ultra-fine Performance Mesh on the front and top panels acts as a dust filter. Periodically remove these panels and clean the mesh to maintain optimal airflow.
- Limpieza interior: Use compressed air to remove dust from inside the chassis, especially from fans, heatsinks, and other components. Ensure the system is powered off and unplugged before cleaning.
- Limpieza exterior: Limpie las superficies exteriores con un paño suave, damp Paño. Evite limpiadores abrasivos o disolventes.
5. Solución de problemas
Esta sección aborda problemas comunes que puede encontrar con la carcasa de su PC.
5.1 Problemas de energía
- El sistema no se enciende:
- Ensure all power cables (24-pin ATX, 8-pin CPU, GPU power) are securely connected to the motherboard and components.
- Verifique que el interruptor de la fuente de alimentación esté en la posición “ENCENDIDO”.
- Check that the front panel power switch cable is correctly connected to the motherboard's F_PANEL header.
5.2 D-RGB Lighting Issues
- D-RGB not lighting up or incorrect colors:
- Ensure the D-RGB cables from the fans and LED strips are correctly connected to the integrated D-RGB controller.
- If using motherboard synchronization, ensure the D-RGB controller is connected to the motherboard's D-RGB header and that the motherboard's lighting software is configured correctly.
- Verify the D-RGB controller is receiving power (e.g., via SATA power connector).
- Try cycling through modes and colors using the front I/O buttons to rule out software issues.
5.3 Fan Noise or Malfunction
- Ruido excesivo del ventilador:
- Verifique si hay acumulación de polvo en las aspas del ventilador y límpielas si es necesario.
- Ensure fans are securely mounted and not vibrating against the chassis.
- Verify fan speeds are controlled appropriately by the motherboard or fan controller.
- El ventilador no gira:
- Check fan power connections to the motherboard or fan hub.
- Ensure fan headers are enabled in the BIOS/UEFI settings.
6. Especificaciones
Detailed technical specifications for the Phanteks Eclipse G500A DRGB Mid Tower Case.
| Característica | Especificación |
|---|---|
| Nombre del modelo | Eclipse G500A DRGB, White |
| Número de modelo del artículo | PH-EC500GA_DMW01A |
| Factor de forma | Torre Media |
| Dimensiones (LxAnxAl) | 19.69 x 9.45 x 20.28 pulgadas (500 x 240 x 515 mm) |
| Peso del artículo | 23.2 libras |
| Material | Chasis de acero, vidrio templado |
| Soporte de placa base | ATX, micro-ATX, mini-ITX, E-ATX (hasta 280 mm de ancho) |
| Ranuras de expansión | 7 |
| Soporte de GPU vertical | Yes (with optional bracket PH-VGPUKT4.0_03 or riser cable) |
| Bahías de unidad internas de 3.5" | 10 (2x included, expandable) |
| Bahías de unidad internas de 2.5" | 9 (9x incluidos) |
| E/S frontal | 2x USB 3.0, USB-C Gen2, Microphone/Headphone Combo, Power Button, D-RGB Mode, D-RGB Color |
| Ventiladores preinstalados | 3x M25-140 D-RGB (Front) |
| Longitud máxima de GPU | 435 mm / 17.2 pulgadas |
| Altura máxima del enfriador de CPU | 185 milímetros |
| Longitud máxima de la fuente de alimentación | 195mm (if all 4 bottom HDD positions used) / 250mm (if 2 bottom HDD used) |
| Método de enfriamiento | Ventilador, Agua |
7. Garantía y soporte
Phanteks products are manufactured with high-quality standards. For warranty information and technical support, please refer to the official Phanteks websitio o póngase en contacto con su servicio de atención al cliente.
Información del contacto:
- Websitio: www.phanteks.com
- Phanteks Taiwan Inc.: 11.º piso, n.º 150, calle Jian 1.ª, distrito Zhonghe, ciudad de Nueva Taipei 235
- Importer EU (Axpertec Int B.V.): Sydneystraat 33, 3047 BP Rotterdam, The Netherlands
- Importer US (Axpertec Inc.): 20465 E Walnut Dr. N, City of Industry, California 91789, United States

Figure 8: Phanteks company and importer details, along with compliance markings (CE, UKCA, RoHS).