
1. Introducción
This manual provides detailed instructions for the installation, operation, and maintenance of your Naifay Single Din Car Stereo with a 7-inch flip-out touchscreen. This unit supports Apple CarPlay, Android Auto, Bluetooth connectivity, FM radio, and various media inputs, enhancing your in-car entertainment and navigation experience.
2. Información de seguridad
- Instalación profesional recomendada: Debido a la complejidad de los sistemas eléctricos de los automóviles, se recomienda encarecidamente una instalación profesional para evitar daños a la unidad o al vehículo.
- Fuente de alimentación: Ensure your car's power supply is 16V or below. Incorrect voltagPuede dañar la unidad.
- Alambrado: Always connect the yellow wire to the positive pole of the battery (12V+ constant), the black wire to the negative pole of the battery (ground), and the red wire to the ACC (car keyhole) for proper power supply. Ensure all positive and negative wires are correctly insulated to avoid short circuits.
- Seguridad en la conducción: No opere la unidad de forma que le distraiga de la conducción. Priorice siempre la seguridad vial.
- Operación de la pantalla: The screen is manually operated. Ensure it is securely positioned when in use and folded away when not needed to avoid obstruction or damage.
3. Contenido del paquete
Verifique que todos los artículos estén presentes en el paquete:
- Naifay Single Din Car Stereo Unit
- Cable de alimentación
- HD Camera (Backup Camera)
- Cables de cámara
- Mando a distancia
- Manual de usuario
- Llaves de desmontaje

Image: Package contents and wiring diagram for the Naifay Single Din Car Stereo.
4. Producto terminadoview
4.1. Panel frontal y pantalla
The unit features a 7-inch LCD flip-out touchscreen for interactive control and display. The screen can be manually pulled out for use and folded back when not required. The front panel includes essential controls and a USB port.

Imagen: Frente view of the Naifay Single Din Car Stereo with its 7-inch manual flip-out screen extended.
4.2. Rear Ports and Connections
The rear of the unit provides various ports for connectivity, including:
- Antenna Input (ANT)
- Audio Outputs (L-OUT, R-OUT)
- Video Outputs (V-OUT1, V-OUT2)
- CVBSIN (Video Input)
- CAMIN (Camera Input)
- Conector del cable de alimentación
- Puerto USB
- Entrada auxiliar
- Entrada de micrófono externo

Imagen: Trasera view of the Naifay Single Din Car Stereo, detailing the various input and output ports for audio, video, and power connections.
5. Configuración
5.1. Installation Size Check
Before installation, confirm that the unit's dimensions (178mm L x 50mm H / 7in L x 1.97in H) match your car's dashboard opening. If the size is incompatible, a mounting kit may be required. Buscar a compatible dash kit using your vehicle's year, make, and model.

Image: Diagram illustrating the dimensions of the Naifay Single Din Car Stereo, including the main unit and the extended 7-inch screen.
5.2. Instrucciones de cableado
Refer to the wiring diagram for correct connections. Improper wiring can prevent the unit from powering on or saving settings.
- Cable amarillo (B+): Connect to the positive pole of the car battery (12V+ constant).
- Cable negro (GND): Connect to the negative pole of the car battery (ground).
- Cable rojo (ACC): Connect to the car's ignition power wire.
- Cables de altavoz: Connect the corresponding speaker wires (Green/Green-Black, White/White-Black, Gray/Gray-Black, Purple/Purple-Black) to your car's speakers.
- Cable azul (ANT): Connect to the auto antenna or ampEncendido remoto del lifier.
- Cable marrón (CLAVE): For steering wheel controls.
- Cable naranja (ILL): For illumination (headlight control line).
- Cable rosa (REVERSO): Connect to the reversing light positive electrode for backup camera activation.

Image: Comprehensive wiring diagram for connecting the Naifay Single Din Car Stereo to the vehicle's electrical system and speakers.
5.3. Instalación de la cámara de respaldo
The unit includes a 12-lamp high-definition reversing camera with night vision and a 170-degree wide-angle view. Connect the camera's video cable to the CAMIN input on the stereo and the power wire to the reversing light positive electrode. The unit will automatically display the reverse image when the vehicle is in reverse gear.

Image: Diagram illustrating the connection and functionality of the rear view camera, showing its wide-angle view and automatic activation.
6. Instrucciones de funcionamiento
6.1. Encendido/apagado y funcionamiento de la pantalla
Press the power button to turn the unit on or off. The 7-inch screen is manually operated; gently pull it out to extend and push it back to retract. The unit will continue to function even with the screen retracted.
Video: Demonstrates the manual flip-out screen mechanism of the Naifay Single Din Car Radio, showing how it extends and retracts.
6.2. Función de radio
Access the FM radio function from the main menu. The unit supports full digital electronic control for searching radio stations and automatically scans for available frequencies. It can store up to 18 stations in memory.

Image: The FM Radio interface, displaying frequency tuning and preset station options.
6.3. Conexión Bluetooth
To connect your smartphone via Bluetooth, navigate to the Bluetooth menu on the car stereo. On your phone, search for available Bluetooth devices and select 'Carkit'. Enter the PIN '0000' if prompted. Once connected, you can make hands-free calls and stream music.

Image: The Bluetooth calling interface on the car stereo, showing a dial pad and call options.
6.4. Apple CarPlay y Android Auto
Connect your iPhone or Android phone to the stereo via a USB data cable. The unit will automatically launch Apple CarPlay or Android Auto, allowing access to navigation, music, calls, and messages through the touchscreen or voice commands.

Image: The car stereo displaying both Apple CarPlay and Android Auto interfaces, showing various app icons and navigation.
Vídeo: Terminadoview of the Naifay Flip Out Single Din Car Stereo, highlighting its Apple CarPlay and Android Auto compatibility and features.
6.5. Función Mirror Link
The Mirror Link function allows you to display your smartphone's screen content directly on the car stereo. Connect your phone via USB and select the Mirror Link option. This enables viewing of online GPS navigation, videos, and other apps from your phone.

Image: The Mirror Link feature in use, showing a smartphone's display mirrored onto the car stereo's screen for navigation.
6.6. USB/SD/AUX Input
The unit supports media playback from USB drives, SD cards, and auxiliary input devices. Insert your media into the respective ports to access music and video files.

Image: Close-up of the car stereo's inputs, highlighting support for USB, SD card, and AUX connections for media playback.
6.7. Control del volante
The unit supports steering wheel control. After connecting the brown KEY wire, you can configure the steering wheel buttons to control functions like volume, track skipping, and station changes directly from your steering wheel.
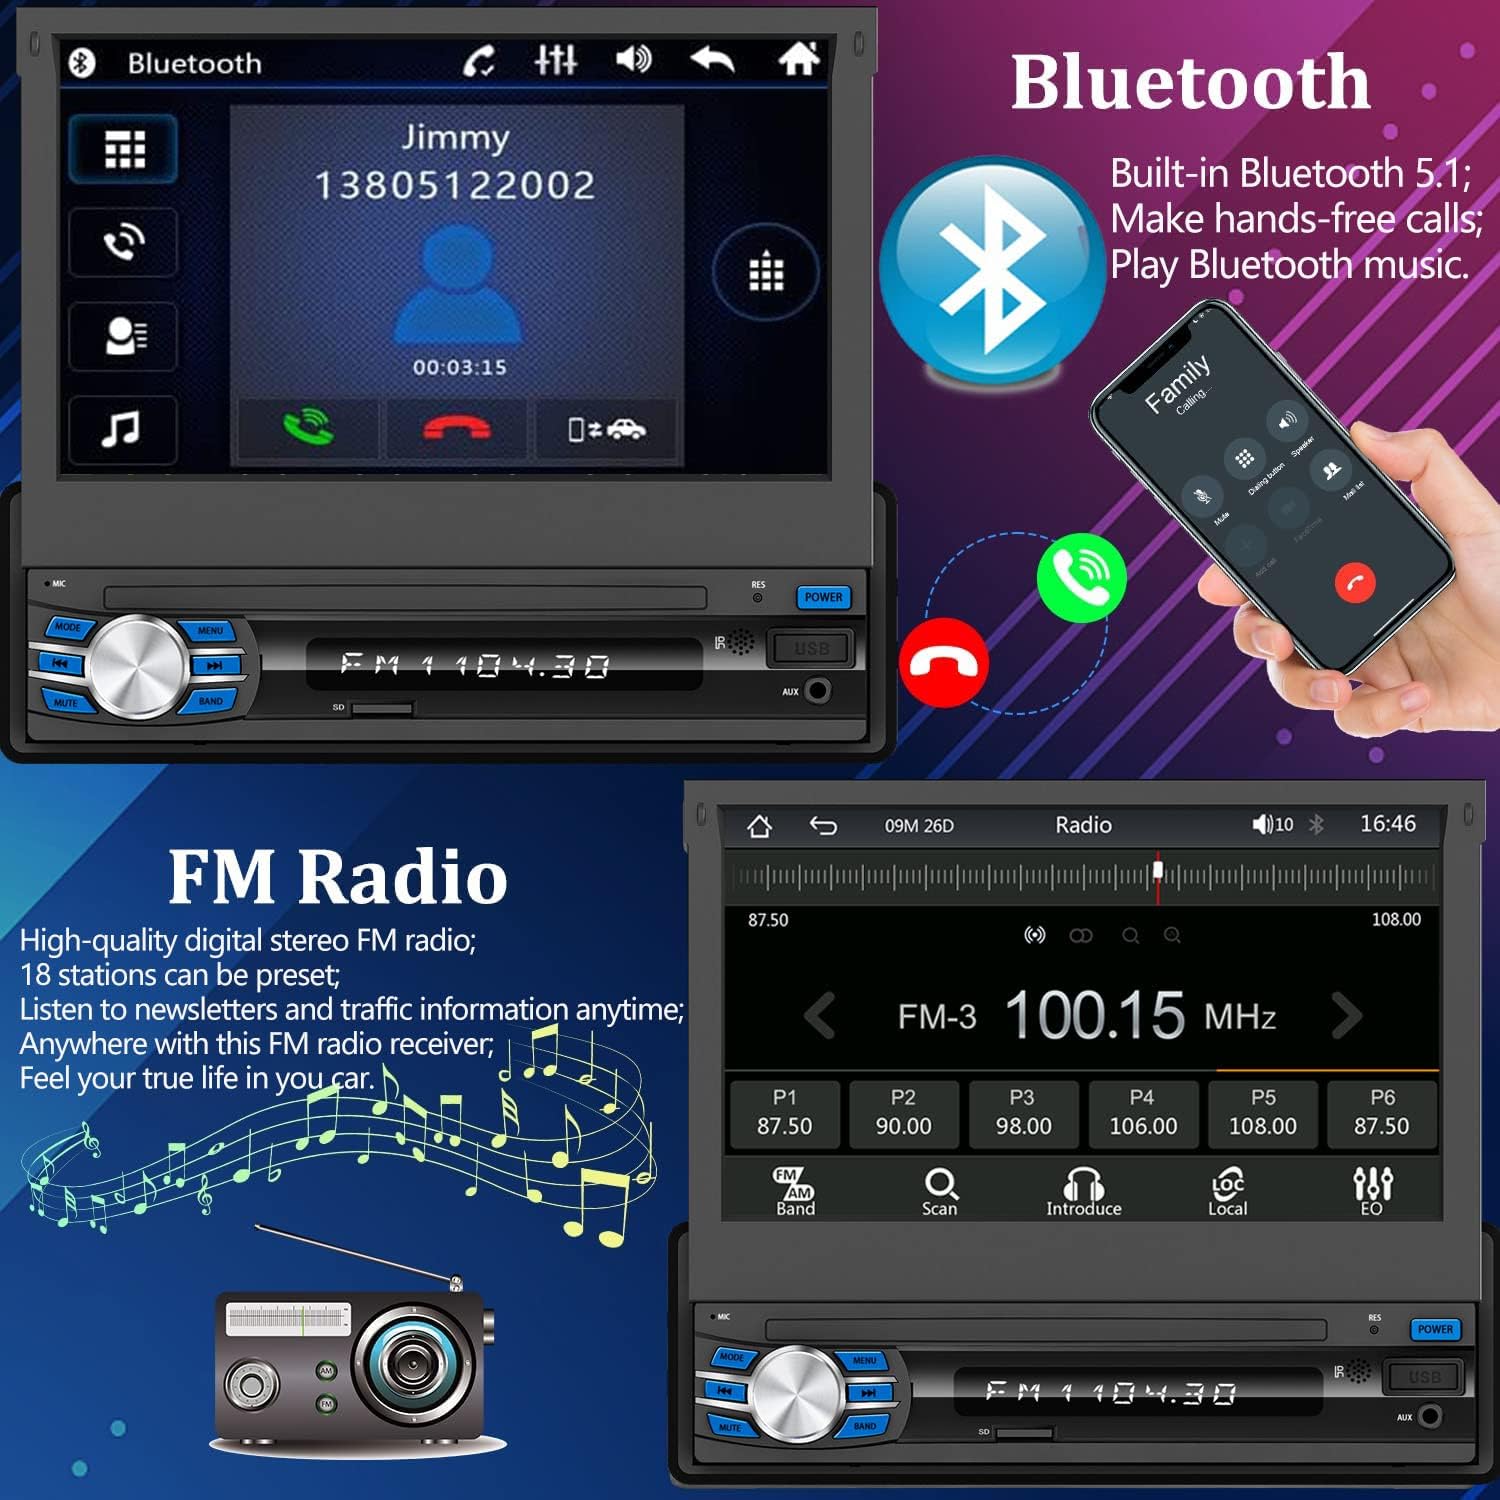
Image: The steering wheel control setup screen on the car stereo, showing options to learn and assign functions to vehicle steering wheel buttons.
6.8. Ajustes de audio (EQ)
Customize your audio experience using the built-in 10-band equalizer (EQ). Adjust frequency bands to suit your preferences for different music genres (e.g., Jazz, Classic, Rock, Pop, Soft).
Image: The audio equalizer interface, showing a 10-band graphic EQ for fine-tuning sound output.
7. Mantenimiento
- Limpieza de la pantalla: Utilice un paño suave y seco para limpiar la pantalla táctil. Evite limpiadores abrasivos o disolventes.
- Limpieza general: Mantenga la unidad libre de polvo y residuos. Utilice un cepillo suave o aire comprimido para las zonas de difícil acceso.
- Evite los líquidos: No exponga la unidad a humedad excesiva ni a líquidos.
8. Solución de problemas
8.1. Unit Does Not Power On / Settings Not Saved
Posible causa: Incorrect wiring of power cables.
Solución: Verify that the yellow (B+), black (GND), and red (ACC) wires are connected correctly as per the wiring diagram. Ensure the yellow wire has constant 12V power and the red wire has switched 12V power.
8.2. No hay sonido después de la instalación
Posible causa: Wiring error or short-circuited speaker wires.
Solución: Check all speaker wire connections for proper polarity and ensure no wires are short-circuited to the car's metal frame. If an external amplifier is used, ensure it is powered on and correctly connected.
8.3. No se puede conectar por Bluetooth
Posible causa: Incorrect pairing procedure or phone settings.
Solución: Asegúrese de que Bluetooth esté habilitado en su teléfono y en el estéreo del automóvil. Buscar 'Carkit' on your phone and pair. No need to open Bluetooth settings on the car stereo, only operate on the mobile phone.
8.4. No se puede Buscar Estaciones FM
Posible causa: Antenna not properly connected or damaged.
Solución: Ensure the antenna plug is fully inserted. Check for any disconnections in the antenna line. If issues persist, try inserting a metal strip into the antenna port to test for reception.
9. Especificaciones
| Característica | Especificación |
|---|---|
| Marca | Naifay |
| Número de modelo | D1 |
| Tipo de pantalla | 7-inch Flip Out Touchscreen |
| Tecnología de conectividad | Auxiliar, Bluetooth, USB |
| Tipo de controlador | Android, iOS |
| Dispositivos compatibles | teléfono inteligente, altavoz |
| Modo de salida de audio | Estéreo |
| Configuración de canales de sonido envolvente | 4.0 |
| Número de canales | 4 |
| Codificación de vídeo | H.264, H.265/HEVC, MPEG-4, etc. |
| Servicios de Internet compatibles | Mapas |
| Método de control | Remoto |
| Tipo de salida de audio | Oradores |
| Tecnología inalámbrica | Bluetooth |
| Formatos de audio compatibles | WAV, WMA |
| Dimensiones del artículo (Pr. x An. x Al.) | 7.48" de profundidad x 2.44" de ancho x 7.3" de alto |
10. Garantía y soporte
The Naifay Single Din Car Stereo (Model D1) comes with a Garantía del fabricante de 1 años. Replacement is available within 12 months of purchase.
For technical support, troubleshooting assistance, or warranty claims, please contact Naifay customer service. You can typically find contact information by clicking on "Sold by Naifay" on the product page and selecting "Ask a question." Naifay aims to provide quick replies within 24 hours and offers lifetime after-sales consultation and technical support.

Image: Naifay customer support details, including response times, return policy, replacement period, and lifetime technical support.