Pro-Ject Debut III Phono HG OM5e
Manual de usuario del tocadiscos Pro-Ject Debut III Phono SB
Model: Debut III Phono HG OM5e
Introducción
Welcome to the user manual for your new Pro-Ject Debut III Phono SB Audiophile Turntable. This manual provides essential information for setting up, operating, and maintaining your turntable to ensure optimal performance and longevity. Please read these instructions carefully before first use.

Figure 1: Pro-Ject Debut III Phono SB Turntable (Walnut)
The Pro-Ject Debut III Phono SB is an audiophile-grade turntable featuring an 8.6" aluminum tonearm, electronic speed selection, and a pre-mounted Ortofon OM5e phono cartridge. It includes a built-in phono preamp para una conectividad versátil.
Contenido del paquete
Before beginning setup, please ensure all components listed below are present in your package:
- Pro-Ject Debut III Phono SB Turntable
- Guardapolvo
- Estera de fieltro
- Fuente de alimentación
- RCA Cable (semi-balanced shielded audio cable, 1.23m)
- Standard Flat Belt (for 33/45 RPM)
- Transportador de alineación de cartucho
- Round Belt (for 78 RPM)
- Peso antipatinaje
- Adapter for 7" Singles
- Ortofon OM5e Phono Cartridge (pre-mounted)
Instrucciones de instalación
Follow these steps carefully to set up your turntable.
1 Colocación
Coloque el tocadiscos sobre una superficie estable y nivelada, alejado de la luz solar directa, fuentes de calor y vibraciones fuertes. Asegúrese de que haya una ventilación adecuada alrededor de la unidad.
2. Instalación del plato y la correa
- Carefully place the heavy steel platter onto the turntable spindle.
- Locate the drive motor pulley. Gently stretch the standard flat belt (for 33/45 RPM) around the motor pulley and the inner rim of the platter. For 78 RPM playback, use the round belt.

Figure 2: Turntable Platter
Ensure the drive belt is correctly seated around the motor pulley and the platter's inner rim for stable rotation.
3. Configuración del brazo y del cartucho
Your Ortofon OM5e cartridge is pre-mounted and pre-adjusted. However, you will need to set the tracking force and anti-skating.
- Establecer fuerza de seguimiento: Rotate the counterweight at the rear of the tonearm until the tonearm floats freely and is balanced horizontally. Lock the tonearm in its rest. Rotate the tracking force dial (the numbered ring on the counterweight) to '0'. Then, rotate the entire counterweight (including the dial) counter-clockwise until the desired tracking force is set. For the Ortofon OM5e, the recommended tracking force is typically 1.75g.
- Conjunto Anti-Skating: Attach the anti-skating weight to the small thread loop on the tonearm support. The thread should pass through the second groove for the Ortofon OM5e cartridge.

Figure 3: Tonearm with Anti-Skating Weight
Proper adjustment of tracking force and anti-skating is crucial for optimal sound quality and record preservation.
4. Conectarse a un Ampmás vivaz
The Debut III Phono SB features a built-in phono preamp, offering two output options:
- Fuera de la linea: Use this if your ampEl lifador lo hace no have a dedicated phono input. Connect the supplied RCA cable from the turntable's "Line Out" jacks to any standard line-level input on your amplificador (p. ej., AUX, CD, sintonizador).
- Salida de fono: Use this if your ampmás vivaz hace have a dedicated phono input. Connect the supplied RCA cable from the turntable's "Phono Out" jacks to your amplifier's "Phono" input.
Always connect the ground wire from the turntable to the ground terminal on your ampLificador para minimizar el zumbido.

Figure 4: RCA Outputs and Ground Terminal
Choose the appropriate output based on your ampcapacidades del generador.
5. Conexión de alimentación
Connect the power supply to the DC input jack on the turntable and then plug it into a suitable wall outlet.
Instrucciones de funcionamiento
1. Encendido / apagado
The power switch is located on the underside of the turntable plinth. Flip the switch to the 'ON' position to power on the unit.

Figura 5: Ubicación del interruptor de encendido
The discreetly placed power switch maintains the clean aesthetic of the turntable.
2. Selección de velocidad
The Debut III Phono SB features electronic speed selection for 33, 45, and 78 RPM.
- To switch between 33 and 45 RPM, press the speed control button located on the underside of the plinth. The platter will adjust to the selected speed.
- For 78 RPM playback, you must manually change the drive belt to the larger diameter step on the motor pulley and use the round belt provided. Then, select 45 RPM using the electronic speed control.
3. Reproducción de un disco
- Place a record on the platter. If playing a 7" single, use the provided adapter.
- Select the correct playback speed (33, 45, or 78 RPM).
- Levante suavemente el brazo utilizando la palanca de señalización.
- Coloque el brazo sobre el surco inicial deseado del disco.
- Baje lentamente la palanca de señalización para dejar caer con cuidado la aguja sobre el disco.
- At the end of the record, lift the tonearm using the cueing lever and return it to the tonearm rest. Secure it with the tonearm clip.
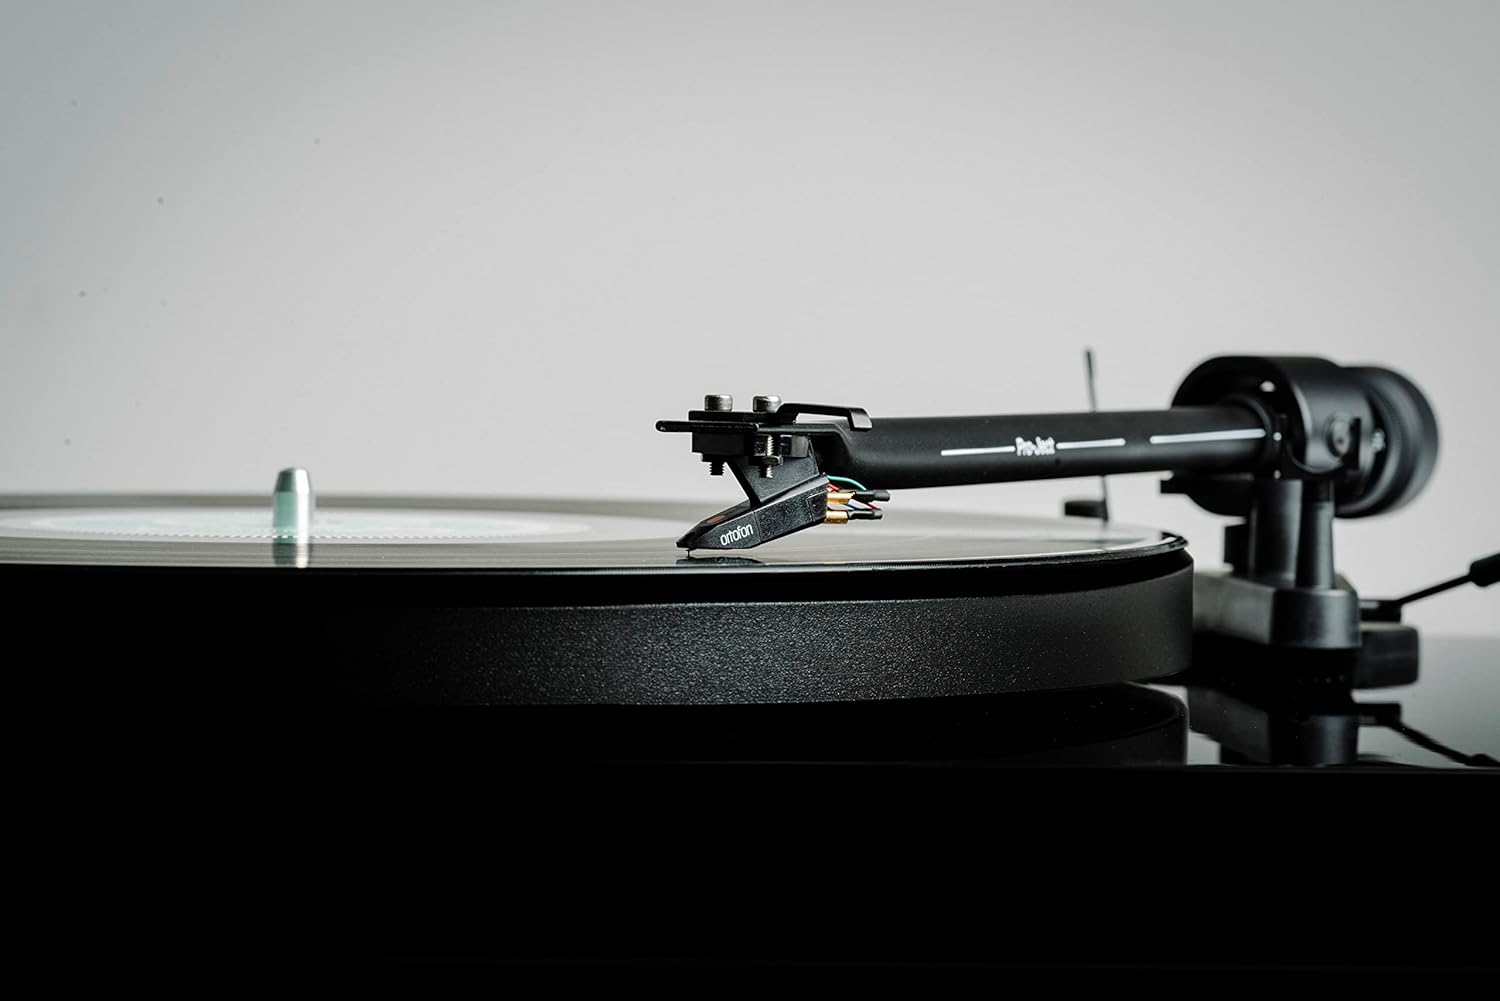
Figure 6: Cartridge on Record
Handle the tonearm and cartridge with care to prevent damage to the stylus or records.
Mantenimiento
El mantenimiento regular ayudará a preservar el rendimiento y la apariencia de su tocadiscos.
- Cleaning the Plinth and Dustcover: Use a soft, lint-free cloth to wipe down the plinth and dustcover. For stubborn marks, a slightly damp Se puede usar un paño y luego uno seco. Evite limpiadores abrasivos o disolventes.
- Limpieza del lápiz óptico: Use a dedicated stylus cleaning brush or fluid. Always brush from back to front (away from the cantilever). Clean the stylus regularly to prevent debris buildup, which can degrade sound quality and damage records.
- Reemplazo de correa: The drive belt may stretch over time. If you notice inconsistent speed or reduced torque, consider replacing the belt.
- Cuidado del cartucho: Avoid touching the stylus with your fingers. If the cartridge needs replacement, consult a qualified technician or refer to the cartridge manufacturer's instructions.

Figure 7: Turntable with Dustcover
Keep the dustcover closed when not in use to protect the turntable from dust and debris.
Solución de problemas
Si tiene problemas con su tocadiscos, consulte los siguientes problemas y soluciones comunes.
| Problema | Posible causa | Solución |
|---|---|---|
| No power / No rotation | Power cable not connected; Power switch off; Faulty power supply. | Check power connections; Ensure power switch is ON; Test with another power outlet. |
| Sin sonido o volumen bajo | Entrada incorrecta seleccionada en amplifier; RCA cables not connected properly; Phono/Line Out switch incorrect; Stylus dirty or damaged. | Select correct input (e.g., AUX, CD, Phono); Reconnect RCA cables firmly; Ensure Phono/Line Out switch matches amplifier input; Clean or replace stylus. |
| Zumbido | Ground wire not connected; Nearby electrical interference; Loose connections. | Conecte el cable de tierra a amplifier; Move turntable away from other electronics; Check all cable connections. |
| Sonido distorsionado | Incorrect tracking force; Dirty stylus; Damaged stylus; Worn record. | Adjust tracking force; Clean stylus; Replace stylus; Try a different record. |
| Velocidad inconsistente | Drive belt stretched or dirty; Platter not seated correctly; Motor issue. | Clean or replace drive belt; Re-seat platter; Contact support if issue persists. |
Presupuesto
Key technical specifications for the Pro-Ject Debut III Phono SB Turntable:
- Modelo: Debut III Phono HG OM5e
- Drive Principle: Cinturón de conducir
- Velocidades: 33, 45, 78 RPM (electronic speed selection for 33/45)
- Plato: 1.7kg heavy steel platter
- brazo: 8.6" Aluminum Tonearm
- Cartucho: Ortofon OM5e (pre-mounted)
- Preamplificador de fonoamp: Built-in (switchable Phono/Line Out)
- Tipo de motor: Motor de corriente continua
- Dimensiones del producto (L x An x Al): 16.34 x 12.6 x 4.65 pulgadas (41.5 x 32 x 11.8 cm)
- Peso del artículo: 12.1 libras (5.5 kg)
- Material: Engineered Wood (Plinth)
- Color: Nuez
Garantía y soporte
For warranty information and technical support, please refer to the official Pro-Ject Audio Systems webSitio web o contacte a su distribuidor autorizado. Conserve su comprobante de compra para reclamaciones de garantía.
Fabricante: Sistemas de audio Pro-Ject
Ask a question about this manual
Ask about setup, troubleshooting, compatibility, parts, safety, or missing instructions. Manuals+ will review the question and use this page’s manual context to help answer it.