1. Introducción
Thank you for choosing the Goshyda Portable Multimedia 1080P Projector. This compact and versatile device is designed to provide a personal cinema experience, supporting various multimedia inputs for entertainment, presentations, and more. Please read this manual carefully before using the projector to ensure proper operation and to maximize its lifespan.

Image 1.1: The Goshyda YG300 Mini Portable Projector in a home entertainment setting.
2. Información de seguridad
- Fuente de alimentación: Use only the specified 5V 2A power adapter or a compatible power bank. Incorrect voltagPodría dañar el dispositivo.
- Ventilación: No obstruya las aberturas de ventilación. Asegúrese de que haya suficiente flujo de aire alrededor del proyector para evitar el sobrecalentamiento.
- Ambiente: Avoid exposing the projector to water, moisture, dust, or extreme temperatures. Operate in a clean, dry environment.
- Limpieza: Desconecte la alimentación antes de limpiar. Utilice un paño suave y seco. No utilice limpiadores líquidos ni en aerosol.
- Desmontaje: No intente desmontar ni reparar el proyector usted mismo. Encargue cualquier reparación a personal cualificado.
- Protección ocular: No mire directamente a la lente del proyector cuando la lamp Está encendido.
3. Contenido del paquete
Por favor, revise el contenido del paquete al abrirlo. Si falta algún artículo o está dañado, contacte con su vendedor.
- Goshyda Portable Projector
- Mando a distancia
- AV Cable
- Adaptador de corriente
- Manual de usuario (este documento)

Image 3.1: Included accessories with the Goshyda Portable Projector.
4. Producto terminadoview
4.1. Características del proyector
- 1080P Resolution Support: Ofrece imágenes claras y detalladas.
- Diseño compacto y portátil: Weighing approximately 290g, it is easy to carry.
- Conectividad multipuerto: Includes USB, HDMI, AV, memory card slot, and audio output.
- Altavoces incorporados: Proporciona audio integrado para mayor comodidad.
- Potencia flexible: Can be powered by a 5V 2A wall charger or power bank.

Image 4.1: Visual representation of the projector's main features.
4.2. Projector Ports and Controls
Familiarícese con los distintos puertos y controles de su proyector.
- Lente: Front-facing projection lens.
- Anillo de enfoque: Ajusta la claridad de la imagen.
- Entrada de energía (DC IN): Se conecta al adaptador de corriente 5 V 2 A.
- Puerto HDMI: Para conectar dispositivos mediante cable HDMI.
- Puerto USB: Para conectar dispositivos de almacenamiento USB.
- Puerto AV: For connecting devices via AV cable.
- Ranura para tarjeta microSD: Para insertar una tarjeta de memoria.
- Salida de audio: Para conectar altavoces externos o auriculares.
- Botones de control: On the top panel for basic navigation and selection.

Imagen 4.2: Lateral view of the projector highlighting its connectivity ports.

Image 4.3: Close-up of the projector lens.
5. Configuración
5.1. Conexión de alimentación
- Connect the provided power adapter to the DC IN port on the projector.
- Conecte el adaptador de corriente a una toma de corriente estándar.
- Alternatively, for portable use, connect a 5V 2A power bank to the DC IN port.

Image 5.1: Powering the projector via wall adapter or power bank.
5.2. Colocación y proyección
Place the projector on a stable, flat surface. The optimal projection distance is between 1 to 2.5 meters, allowing for a screen size of up to 60 inches.
- For a 24-inch screen, place the projector approximately 0.8 meters away.
- For a 47-inch screen, place the projector approximately 1.2 meters away.
- For a 60-inch screen, place the projector approximately 1.6 meters away.
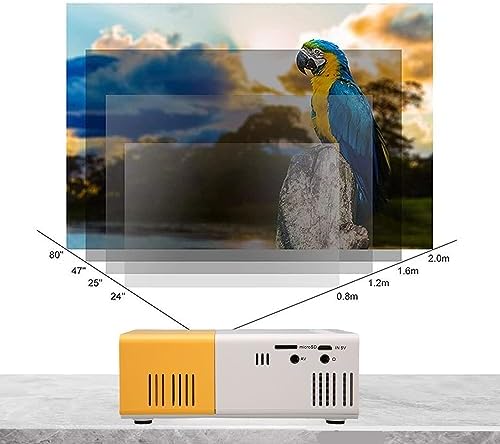
Image 5.2: Projection distance guidelines for various screen sizes. Note: Maximum recommended projection size is 60 inches.
5.3. Ajuste de enfoque
After placing the projector and powering it on, rotate the focus ring located around the lens until the projected image appears clear and sharp.
6. Instrucciones de funcionamiento
6.1. Encendido y apagado
- Encendido: Pulse el botón de encendido del proyector o del control remoto.
- Apagado: Presione el botón de encendido nuevamente. El proyector se apagará.
6.2. Selección de fuente de entrada
Use the 'Source' button on the remote control or the projector's control panel to cycle through available input sources (HDMI, USB, AV, MicroSD).
6.3. Navegación por el menú
Use the arrow buttons on the remote control or projector to navigate through menus. Press 'OK' or 'Enter' to confirm selections. Use the 'Return' or 'Back' button to go back to the previous menu.
7. Conectividad
El proyector ofrece múltiples opciones de conectividad para varios dispositivos.

Image 7.1: Connectivity options for the Goshyda projector.
7.1. Conexión HDMI
Connect devices such as laptops, TV Sticks, game consoles (e.g., for Xbox One), or Blu-ray players using an HDMI cable. Select 'HDMI' as the input source.
7.2. Conexión USB
Inserte una unidad flash USB en el puerto USB para reproducir contenido multimedia files directly. Select 'USB' as the input source and navigate through your files.
7.3. Conexión AV
Use the provided AV cable to connect older devices like DVD players. Select 'AV' as the input source.
7.4. Conexión de teléfono inteligente/tableta
To connect directly to your smartphone or tablet, you will need an appropriate adapter (e.g., Micro USB to HDMI, Type-C to HDMI, or a dedicated HD multimedia interface device), depending on your device's operating system (OS X or Android) and available ports. These adapters are sold separately.
7.5 Salida de audio
Connect external speakers or headphones to the audio output port for enhanced sound.
8. Mantenimiento
- Limpieza de lentes: Use a soft, lint-free cloth specifically designed for optical lenses to gently wipe the projector lens. Do not use abrasive materials or harsh chemicals.
- Limpieza exterior: Limpie el exterior del proyector con un paño suave y seco.
- Almacenamiento: Cuando no utilice el proyector durante períodos prolongados, guárdelo en un lugar fresco y seco, alejado de la luz solar directa y del polvo.
9. Solución de problemas
| Problema | Posible causa | Solución |
|---|---|---|
| Sin poder | Power adapter not connected or faulty; insufficient power supply. | Ensure the 5V 2A power adapter is securely connected and plugged into a working outlet. Try a different power source or power bank. |
| Sin imagen | Incorrect input source selected; cable not connected properly; device not outputting signal. | Select the correct input source (HDMI, USB, AV). Check all cable connections. Ensure the connected device is powered on and outputting a signal. |
| La imagen es borrosa | Enfoque no ajustado; proyector demasiado cerca/lejos de la pantalla. | Rotate the focus ring to sharpen the image. Adjust the projection distance within the recommended range (1-2.5m). |
| Sin sonido | Volume too low or muted; external speakers not connected; audio format not supported. | Increase the volume on the projector and the source device. Check if external speakers are properly connected. Ensure the audio format is supported. |
10. Especificaciones
| Característica | Detalle |
|---|---|
| Marca | Goshyda |
| Número de modelo | Goshyda89pkbg17g0 |
| Resolución de pantalla | 1920 x 1080 (compatible con 1080P) |
| Brillo | 200 lúmenes |
| Relación de aspecto | 4:3 |
| Distancia de proyección | 1 - 2.5 metros |
| Tamaño de proyección | Hasta 60 pulgadas |
| Tecnología de conectividad | HDMI, USB, AV, MicroSD, Audio Out |
| Entrada de potencia | 5 V 2 A |
| Tipo de pantalla | Pantalla LCD |
| Dimensiones del producto | 12L x 8.5W x 4.6H cm (Approx. 4.7 x 3.3 x 1.8 inches) |
| Factor de forma | Portátil |
| Tipo de montaje | Montaje de mesa |
11. Garantía y soporte
For warranty information and customer support, please refer to the documentation provided with your purchase or contact your retailer directly. Keep your proof of purchase for warranty claims.