Introducción
Thank you for choosing the Baseus Super Energy Pro 1600A Car Jump Starter. This device is designed to provide a reliable and powerful solution for starting vehicles with dead batteries, and also functions as a portable power bank. Please read this manual thoroughly before use to ensure safe and proper operation. Keep this manual for future reference.
Información de seguridad
- Always read the vehicle's owner's manual before attempting to jump start it.
- No intente arrancar con puente una batería congelada.
- Asegúrese de que haya una ventilación adecuada al utilizar el dispositivo.
- Mantenga el dispositivo fuera del alcance de los niños y las mascotas.
- No exponga el dispositivo a la lluvia ni a temperaturas extremas.
- Evite cortocircuitar el puente clamps. Do not connect the red and black clamps juntos
- If the device or cables are damaged, do not use them. Contact support.
- Conecte siempre el clamps a los terminales correctos de la batería (rojo al positivo, negro al negativo).
- Remove the jump starter immediately after the vehicle starts.
Contenido del paquete
Verifique que todos los artículos estén presentes en su paquete:
- Arrancador de batería para coche Baseus Super Energy Pro
- Cables de puente inteligentes con Clamps
- Cable de carga USB-C
- Manual de usuario (este documento)

Image: Contents of the Baseus Super Energy Pro Car Jump Starter package, showing the main unit, smart jumper cables, and a USB-C charging cable.
Producto terminadoview
Familiarize yourself with the components of your Baseus Super Energy Pro Car Jump Starter:
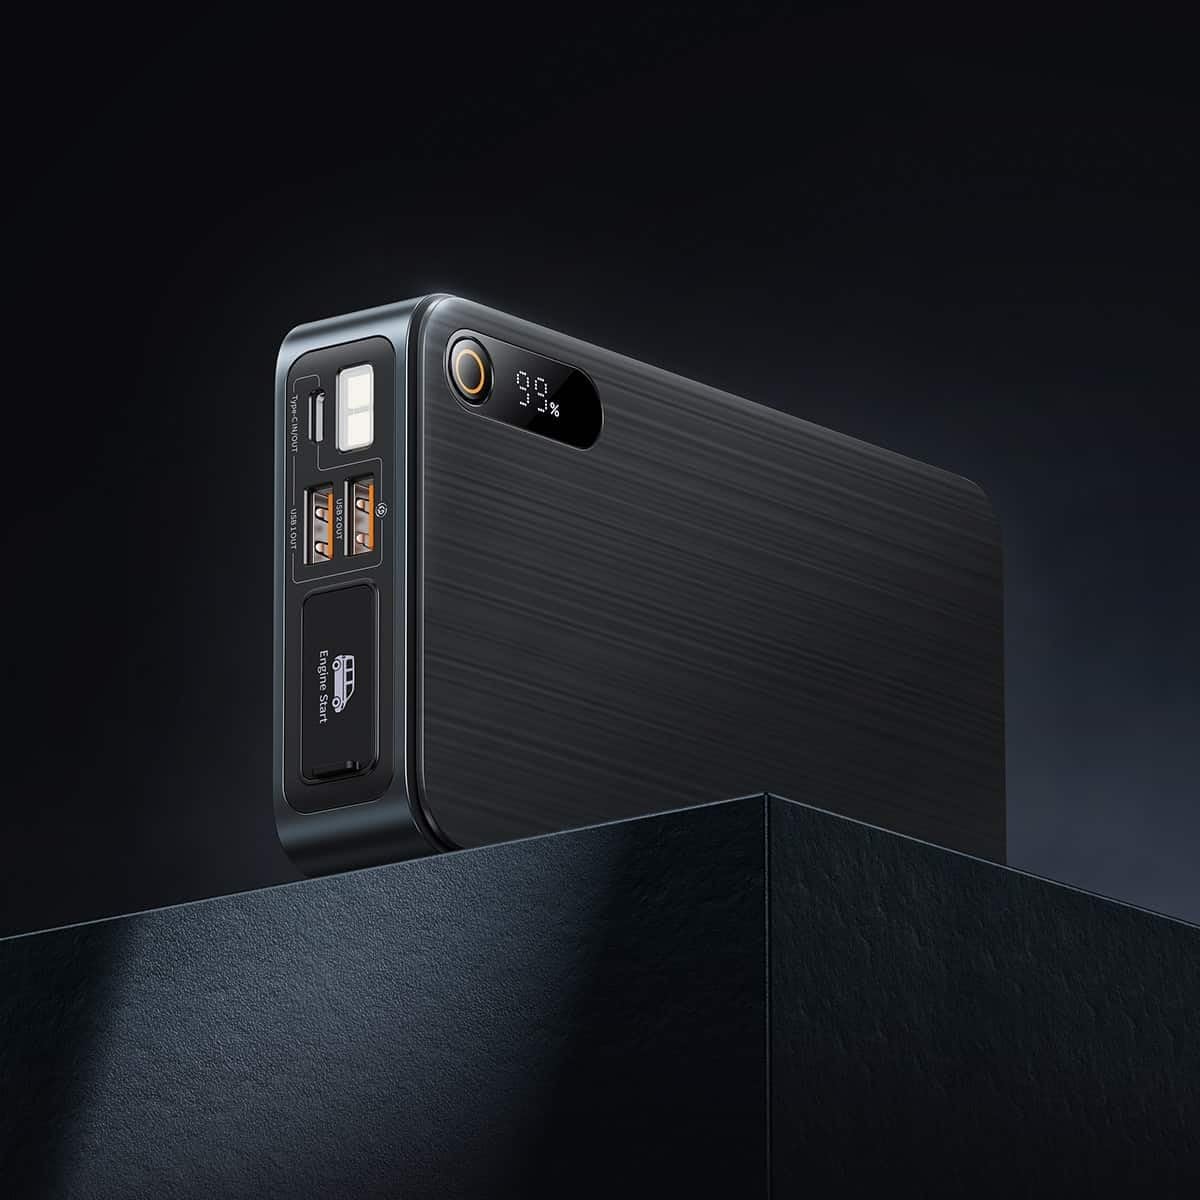
Image: Close-up of the jump starter's side panel, highlighting the various ports and the digital display.
- Pantalla digital: Muestra el porcentaje de batería restantetage.
- Botón de encendido: Activates the device and turns on the LED light.
- Puertos de salida USB-A: For charging external devices like smartphones or tablets.
- Puerto de entrada/salida tipo C: Used for charging the jump starter itself or charging other devices.
- Engine Start Port: Dedicated port for connecting the smart jumper cables.
- Linterna led: Proporciona iluminación en ambientes oscuros.

Image: The Baseus Super Energy Pro Car Jump Starter unit, displaying its digital battery indicator.
Carga del dispositivo
Before first use, fully charge the Baseus Super Energy Pro Car Jump Starter. It is recommended to keep the device charged above 50% for optimal performance and longevity.
- Conecte el cable de carga USB-C provisto al puerto Tipo-C del arrancador.
- Connect the other end of the USB-C cable to a suitable USB power adapter (not included).
- La pantalla digital mostrará el progreso de la carga. El dispositivo estará completamente cargado cuando la pantalla muestre el 100 %.
Setup for Jump Starting
Ensure your vehicle is in Park (P) or Neutral (N) and the parking brake is engaged. Turn off all vehicle accessories (headlights, radio, air conditioning).
- Asegúrese de que el arrancador tenga suficiente carga (al menos 50%).
- Connect the blue end of the smart jumper cables into the Engine Start port on the jump starter. Ensure it is firmly seated.
Operating Instructions (Jump Starting)
Siga estos pasos cuidadosamente para arrancar su vehículo:
- Conectar cl rojoamp: Coloque el cl rojo (+)amp of the jumper cables to the positive (+) terminal of your vehicle's dead battery.
- Conectar Black Clamp: Coloque el cl negro (-)amp of the jumper cables to the negative (-) terminal of your vehicle's dead battery.
- Indicador de verificación: Observe the indicator light on the smart jumper cable. A solid green light indicates a correct connection and that the device is ready to start. If it's red or flashing, check connections or refer to troubleshooting.
- Vehículo de arranque: Once the indicator is green, start your vehicle's engine.
- Retire los cables puente: As soon as the engine starts, immediately remove the blue plug of the jumper cables from the jump starter.
- Desconectar Clamps: Luego, desconecte el cable negro (-).amp de la batería del vehículo, seguido del testigo rojo (+)amp.
Allow your vehicle's engine to run for at least 20-30 minutes to recharge its battery.
Mantenimiento
- Almacenamiento: Guarde el arrancador en un lugar fresco y seco, alejado de la luz solar directa y de la humedad.
- Cargando: Para una vida útil óptima de la batería, recargue el dispositivo cada 3 a 6 meses, incluso si no está en uso.
- Limpieza: Limpie el dispositivo con un paño suave y seco. No utilice productos químicos agresivos ni materiales abrasivos.
- Eliminación de la batería: Do not dispose of the device in household waste. Follow local regulations for proper disposal of lithium-ion batteries.
Solución de problemas
| Problema | Posible causa | Solución |
|---|---|---|
| El vehículo no arranca | La batería del arrancador está baja. Conexión de cable incorrecta. La batería del vehículo está gravemente dañada. | Recarga el arrancador. Compruebe clamp connections to battery terminals. Consulte con un mecánico profesional. |
| El arrancador auxiliar no carga | Cable de carga o adaptador defectuoso. Type-C port damaged. | Pruebe con un cable USB-C y un adaptador de corriente diferentes. Contacte con atención al cliente. |
| Smart cable indicator is red/flashing | Conexión de polaridad inversa. Cortocircuito detectado. Sobrecorriente/sobrevol.tage. | Desconectar y volver a conectar clamps correctamente (rojo a +, negro a -). Asegúrese de clampLos s no se tocan entre sí. Disconnect and try again after a few minutes. If problem persists, contact support. |
Presupuesto
| Característica | Detalle |
|---|---|
| Marca | Baseus |
| Número de modelo | CGNL070001 |
| Corriente pico | 1600 A |
| Composición de la batería | Iones de litio |
| Tipo de servicio del vehículo | Auto |
| Dimensiones del producto (L x An x Al) | 10 x 5 x 1.27 cm |
| Peso del artículo | 920 gramos |
| Entrada/Salida | USB-A Output, Type-C Input/Output |
Garantía y soporte
For warranty information or technical support, please refer to the warranty card included with your product or contact the retailer where you purchased the device. You may also visit the official Baseus webSitio para obtener más ayuda y detalles de contacto.