1. Introducción
This manual provides essential instructions for the installation, operation, and maintenance of the Generic MIQ17L-Hulk M4640G Desktop Motherboard. Please read this manual thoroughly before proceeding with installation to ensure correct setup and to prevent damage to the components. This motherboard is designed for D630 systems and supports LGA 1151 processors and DDR4 memory modules.
2. Información de seguridad
- Desconecte siempre la fuente de alimentación de la toma de pared antes de instalar o quitar cualquier componente.
- Wear an anti-static wrist strap or frequently touch a grounded metal object to discharge static electricity before handling the motherboard or other components. Electrostatic discharge (ESD) can severely damage electronic parts.
- Manipule la placa base por los bordes para evitar tocar componentes sensibles.
- Asegúrese de que haya una ventilación adecuada dentro de la carcasa de su computadora para evitar el sobrecalentamiento.
- Keep the motherboard away from liquids and excessive humidity.
3. Contenido del paquete
Verifique que todos los artículos estén presentes y en buen estado. Si algún artículo está dañado o falta, contacte a su vendedor.
- Generic MIQ17L-Hulk M4640G Desktop Motherboard
- I/O Shield (may be pre-attached or separate)
- Cables de datos SATA (la cantidad puede variar)
- Manual de usuario (este documento)
4. Configuración e instalación
4.1. Preparación
- Gather necessary tools: Phillips-head screwdriver, anti-static wrist strap, thermal paste.
- Prepare un espacio de trabajo limpio, bien iluminado y sin estática.
- Asegúrese de que la fuente de alimentación esté desconectada de la toma de pared.
4.2. Instalación de la CPU
Carefully open the CPU socket lever. Align the triangular mark on your LGA 1151 CPU with the corresponding mark on the socket. Gently place the CPU into the socket without forcing it. Close the lever to secure the CPU.
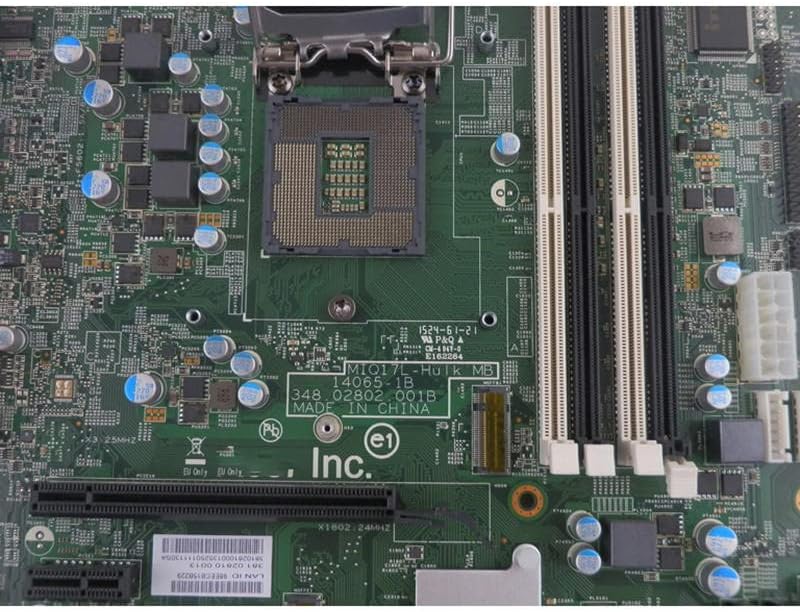
Figure 1: LGA 1151 CPU Socket and DDR4 RAM Slots. This image shows the central CPU socket where the processor is installed, surrounded by capacitors and the clips for the DDR4 memory modules.
4.3. Instalación del disipador de CPU
Apply a small amount of thermal paste to the center of the CPU. Install your CPU cooler according to its manufacturer's instructions, ensuring even pressure and secure mounting.
4.4. Instalación de RAM
Open the clips on the DDR4 memory slots. Align the notch on your DDR4 memory module with the key in the slot. Press down firmly on both ends of the module until the clips snap into place, securing the RAM.
4.5. Montaje de la placa base
Install the I/O shield into your computer case's rear opening. Carefully place the motherboard into the case, aligning the screw holes with the standoffs. Secure the motherboard with screws, ensuring it is firmly seated but not overtightened.
4.6. Conexiones de la fuente de alimentación
Conecte el conector de alimentación ATX de 24 pines y el conector de alimentación de CPU de 8 pines (o 4 pines) de su fuente de alimentación a los puertos correspondientes en la placa base.
4.7. Storage and Peripheral Connections
Connect your SATA storage devices (HDDs/SSDs) to the SATA ports on the motherboard using SATA data cables. Connect the front panel connectors (power button, reset button, USB ports, audio jacks, LED indicators) from your case to the corresponding headers on the motherboard. Refer to your case manual for specific pin assignments.
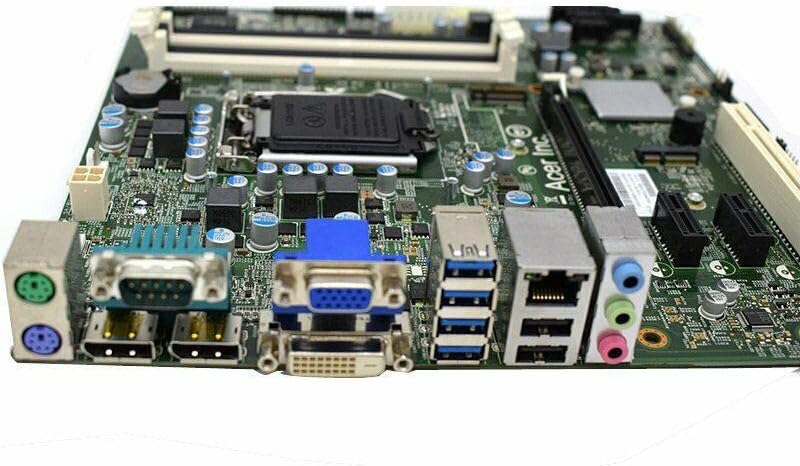
Figure 2: Rear Input/Output (I/O) Panel. This image displays the array of external ports available on the motherboard, including multiple USB ports, video outputs (HDMI, VGA), an Ethernet port, and audio jacks for connecting peripherals.
5. Instrucciones de funcionamiento
5.1. Arranque inicial
After all components are installed and connected, connect the power supply to the wall outlet and power on your system. The system should initiate the Power-On Self-Test (POST).
5.2. Acceso a BIOS/UEFI
Durante la secuencia de arranque inicial, presione la tecla designada (comúnmente DEL, F2, o F10) to enter the BIOS/UEFI setup utility. Here you can configure boot order, system time, and other advanced settings.
5.3. Instalación del controlador
After installing your operating system, install the necessary drivers for the motherboard's chipset, audio, network, and other integrated components. These drivers are typically provided by the operating system or can be downloaded from the manufacturer's websitio.
6. Mantenimiento
- Eliminación de polvo: Periodically clean the interior of your computer case and motherboard components using compressed air to prevent dust buildup, which can hinder cooling and performance.
- Actualizaciones de BIOS/UEFI: Verifique el fabricante webSitio para actualizaciones de BIOS/UEFI. Las actualizaciones pueden mejorar la estabilidad, la compatibilidad y el rendimiento. Siga atentamente las instrucciones de actualización para evitar daños en el sistema.
- Sistema de organización de cables: Asegúrese de que los cables estén colocados de forma ordenada para mejorar el flujo de aire y evitar interferencias.
7. Solución de problemas
- Sin energía: Check all power connections (24-pin ATX, 8-pin CPU, power supply to wall). Ensure the power supply switch is in the 'ON' position.
- Sin visualización/Sin PUBLICACIÓN: Verify that the monitor is connected and powered on. Reseat RAM modules and expansion cards. Check CPU installation and cooler connection. Try booting with minimal components (CPU, one RAM stick, GPU if no integrated graphics).
- Inestabilidad/fallos del sistema: Ensure all drivers are up to date. Check for overheating by monitoring CPU and GPU temperatures. Test RAM modules individually.
- Periférico no detectado: Ensure the peripheral is properly connected. Check device manager in your operating system for driver issues. Try a different port.
- Restablecimiento del BIOS: If system settings become unstable, you can reset the BIOS to default settings. This is usually done by removing the CMOS battery for a few minutes or using a 'Clear CMOS' jumper on the motherboard (refer to motherboard layout for location).
8. Especificaciones
| Característica | Descripción |
|---|---|
| Modelo | MIQ17L-Hulk M4640G |
| Zócalo de CPU | LGA 1151 |
| Tipo de memoria | DDR4 |
| Sistemas compatibles | D630 |
| Fabricante | Genérico |
| Fecha de primera disponibilidad | 16 de marzo de 2023 |
9. Garantía y soporte
For warranty information and technical support, please refer to the terms provided by your retailer or contact the manufacturer directly. Keep your proof of purchase for warranty claims. This manual does not provide specific warranty details, as they may vary by region and retailer.