1. Introducción
This manual provides detailed instructions for the setup, operation, maintenance, and troubleshooting of your Volcora 80mm Thermal Receipt Printer. This printer is designed for Point-of-Sale (POS) applications, offering fast and efficient thermal printing with an auto-cutter. It supports USB and Ethernet connectivity and is compatible with Android, Windows, and Linux operating systems.
2. Información de seguridad
- Asegúrese de que la impresora esté conectada a una toma de corriente con conexión a tierra.
- No exponga la impresora al agua ni a la humedad excesiva.
- Evite colocar la impresora bajo la luz solar directa o cerca de fuentes de calor.
- Utilice únicamente el adaptador de corriente proporcionado con la impresora.
- Mantenga la impresora fuera del alcance de los niños.
- No intente desmontar ni reparar la impresora usted mismo. Contacte con el servicio de atención al cliente para obtener ayuda.
3. Contenido del paquete
Verifique que todos los artículos estén presentes en el paquete:
- Volcora 80mm Thermal Receipt Printer
- Cable de alimentación
- Cable USB
- Test Paper Roll
- CD de instalación

Figure 3.1: Package Contents. The image displays the Volcora Thermal Receipt Printer along with its accessories: a power cord, a USB cable, a roll of test paper, and an installation CD.
4. Producto terminadoview
4.1. Puertos y botones
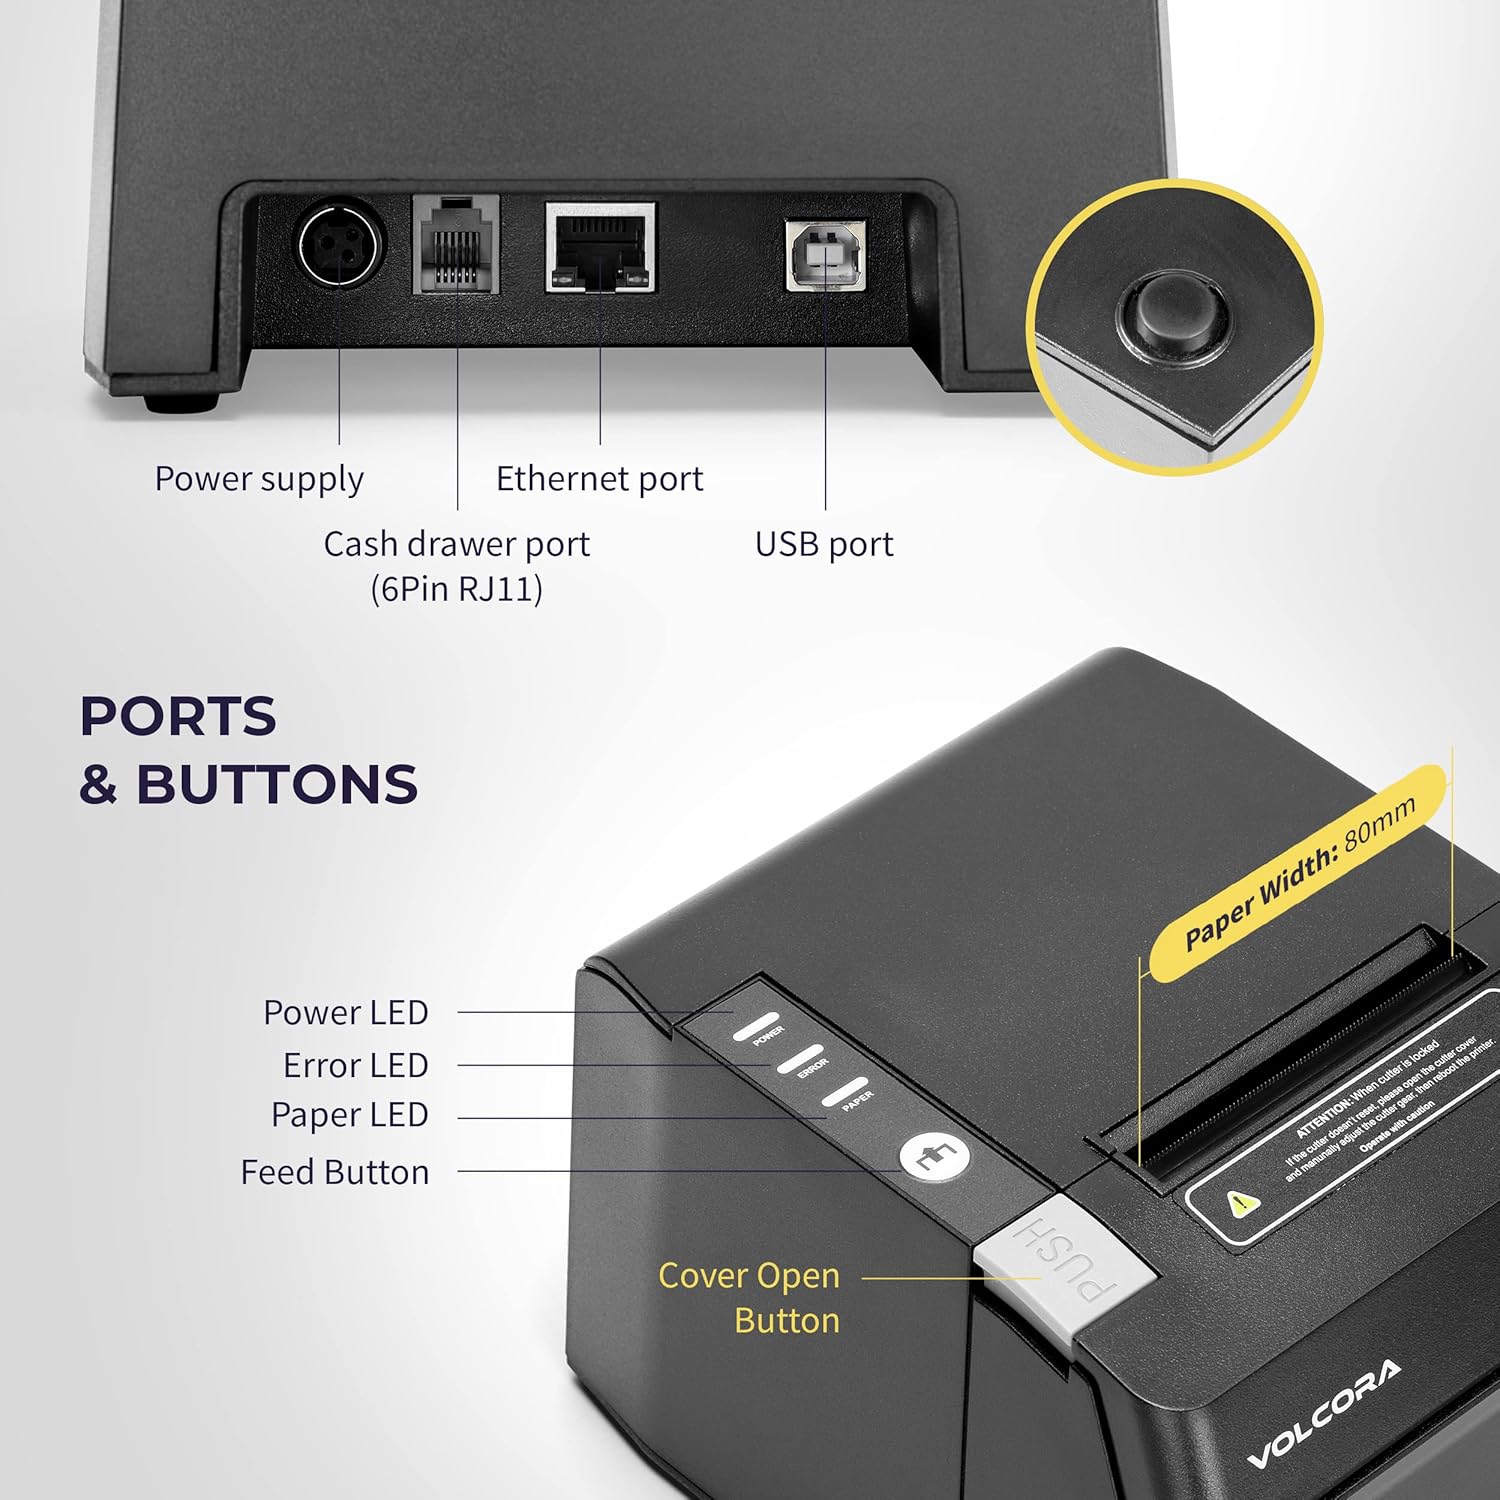
Figure 4.1: Printer Ports and Buttons. This image illustrates the rear ports including Power Supply, Ethernet Port, Cash Drawer Port (6Pin RJ11), and USB Port. It also shows the front panel with Power LED, Error LED, Paper LED, Feed Button, and Cover Open Button.
- Puerto de fuente de alimentación: Se conecta al adaptador de corriente.
- Puerto Ethernet: For network connectivity (LAN).
- Cash Drawer Port (6Pin RJ11): Se conecta a un cajón de efectivo.
- Puerto USB: Para conexión directa a una computadora.
- LED de encendido: Indica el estado de energía.
- LED de error: Indicates printer errors.
- Paper LED: Indicates paper status (e.g., low paper).
- Botón de alimentación: Alimenta el papel manualmente.
- Botón de apertura de tapa: Releases the printer cover to access the paper roll.

Figura 4.2: Múltiples views of the Volcora Thermal Receipt Printer, showing its compact design and various connection points.
5. Configuración
5.1. Unboxing and Connecting
- Desempaque la impresora y retire todos los materiales de embalaje.
- Conecte el adaptador de corriente a la impresora y luego a una toma de corriente.
- Connect the printer to your Windows PC using the provided USB cable.
Video 5.1: Getting Started with Volcora Thermal Receipt Printer. This video demonstrates the unboxing, connecting the printer to power and a Windows PC via USB, and performing a self-test.
5.2. Instalación del rollo de papel
- Press the Cover Open Button to open the printer cover.
- Inserte el rollo de papel térmico con la cara de impresión hacia arriba.
- Saque un trozo pequeño de papel más allá del cortador.
- Cierre la cubierta de la impresora firmemente hasta que encaje en su lugar.
5.3. Instalación del controlador (Windows)
- Download the latest driver for Windows from the Volcora support websitio: volcora.com/support.
- Descomprima el archivo descargado file y ejecute el instalador del controlador.
- Follow the on-screen prompts, agreeing to the license and selecting your printer model (e.g., 500108).
- Ensure the printer is connected via USB during installation.
- After successful installation, the printer should be recognized in your computer's "Printers & scanners" settings.

Figure 5.2: Easy Installation Steps. This diagram outlines the four main steps: Download drivers, Install drivers, Connect the printer, and Test print.
5.4. Network Configuration (Ethernet)
If you are using the Ethernet connection, you may need to configure the printer's IP address to match your network's subnet. This can be done using the Setting Tool software.
- First, identify your PC's IP address and subnet mask.
- Perform a printer self-test (see Section 6.2) to get the printer's current IP address.
- If the printer's IP is not in the same subnet as your PC, you will need to adjust either the PC's IP or the printer's IP.
- Open the Setting Tool software (available from volcora.com/support).
- Select the printer model and choose 'NET' for the port type.
- Enter the printer's current IP address and click 'Get Param' to retrieve its network settings.
- Modify the IP address, subnet mask, and gateway to align with your network configuration.
- Click 'Set' to apply the new settings to the printer.
- Perform another self-test to confirm the IP address has been updated.
Video 5.2: How to Modify LAN IP Address of Volcora Receipt Printer. This video guides you through identifying current IP addresses, changing PC host IP, and using the Setting Tool to configure the printer's IP address for Ethernet connectivity.
5.5. Opciones de colocación

Figure 5.3: Multiple Use & Placement. The printer can be wall-mounted for kitchen use or placed on a counter for receipt printing.
6. Instrucciones de funcionamiento
6.1. Impresión básica
Once the printer is connected and drivers are installed, you can print receipts from your POS software or any application that supports printing. The printer features a 203 dpi resolution for clear prints and an auto-cutter for efficient receipt handling.

Figure 6.1: Efficient Printing. This image highlights the printer's fast print speed, low noise operation, and clear 203 dpi output, showing a receipt with a QR code and a barcode.
The printer supports various barcode types including UPC-A, UPC-E, EAN13, EAN8, CODE39, ITF25, CODABAR, CODE93, CODE128, QRCODE, PDF417, and Data matrix.
6.2. Printer Self-Test
A self-test prints the printer's configuration, including its IP address (if connected via Ethernet), and confirms basic functionality.
- Asegúrese de que la impresora esté apagada.
- Press and hold the "Feed" button.
- While holding the "Feed" button, power on the printer.
- Continue holding the "Feed" button for approximately 5 seconds until the self-test page begins to print.
6.3. Compatibilidad
The Volcora Thermal Receipt Printer is compatible with various POS systems and operating environments. It supports ESC/POS commands.

Figure 6.2: Printer Compatibility. This chart lists compatible POS systems such as Loyverse, SumUp, Gloria Food, FoodZaps, TabShop POS, POSAPP.vn POS, Olsera POS, and KaHero POS. It also lists systems that are not compatible, including Square, Toast, Ubereats, Grubhub, Doordash, Postmates, Clover, and Shopify.
Sistemas operativos compatibles: Android, Windows, Linux. (Note: A software development kit (SDK) is required for custom application development on Ethernet-supported systems, including Windows, Linux, and MAC.)
No compatible con: Delivery platforms or POS applications such as Ubereats, Grubhub, Doordash, Postmates, Square, Clover, or Shopify. Does not offer Bluetooth or WiFi printing options.

Figure 6.3: Detailed Compatibility Table. This table shows compatibility for USB and Serial connections across various operating systems (Windows, Mac OS, Linux, Android, iOS) and notes about SDK and ESC/POS commands.
7. Mantenimiento
7.1. Limpieza
- Regularly clean the printer's exterior with a soft, damp paño.
- To clean the thermal print head, use an alcohol swab. Ensure the printer is off and cool before cleaning.
- Retire cualquier polvo o residuo de papel de la ruta del papel.
8. Solución de problemas
8.1. Problemas comunes y soluciones
| Problema | Posible causa | Solución |
|---|---|---|
| La impresora no responde | Problema de energía, cable suelto, controlador no instalado. | Check power connection. Ensure USB/Ethernet cable is securely connected. Verify driver installation (Section 5.3). |
| Blank pages or faint print | Thermal paper loaded incorrectly, print head dirty. | Reload paper with the thermal side facing up. Clean the thermal print head (Section 7.1). |
| Atasco de papel | Incorrect paper loading, foreign object. | Open the cover, remove jammed paper, and ensure proper loading. Remove any obstructions. |
| Problemas de conexión Ethernet | Incorrect IP address configuration. | Perform a self-test to check the printer's IP. Use the Setting Tool to configure the IP address to match your network (Section 5.4). |
| Printer not compatible with POS software | Software not supported. | Refer to the compatibility list (Section 6.3). Contact your POS software provider for compatibility information. |
For further assistance, refer to the Volcora support center or contact customer service.
9. Especificaciones
| Característica | Detalle |
|---|---|
| Marca | Vólcora |
| Número de modelo | 500108 |
| Tecnología de impresión | Térmico |
| Velocidad de impresión | Hasta 220 mm / s |
| Resolución de impresión | 203 ppp |
| Ancho del papel | 80 mm (3 1/8") |
| Ancho de impresión | 72 mm |
| Interfaz | USB, Ethernet (LAN), Cash Drawer (RJ11) |
| Vida útil del cortador automático | 1.5 millones de cortes |
| Potencia de entrada | CA 110V / 240V, 50-60Hz |
| Potencia de salida | CC 24 V/2 A |
| Dimensiones del producto | 7"D x 6"W x 4.5"H (approx. 16 x 4 x 16 inches as per some specs) |
| Peso del artículo | 3.76 libras |
| Códigos de barras compatibles | UPC-A, UPC-E, EAN13, EAN8, CODE39, ITF25, CODABAR, CODE93, CODE128, QRCODE, PDF417, Data matrix |
| Comando de impresora | ESC/POS |
10. Garantía
This Volcora Thermal Receipt Printer comes with a Garantía limitada. Please refer to the warranty card included in your package or visit the Volcora support websitio para conocer los términos y condiciones detallados.
11. Atención al cliente
For additional assistance, troubleshooting, or to download drivers and tools, please use the following resources:
- Volcora Help Portal: https://help.volcora.com
- Download Support Center: https://volcora.com/support
- Correo electrónico de atención al cliente: soporte@volcora.com
Our U.S. based customer support team is available to assist with any integration issues.