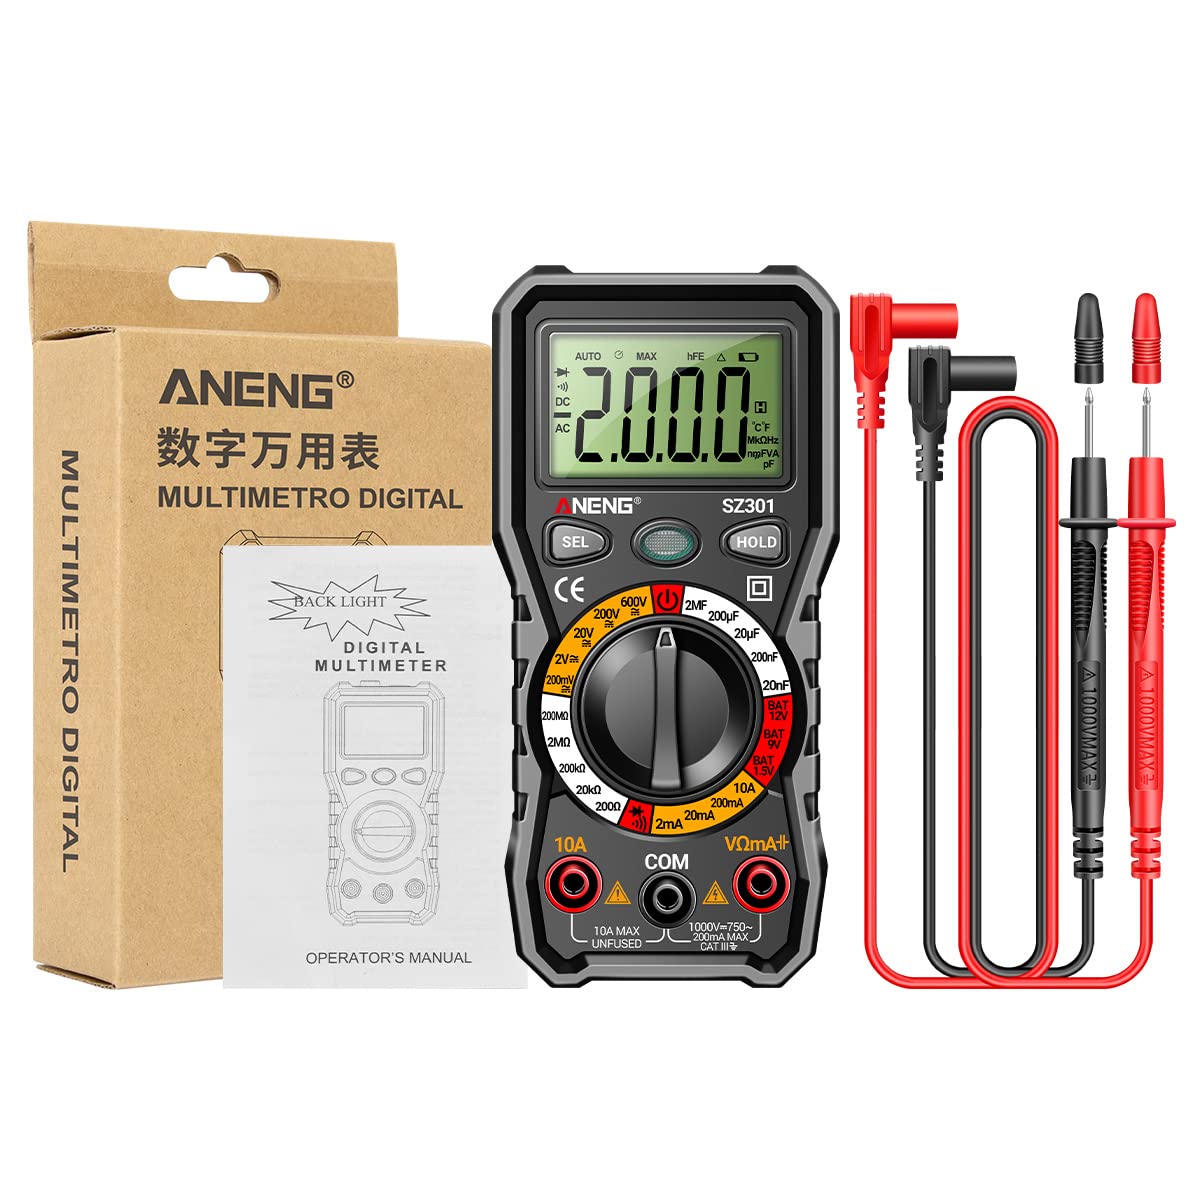
ANENG SZ301
Multímetro digital ANENG SZ301
Manual de instrucciones de usuario
Modelo: SZ301 | Marca: ANENG
1. Introducción
This manual provides detailed instructions for the safe and effective use of your ANENG SZ301 Digital Multimeter. The SZ301 is a versatile, automatic range digital multimeter designed for measuring DC voltage, vol. CAtage, DC current, AC current, resistance, capacitance, diode, and continuity. It features a digital display with a maximum count of 2000, an automatic shutdown function, and a built-in NCV sensor for non-contact voltage detection. Please read this manual thoroughly before operation and retain it for future reference.
2. Información de seguridad
Para garantizar el funcionamiento y servicio seguros del medidor, siga estas precauciones de seguridad:
- Respete siempre los códigos de seguridad locales y nacionales.
- No utilice el medidor si parece dañado o si el aislamiento de los cables de prueba está comprometido.
- Nunca aplique voltage o corriente que exceda los límites máximos especificados.
- Extreme las precauciones cuando trabaje con vol.tages superior a 30 V CA RMS, 42 V pico o 60 V CC. Estos volúmenestagPueden suponer un riesgo de descarga eléctrica.
- Desconecte siempre los cables de prueba del circuito antes de cambiar funciones o rangos.
- Asegúrese de que la tapa de la batería esté bien cerrada antes de utilizar el medidor.
- Reemplace las baterías inmediatamente cuando aparezca el indicador de batería baja para garantizar lecturas precisas.
- The built-in NCV sensor detects AC voltage. An LED flash and buzzer sound indicate detection, helping prevent electric shock.
3. Producto terminadoview
The ANENG SZ301 Digital Multimeter is designed for ease of use and durability. It features a robust silicone case for protection and a convenient pen holder/card slot.

Componentes clave:
- Pantalla digital: Muestra lecturas de medición, unidades e indicadores.
- Tecla de cambio de función (SEL): Used to select different measurement modes within a range (e.g., AC/DC voltage, Diodo/Zumbador).
- Tecla de retención de datos (HOLD): Freezes the current reading on the display. Long press for shutdown.
- Dial giratorio: Selects the primary measurement function (Voltage, Resistance, Capacitance, Current, Battery Test, Diode/Continuity).
- Tomas de entrada:
- Conector COM: Entrada común (negativa) para todas las mediciones.
- Conector VΩmA+: Entrada positiva para voltage, resistance, capacitance, diode, and small current measurements.
- Conector 10A: Entrada positiva para mediciones de alta corriente (hasta 10 A).
- Sensor de velocidad de conducción nerviosa: Vol sin contactotagÁrea de detección e.
- Luz LED: Para iluminar áreas de trabajo oscuras.
- Indicador de batería baja: Icon on the display indicating low battery power.


4. Características principales
- Multifuncional: A fully functional multipurpose machine capable of measuring various electrical parameters.
- Built-in NCV Sensor: Vol sin contactotage (NCV) measurement detects voltage in the air. An LED flashes and an alarm buzzer sounds when nearby AC voltage is detected, enhancing safety.
- Support Frame & Pen Holder: Features a built-in pen slot for easy carrying and an anti-drop, shock-proof storage slot. The 90-degree design of the rear bracket allows for convenient hands-free measurement.
- Apagado automático: If the multimeter is not used within 15 minutes, it will automatically shut down to conserve battery power.
- LED Light & Backlight: Long press the appropriate button to turn on the LCD bright screen backlight, allowing clear visibility of values in dark environments. A flashlight function illuminates the front for night work assistance.

5. Configuración
5.1 Instalación de la batería
- Asegúrese de que el multímetro esté apagado y los cables de prueba estén desconectados.
- Localice el compartimento de la batería en la parte posterior del dispositivo.
- Desenrosque la tapa del compartimiento de la batería.
- Insert two (2) AA batteries, observing the correct polarity (+/-) as indicated inside the compartment.
- Vuelva a colocar la tapa del compartimiento de la batería y asegúrela con el tornillo.
5.2 Encendido inicial
Turn the rotary dial from the 'OFF' position to any desired measurement function. The display will light up, indicating the meter is ready for use.
6. Instrucciones de funcionamiento
Before making any measurements, ensure the test leads are correctly inserted into the appropriate input jacks.
6.1 Vol. CCtage Medición (V–)
- Turn the rotary dial to the 'V–' range (e.g., 200mV, 2V, 20V, 200V, 600V). The meter may automatically select the range.
- Insert the red test lead into the 'VΩmA+' jack and the black test lead into the 'COM' jack.
- Conecte los cables de prueba en paralelo al voltaje de CC.tagLa fuente o componente que desea medir.
- Leer el vol.tage valor en la pantalla.
6.2 Vol. CAtage Medición (V∼)
- Turn the rotary dial to the 'V∼' range (e.g., 2V, 20V, 200V, 600V). The meter may automatically select the range.
- Insert the red test lead into the 'VΩmA+' jack and the black test lead into the 'COM' jack.
- Conecte los cables de prueba en paralelo al voltaje de CA.tage fuente o componente.
- Leer el vol.tage valor en la pantalla.

6.3 Medición de resistencia (Ω)
- Turn the rotary dial to the 'Ω' range (e.g., 200Ω, 2kΩ, 20kΩ, 200kΩ, 2MΩ, 20MΩ).
- Insert the red test lead into the 'VΩmA+' jack and the black test lead into the 'COM' jack.
- Asegúrese de que el circuito o componente esté desenergizado antes de medir la resistencia.
- Conecte los cables de prueba al componente cuya resistencia desea medir.
- Lea el valor de resistencia en la pantalla.
6.4 Prueba de diodo (→|)
- Turn the rotary dial to the 'Diode/Buzzer' position. Press the 'SEL' button if necessary to select Diode mode.
- Insert the red test lead into the 'VΩmA+' jack and the black test lead into the 'COM' jack.
- Conecte el cable de prueba rojo al ánodo y el cable de prueba negro al cátodo del diodo.
- La pantalla mostrará el volumen hacia adelante.tage drop. Invierta los cables; la pantalla debería mostrar 'OL' (bucle abierto) para un diodo en buen estado.

6.5 Medición de capacitancia (F)
- Turn the rotary dial to the 'F' (Capacitance) range (e.g., 2nF, 20nF, 200nF, 2µF, 20µF, 200µF).
- Insert the red test lead into the 'VΩmA+' jack and the black test lead into the 'COM' jack.
- Asegúrese de que el capacitor esté completamente descargado antes de realizar la medición para evitar daños al medidor.
- Conecte los cables de prueba a través del capacitor.
- Lea el valor de capacitancia en la pantalla.
6.6 Medición de corriente (A)
- For small currents (mA): Turn the rotary dial to the 'mA' range (e.g., 2mA, 20mA, 200mA). Insert the red test lead into the 'VΩmA+' jack and the black test lead into the 'COM' jack.
- For high currents (10A): Turn the rotary dial to the '10A' range. Insert the red test lead into the '10A' jack and the black test lead into the 'COM' jack.
- Ensure the circuit is de-energized. Open the circuit where you want to measure current.
- Connect the meter in series with the circuit. The current must flow through the meter.
- Vuelva a energizar el circuito y lea el valor actual en la pantalla.
6.7 Prueba de continuidad (♫)
- Turn the rotary dial to the 'Diode/Buzzer' position. Press the 'SEL' button if necessary to select Continuity mode.
- Insert the red test lead into the 'VΩmA+' jack and the black test lead into the 'COM' jack.
- Asegúrese de que el circuito o componente esté desenergizado.
- Conecte los cables de prueba a través del componente o cable.
- Si existe continuidad (resistencia por debajo de un cierto umbral), sonará el zumbador.
6.8 Battery Test (BAT)
- Turn the rotary dial to the 'BAT' position (1.5V, 9V, 12V).
- Insert the red test lead into the 'VΩmA+' jack and the black test lead into the 'COM' jack.
- Conecte el cable de prueba rojo al terminal positivo y el cable de prueba negro al terminal negativo de la batería.
- Leer el volumen de la bateríatage en la pantalla.
6.9 NCV (Volumen sin contacto)tage) Detección
- Gire el dial giratorio a la posición 'NCV'.
- Move the top part of the multimeter (where the NCV sensor is located) close to the AC voltage fuente (por ejemplo, una toma eléctrica o un cable con corriente).
- Si AC voltage is detected, the LED indicator will flash, and the buzzer will sound, with the frequency increasing a medida que el medidor se acerca al volumentagy fuente.
7. Mantenimiento
7.1 Limpieza
Limpiar la carcasa con publicidadamp Paño y detergente suave. No utilice abrasivos ni disolventes. Asegúrese de que el medidor esté completamente seco antes de usarlo.
7.2 Reemplazo de batería
When the low battery indicator appears on the display, replace the batteries as described in the 'Battery Installation' section (5.1). Always use two new AA batteries.
7.3 Almacenamiento
Si no va a utilizar el medidor durante un período prolongado, retire las pilas para evitar fugas y daños. Guarde el medidor en un lugar fresco y seco, alejado de la luz solar directa y de temperaturas extremas.
8. Solución de problemas
- El medidor no se enciende: Verifique la instalación de la batería y asegúrese de que las baterías no estén agotadas.
- No se muestra ninguna lectura o 'OL': Ensure test leads are properly connected to the circuit and the correct function/range is selected. 'OL' often indicates an open circuit or a value exceeding the selected range.
- Lecturas inexactas: Check battery level. Ensure test leads are making good contact. Verify the correct function and range are selected for the measurement.
- Apagado automático: This is a normal power-saving feature. Turn the rotary dial to 'OFF' and then back to the desired function to restart.
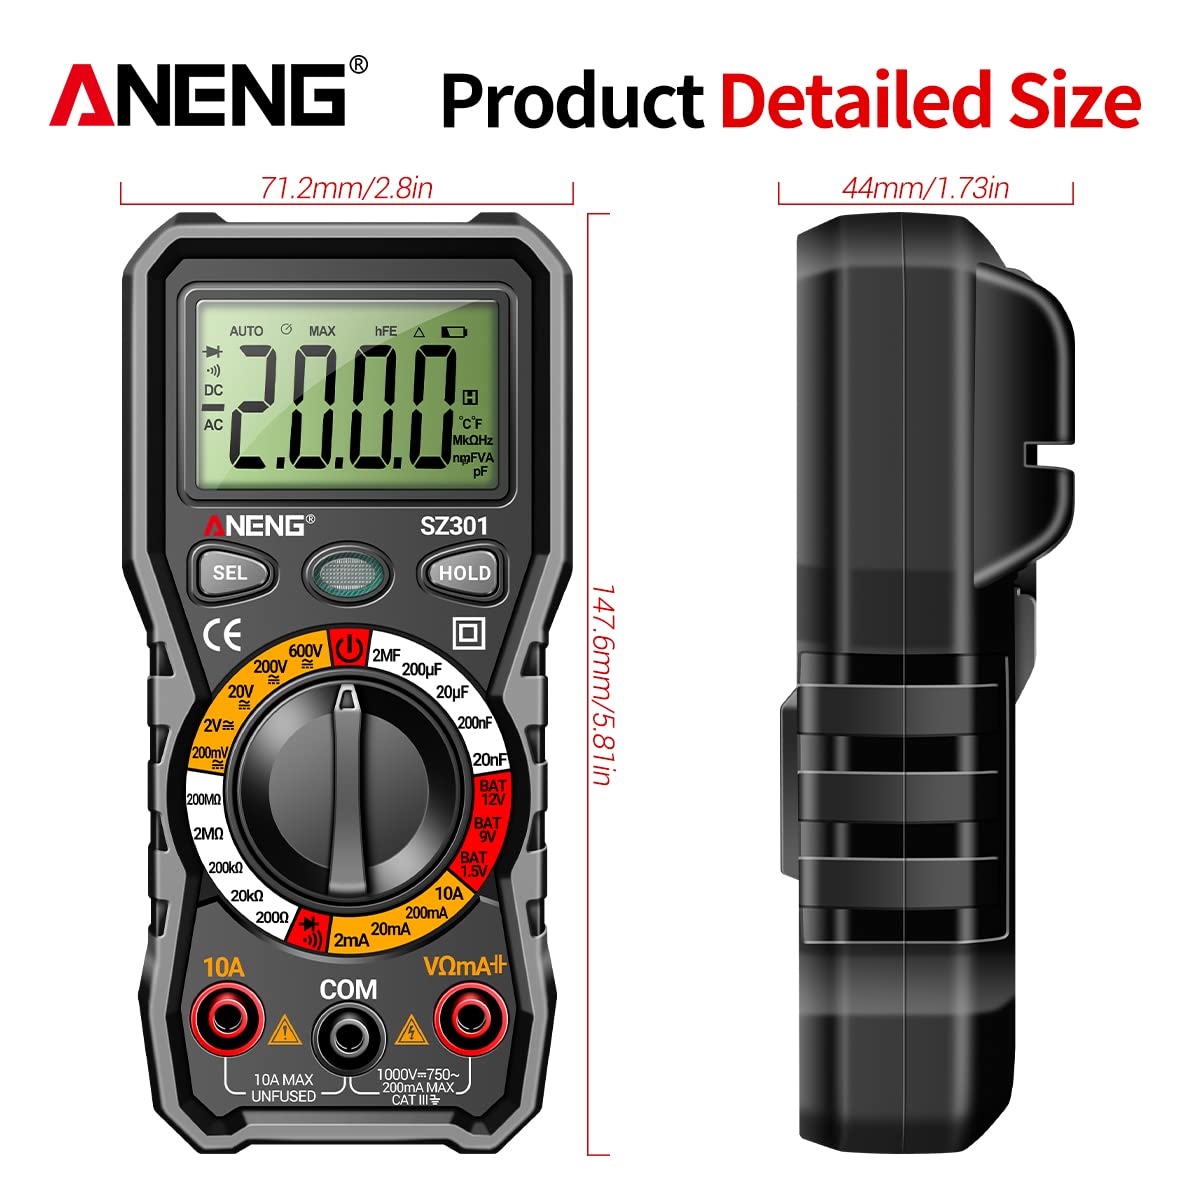
9. Especificaciones
| Parámetro | Valor |
|---|---|
| Tipo de pantalla | Pantalla digital |
| Número de modelo | SZ301 |
| Vol DCtage Rango | 200mV - 600V |
| Vol. CAtage Rango | 0 V - 600 V |
| Conteo máximo | 2000 |
| Fuente de poder | 2 pilas AA (no incluidas) |
| Material de la carcasa | abdominales |
| Tamaño | Aprox. 147.7 x 70.3 x 42.5 mm (5.81 x 2.77 x 1.67 pulgadas) |
| Color | Negro |
| Tipo de medida | Ammeter, Multimeter |
| Fabricante | GOLDEN BLUE |
| Fecha de primera disponibilidad | 14 de abril de 2023 |
10. Garantía y soporte
Para obtener información sobre la garantía o asistencia técnica, consulte la documentación incluida con su compra o póngase en contacto directamente con el vendedor o fabricante. Conserve el comprobante de compra para cualquier reclamación de garantía.
Ask a question about this manual
Ask about setup, troubleshooting, compatibility, parts, safety, or missing instructions. Manuals+ will review the question and use this page’s manual context to help answer it.