1. Introducción
Thank you for choosing the FAHEFANA 20V Brushless Cordless Drill. This manual provides essential information for the safe operation, maintenance, and troubleshooting of your tool. Please read this manual thoroughly before first use and keep it for future reference.

Image 1.1: The FAHEFANA 20V Brushless Cordless Drill, including two batteries and a selection of accessories.
2. Instrucciones de seguridad
Siga siempre las precauciones de seguridad básicas para reducir el riesgo de incendio, descarga eléctrica y lesiones personales.
- Seguridad en el área de trabajo: Mantenga su área de trabajo limpia y bien iluminada. Las áreas desordenadas u oscuras pueden provocar accidentes. No opere herramientas eléctricas en atmósferas explosivas, como en presencia de líquidos, gases o polvo inflamables.
- Seguridad eléctrica: Evite el contacto corporal con superficies conectadas a tierra. No exponga las herramientas eléctricas a la lluvia ni a la humedad. La entrada de agua en una herramienta eléctrica aumenta el riesgo de descarga eléctrica.
- Seguridad personal: Use siempre protección para los ojos. Use protección auditiva al trabajar durante periodos prolongados. Vístase adecuadamente; evite ropa holgada o joyas. Mantenga el cabello, la ropa y los guantes alejados de las piezas móviles.
- Uso y cuidado de herramientas: No fuerce la herramienta eléctrica. Utilice la herramienta eléctrica correcta para su aplicación. Desconecte la batería de la herramienta eléctrica antes de realizar ajustes, cambiar accesorios o guardarla.
- Uso y cuidado de la batería: Recargue únicamente con el cargador especificado por el fabricante. No utilice las baterías con otras herramientas eléctricas. Cuando no utilice la batería, manténgala alejada de otros objetos metálicos.
3. Contenido del paquete
Desempaque cuidadosamente todos los artículos y compruébelos con la lista a continuación. Si falta alguna pieza o está dañada, contacte con su vendedor.
- 1 x FAHEFANA 20V Brushless Cordless Drill
- 2 baterías de iones de litio de 2000 mAh
- 1 x cargador rápido
- 4 x Destornillador Bits
- 3 x Helical Drill Bits
- 3 brocas planas
- 9 llaves de tubo
- 1 x adaptador de enchufe
- 1 x Hexagonal Screw Holder
- 1 x Destornillador de eje flexible
- 1 x Estuche de transporte

Imagen 3.1: Másview of the drill, two batteries, charger, and the comprehensive set of 25 accessories.
4. Producto terminadoview
Familiarize yourself with the components of your FAHEFANA 20V Brushless Cordless Drill.

Image 4.1: Labeled diagram of the drill components, including the 10mm chuck, LED light, variable speed trigger, power indicator, belt clip, forward/reverse switch, speed selector, and 25+1 torque adjustment ring.
Tecnología de motor sin escobillas
This drill features a powerful brushless motor, offering several advantages sobre los motores cepillados tradicionales:
- Mayor eficiencia: Delivers up to 60 Nm of torque, providing more power for demanding tasks.
- Mayor vida útil: Eliminates carbon brush wear, reducing maintenance and extending tool life.
- Diseño compacto: Allows for a more compact and lightweight tool.
- Seguridad mejorada: Operates without sparks, making it safer in certain environments.
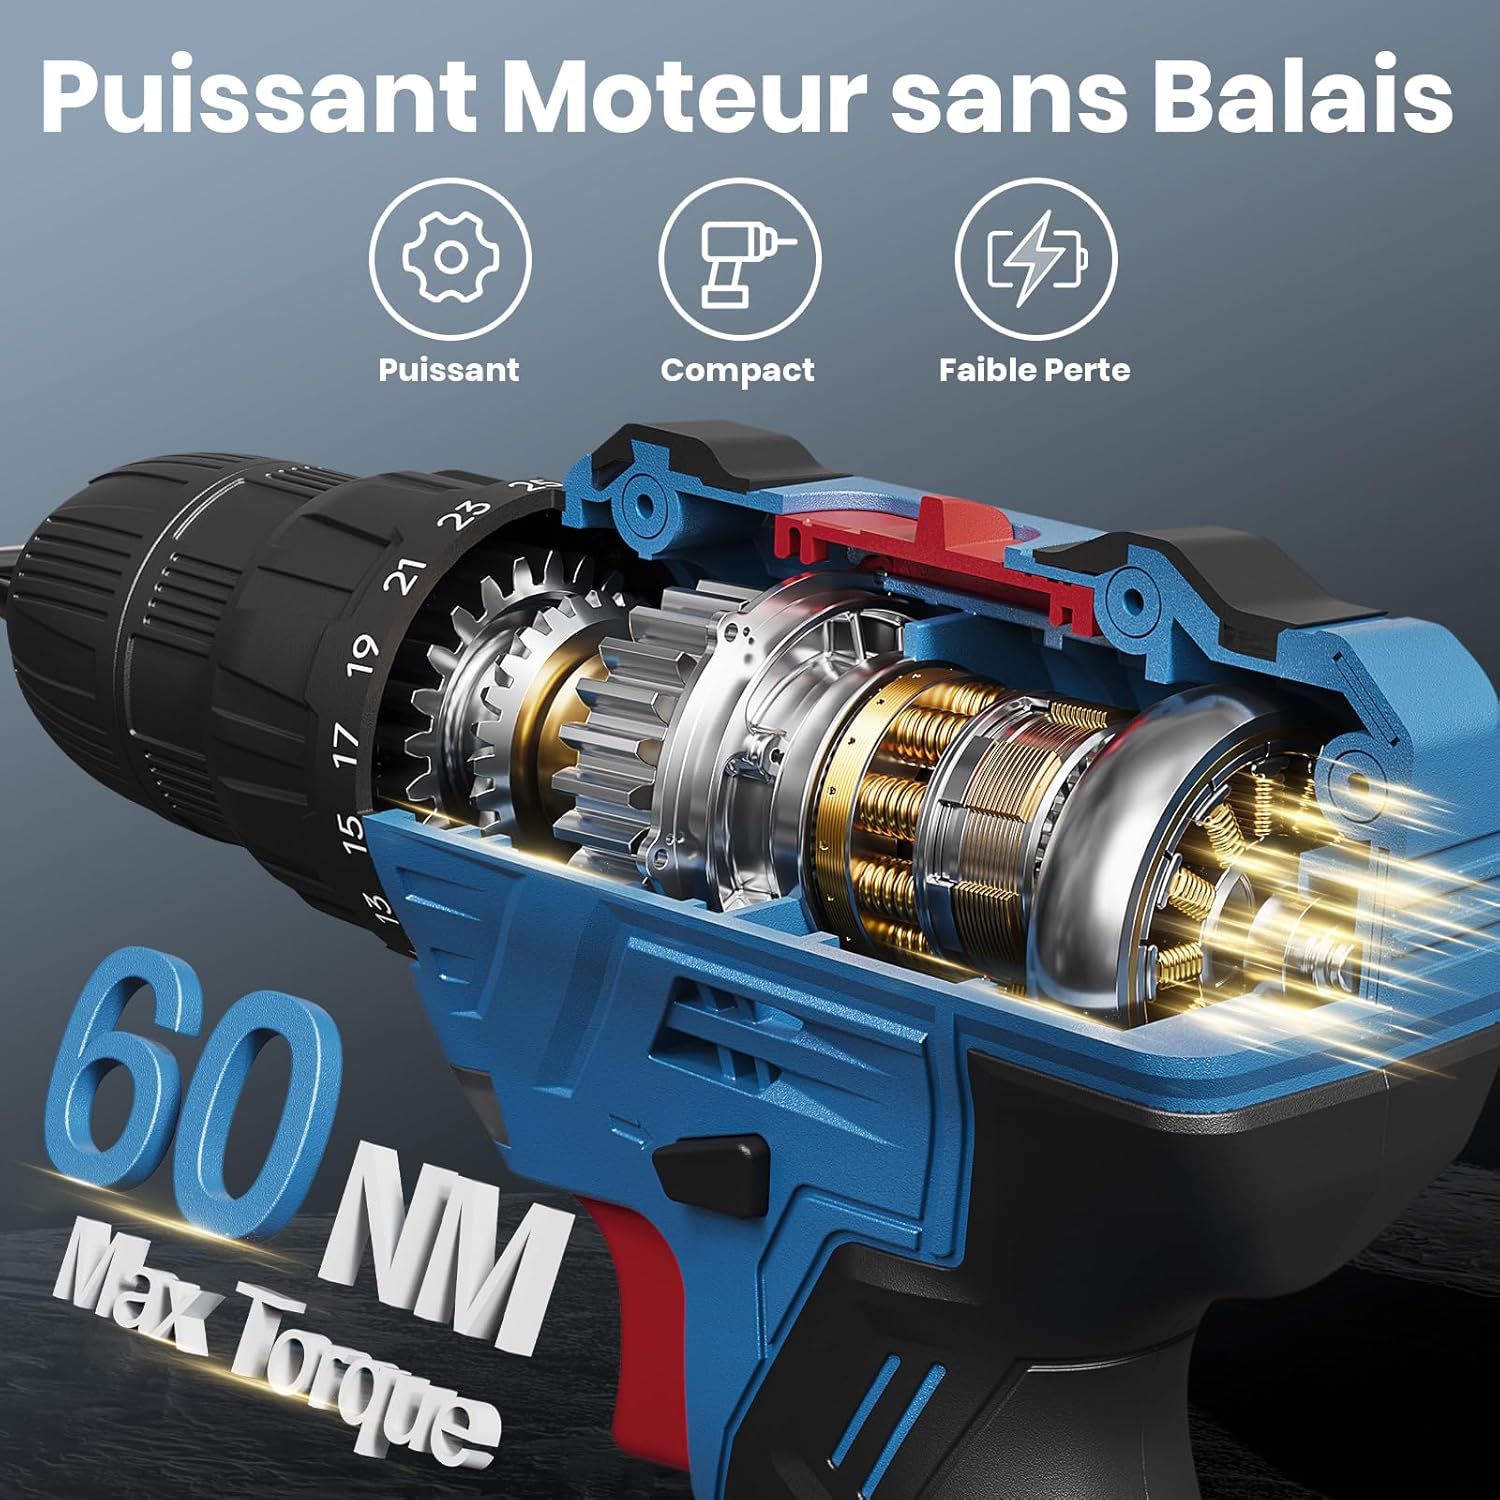
Imagen 4.2: Un interior view illustrating the brushless motor, emphasizing its powerful, compact, and low-loss design.
5. Configuración
5.1 Carga de la batería
The drill is powered by 20V Lithium-ion batteries. Ensure batteries are fully charged before first use.
- Conecte el cargador rápido a una toma de corriente estándar.
- Coloque la batería en el cargador. La luz indicadora del cargador mostrará el estado de carga.
- A full charge typically takes approximately one hour.
- Una vez cargada, retire la batería del cargador.

Image 5.1: The two 2000mAh Lithium-ion batteries, one connected to the fast charger and another ready for use, enabling continuous operation.
5.2 Instalación y extracción de la batería
- Instalación: Alinee el paquete de baterías con la base del mango del taladro y deslícelo hasta que encaje firmemente en su lugar.
- Eliminación: Press the battery release buttons on the sides of the battery pack and slide the battery out of the drill.
5.3 Accessory Installation and Removal (Drill Bits, Screwdriver Bits)
The drill features a 10mm (3/8") keyless chuck for quick and easy bit changes.
- Para abrir el mandril: Rotate the chuck collar counter-clockwise until the jaws are wide enough to insert the desired bit.
- Para insertar un bit: Insert the shank of the drill bit or screwdriver bit into the chuck jaws. Ensure the bit is centered.
- Para cerrar el mandril: Rotate the chuck collar clockwise until the bit is firmly secured. Do not overtighten.
- Para quitar un bit: Gire el collar del mandril en sentido antihorario para aflojar las mordazas y extraer la broca.
6. Instrucciones de funcionamiento
6.1 Power On/Off and Variable Speed Trigger
The drill is activated by pressing the variable speed trigger. The speed of rotation is controlled by the amount of pressure applied to the trigger. Pressing lightly results in lower speed, while pressing fully results in maximum speed.
Selección de 6.2 velocidades
The drill has two speed settings, selected via the speed selector switch located on top of the drill.
- Velocidad 1 (0-500 RPM): For screwdriving applications and drilling larger holes in softer materials. Provides higher torque.
- Velocidad 2 (0-1850 RPM): For drilling smaller holes and general drilling in various materials. Provides higher speed.

Image 6.1: The speed selector switch, illustrating Speed 1 (0-500 RPM) for screwdriving and Speed 2 (0-1850 RPM) for drilling.
6.3 Ajuste del par
The torque adjustment ring allows you to select from 25 torque settings plus a drill mode. This prevents overtightening screws and damaging materials.
- Configuraciones 1-25: For screwdriving. Start with a lower setting and increase as needed until the screw is driven flush without stripping.
- Modo de taladro (icono de taladro): For drilling applications. This setting provides maximum torque for drilling.

Image 6.2: The 25+1 precise clutch control ring, showing settings for various materials like plastic, wood, screws, and metals.
6.4 Rotación hacia adelante/atrás
El interruptor de avance/retroceso, ubicado encima del gatillo, controla la dirección de rotación.
- Empujando el interruptor hacia la izquierda (cuando viewed from the rear) sets the drill to forward rotation for driving screws or drilling.
- Pushing the switch to the right sets the drill to reverse rotation for removing screws or backing out drill bits.
- Cuando el interruptor está en la posición central, el gatillo está bloqueado, lo que evita el arranque accidental.
6.5 Luz de trabajo LED
La luz LED integrada ilumina automáticamente el área de trabajo cuando se presiona el gatillo, mejorando la visibilidad en espacios con poca iluminación.

Image 6.3: The LED light feature in action, illuminating the work area for improved visibility in dark or confined spaces.
6.6 Drilling and Screwdriving Techniques
- Perforación: Select the appropriate drill bit and speed. Apply steady, even pressure. For hard materials, use a slower speed and apply cutting fluid if necessary.
- Destornillador: Select the correct screwdriver bit and torque setting. Hold the drill firmly and apply pressure in line with the screw to prevent cam-out.

Image 6.4: A user operating the cordless drill to create a hole in a wooden plank, demonstrating a typical drilling application.
7. Mantenimiento
El mantenimiento regular garantiza un rendimiento óptimo y prolonga la vida útil de su herramienta.
- Limpieza: Keep the ventilation slots clear and free of dust. Use a soft, damp paño para limpiar la herramienta casing. No utilice productos químicos agresivos ni limpiadores abrasivos.
- Mantenimiento del mandril: Limpie periódicamente las mordazas del mandril para garantizar un agarre adecuado de las brocas.
- Cuidado de la batería: Guarde las baterías en un lugar fresco y seco, alejado de la luz solar directa. No guarde las baterías completamente descargadas durante períodos prolongados.
- Almacenamiento: When not in use, store the drill and accessories in its carrying case in a dry, secure location out of reach of children.
8. Solución de problemas
| Problema | Posible causa | Solución |
|---|---|---|
| El taladro no arranca | Batería sin carga o mal instalada. Interruptor de avance/retroceso en posición central (bloqueado). | Charge battery and ensure it is securely installed. Move forward/reverse switch to forward or reverse position. |
| Pérdida de potencia durante el funcionamiento | La carga de la batería es baja. Protección contra sobrecarga activada. | Recargue la batería. Reduzca la presión sobre la herramienta o utilice un ajuste de velocidad/par más bajo. |
| La broca se resbala en el mandril | El portabrocas no está bien apretado. El vástago de la broca está sucio o dañado. | Vuelva a apretar el mandril firmemente. Limpie o reemplace la broca. |
| Vibración excesiva | Broca doblada o dañada. | Reemplace la broca. |
9. Especificaciones
| Característica | Especificación |
|---|---|
| Número de modelo | 20VDZ |
| Volumentage | 20 voltios |
| Tipo de batería | Polímero de litio |
| Capacidad de la batería | 2000 mAh |
| Par máximo | 60 Nm |
| Velocidad sin carga (Velocidad 1) | 0-500 RPM |
| Velocidad sin carga (Velocidad 2) | 0-1850 RPM |
| Ajustes de par | 25 + 1 (Modo de ejercicio) |
| Tamaño de Chuck | 10 mm (3/8") |
| Dimensiones del producto | 29.2 x 27.3 x 8.8 cm |
| Peso del producto | 2.6 kilogramos |
10. Garantía y soporte
FAHEFANA products are manufactured to high-quality standards. For warranty information, technical support, or service inquiries, please refer to the warranty card included with your purchase or contact your retailer. Please have your model number (20VDZ) and purchase date available when contacting support.