Bar Food Processor and Small Rice Cooker Combo (ASIN: B0CB69PXWR)
Manual de usuario del procesador de alimentos de barra y olla arrocera pequeña
Model: Food Processor and Small Rice Cooker Combo (ASIN: B0CB69PXWR)
Marca: Bar
1. Introducción y másview
Thank you for choosing the Bar Food Processor and Small Rice Cooker combo. This manual provides essential information for the safe and efficient operation, maintenance, and troubleshooting of your new kitchen appliances. Please read this manual thoroughly before first use and retain it for future reference.
This versatile combo is designed to simplify your cooking tasks. The food processor efficiently handles chopping, mixing, grating, shredding, slicing, and dough-making, while the rice cooker offers multiple functions for perfectly cooked rice, porridge, soup, and more.
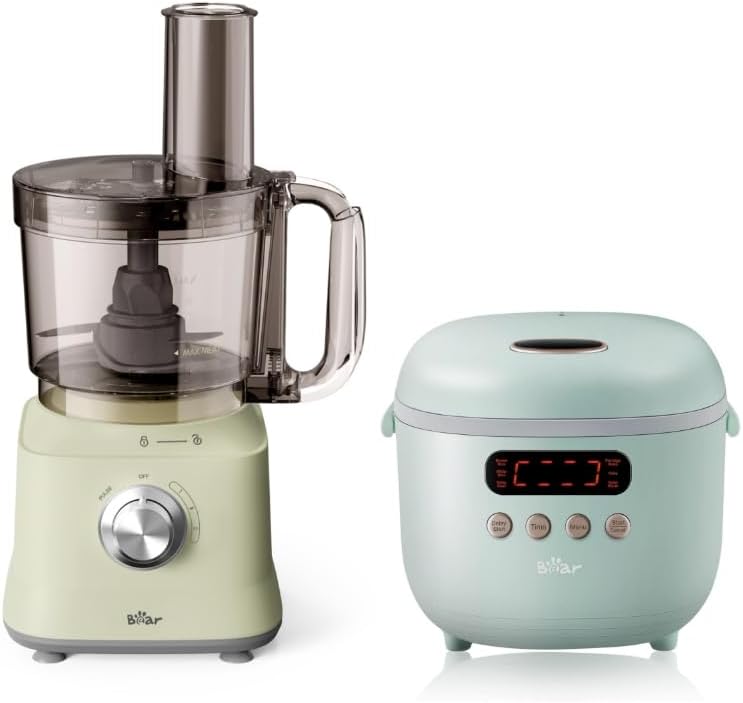
Figura 1.1: The Bar Food Processor (left) and Small Rice Cooker (right) together. This image displays both appliances included in the combo, showcasing their compact design and white/light green color scheme.
2. Instrucciones de seguridad importantes
ADVERTENCIA: Para reducir el riesgo de incendio, descarga eléctrica o lesiones, siga siempre estas precauciones básicas de seguridad.
- Lea todas las instrucciones antes de utilizar el aparato.
- No sumerja la base del motor de ninguno de los aparatos en agua ni en otros líquidos.
- Desconéctelo del tomacorriente cuando no esté en uso, antes de colocar o quitar piezas y antes de limpiarlo.
- Es necesaria una estrecha supervisión cuando cualquier aparato sea utilizado por niños o cerca de ellos.
- Avoid contact with moving parts. Always use the food pusher when feeding food into the food processor.
- Las cuchillas están afiladas. Manéjelo con sumo cuidado.
- No opere ningún electrodoméstico con un cable o enchufe dañado, o después de que el electrodoméstico no funcione correctamente o se haya caído o dañado de alguna manera.
- No utilizar en exteriores.
- No deje que el cable cuelgue del borde de la mesa o mostrador, ni que toque superficies calientes.
- No lo coloque sobre o cerca de un quemador de gas o eléctrico caliente, ni dentro de un horno caliente.
- Se debe tener mucho cuidado al mover un aparato que contenga aceite caliente u otros líquidos calientes.
- Siempre conecte primero el enchufe al aparato y luego el cable a la toma de corriente. Para desconectarlo, apague cualquier control y desenchúfelo de la toma de corriente.
- El uso de accesorios no recomendados o vendidos por el fabricante puede provocar incendios, descargas eléctricas o lesiones.
3. Componentes del producto
3.1 Componentes del procesador de alimentos
- Base del motor con dial de control
- Processing Bowl (1500mL capacity)
- Tapa con tolva de alimentación
- Empujador de alimentos
- S-Blade (for chopping/mixing)
- Cuchilla para masa
- Reversible Shred/Slice Disc
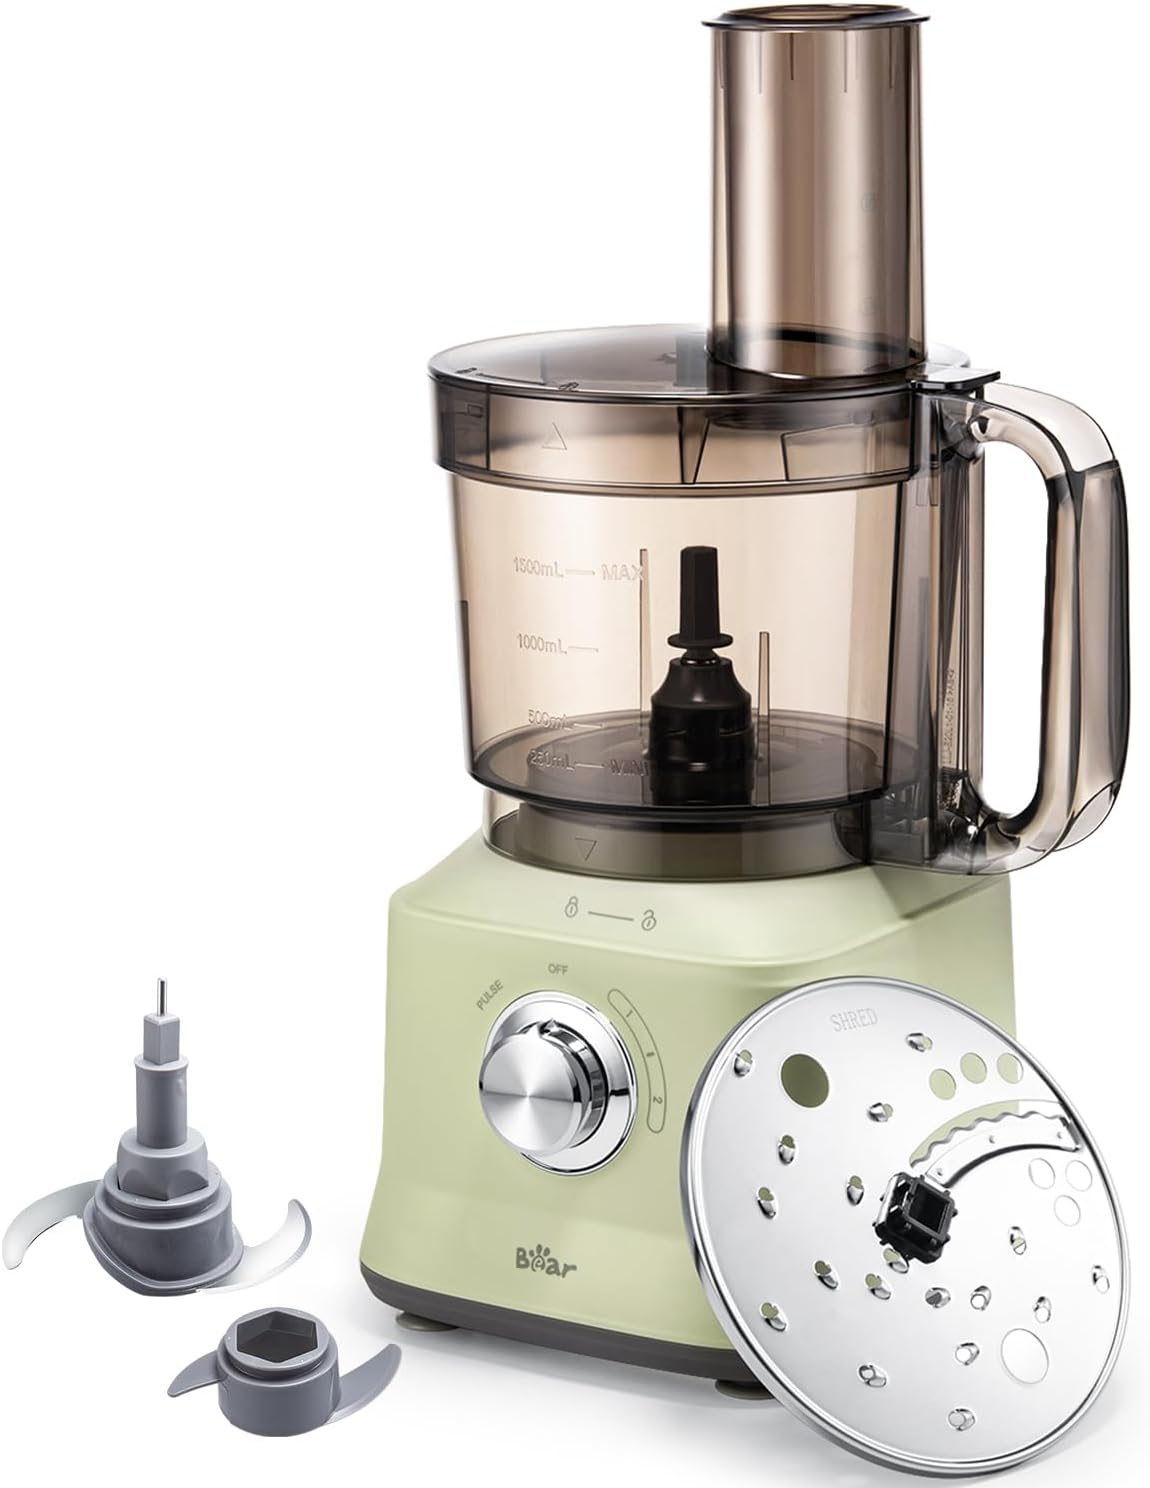
Figura 3.1: The Bar Food Processor disassembled, showing the motor base, processing bowl, lid, and various attachments including the S-blade, dough blade, and reversible shred/slice disc.
3.2 Small Rice Cooker Components
- Unidad principal con panel de control
- Maceta interior extraíble.
- Tapa
- Taza medidora
- Paleta de arroz

Figura 3.2: Frente view of the Bar Small Rice Cooker, highlighting its compact design and digital display with control buttons.
4. Configuración
4.1 Food Processor Setup
- Coloque la base del motor sobre una superficie limpia, seca y estable.
- Place the processing bowl onto the motor base, aligning the tabs and twisting clockwise until it locks into place.
- Carefully place the desired blade (S-blade or dough blade) or disc onto the center shaft inside the bowl. Ensure it is seated properly.
- Agregue los ingredientes al tazón.
- Place the lid onto the processing bowl, aligning the tabs and twisting clockwise until it locks. The appliance will not operate unless the bowl and lid are correctly locked.
- Ensure the control dial is in the 'OFF' position before plugging the unit into a power outlet.
4.2 Small Rice Cooker Setup
- Coloque la unidad principal sobre una superficie estable y resistente al calor.
- Wash the inner pot, measuring cup, and rice paddle thoroughly before first use.
- Coloque el recipiente interior limpio en la unidad principal.
- Asegúrese de que la tapa esté bien cerrada.
- Conecte el cable de alimentación a una toma de corriente adecuada. La pantalla se iluminará.
5. Instrucciones de funcionamiento
5.1 Funcionamiento del procesador de alimentos
The food processor features an 800W motor with two speed settings and a pulse function for precise control.
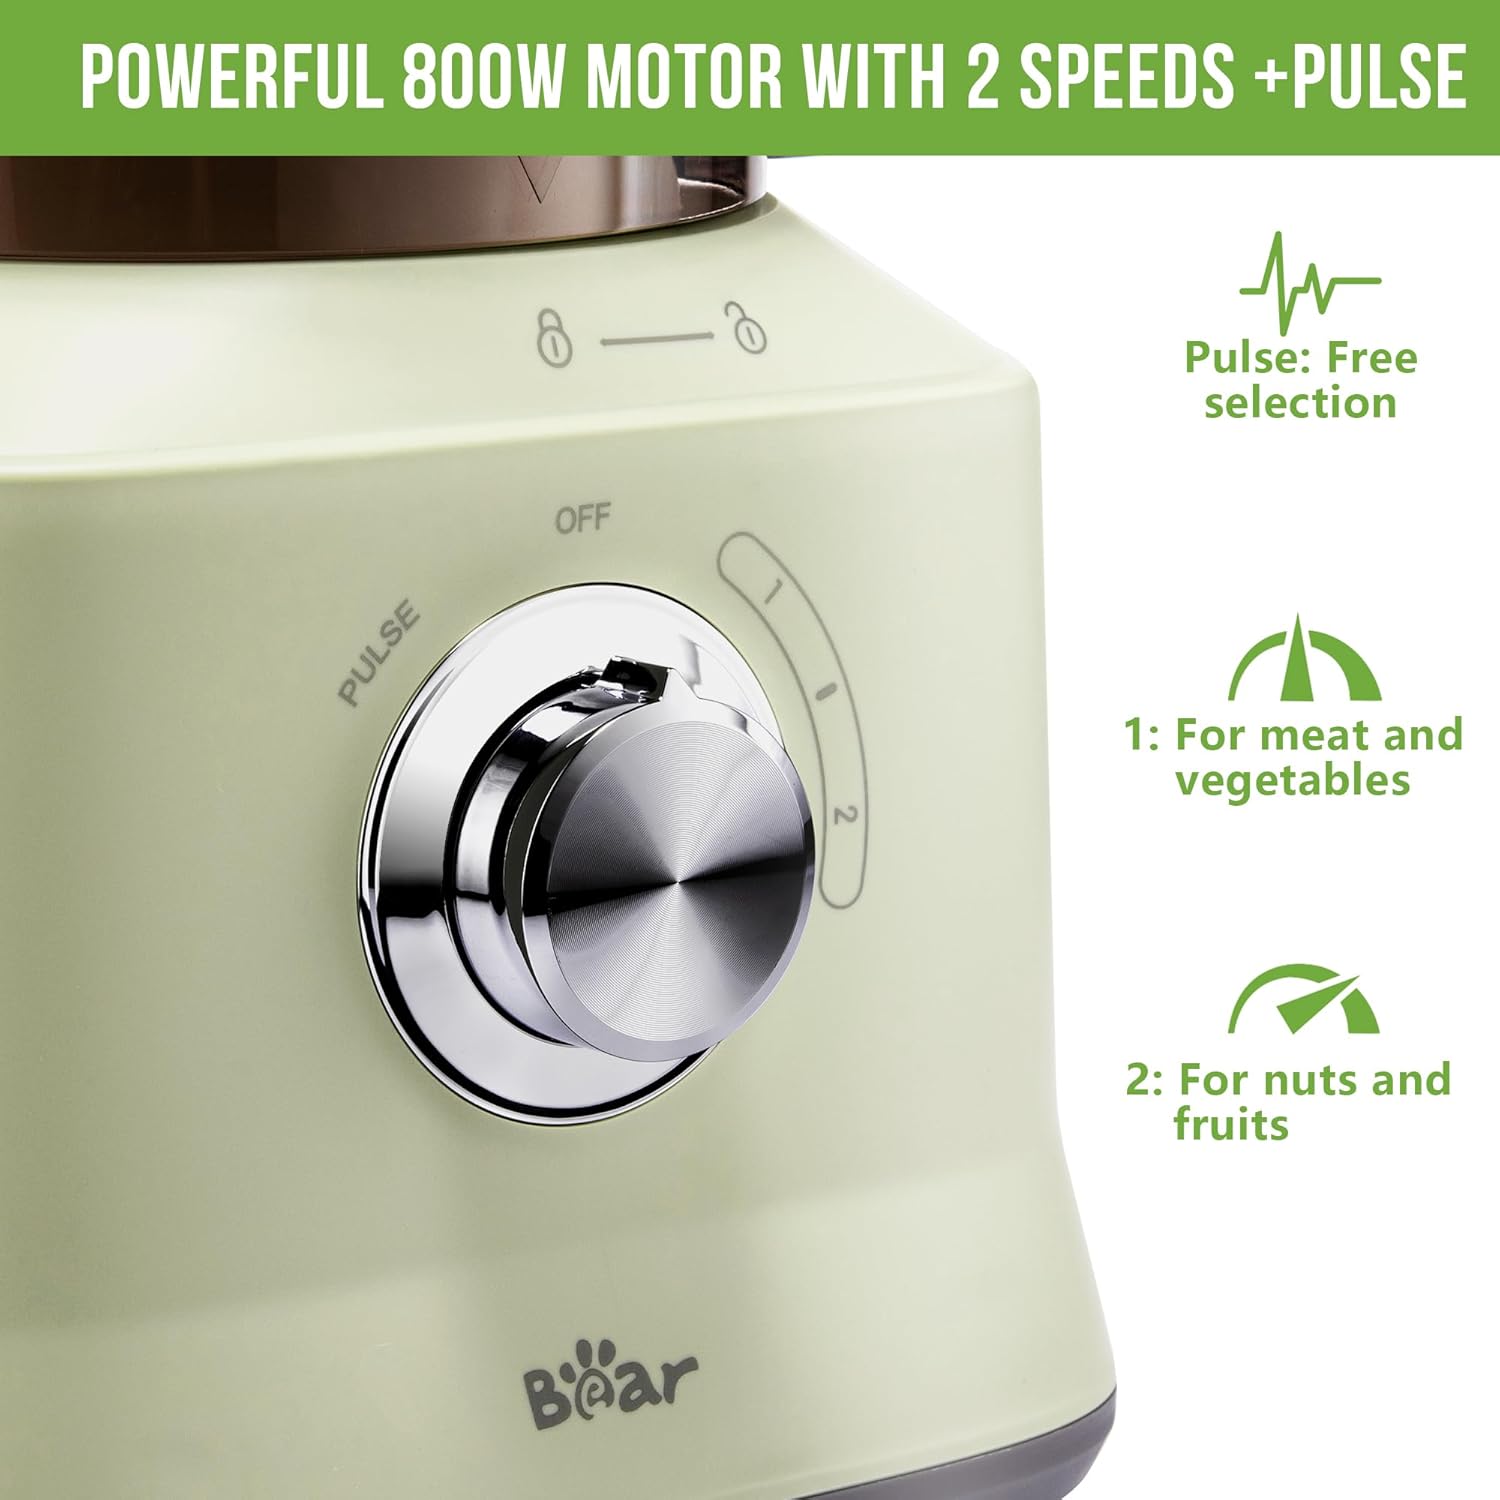
Figura 5.1: Close-up of the Bar Food Processor's control dial, showing the 'OFF', 'PULSE', '1', and '2' settings. Speed 1 is recommended for meat and vegetables, while Speed 2 is for nuts and fruits.
- After setup (Section 4.1), ensure the unit is plugged in.
- Configuraciones de velocidad:
- Turn the control dial to '1' for lower speed, suitable for processing softer ingredients like vegetables and meat.
- Turn the control dial to '2' for higher speed, ideal for harder ingredients such as nuts and fruits.
- Función de pulso: Turn the control dial to 'PULSE' and hold for short bursts of power. This is ideal for coarse chopping or when precise control is needed. Release the dial to stop.
- Using the Feed Chute: For continuous processing (e.g., slicing or shredding), add ingredients through the feed chute in the lid. Always use the food pusher to guide ingredients down, never your fingers.
- Funciones: The food processor supports various tasks depending on the attachment used:

Figura 5.2: Visual guide to the Bar Food Processor's capabilities: Kneading with the BPA-free dough blade, Chopping with the stainless steel S-blade, Shredding with the stainless steel reversible shred disc, and Slicing with the stainless steel reversible slice disc.
- Amasadura: Use the BPA-free dough blade for preparing dough.
- El cortar: Use the stainless steel S-blade for chopping vegetables, meat, and other ingredients.
- Trituración: Use the stainless steel reversible shred disc for shredding ingredients like carrots or cheese.
- Rebanar: Use the stainless steel reversible slice disc for uniform slicing of vegetables.
- When finished, turn the dial to 'OFF' and unplug the appliance. Wait for blades to stop completely before removing the lid and bowl.
5.2 Small Rice Cooker Operation
The rice cooker offers 6 cooking functions and precise temperature control for optimal results.

Figura 5.3: The digital control panel of the Bar Small Rice Cooker, displaying various menu options including Brown Rice, White Rice, Porridge, Soup, Cake, and Keep Warm, along with Delay Start, Time, Menu, and Start/Cancel buttons.
- Medir los ingredientes: Use the provided measuring cup to measure rice. Rinse rice thoroughly if desired. Add rice to the inner pot.
- Agregar agua: Añada la cantidad de agua adecuada según el tipo de arroz y la consistencia deseada. Consulte las marcas de nivel de agua en el interior de la olla.
- Seleccionar función: Press the 'Menu' button repeatedly to cycle through the available cooking functions: 'Brown Rice', 'White Rice', 'Porridge', 'Soup', 'Cake', and 'Reheat'. The selected function will be highlighted on the display.
- Inicio diferido (opcional): To set a delayed start time, press the 'Delay Start' button after selecting your desired cooking function. Use the 'Time' button to adjust the delay duration.
- Empezar a cocinar: Press the 'Start/Cancel' button to begin the cooking process. The display will show a countdown or cooking indicator.
- Mantener caliente: Once cooking is complete, the rice cooker will automatically switch to 'Keep Warm' mode. This function maintains the temperature of the food without overcooking.
- Cancelar: To stop the cooking process at any time, press the 'Start/Cancel' button.

Figura 5.4: Diagram illustrating the precise temperature control of the Bar Small Rice Cooker during the cooking process, including stages like soaking, heating, steaming, and keeping warm to ensure perfectly cooked rice.
6. Mantenimiento y limpieza
Proper cleaning and maintenance will ensure the longevity and optimal performance of your Bar appliances. Always unplug the appliance from the power outlet before cleaning.
6.1 Limpieza del procesador de alimentos
- Base del motor: Limpie la base del motor con un anuncioamp Paño. No sumerja la base del motor en agua ni en ningún otro líquido.
- Processing Bowl, Lid, Blades, and Discs: These parts are recommended for hand washing. Wash them in warm, soapy water immediately after use to prevent food from drying on. Rinse thoroughly and dry completely before storing. Handle blades and discs with extreme care as they are very sharp.
- Para residuos de comida persistentes, sumerja las piezas en agua tibia con jabón antes de limpiarlas.
6.2 Small Rice Cooker Cleaning
- Unidad principal: Limpie el exterior de la unidad principal con un paño suave y húmedo.amp paño. No sumerja la unidad principal en agua.
- Olla interior: The removable inner pot should be hand washed with warm, soapy water. Use a non-abrasive sponge to avoid scratching the non-stick coating. Rinse thoroughly and dry.
- Tapa: Wash the lid with warm, soapy water and rinse. Ensure all food particles are removed from the steam vent.
- Taza medidora y paleta de arroz: Lavar con agua tibia y jabón y secar.
7. Solución de problemas
If you encounter issues with your Bar Food Processor or Small Rice Cooker, please refer to the following common problems and solutions:
| Problema | Posible causa | Solución |
|---|---|---|
| El aparato no se enciende. | Not plugged in; Bowl/Lid not locked (Food Processor); Power outage. | Ensure power cord is securely plugged in. For Food Processor, ensure bowl and lid are correctly locked into place. Check household circuit breaker. |
| Food Processor stops during operation. | Overload; Bowl/Lid dislodged. | Reduce the amount of food. Turn off, unplug, and re-secure bowl and lid. Allow motor to cool if it was overloaded. |
| Food Processor blades not spinning. | Blade not properly seated; Bowl/Lid not locked. | Ensure blade is correctly placed on the shaft. Verify bowl and lid are fully locked. |
| El arroz está poco cocido o demasiado cocido. | Incorrect water-to-rice ratio; Wrong cooking function selected. | Adjust water amount according to rice type and desired texture. Ensure the correct cooking function (e.g., 'White Rice', 'Brown Rice') is selected. |
| Rice cooker display shows error. | Inner pot not in place; Sensor issue. | Ensure the inner pot is correctly seated. Unplug the unit for a few minutes and plug it back in to reset. If the error persists, contact customer support. |
If the problem persists after trying these solutions, please contact Bar customer support for assistance.
8. Especificaciones
| Característica | Detalle |
|---|---|
| Marca | Bar |
| Nombre del modelo | Small Rice Cooker (part of combo) |
| ASIN | B0CB69PXWR |
| Color | Blanco |
| Característica especial | Removable Bowl (Rice Cooker) |
| Instrucciones de cuidado del producto | Lavado a mano |
| Componentes incluidos | Instruction Manual, Food Processor, Rice Cooker, various blades/discs, inner pot, measuring cup, rice paddle |
| Fecha de primera disponibilidad | 5 de julio de 2023 |
| Food Processor Motor | 800 W |
| Food Processor Speeds | 2 velocidades + pulso |
| Capacidad de la olla arrocera | Apto para 1-4 personas |
| Rice Cooker Functions | White Rice, Brown Rice, Porridge, Soup, Cake, Reheat |
9. Garantía y soporte
For warranty information, please refer to the documentation included with your purchase or visit the official Bar brand webSitio. Conserve su comprobante de compra para reclamaciones de garantía.
If you require further assistance, have questions about your product, or need to report an issue, please contact Bar customer support through their official channels. You can typically find contact information on the brand's websitio o a través del minorista donde compró el producto.
Bar Store Link: Visit the Bar Store on Amazon
Ask a question about this manual
Ask about setup, troubleshooting, compatibility, parts, safety, or missing instructions. Manuals+ will review the question and use this page’s manual context to help answer it.