
RCYAGO ECF-SGW07
RCYAGO Sprinkler Timer User Manual
Model: ECF-SGW07
Introducción
The RCYAGO Sprinkler Timer is an advanced, programmable water timer designed for efficient garden and lawn irrigation. Featuring two independent outlets, it allows for precise control over watering schedules, ensuring your plants receive optimal hydration while conserving water. This manual provides comprehensive instructions for installation, operation, and maintenance of your new sprinkler timer.
Características principales
- Dos salidas independientes: Two large outlets, each with a maximum flow rate of 35 liters per minute, allowing separate watering schedules for different zones.
- Duración de riego flexible: Set watering times from 1 minute to 5 hours 59 minutes per zone.
- Customizable Cycle Intervals: Program watering cycles every 1 to 7 days, or select specific days of the week (Monday to Sunday).
- Six Independent Programs: Each of the two outlets can be set with up to three distinct watering plans (P1, P2, P3) to meet varied plant needs throughout the day.
- Modo de riego manual: Provides on-demand watering from 0 to 59 minutes, ideal for additional care without disrupting preset schedules.
- Función de retraso por lluvia: Pause watering for 1 to 7 days based on local rainfall, preventing overwatering and saving water.
- Diseño duradero e impermeable: IP55 waterproof rating with multiple sealing washers and threaded sealing tape to prevent leaks.
- Fácil instalación: Features a 360° rotatable interface for quick and simple setup, compatible with 3/4" or 1/2" faucets.
- Pantalla fácil de usar: Equipped with a 2.5-inch LCD display and a low battery reminder for convenient operation.
Configuración e instalación
1. Instalación de la batería
The timer requires 4 new AA (1.5V) alkaline batteries (not included). Locate the battery compartment on the back of the unit. Open the cover, insert the batteries according to the polarity markings, and securely close the cover, ensuring the rubber ring is properly seated to maintain waterproofing.

Imagen: La parte inferior view of the sprinkler timer, highlighting the battery compartment for 4 AA batteries and the IP55 waterproof rating, along with a stainless steel filter.
2. Conexión al grifo
The timer is designed for easy connection to standard outdoor faucets. It includes thread reducers for compatibility with both 3/4" and 1/2" sized faucets. Ensure the O-ring is properly seated in the connector before attaching the timer to your faucet. The 360° rotatable interface allows for flexible positioning.
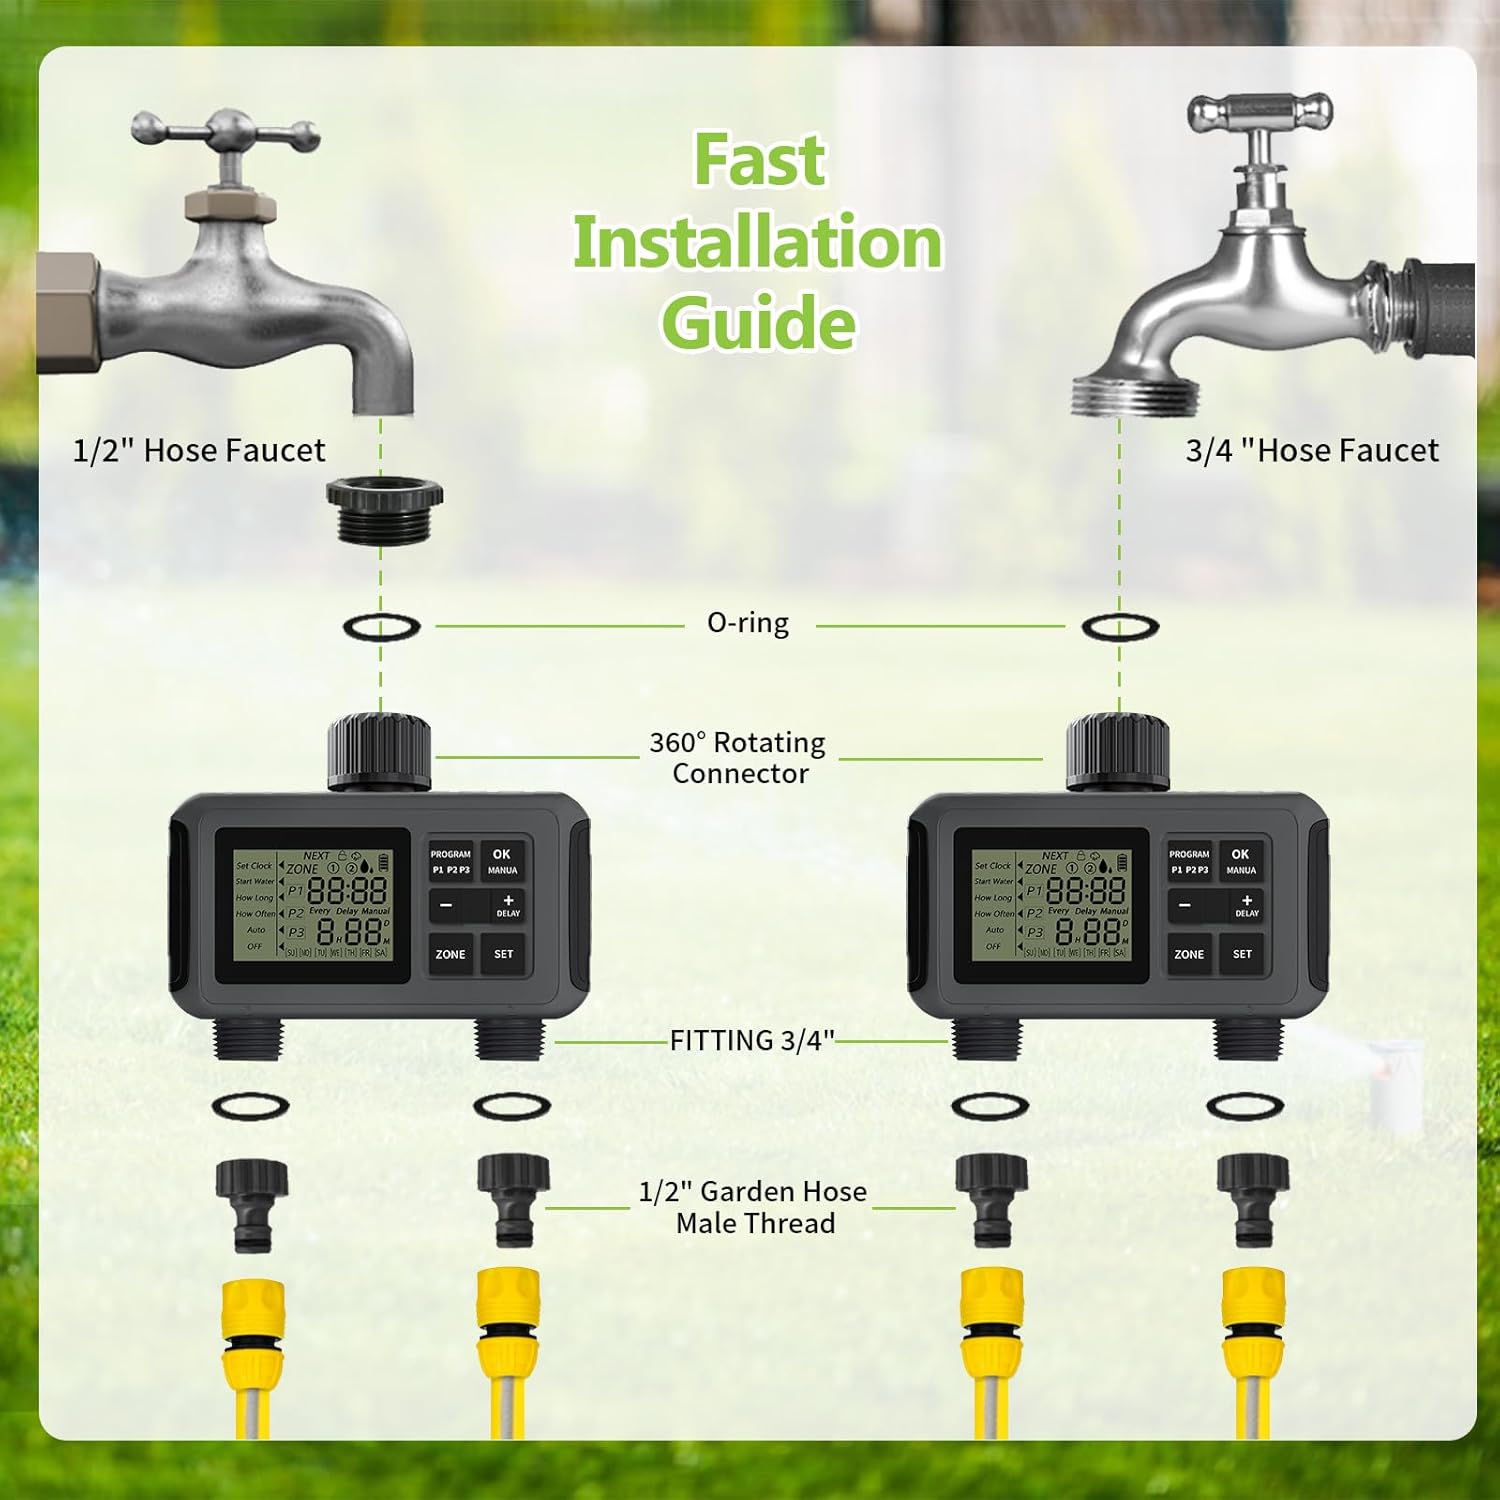
Image: A visual guide demonstrating the fast installation process for the sprinkler timer, showing connections to both 1/2" and 3/4" hose faucets using the O-ring, 360° rotating connector, and 1/2" garden hose male thread fittings.
3. Conexión de mangueras
Connect your garden hoses to the two independent outlets at the bottom of the timer. Each outlet is compatible with any standard 3/4" or 1/2" garden outdoor hose. Use the provided threaded sealing tape and sealing washers to ensure a leak-proof connection.
Operación
Comprensión de la pantalla y los controles
The timer features a clear 2.5-inch LCD display and intuitive buttons for programming. The display shows current settings, time, and program status. The main buttons include PROGRAM, OK, MANUA, -, +, DELAY, ZONE, and SET.
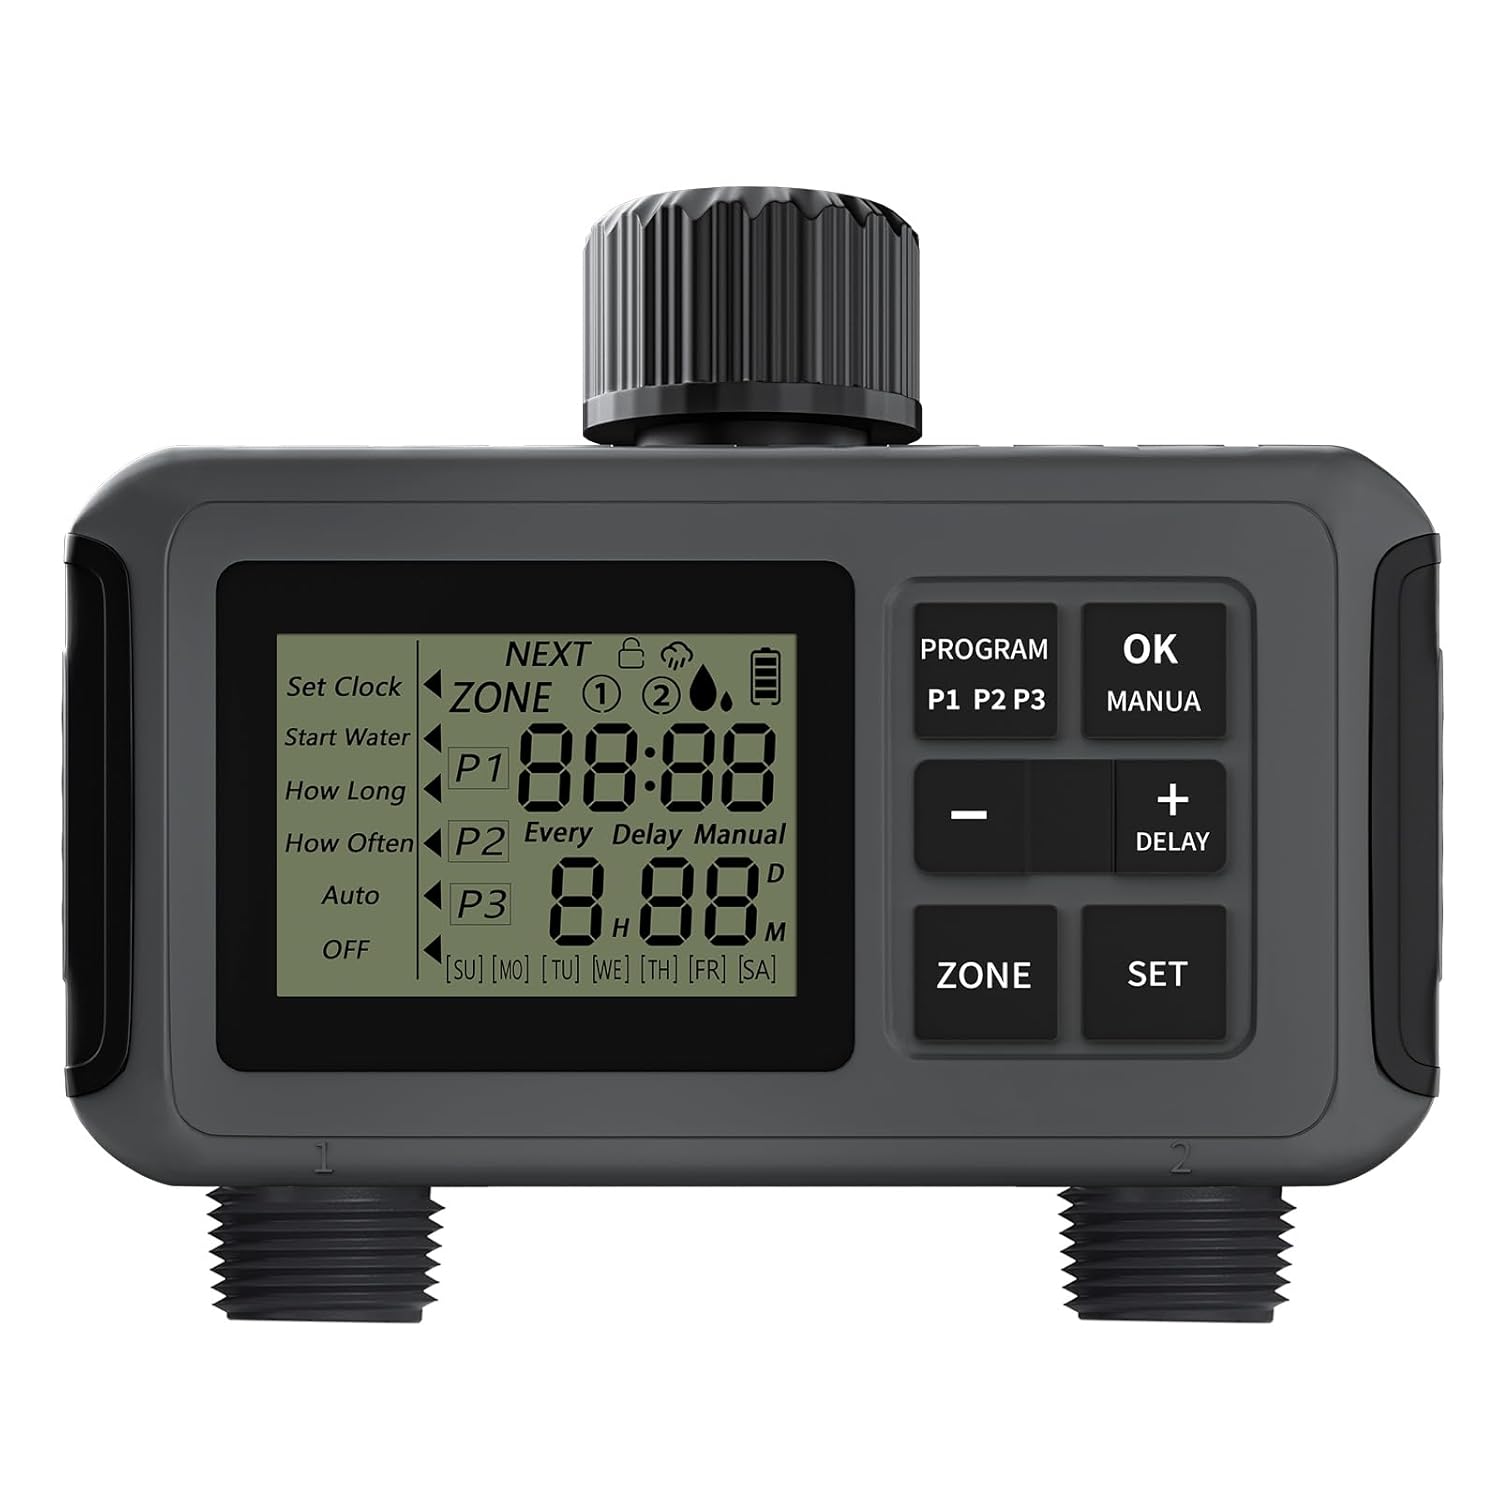
Image: The RCYAGO Sprinkler Timer showing its main LCD display, control buttons (PROGRAM, OK, MANUA, -, +, DELAY, ZONE, SET), and the two independent outlets.
Setting Watering Programs (P1, P2, P3)
The timer allows you to set up to three independent programs (P1, P2, P3) for each of the two zones. This enables highly customized watering schedules.
- Seleccionar Zona: Presione el ZONA Botón para cambiar entre la Zona 1 y la Zona 2.
- Ingrese al modo de programa: Presione el PROGRAMA button to cycle through P1, P2, P3, and Auto/Manual/OFF modes.
- Establecer hora de inicio: When a program (P1, P2, or P3) is selected, use the + y - buttons to adjust the start time. Press COLOCAR or OK Para confirmar.
- Set Watering Duration (How Long): Adjust the watering duration from 1 minute to 5 hours 59 minutes using the + y - botones. prensa COLOCAR or OK Para confirmar.
- Set Watering Frequency (How Often): Choose the watering frequency (e.g., every 1-7 days or specific days of the week) using the + y - botones. prensa COLOCAR or OK Para confirmar.
- Activar programa: Ensure the timer is set to "Auto" mode for the programs to run automatically.

Image: The sprinkler timer connected to two hoses, illustrating how each zone (Zone 1 and Zone 2) can be independently programmed with three different watering plans (P1, P2, P3) for varied start times and durations.

Image: A visual representation of the automatic watering schedule, showing a calendar for setting cycle intervals (every 1 to 7 days or specific days) and sliders for adjusting start water time, watering duration, and watering frequency.
Modo de riego manual
To initiate manual watering for either zone:
- Presione el MANÚA botón.
- Utilice el + y - buttons to set the desired manual watering duration from 0 to 59 minutes.
- Prensa OK para iniciar el riego manual.
- Once the manual watering time ends, the timer will automatically revert to its preset Auto mode.
Función de retraso por lluvia
To temporarily pause your watering schedule due to rain:
- Mantenga pulsado el DEMORA botón (o + button for 5 seconds) until the delay option appears on the screen.
- Utilice el + y - buttons to select the desired delay duration from 1 to 7 days.
- Prensa OK to confirm the rain delay. The timer will resume its scheduled programs automatically after the delay period.
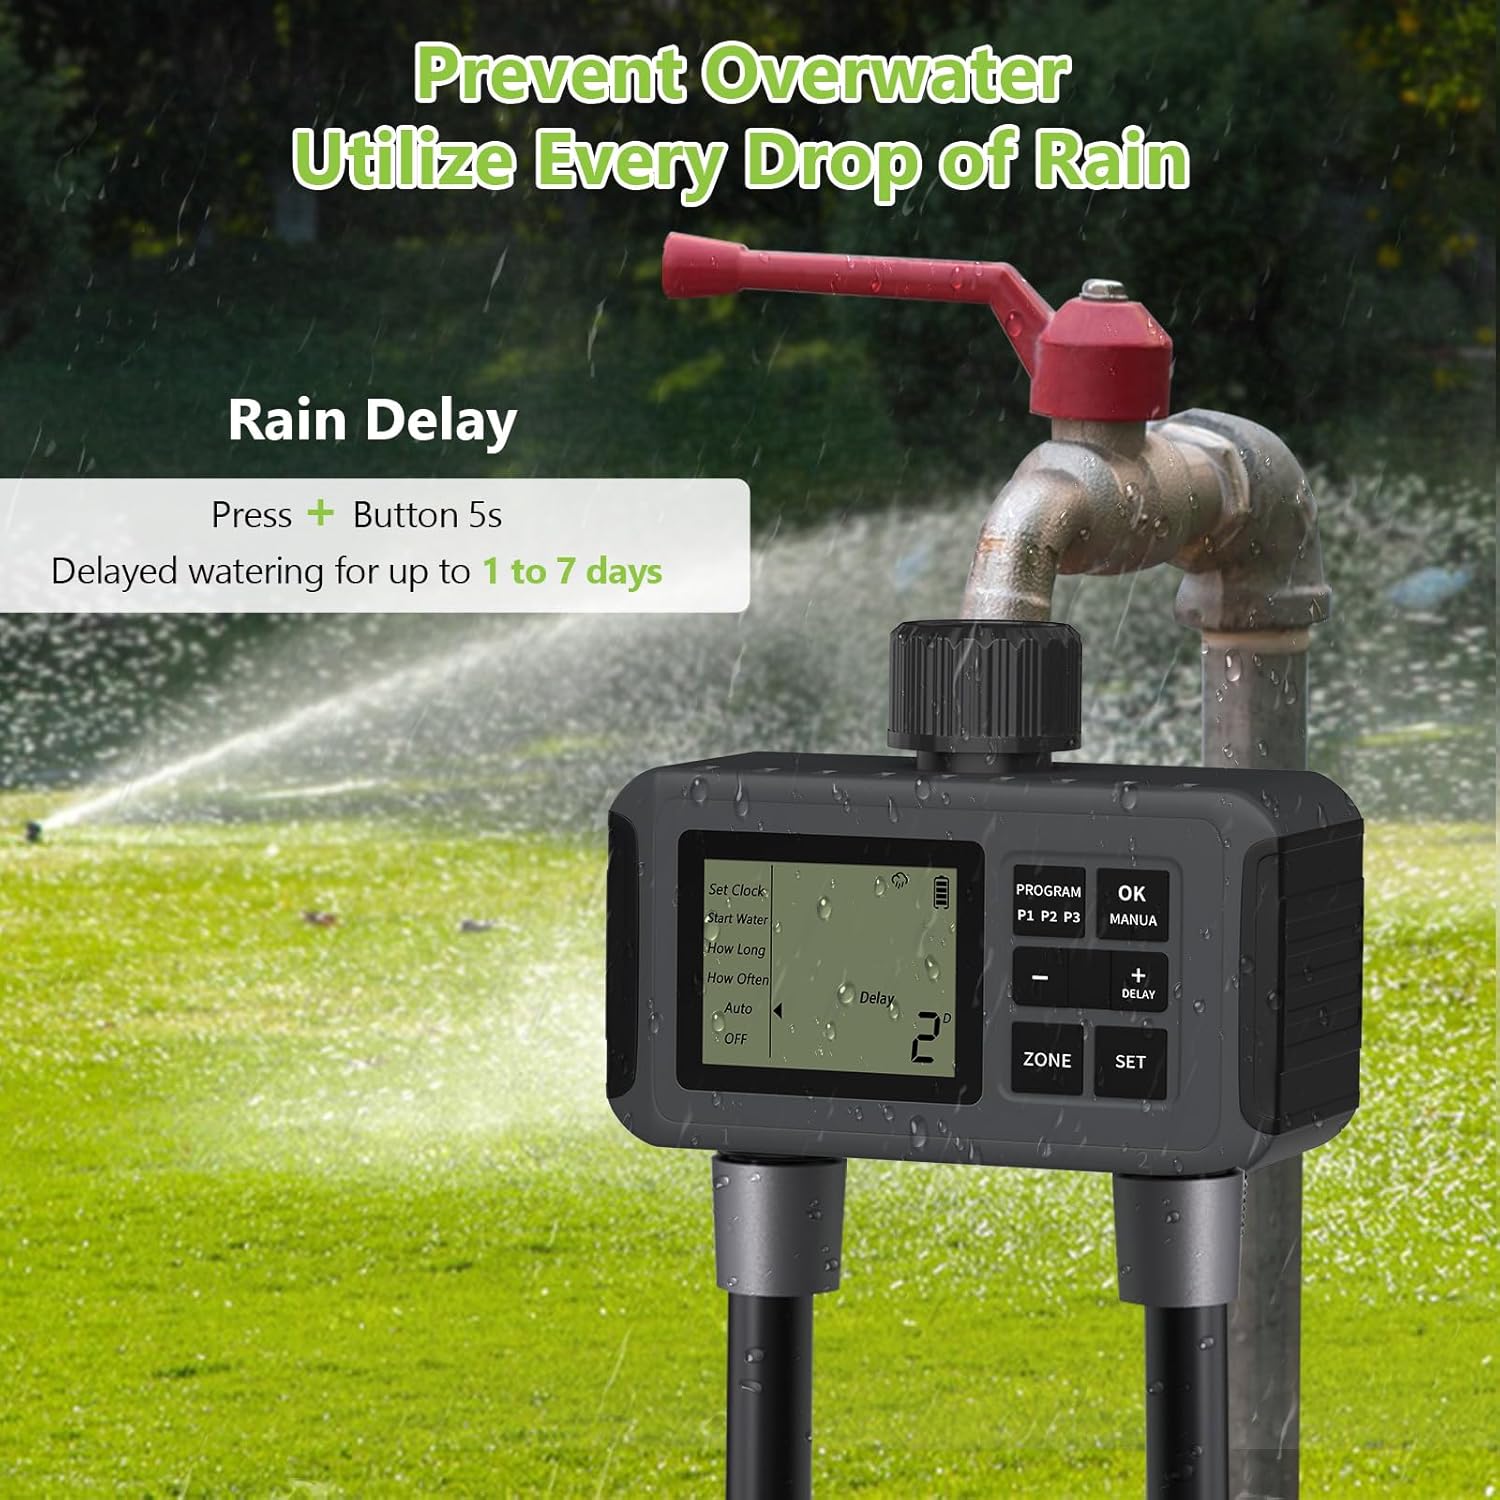
Image: The sprinkler timer connected to a faucet, displaying the rain delay function on its screen, indicating that watering can be delayed for up to 1 to 7 days to prevent overwatering.
Mantenimiento
- Reemplazo de batería: Replace batteries when the low battery indicator appears on the LCD display to ensure continuous operation. Always use new AA alkaline batteries.
- Prevención de fugas: Regularly check the sealing washers and threaded tape at the connections to ensure they are intact and preventing leaks. Replace if worn.
- Limpieza de filtros: The timer is equipped with a stainless steel filter at the inlet. Periodically remove and clean this filter to prevent debris from entering the timer and affecting water flow.
- Almacenamiento de invierno: En condiciones de congelación, desconecte el temporizador del grifo y guárdelo en el interior para evitar daños por la expansión del hielo.
Solución de problemas
- El temporizador no riega: Check battery level. Ensure the timer is in "Auto" mode and not in "OFF" or "Delay" mode. Verify that the faucet is turned on.
- No hay flujo de agua: Check for kinks in the hose. Ensure the stainless steel filter is not clogged. Verify water pressure from the faucet.
- Fugas en las conexiones: Ensure all connections are tightened properly. Check that O-rings and sealing washers are correctly seated and not damaged. Apply new threaded sealing tape if necessary.
- La pantalla no funciona: Reemplace las baterías. Asegúrese de que las baterías estén insertadas con la polaridad correcta.
Presupuesto
| Marca | RCYAGO |
| Número de modelo | ECF-SGW07 |
| Peso del artículo | 558 gramos |
| Dimensiones del artículo (LxWxH) | 6.1 x 14 x 11.7 centímetros |
| Rango de presión de agua | 7.25 psi - 116 psi |
| Caudal (máx.) | 35 liters per minute (per outlet) |
| Duración del riego | 1 min to 5 hrs 59 min |
| Intervalo de riego | Every 1 to 7 days or specific days |
| Fuente de poder | 4 pilas alcalinas AA (1.5 V) |
| Clasificación de impermeabilidad | IP55 |
| Tamaño de pantalla | 2.5 pulgadas |
Garantía y soporte
For warranty information or technical support, please refer to the product packaging or contact RCYAGO customer service directly. Keep your purchase receipt as proof of purchase.
Ask a question about this manual
Ask about setup, troubleshooting, compatibility, parts, safety, or missing instructions. Manuals+ will review the question and use this page’s manual context to help answer it.