
1. Introducción
The FXTUL M6 Motorcycle Diagnostic Tool is a comprehensive OBD2 scanner designed for diagnosing and maintaining motorcycles. It features a 5-inch RGB display screen and offers full system coverage, real-time data recording, and printable reports. This manual provides detailed instructions for the proper use and maintenance of your M6 diagnostic tool.

Figure 1: FXTUL M6 Diagnostic Tool, cables, and protective carrying case.
2. Producto terminadoview
2.1 Características principales
- Diagnóstico del sistema: Supports engine, ABS, tire pressure, anti-theft, and other systems. Reads and clears Diagnostic Trouble Codes (DTCs), views freeze frame data, displays data streams, and performs active tests.
- 104 Service Functions: Includes ECU reset, oil maintenance lamp reset, CO Trimmer adjustments, TPS adjustments, auto adaptive parameter reset, service light reset, and idling adjustments.
- Prueba de batería: Features cranking test, standard test, quick test, and charging test functions.
- Grabación y reproducción de datos: Registra datos de diagnóstico para su posterior revisión.view y análisis.
- Information Printing: Generates printable reports for diagnostic results, module information, fault codes, and data streams.
- Imagen Viewes: Captures and reviews screenshots of the device interface during diagnosis.
- 5-inch RGB Display: High-resolution (800x480) screen with customizable dark and light themes.
- Wide Motorcycle Coverage: Compatible with over 70 motorcycle brands and models globally.
- Free Lifetime Software Upgrade: Connects to a computer via USB for software updates.
- Soporte multi-idioma: Offers various language options for user interface.
2.2 Componentes y controles
The FXTUL M6 device features a user-friendly interface with a clear display and intuitive controls.
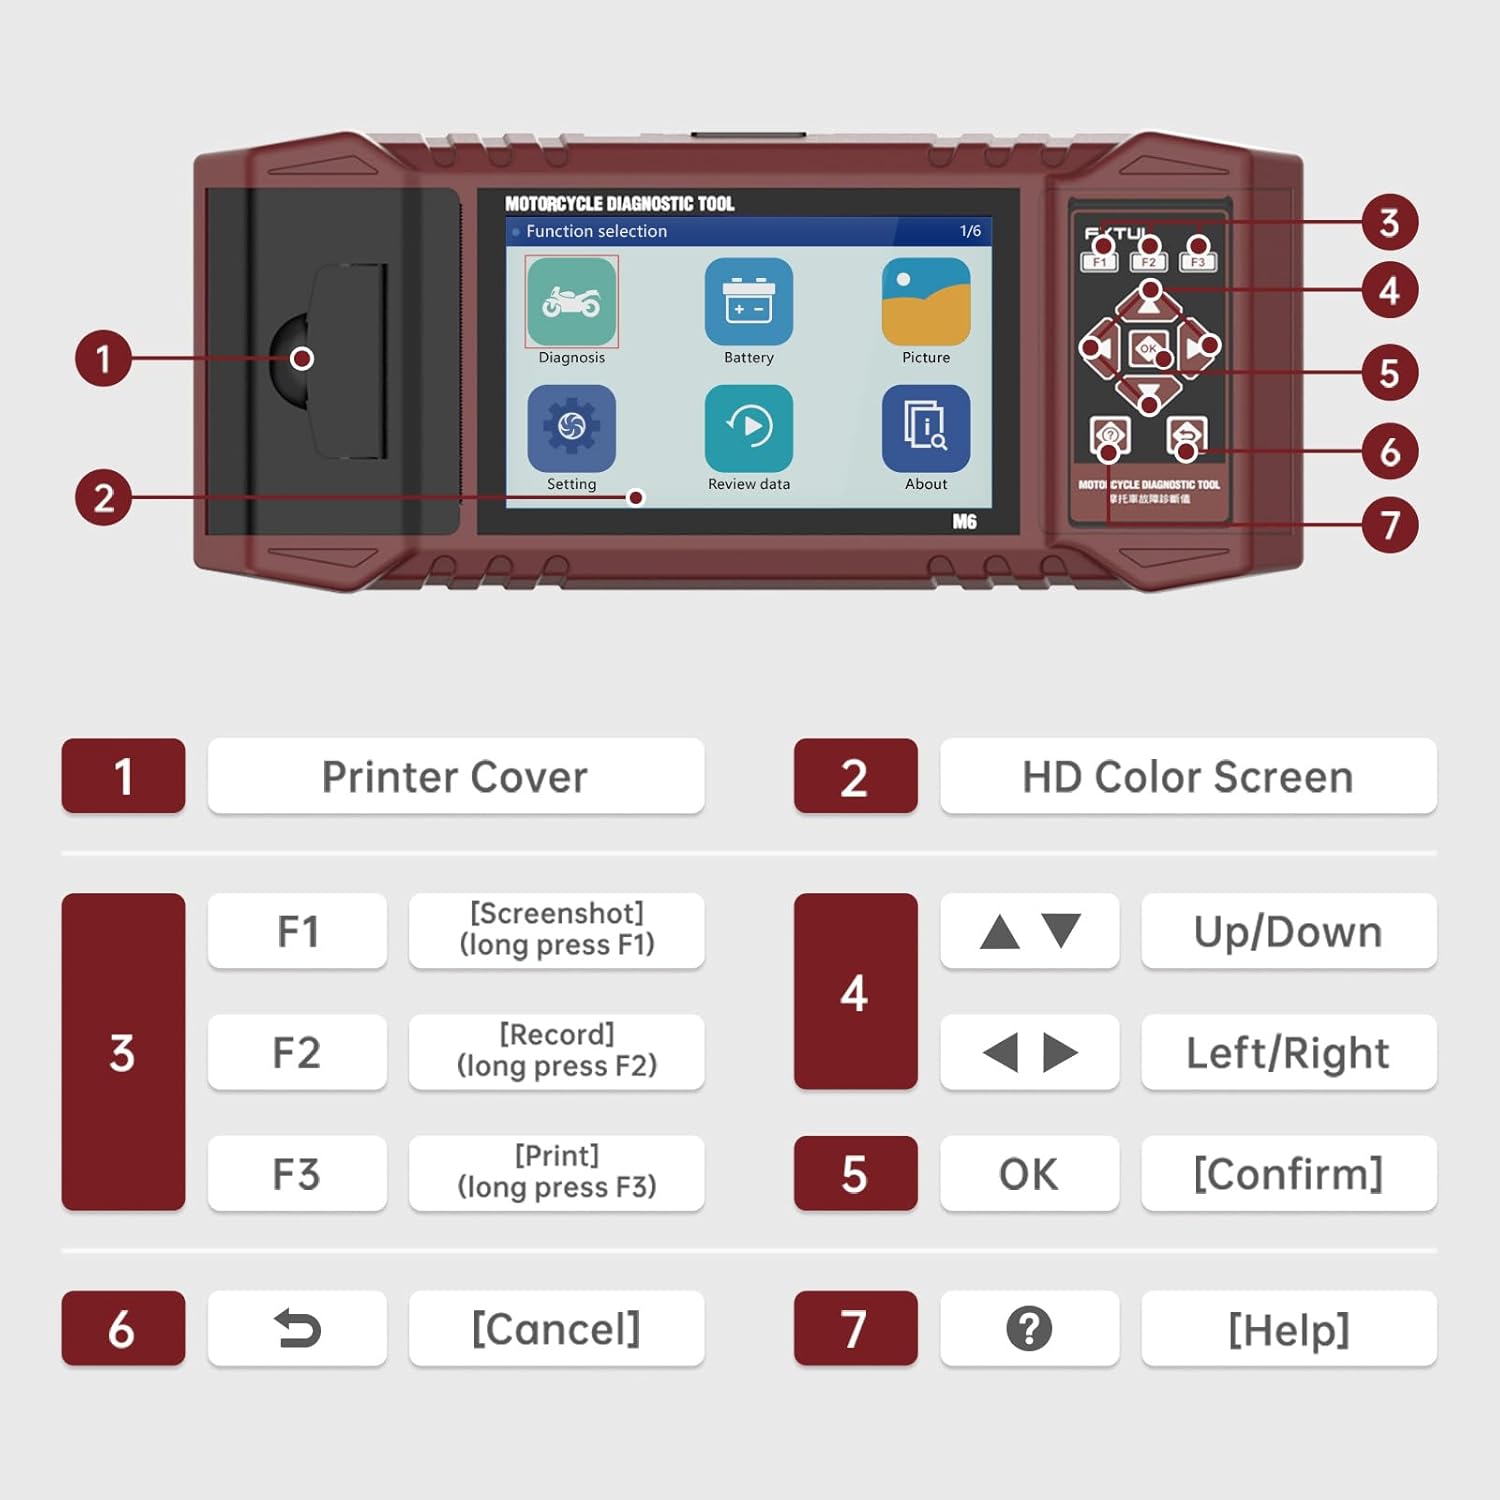
Figure 2: Labeled components and controls of the FXTUL M6 Diagnostic Tool.
| No. | Componente | Función |
|---|---|---|
| 1 | Cubierta de la impresora | Covers the built-in thermal printer. |
| 2 | Pantalla a color HD | 5-inch RGB display for interface and data. |
| 3 | Function Keys (F1, F2, F3) | F1: Screenshot (long press), F2: Record (long press), F3: Print (long press). |
| 4 | Teclas de navegación | Up/Down, Left/Right for menu navigation. |
| 5 | OK tecla | Confirma selecciones. |
| 6 | Cancelar clave | Returns to previous screen or cancels operation. |
| 7 | Clave de ayuda | Proporciona ayuda contextual. |
3. Configuración
- Desembalaje: Carefully remove the M6 diagnostic tool and all accessories from the packaging. Verify all components listed in the "What's in the Box" section are present.
- Conexión de energía: The device is typically powered via the motorcycle's diagnostic port. Ensure the motorcycle's ignition is turned off before connecting the tool.
- Connecting to Motorcycle: Locate the diagnostic port on your motorcycle. Connect the appropriate diagnostic cable from the M6 tool to the motorcycle's port.
- Encendido: Turn the motorcycle's ignition to the ON position. The M6 tool should power on automatically. If not, check the connection.
- Selección de idioma: Upon first use, you may be prompted to select your preferred language. Navigate using the arrow keys and confirm with the OK button.
4. Instrucciones de funcionamiento
4.1 Diagnóstico del sistema
This function allows for comprehensive scanning of various motorcycle systems to identify and resolve issues.
- Desde el menú principal, seleccione “Diagnóstico”.
- The tool will automatically identify the vehicle model and scan all available systems.
- Review the assembly status and fault codes for each system.
- To read fault codes, select the "Read Fault Codes" option.
- To clear all fault codes, select the "Clear Fault Codes" option. Confirm the action when prompted.

Figure 3: Vehicle System Diagnostic interface for reading and clearing fault codes.
4.2 Funciones del servicio
The M6 supports over 100 service functions for various maintenance procedures.
- From the main menu, navigate to the "Service Functions" or similar option (may be under "Diagnosis" depending on software version).
- Select the desired service function from the list (e.g., ECU reset, Oil service light reset, CO adjustment).
- Siga las instrucciones en pantalla para completar el procedimiento.

Figura 4: Examples of 104 service functions supported by the tool.
4.3 Leer flujo de datos
View real-time data parameters from the motorcycle's ECU. The data stream waveform graph automatically adapts for easy viewEn.
- From the "Diagnosis" menu, select "Data Stream" or "Live Data".
- Choose the specific data parameters you wish to monitor.
- The data will be displayed numerically and can also be viewed as a waveform graph for trend analysis.

Figure 5: Data Stream Display and Waveform Analysis.
4.4 Prueba de batería
Perform various tests on the motorcycle's battery.
- Desde el menú principal, seleccione “Batería”.
- Choose the desired test: "Cranking Test", "Standard Test", "Quick Test", or "Charging Test".
- Follow the on-screen instructions to perform the test and view resultados.

Figure 6: Battery Test functions interface.
4.5 Grabación y reproducción de datos
Record diagnostic sessions for later review y análisis.
- During a diagnostic process, long-press the F2 key to initiate data recording.
- To play back recorded data, select "Review data" from the main menu.
- Navigate through recorded files and select the one you wish to play back.
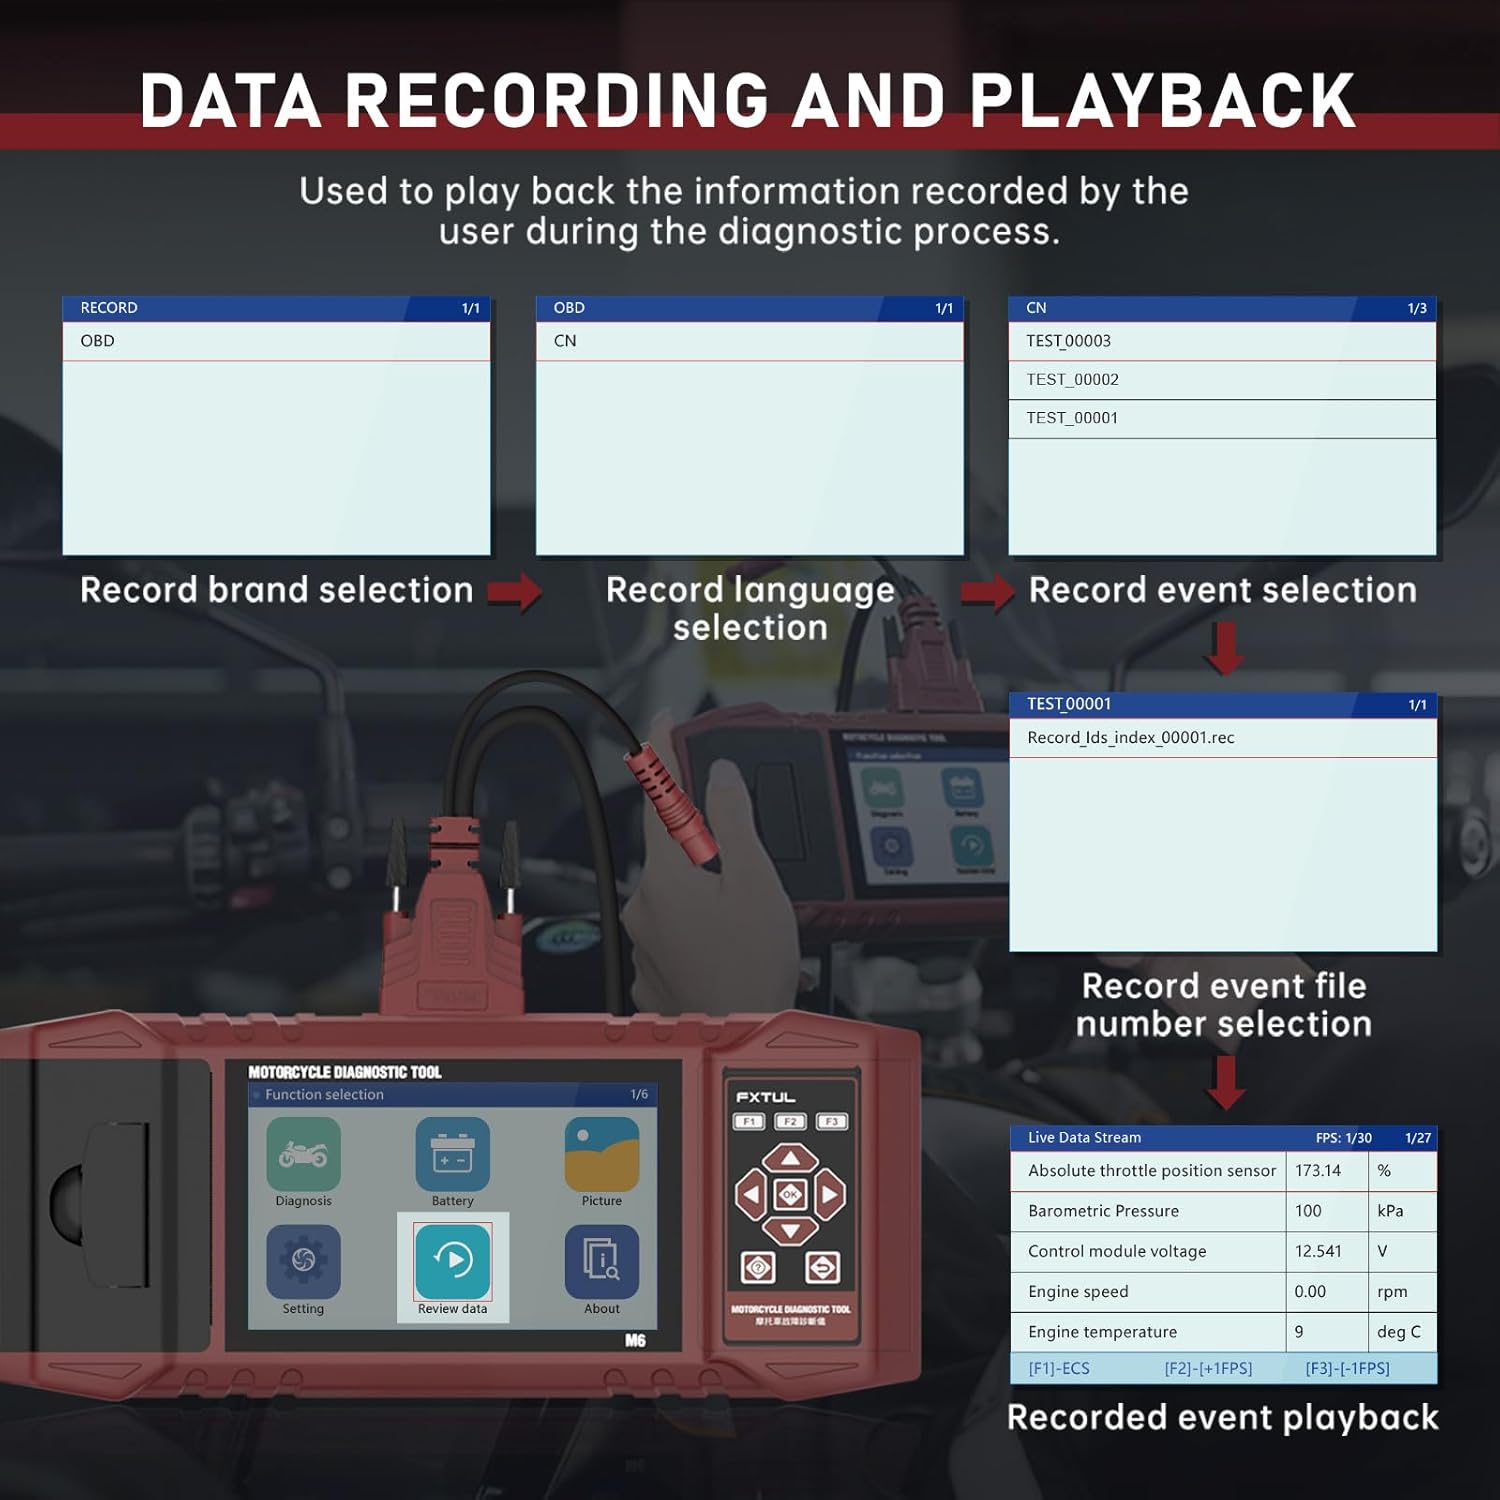
Figure 7: Data Recording and Playback process.
4.6 Information Printing
Print diagnostic reports directly from the device using the built-in printer.
- On any screen displaying information you wish to print (e.g., diagnostic reports, fault codes), long-press the F3 key.
- Input any required user or vehicle information using the on-screen keyboard.
- The device will print the information.

Figure 8: Information Printing function.
4.7 imagen Viewer
Capture screenshots of the device interface and review ellos más tarde.
- To capture a screenshot, long-press the F1 key on any interface.
- A view saved images, select "Picture" from the main menu.
- You can browse through saved images and delete them as needed.

Figure 9: Image Viewer interface for browsing and deleting screenshots.
5. Actualización de software
The FXTUL M6 offers free lifetime software upgrades to ensure compatibility with new motorcycle models and features.
- Descargar actualización: Obtain the latest software update files from the official FXTUL websitio o poniéndose en contacto con el servicio de atención al cliente.
- Conectar a la computadora: Connect the M6 device to your computer using a USB cable.
- Reconocimiento de dispositivo: Wait for the computer to recognize the device. A new drive symbol should appear.
- Replace Folder: Open the new drive. Locate the "DIAGNOSE" folder. Replace this folder with the downloaded "DIAGNOSE" upgrade folder.
- Reiniciar: Disconnect the device from the computer and power it on again. The updated software will be loaded.

Figure 10: Software upgrade process via USB connection.
6. Solución de problemas
- El dispositivo no se enciende:
- Ensure the diagnostic cable is securely connected to both the M6 tool and the motorcycle's diagnostic port.
- Verify the motorcycle's ignition is turned to the ON position.
- Compruebe el volumen de la batería de la motocicleta.tage.
- Cannot connect to motorcycle ECU:
- Ensure the correct diagnostic cable for your motorcycle model is being used.
- Verify the motorcycle's ignition is ON and the engine is off (unless specific tests require it to be running).
- Check for any blown fuses in the motorcycle's diagnostic circuit.
- Ensure the M6 software is up to date. Some newer motorcycle models may require the latest software version.
- Specific motorcycle models not listed:
- While the tool supports over 70 brands, specific models within those brands may require the latest software updates. Perform a software upgrade as described in Section 5.
- Contact FXTUL customer support with your motorcycle's make, model, and year for assistance with compatibility.
- La impresora no funciona:
- Check if the printer cover is properly closed.
- Ensure there is sufficient thermal paper loaded in the printer.
- Verify you are long-pressing the F3 key to initiate printing.
7. Especificaciones
| Especificación | Detalle |
|---|---|
| Modelo | FXTUL-M6 |
| Pantalla de visualización | 5-inch RGB Display (800x480 resolution) |
| Peso del artículo | 8.48 libras |
| Dimensiones del paquete | 15 x 12 x 5 pulgadas |
| Supported Motorcycle Brands | 70+ (e.g., Ducati, Harley Davidson, BMW, Kawasaki, Yamaha, Honda, Suzuki, etc.) |
| Conectividad | OBD2, USB for updates |
| Fuente de poder | Vehicle's diagnostic port |
| Actualizaciones de software | Free Lifetime Upgrade |

Figure 11: Partial list of supported motorcycle brands and models.
8. Garantía y soporte
FXTUL is committed to providing high-quality products and customer satisfaction. The M6 Motorcycle Diagnostic Tool is designed for durability and reliability.
- Seguro de calidad: The product is manufactured under strict quality control standards.
- Free Lifetime Software Upgrade: As mentioned in Section 5, software updates are provided free of charge for the lifetime of the product.
- Apoyo técnico: For any technical assistance, troubleshooting, or inquiries regarding product functionality and compatibility, please contact FXTUL customer support. Refer to the product packaging or official websitio para detalles de contacto.