
1. Introducción
This manual provides detailed instructions for the installation, operation, and maintenance of your Tiandy TC-C32XN 2MP Fixed IP Dome Turret Camera. Please read this manual thoroughly before using the product to ensure correct usage and optimal performance. Keep this manual for future reference.
2. Información de seguridad
- Asegúrese de que la fuente de alimentación coincida con los requisitos de la cámara para evitar daños.
- No exponga la cámara a temperaturas extremas, humedad o ambientes corrosivos.
- Avoid pointing the camera directly at strong light sources for extended periods, as this may damage the image sensor.
- Manipule la cámara con cuidado. No la deje caer ni la someta a vibraciones fuertes.
- Toda instalación y servicio debe ser realizado por personal calificado.
- Desconecte la alimentación antes de limpiar o realizar mantenimiento.
3. Contenido del paquete
Verifique que todos los artículos estén presentes en su paquete:
- Tiandy TC-C32XN 2MP Fixed IP Dome Turret Camera
- Adaptador
- Tornillos de montaje y tacos de pared
- Guía de inicio rápido (si está incluida)
4. Producto terminadoview
The Tiandy TC-C32XN is a 2MP Fixed IP Dome Turret Camera designed for reliable surveillance. It features Smart IR for clear night vision up to 30 meters, a built-in microphone, and an SD card slot for local storage.

Figura 4.1: Frente view of the Tiandy TC-C32XN camera, showing the lens and IR illuminators.
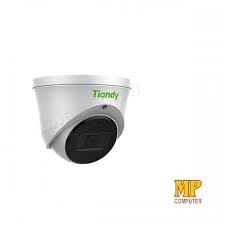
Figura 4.2: Lado view of the Tiandy TC-C32XN camera, highlighting its dome turret form factor.
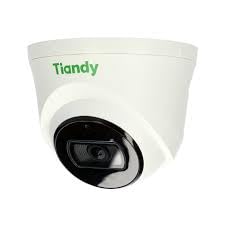
Figura 4.3: Angulado view of the Tiandy TC-C32XN camera, showcasing su diseño compacto.
5. Configuración e instalación
5.1 Montaje
- Selecciona una ubicación: Choose a suitable outdoor or indoor location (IP67 rated for outdoor use) that provides the desired viewing angle and is within reach of power and network connections. The camera is designed for protruding mounting.
- Perforar agujeros: Utilice la plantilla de montaje proporcionada (si corresponde) para marcar y perforar agujeros para los tornillos de montaje.
- Asegure la cámara: Attach the camera base securely to the mounting surface using the provided screws and wall plugs.
5.2 Cableado
- Conexión de energía: Connect the provided adapter to the camera's power input and then to a power outlet. The camera operates on corded electric power.
- Conexión de red: Connect an Ethernet cable from your network router or PoE switch to the camera's Ethernet port. This camera supports Ethernet connectivity for data transmission.
5.3 Configuración inicial
- Encendido: Once wired, power on the camera.
- Descubrimiento de red: Use the Tiandy client software or a network scanner tool to discover the camera's IP address on your local network.
- Cámara de acceso: Abrir una web Navegador e ingrese la dirección IP de la cámara para acceder a su web interface. Log in using the default credentials (refer to the quick start guide for default username/password).
- Cambiar contraseña predeterminada: Por seguridad, cambie inmediatamente la contraseña predeterminada después del primer inicio de sesión.
- Integración NVR: If using with an NVR, add the camera to your NVR system following the NVR's instructions. This camera is compatible with all brand NVRs.
- Configuración de la aplicación móvil: Download the official Tiandy mobile application (available for Android and iOS) and follow the in-app instructions to add your camera for remote viewing y control.
6. Instrucciones de funcionamiento
6.1 en vivo View y Grabación
Acceda a la cámara en vivo view A través de la web interface, NVR, or mobile app. Configure recording schedules and methods (continuous, motion-triggered) via the camera's settings.
6.2 Smart IR and Night Vision
The camera features Smart IR technology, which automatically adjusts the intensity of its infrared LEDs to prevent overexposure of objects close to the camera, ensuring clear images in low-light conditions up to 30 meters. It also supports 'Night Color' low light technology for enhanced visibility.
6.3 Detección de movimiento y alertas
Configure motion detection zones and sensitivity in the camera settings. The camera supports 'Motion Only' alert types. When motion is detected, the camera can trigger recordings, send notifications to your mobile device, or activate other configured actions. It also supports advanced features like tripwire and perimeter intrusion detection.
6.4 Funcionalidad de audio
The built-in microphone allows for audio monitoring of the surveillance area. Audio settings can be adjusted in the camera's web interfaz o NVR.
6.5 Almacenamiento en tarjeta SD
Insert a compatible SD card into the camera's SD card slot for local storage of recordings. Ensure the card is formatted correctly via the camera's settings. The camera supports SD flash memory type.
6.6 Botón de reinicio
A reset button is included for restoring the camera to its factory default settings. Consult the quick start guide for the exact location and procedure for your model.
7. Mantenimiento
- Limpieza: Limpie suavemente la lente y el cuerpo de la cámara con un paño suave y seco. No utilice productos químicos agresivos ni limpiadores abrasivos.
- Actualizaciones de firmware: Regularly check the Tiandy official webSitio para actualizaciones de firmware. Mantener el firmware de su cámara actualizado garantiza un rendimiento y una seguridad óptimos.
- Inspección de cables: Periodically inspect all cables for signs of wear or damage, especially for outdoor installations.
8. Solución de problemas
- Sin energía: Asegúrese de que el adaptador de corriente esté conectado de forma segura y que la toma de corriente funcione.
- Sin vídeo: Check network cable connections. Verify the camera's IP address and network settings. Ensure the camera is properly added to your NVR or viewsoftware de ing.
- Mala calidad de imagen: Clean the camera lens. Adjust focus if applicable. Check lighting conditions and camera placement.
- Problemas de conexión de red: Verify router and network cable functionality. Restart the camera and network devices.
- No se puede acceder Web Interfaz: Ensure your computer is on the same network segment as the camera. Verify the camera's IP address. Try resetting the camera to factory defaults if necessary (this will erase all settings).
9. Especificaciones
| Característica | Especificación |
|---|---|
| Modelo | TC-C32XN |
| Resolución de imágenes fijas efectiva | 2 MP (1920 x 1080) |
| Velocidad de cuadros | 30 cuadros por segundo |
| Tecnología de fotosensor | CMOS (1/2.8") |
| Rango de visión nocturna | 30 Metres (Smart IR) |
| Tecnología con poca luz | Color de la noche |
| Zoom óptico | 3 x |
| Micrófono incorporado | Sí |
| Ranura para tarjeta SD | Yes (Flash Memory Type: SD) |
| Tipo de alerta | Motion Only (supports tripwire and perimeter) |
| Tecnología de conectividad | Wireless (IR), Ethernet |
| Fuente de poder | Eléctrico con cable |
| Calificación de protección internacional | IP67 |
| Factor de forma | Dome Turret |
| Tipo de montaje | Saliente |
| Compatibilidad del sistema operativo | Android, iOS |
| Dimensiones del producto (L x An x Al) | 50 x 50 x 70 milímetros |
| Peso del artículo | 20 gramos |
| Componentes incluidos | Adaptador |
| Color | Blanco |
10. Garantía y soporte
For warranty information and technical support, please refer to the warranty card included with your product or visit the official Tiandy website. Contact the seller or manufacturer directly for assistance with product issues or inquiries.