Acekool CF9
Manual del usuario del aire acondicionado portátil Acekool
Modelo: CF9 | Marca: Acekool
1. Introducción
Thank you for choosing the Acekool Portable Air Conditioner. This 3-in-1 unit provides powerful cooling, efficient dehumidification, and effective air circulation through its fan mode. Designed for convenience and portability, it is ideal for cooling rooms up to 35 square meters. Please read this manual thoroughly before operation to ensure proper use, maintenance, and safety.
2. Información de seguridad
Para reducir el riesgo de incendio, descarga eléctrica o lesiones al usar su aire acondicionado, siga estas precauciones básicas:
- Conecte siempre la unidad a una toma de corriente de 220 V CA con conexión a tierra. No utilice cables de extensión ni adaptadores.
- No opere la unidad con un cable o enchufe dañado.
- No bloquee las entradas ni salidas de aire. Asegúrese de que haya suficiente espacio libre alrededor de la unidad para un flujo de aire adecuado.
- Mantenga la unidad alejada de fuentes de calor, luz solar directa y materiales inflamables.
- No introduzca los dedos ni objetos extraños en las entradas o salidas de aire.
- Desenchufe la unidad antes de limpiarla o realizar cualquier mantenimiento.
- Este aparato no está diseñado para ser utilizado por personas (incluidos niños) con capacidades físicas, sensoriales o mentales reducidas, o con falta de experiencia y conocimientos, a menos que hayan recibido supervisión o instrucciones sobre el uso del aparato por parte de una persona responsable de su seguridad.
- Asegúrese de que la unidad esté colocada sobre una superficie plana y estable para evitar que se vuelque.
3. Características del producto
- Potente y eficiente: Delivers strong cooling power to quickly and effectively cool your room. Enjoy personal comfort at the touch of a button.
- Flexible and Mobile: Equipped with wheels for easy movement between rooms. Provides a pleasant climate in bedrooms, living rooms, or offices. Adjustable settings allow customization of cooling needs.
- Easy to Use and Control: Features an intuitive control panel and remote control for setting temperature, timer, and fan speed. The convenient timer function allows pre-programming for energy saving.
- Energy-efficient and Environmentally Friendly: Designed for low power consumption, helping to reduce energy costs. Uses R290 refrigerant, contributing to environmental protection.
- Elegante y compacto: Boasts a sleek and modern design that blends seamlessly into any room, making it an attractive addition to your home or office.

Image: The unit's compact size delivers high cooling performance, suitable for rooms up to 300 sq. ft. with 9000 BTU cooling capacity and 350m³/h airflow.

Image: The unit uses environmentally friendly R290 refrigerant, promoting energy efficiency and cost savings.

Image: The 3-in-1 operation system includes cooling (down to 16°C), dehumidifying (up to 42L/day), and fan (2 speeds) functions.
4. Especificaciones del producto
| Especificación | Valor |
|---|---|
| Marca | Acekool |
| Número de modelo | CF9 |
| Dimensiones del producto (L x An x Al) | 45 x 89 x 44 cm |
| Peso | 26 kilogramos |
| Clasificación de eficiencia energética | A |
| Capacidad de enfriamiento | 9000 BTU |
| Capacidad de deshumidificación | 42 litros/día |
| Consumo anual de energía | 1000 vatios |
| Nivel de ruido | 55 dB |
| Tipo de instalación | Ventana |
| Característica especial | Deshumidificador |
| Color | Negro |
| Volumentage | 220 voltios |
| Fuerza | 1000 vatios |
| Índice de eficiencia energética estacional (SEER) | 2.6 |
5. Contenido del paquete
Por favor, compruebe que todos los componentes estén presentes y en buen estado:
- Unidad de aire acondicionado portátil Acekool
- Manguera de escape
- Window Seal Kit (includes window slider kit and adapter)
- Mando a distancia
- Manguera de drenaje (para drenaje continuo en modo deshumidificador)
- Manual de usuario (este documento)
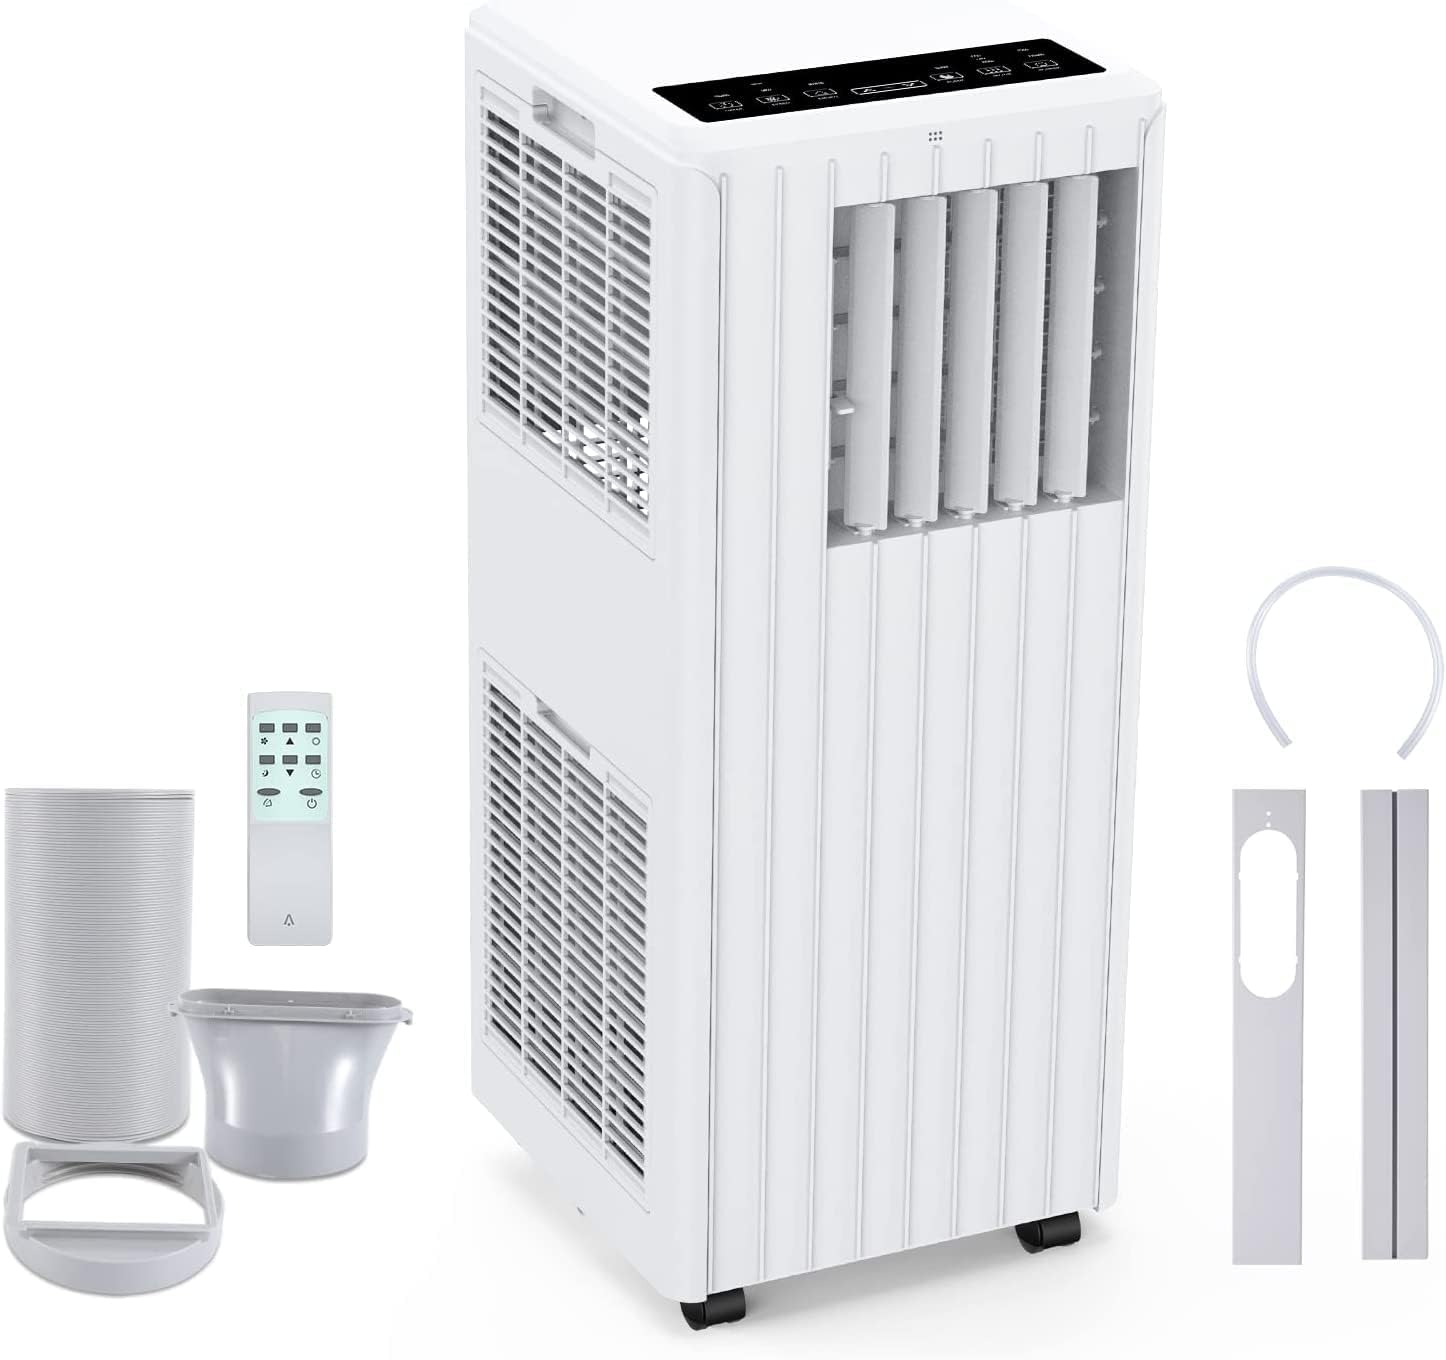
Image: All components included in the package: the main unit, exhaust hose, window sealing plate, remote control, and drain bucket.
6. Configuración e instalación
Siga estos pasos para configurar su aire acondicionado portátil:
- Posicionamiento: Place the air conditioner on a flat, stable surface near a window and a grounded electrical outlet. Ensure there is at least 20 cm (8 inches) of space around the unit for proper airflow.
- Conecte la manguera de escape: Screw one end of the exhaust hose into the air outlet on the back of the unit.
- Install Window Seal Kit: Ajuste el kit de correderas para ventanas a la abertura de su ventana. Asegúrelo en su lugar.
- Conecte la manguera de escape al kit de ventana: Attach the other end of the exhaust hose to the adapter on the window slider kit, ensuring a tight seal to prevent hot air from re-entering the room.
- Conexión de energía: Conecte el cable de alimentación a un tomacorriente de CA de 220 V con conexión a tierra.

Image: Visual guide for easy installation, showing how to connect the exhaust hose to the unit and the window sealing plate.
7. Instrucciones de funcionamiento
Your Acekool Portable Air Conditioner can be operated using the control panel on the unit or the included remote control.
Panel de control y control remoto
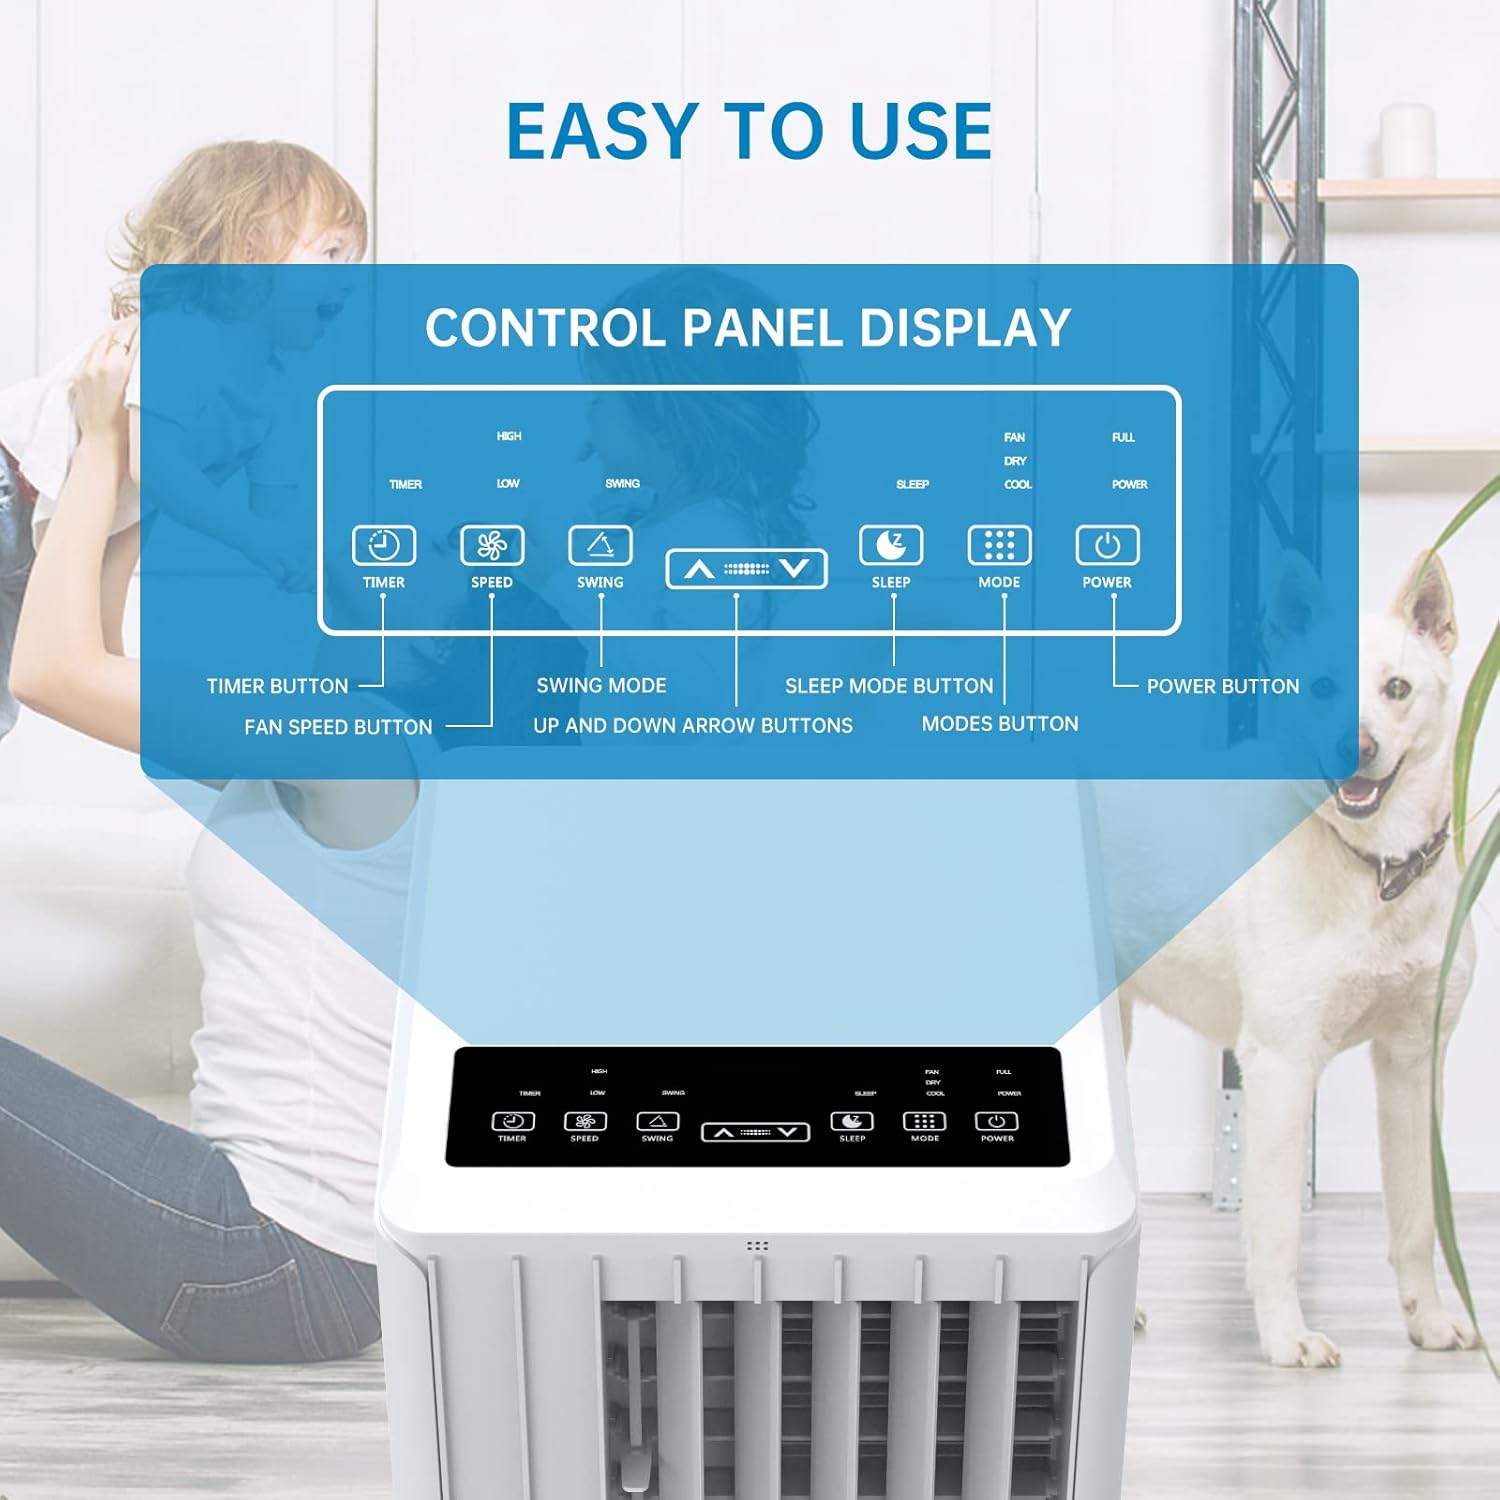
Imagen: Detallada view of the control panel display, indicating buttons for Timer, Speed, Swing, Sleep, Mode, and Power.

Image: The unit can be conveniently controlled via the remote control, and features a swing mode for wider air distribution.
Modos de funcionamiento

Imagen: Más alláview of the main operating modes: Cool, Fan, Dry (Dehumidifying), and Sleep, along with smart timer functionality.
- Modo frío: Press the "Mode" button until the snowflake icon appears. Use the Up/Down arrows to set your desired temperature (16°C - 30°C). The unit will cool the room to the set temperature.
- Modo de ventilador: Press the "Mode" button until the fan icon appears. In this mode, the unit circulates air without cooling. Use the "Speed" button to adjust fan speed (Low/High).
- Modo deshumidificación (seco): Press the "Mode" button until the water drop icon appears. The unit will remove excess moisture from the air. In this mode, the fan speed cannot be adjusted. Ensure the continuous drainage hose is connected for prolonged use.
- Modo de sueño: Press the "Sleep" button. In this mode, the unit operates quietly and gradually increases the temperature by 1°C after the first hour and another 1°C after the second hour, maintaining this temperature for 6 hours before returning to normal operation. This mode is ideal for nighttime use.

Image: The sleep mode offers automatic shut-off, quiet operation (55dB), and a 24-hour smart timer for comfortable nighttime use.
Funciones adicionales
- Función de temporizador: Press the "Timer" button to set the desired operating time (1-24 hours) for automatic turn on/off.
- Velocidad del ventilador: In Cool or Fan mode, press the "Speed" button to cycle through Low and High fan speeds.
- Función de oscilación: Press the "Swing" button to activate or deactivate the automatic vertical oscillation of the air louvers, distributing air more evenly.
8. Mantenimiento
El mantenimiento regular garantiza un rendimiento óptimo y prolonga la vida útil de su aire acondicionado. Desconecte siempre la unidad antes de limpiarla.
Limpieza del filtro de aire
El filtro de aire debe limpiarse cada dos semanas o con mayor frecuencia según el uso y la calidad del aire.
- Retire el filtro de aire de la parte posterior de la unidad.
- Lave el filtro con agua tibia y jabón. Enjuáguelo bien.
- Deje que el filtro se seque al aire por completo antes de volver a insertarlo en la unidad.
Drenaje de agua
The unit has an internal water tank that collects condensed water. When the tank is full, the unit will stop operating and display a "FULL" indicator. You will need to drain the water manually.
- Coloque una bandeja o balde poco profundo debajo del puerto de drenaje en la parte inferior trasera de la unidad.
- Retire el tapón de drenaje para permitir que salga el agua.
- Una vez drenado, vuelva a colocar el tapón de drenaje de forma segura.
For continuous dehumidification, attach the provided drain hose to the continuous drain port.
Limpieza del exterior de la unidad
Limpie el exterior de la unidad con un paño suave yamp paño. No utilice productos químicos agresivos ni limpiadores abrasivos.
Almacenamiento
Si va a almacenar la unidad durante un período prolongado:
- Drene toda el agua de la unidad.
- Limpie el filtro de aire.
- Guarde la unidad en un lugar seco y fresco, alejado de la luz solar directa.
9. Solución de problemas
Antes de contactar con el servicio de atención al cliente, consulte la siguiente guía de solución de problemas para problemas comunes:
| Problema | Posible causa | Solución |
|---|---|---|
| La unidad no se enciende | No power supply; Power cord unplugged; Circuit breaker tripped; Water tank full. | Verifique la toma de corriente; enchufe el cable de alimentación de forma segura; reinicie el disyuntor; drene el tanque de agua. |
| La unidad no enfría eficazmente | Air filter dirty; Exhaust hose not properly installed/sealed; Room too large; Doors/windows open; Air inlet/outlet blocked. | Clean air filter; Ensure exhaust hose is properly installed and sealed; Close doors/windows; Clear obstructions from air inlets/outlets. |
| La unidad es ruidosa | La unidad no está sobre una superficie plana; el filtro de aire está sucio; los componentes internos vibran. | Coloque la unidad sobre una superficie plana y estable; Limpie el filtro de aire; Si el ruido persiste, comuníquese con atención al cliente. |
| Fugas de agua de la unidad | Drain plug loose; Continuous drain hose not properly connected or blocked. | Ensure drain plug is secure; Check continuous drain hose for proper connection and clear any blockages. |
| El control remoto no funciona | Pilas agotadas o insertadas incorrectamente; Obstrucción entre el control remoto y la unidad. | Replace batteries; Ensure line of sight between remote and unit. |
10. Garantía y soporte
Para obtener información sobre la garantía y asistencia al cliente, consulte la tarjeta de garantía incluida con su producto o visite el sitio web oficial de Acekool. website. Do not attempt to repair the unit yourself, as this may void the warranty and pose safety risks. For any issues not covered in this manual, please contact Acekool customer service.
Ask a question about this manual
Ask about setup, troubleshooting, compatibility, parts, safety, or missing instructions. Manuals+ will review the question and use this page’s manual context to help answer it.