1. Introducción
This manual provides comprehensive instructions for the installation and operation of the Joying Radio Power Cable Adapter and Canbus Decoder, model TU-CAN-N. This product is designed to integrate a Joying car radio with specific Toyota vehicle models, enabling features such as steering wheel controls (SWC), air conditioning display, and reverse camera functionality.
Nota importante: This product is exclusively compatible with Joying car radios. Ensure your head unit is a Joying brand radio before proceeding with installation.

Image 1: Compatibility warning for Joying radios.
2. Comprobación de compatibilidad
Before installation, it is crucial to verify the compatibility of this wiring harness with your specific Toyota vehicle and existing car stereo system.
- Car Stereo Back Panel: Compare the power outlet and car plug on the back of your factory stereo with the image provided below. If they match, the harness is likely compatible.
- Modelos de vehículos: This harness is designed for various Toyota models, including Tacoma, Camry, Corolla, RAV4, CH-R, and Highlander.
- Joying Radio Requirement: This harness is specifically designed to work with Joying brand car radios. It may not function correctly with other aftermarket head units.

Imagen 2: Example of a compatible factory stereo back panel.
If you are uncertain about compatibility, please contact Joying support with your car model, year, and a picture of your car's dashboard for confirmation.
3. Contenido del paquete
Al abrir el paquete, asegúrese de que estén presentes todos los siguientes componentes:
- 1x Joying Car Radio Wiring Harness (Toyota JBL Harness Adapter)
- 1x decodificador Canbus
4. Configuración e instalación
This section outlines the steps for connecting the wiring harness and Canbus decoder to your Joying car radio and Toyota vehicle. Professional installation is recommended if you are unfamiliar with car audio wiring.
4.1 Diagrama de cableadoview
Refer to the diagram below for a visual representation of the harness connections. This harness includes connections for Steering Wheel Control (SWC), reverse cameras, external amplifiers, and factory USB.

Image 3: Joying Toyota Canbus Harness wiring diagram.
4.2 Key Connections and Features
- Conectar y usar: The harness is designed for direct connection to your Joying car radio's 20-pin power socket and your vehicle's factory wiring.
- Decodificador Canbus: The included Canbus decoder facilitates communication between the Joying radio and your vehicle's systems, enabling features like Steering Wheel Control, Air Conditioning Display, and Parking Sensor Display.
- Factory USB Support: The harness includes provisions for retaining your vehicle's factory USB port.
- Fábrica AmpSoporte de lifier: The harness supports integration with your vehicle's factory ampmás duradero.
- Factory 360 Camera Support: Connections are provided for vehicles equipped with a factory 360-degree camera system.

Image 4: Supported features and initial CAN wire connection.
As shown in Image 4, ensure the CAN IN + CAN OUT wires are connected together at the back of your Joying head unit. After physical installation, navigate to the head unit's settings to select the correct Toyota model option. If you need assistance with this step, contact Joying support with your car's brand, production year, and a picture of your dashboard.
4.3 Conexión de la cámara de marcha atrás
The harness supports your factory reverse camera. Identify whether your vehicle uses a 24-pin or 16-pin connector for the reverse camera.

Image 5: Identifying and connecting the 24-pin reverse camera plug.
If your vehicle uses a 24-pin plug, connect it to the corresponding reverse camera input on the harness as shown in Image 5.
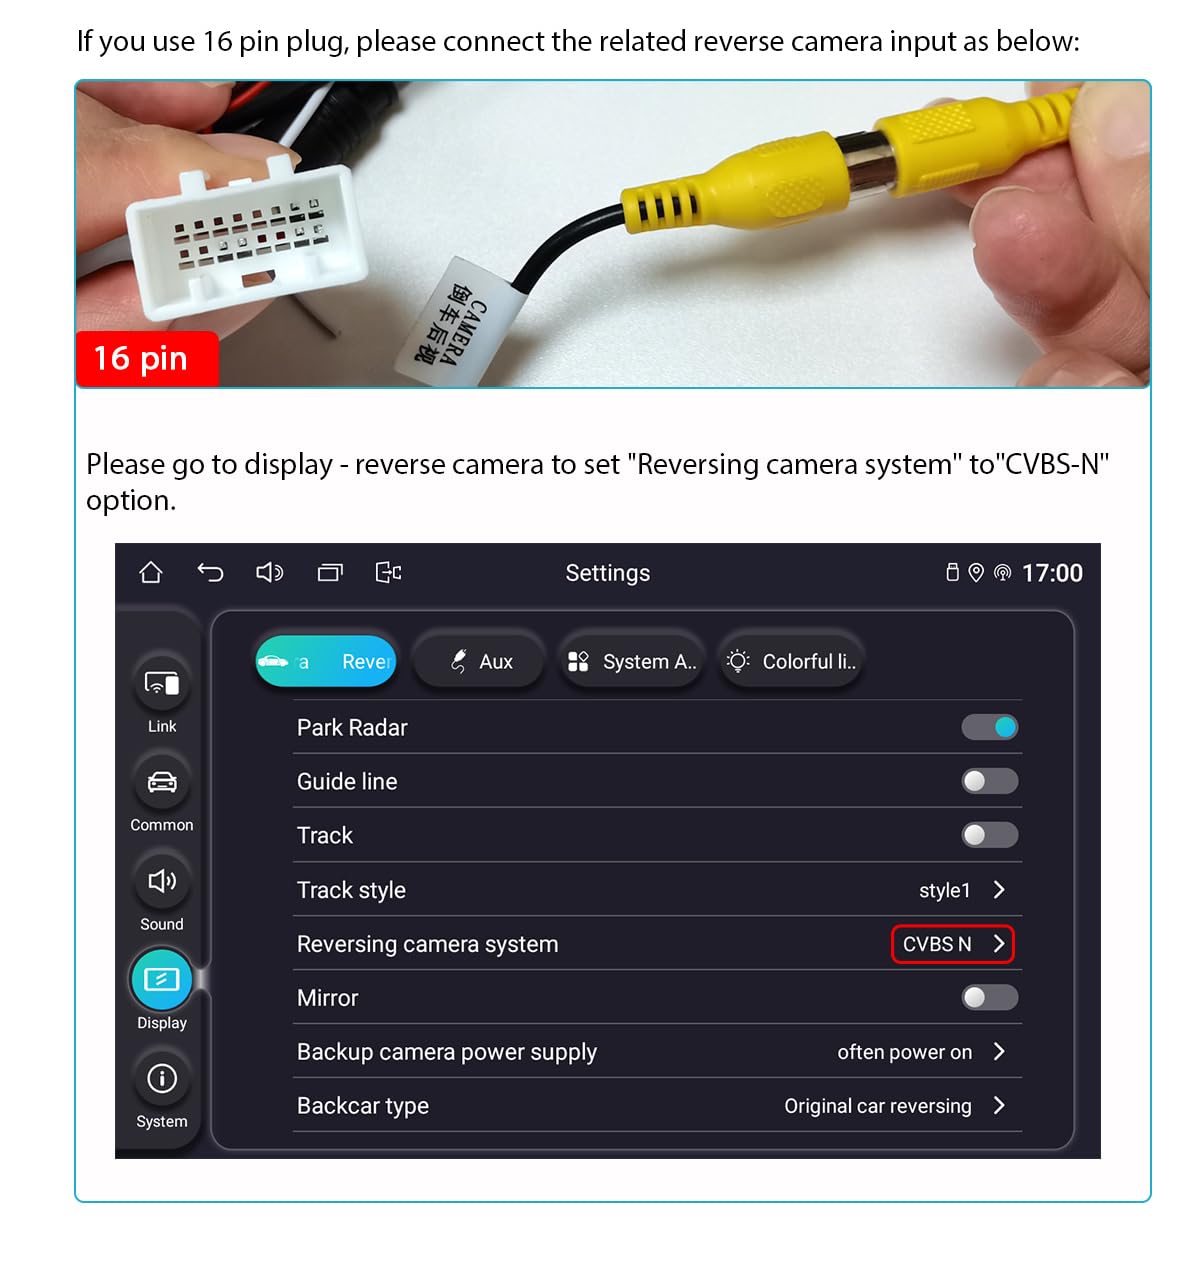
Image 6: Connecting the 16-pin reverse camera plug and configuring head unit settings.
If your vehicle uses a 16-pin plug, connect it as shown in Image 6. After connecting, access your Joying head unit's display settings and set the "Reversing camera system" option to "CVBS-N".
5. Instrucciones de funcionamiento y configuración
After successful installation, configure your Joying head unit to fully utilize the harness features.
5.1 Factory Settings Configuration
Access the factory settings (usually by entering a specific code like "8888") on your Joying head unit. Navigate to the "original car set" menu. Here, you can enable or disable various vehicle-specific functions.
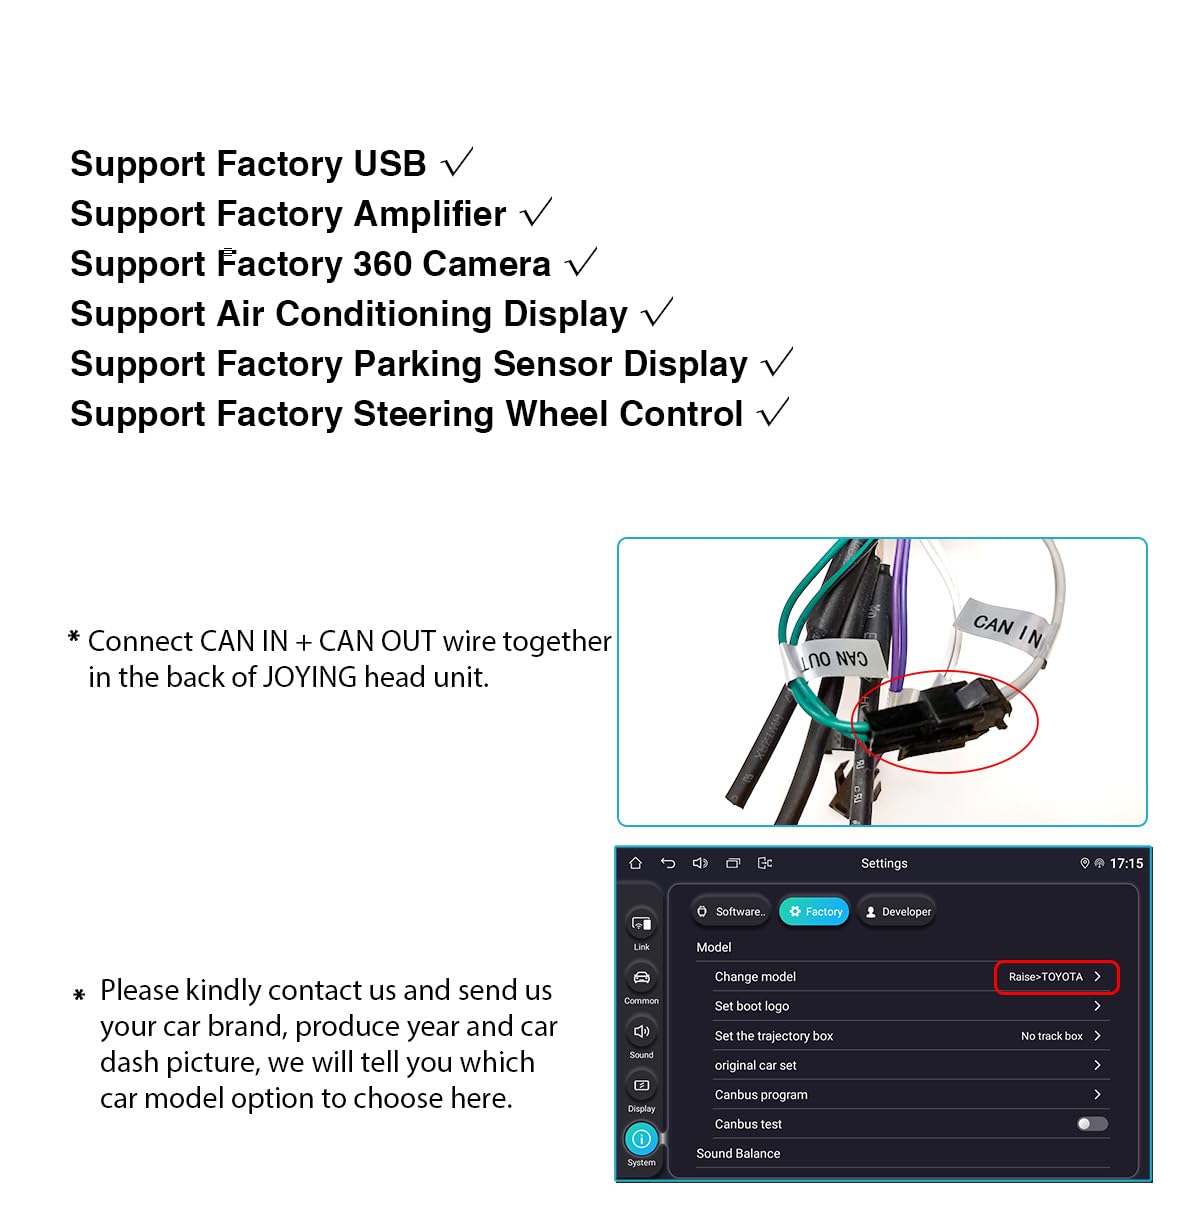
Image 7: Joying head unit factory settings and sound effects menu.
- Air Conditioning Display: Ensure the "Air conditioner display switch" is turned ON to show your vehicle's AC information on the head unit.
- Door Status Display: Enable "Door switch" and "Door open enable" to display door open/close status.
- Controles del volante (SWC): After selecting the correct Toyota model in the settings (as mentioned in Section 4.2), your SWC buttons should function. If not, refer to the troubleshooting section or contact support.
5.2 Sound Settings Adjustment
To optimize audio output, access the "Sound effects" app on your Joying head unit.
- Fad-Bal: Use the Fad-Bal (Fader-Balance) control to set the sound field to the center position for balanced audio. Note that you may not be able to adjust front and rear speaker fade independently if your system uses a factory ampmás duradero.
- Speaker Volume Output: If you experience excessive noise or distortion at high volumes, adjust each speaker's individual output value. It is recommended to set these values to '6' as a starting point for troubleshooting noise issues.
6. Mantenimiento
The Joying Radio Power Cable Adapter and Canbus Decoder is designed for long-term reliability and requires minimal maintenance. Ensure all connections remain secure and free from corrosion. Avoid exposing the harness to excessive moisture or extreme temperatures.
7. Solución de problemas
If you encounter issues during or after installation, consider the following troubleshooting steps:
- Sin sonido:
- Verifique que todas las conexiones del cableado estén seguras.
- Ensure the correct Toyota model is selected in your Joying head unit's factory settings.
- Check the sound settings (Fad-Bal, speaker output levels) as described in Section 5.2.
- Si su vehículo tiene una fábrica amplifier, ensure it is properly powered and recognized by the head unit via the Canbus decoder.
- Los controles del volante no funcionan:
- Confirm the correct Toyota model is selected in the head unit's factory settings.
- Ensure the Canbus decoder is correctly connected and functioning.
- Some Joying head units may require specific SWC learning procedures; consult your head unit's manual.
- La cámara de marcha atrás no se muestra:
- Check the physical connection of the 16-pin or 24-pin reverse camera plug (refer to Section 4.3).
- Verify that "Reversing camera system" is set to "CVBS-N" in the head unit's display settings.
- Ensure the reverse camera itself is functional.
- Air Conditioning Display Not Showing:
- Ensure "Air conditioner display switch" is enabled in the head unit's factory settings (Section 5.1).
- Confirm the Canbus decoder is properly connected and communicating.
- Damaged or Missing Pins: Inspect the harness upon delivery for any physical damage or pulled-out pins. Contact customer support immediately if issues are found.
For further assistance, please contact Joying customer support.
8. Especificaciones
| Marca | ALEGRIA |
| Número de modelo | TU-CAN-N |
| Tipo de conector | 20-pin Power Socket |
| Material | Plastic, Polyvinyl Chloride (PVC) |
| Peso del artículo | 6.4 onzas (aprox. 181 gramos) |
| Dimensiones del paquete | 6.14 x 4.41 x 2.05 pulgadas |
| Fabricante | Joying |
| Primera fecha disponible | 31 de julio de 2023 |
9. Información de garantía
Specific warranty details for this product are not provided in the available information. Please refer to the retailer's return policy or contact Joying customer support for warranty inquiries.
10. Atención al cliente
For technical assistance, compatibility questions, or any other inquiries regarding your Joying Radio Power Cable Adapter and Canbus Decoder, please contact Joying customer support:
- Correo electrónico: amjoying@gmail.com
- Online Store: Visit the JOYING Store on Amazon
When contacting support, please provide your product model (TU-CAN-N), vehicle make, model, and year, and a detailed description of the issue, including any relevant photos or screenshots.