Introducción
This manual provides essential instructions for the safe and efficient operation of your Sanyo PLC-WXU700A 3LCD Projector. The PLC-WXU700A is a WXGA conference room projector featuring 3LCD technology, delivering 3,800 lumens brightness and a native resolution of 1280x800. Please read this manual thoroughly before using the projector and retain it for future reference.
Contenido del paquete
Verifique que todos los artículos estén presentes en su paquete:
- Sanyo PLC-WXU700A 3LCD Projector
- Mando a distancia
- Cable de alimentación
- Cable HDMI
- Manual de usuario (este documento)
Configuración
1. Ubicación del proyector
Position the projector on a stable, flat surface or mount it securely. Ensure adequate ventilation around the projector to prevent overheating. The projector is designed to be portable, allowing for flexible placement in various environments.
2. Conexión de energía
- Connect the supplied power cable to the AC inlet on the rear of the projector.
- Conecte el otro extremo del cable de alimentación a una toma eléctrica con conexión a tierra.
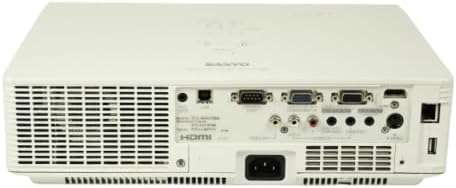
Image: Rear panel of the Sanyo PLC-WXU700A projector, highlighting the power input and connectivity ports.
3. Conexión de fuentes de entrada
The Sanyo PLC-WXU700A offers multiple connectivity options:
- HDMI: Connect the supplied HDMI cable from your source device (e.g., laptop, Blu-ray player) to the HDMI input port on the projector.
- VGA (D-Sub 15-pin): For analog computer connections, use a VGA cable to connect to the D-Sub 15-pin input ports.
- Video compuesto: Use RCA cables for composite video input.
- Entradas de audio: Separate audio input jacks are available for various sources.

Image: Side-rear perspective of the projector, illustrating the array of input ports and side ventilation grilles.
Instrucciones de funcionamiento
1. Encendido / apagado
- Para encender: Presione el FUERZA en el panel de control del proyector o en el control remoto. La luz indicadora de encendido se iluminará.
- Para apagar: Presione el FUERZA Presione el botón dos veces. El proyector entrará en un ciclo de enfriamiento antes de apagarse por completo. No desenchufe el proyector durante el ciclo de enfriamiento.
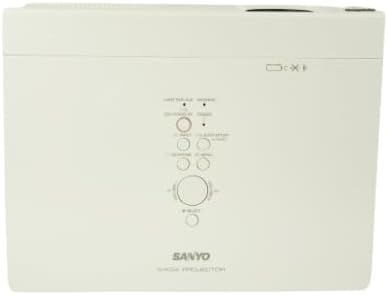
Imagen: de arriba hacia abajo view of the projector, displaying the integrated control panel with various buttons for power, menu navigation, and input selection.
2. Selección de la fuente de entrada
Presione el APORTE or FUENTE button on the projector or remote control to cycle through available input sources (HDMI, VGA, Video). Select the input corresponding to your connected device.
3. Ajuste de la imagen
- Anillo de enfoque: Rotate the focus ring on the projector lens to achieve a sharp image.
- Palanca de zoom: Adjust the zoom lever on the projector lens to change the image size without moving the projector.
- Corrección trapezoidal: If the image appears trapezoidal, use the keystone correction function (usually found in the projector's menu or via dedicated buttons on the remote) to square the image.
Mantenimiento
1. Limpieza del proyector
- Exterior: Limpie el proyector casing con un paño suave y seco. Para la suciedad difícil, utilice un paño ligeramente seco.amp Paño con un detergente suave y luego séquelo.
- Lente: Gently clean the projector lens with a lens cleaning cloth or lens paper. Avoid using abrasive materials.
- Filtros de aire: Regularly check and clean the air filters to ensure proper ventilation and prevent overheating. Refer to the full service manual for filter replacement instructions.
2. Elamp Reemplazo
The Sanyo PLC-WXU700A uses a lamp-based illumination system. The lamp has a finite lifespan and will eventually need replacement. When the lamp indicator light illuminates or the image brightness significantly decreases, it is time to replace the lamp.
- Asegúrese de que el proyector esté apagado y completamente enfriado antes de intentarlo.amp reemplazo.
- Localiza el lamp cover (often on the top or bottom of the projector).
- Desatornille el lamp tapa y retira con cuidado la tapa viejaamp módulo.
- Install a new, genuine Sanyo replacement lamp módulo, asegurándose de que esté bien colocado.
- Reemplace la lamp tapa y apriete los tornillos.
- Restablecer el lamp timer in the projector's OSD (On-Screen Display) menu.
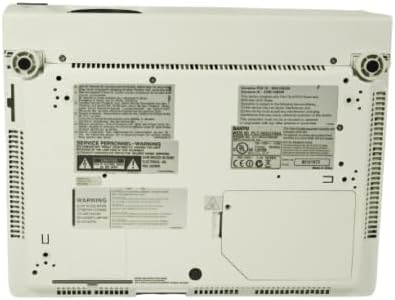
Image: Underside of the projector, displaying product labels, warning information, and potential access panels for maintenance like lamp reemplazo.
Solución de problemas
Si tiene problemas con su proyector, consulte los siguientes problemas y soluciones comunes:
- No se muestra ninguna imagen:
- Asegúrese de que el proyector esté encendido y que el cable de alimentación esté conectado de forma segura.
- Verify that the input source is correctly selected on the projector.
- Check the connection cable (HDMI, VGA) between the source device and the projector. Try a different cable if possible.
- Ensure the source device is outputting a signal.
- La imagen está borrosa:
- Ajuste el anillo de enfoque en la lente del proyector.
- Asegúrese de que el proyector esté a una distancia adecuada de la pantalla.
- La imagen es trapezoidal:
- Adjust the keystone correction setting in the projector's menu.
- Asegúrese de que el proyector esté colocado lo más perpendicular posible a la pantalla.
- El proyector se sobrecalienta o se apaga:
- Ensure all ventilation vents are clear and not obstructed.
- Limpiar los filtros de aire.
- Utilice el proyector en un área bien ventilada.
- El control remoto no funciona:
- Revise y reemplace las baterías del control remoto.
- Asegúrese de que no haya obstrucciones entre el control remoto y el receptor de infrarrojos del proyector.
Presupuesto
| Característica | Detalle |
|---|---|
| Marca | Sanyo (Tekswamp) |
| Modelo | PLC-WXU700A |
| Tecnología de visualización | Pantalla LCD de 3 pulgadas |
| Brillo blanco | Lúmenes 3,800 ANSI |
| Resolución nativa | 1280x800 (WXGA) |
| Relación de contraste | 500:1 |
| Tecnología de conectividad | HDMI, VGA |
| Dimensiones del producto | 10 x 13.1 x 3.1 pulgadas |
| Característica especial | Portátil |
| Usos recomendados | Negocio |
Garantía y soporte
For warranty information and technical support, please refer to the documentation provided at the time of purchase or contact your vendor. Keep your purchase receipt as proof of purchase for warranty claims.