1. Introducción
This manual provides essential instructions for the safe and efficient setup, operation, and maintenance of your BONTEC 10x10 Pop-Up Canopy Tent. Please read all instructions carefully before assembly and use. Retain this manual for future reference.

Image 1: The BONTEC 10x10 Pop-Up Canopy Tent in Beige.
2. Información de seguridad
ADVERTENCIA:
Always ensure the canopy is properly anchored to the ground using the provided sandbags to prevent it from tipping over in windy conditions. Do not use the canopy in high winds or during thunderstorms.
- Mantenga todas las llamas y fuentes de calor alejadas de la tela del dosel.
- Do not leave the canopy unattended in adverse weather conditions.
- Ensure all locking mechanisms are fully engaged during setup and before use.
- Mantenga a los niños y a las mascotas alejados del toldo durante el montaje y desmontaje.
3. Contenido del paquete
Verifique que todos los componentes estén presentes antes de comenzar el ensamblaje:
- 1 x Pop-Up Canopy Frame (Pre-assembled)
- 1 x Canopy Top Fabric (Silver-coated 150D)
- 1 x Wheeled Storage Bag
- 4 x Sandbags (empty, for filling with sand/weight)
- 8 x estacas de tierra
- 4 x Cuerdas

Image 2: All components included in the BONTEC 10x10 Pop-Up Canopy Tent package.
4. Instrucciones de configuración
The BONTEC 10x10 Pop-Up Canopy Tent features an easy one-person setup with a central locking system. Follow these steps for quick assembly:
- Despliegue el marco: Place the folded frame in the desired location. Gently pull the outer legs apart to partially open the frame.
- Coloque la parte superior del dosel: Drape the canopy top fabric over the partially opened frame. Secure the corners of the fabric to the frame using the attached Velcro fasteners.
- Ampliar el marco: From underneath the canopy, push up the central lock hub until it clicks into place. This will fully extend the canopy top.
- Extender las piernas: Extend each leg downwards until it locks into the desired height setting. Use the height-adjustment button design for easy adjustment.
- Asegure el dosel: Fill the provided sandbags with sand or other suitable weight and attach them to each leg. Use the ground stakes and ropes to further secure the canopy, especially in breezy conditions.

Image 3: Visual guide for the three main installation steps.
Guía de video de configuración
Video 1: Official BONTEC 10x10ft Pop Up Canopy Tent Setup Guide (Model ZP02, similar to ZP01-FBA).
Video 2: General 10x10 Pop Up Canopy Tent Setup Instructions from a seller.
5. Instrucciones de funcionamiento
Ajuste de altura
The canopy offers three adjustable height settings. To adjust the height, locate the red height-adjustment button on each leg. Press the button and slide the leg to the desired height, ensuring the button clicks securely into one of the pre-drilled holes.

Image 4: Detail of the height-adjustment button design.
Asegurar el dosel
For optimal stability, especially in outdoor environments, utilize all provided anchoring accessories:
- Sacos de arena: Fill the four sandbags with sand, small stones, wet soil, or bottled water. Attach one sandbag to each leg of the canopy using the integrated straps.
- Estacas de tierra: Insert the ground stakes through the footplates of each leg and into the ground.
- Cuerdas: Attach the ropes to the canopy's corners and secure them to the ground using additional stakes, pulling taut to provide extra stability against wind.
Video 3: Demonstration of securing a canopy tent with sandbags and stakes.
6. Mantenimiento
- Clean the canopy fabric with mild soap and water. Do not use harsh chemicals or abrasive cleaners.
- Ensure the fabric is completely dry before folding and storing to prevent mold and mildew.
- Inspect the frame and fabric regularly for any signs of wear or damage. Replace damaged parts as needed.
7. Almacenamiento
To store your canopy tent:
- Disassemble the canopy by reversing the setup steps.
- Ensure all components, especially the fabric, are clean and dry.
- Fold the frame compactly and place it into the wheeled storage bag.
- Guarde la bolsa en un lugar fresco y seco, lejos de la luz solar directa.
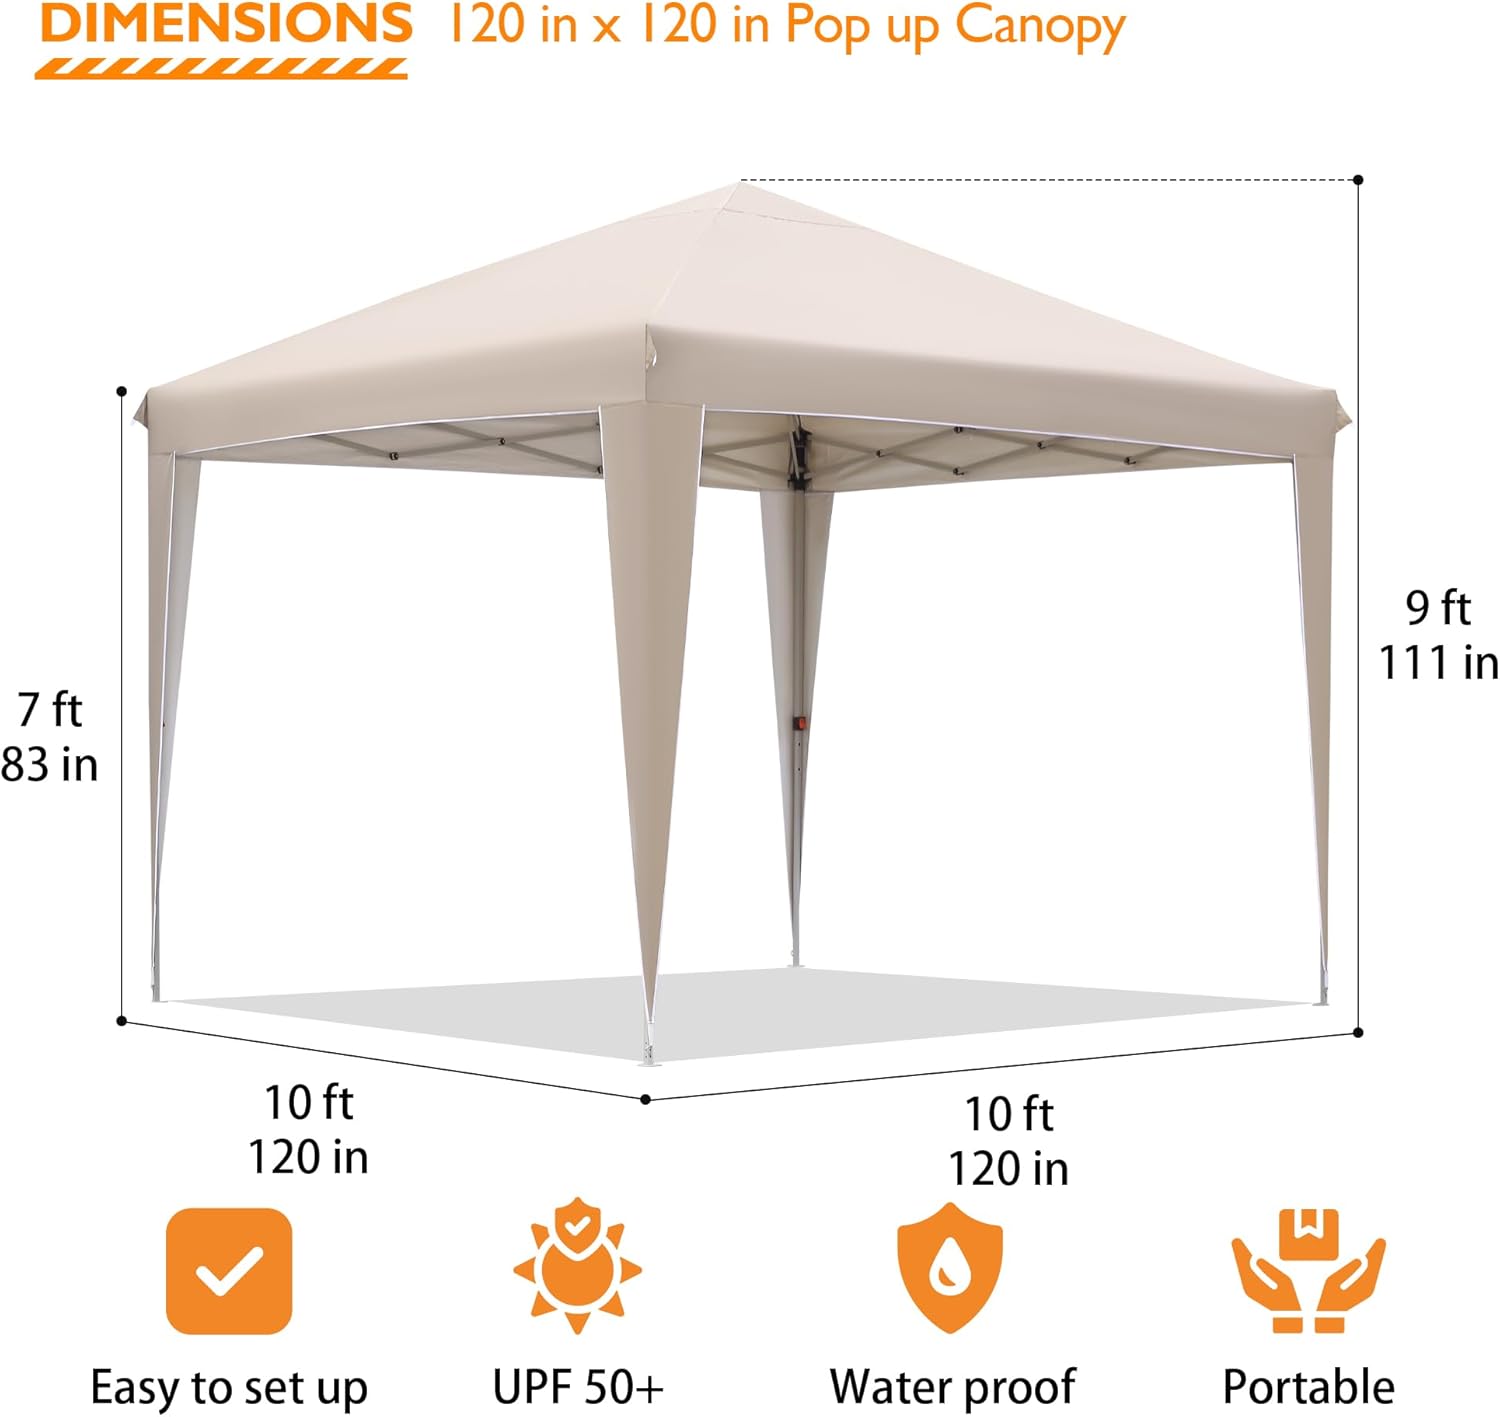
Image 5: Dimensions of the canopy tent.
8. Especificaciones
| Característica | Especificación |
|---|---|
| Marca | BONTEC |
| Número de modelo | ZP01-FBA |
| Dimensiones del producto | 118.1" de largo x 118.1" de ancho x 114.6" de alto (10 pies x 10 pies x 9.55 pies) |
| Superficie del piso | 100 pies cuadrados |
| Material del marco | Metal (High-strength steel) |
| Tela de dosel | Silver-coated 150D Fabric |
| Protección UV | FPS 50+ |
| Nivel de resistencia al agua | Water Resistant (78.7 inches) |
| Peso del artículo | 37.4 libras |
| Requiere ensamblaje | Sí |
9. Solución de problemas
- Canopy not standing securely: Ensure all legs are fully extended and locked. Verify that sandbags are filled and attached, and ground stakes/ropes are properly installed.
- Dificultad para extender/colapsar el marco: Check for any obstructions in the frame's scissor mechanism. Ensure the central locking hub is fully released or engaged as appropriate.
- Acumulación de agua en la parte superior del dosel: Ensure the canopy top is taut and properly secured to the frame. Adjust leg heights if necessary to create proper tension and allow water runoff.
10. Garantía y soporte
For warranty information, technical support, or to order replacement parts, please contact BONTEC customer service directly through their official website or the retailer where the product was purchased. Please have your model number (ZP01-FBA) and purchase date available.