Código postal 5941659
Manual del usuario de la bicicleta magnética de fitness para adultos ZIPRO
Modelo: 5941659
Introducción
Thank you for choosing the ZIPRO Adult Magnetic Fitness Bike. This manual provides essential information for the safe assembly, operation, and maintenance of your new fitness equipment. Please read this manual thoroughly before first use and keep it for future reference.

Figure 1: ZIPRO Adult Magnetic Fitness Bike
Información de seguridad
Su seguridad es primordial. Siga las siguientes pautas:
- Consulte a un médico antes de comenzar cualquier programa de ejercicios.
- Asegúrese de que todas las piezas estén bien fijadas antes de cada uso.
- Mantenga a los niños y las mascotas alejados del equipo durante el funcionamiento.
- Coloque la bicicleta sobre una superficie plana y estable.
- No exceda el peso máximo del usuario de 110 kg (242 lbs).
- Deje de hacer ejercicio inmediatamente si se siente débil, mareado o experimenta dolor.
- Use ropa y calzado deportivo adecuados.
Contenido del paquete
Verifique que todos los componentes estén presentes antes del ensamblaje:
- Marco principal (1)
- Handlebar Assembly with Console (1)
- Seat Post and Saddle (1)
- Pedales (izquierdo y derecho)
- Front and Rear Stabilizers (2)
- Kit de hardware (pernos, arandelas, tuercas, herramientas)
- Portabotellas de agua (1)
- Manual de usuario (este documento)
Instrucciones de montaje
Siga estos pasos para un montaje adecuado:
- Coloque los estabilizadores: Secure the front and rear stabilizers to the main frame using the provided bolts and nuts. Ensure they are firmly tightened for stability.
- Instalar pedales: Identify the Left (L) and Right (R) pedals. The left pedal screws counter-clockwise, and the right pedal screws clockwise. Thread them carefully into the crank arms and tighten securely.

Figure 2: Securely attach pedals.
- Montaje de la tija del sillín y el sillín: Insert the seat post into the main frame. Adjust the height to your preference and secure it with the locking knob. Attach the saddle to the seat post.

Figure 3: Adjusting seat height for comfort.
- Fijar el conjunto del manillar: Connect the handlebar assembly to the main frame. Ensure all cables are properly routed and not pinched. Secure with the designated bolts.
- Instalar soporte para botella de agua: Attach the water bottle holder to the designated location on the main frame.
Configuración
Before your first workout, ensure the bike is set up correctly for your body:
- Altura del asiento: Adjust the seat height so that your leg is almost fully extended at the bottom of the pedal stroke, with a slight bend in the knee.
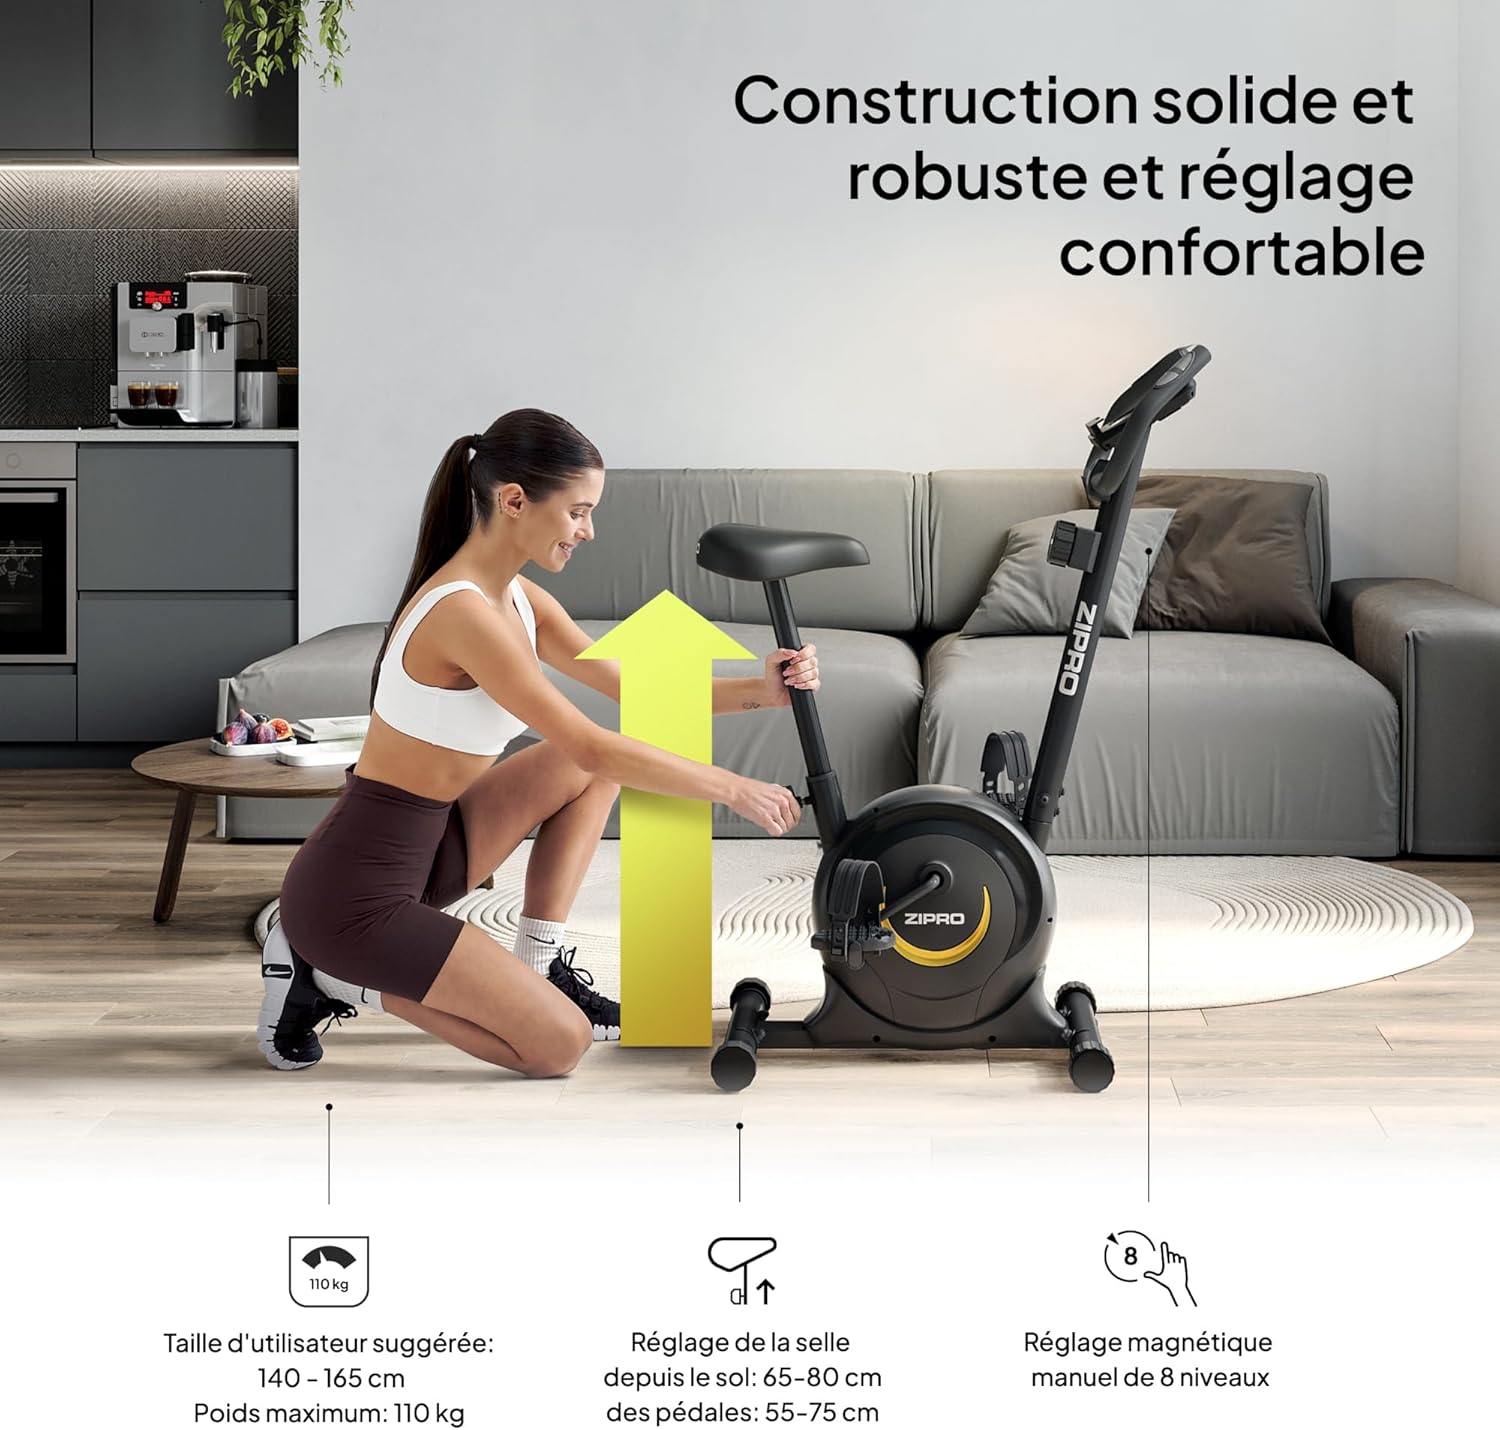
Figure 4: Proper seat height ensures comfort and efficiency.
- Posición del manillar: The handlebars can be adjusted for height to provide a comfortable riding posture. Ensure you can reach them without straining.
- Nivel de resistencia: The magnetic resistance system offers 8 levels. Start with a lower level (1-2) and gradually increase as your fitness improves. The resistance knob is located below the console.

Figure 5: Adjusting the 8-level magnetic resistance.
Instrucciones de funcionamiento
Your fitness bike features an intuitive console to track your workout data:
Funciones de la consola:

Figure 6: Console display showing Time, Speed, Calories, Pulse, and Distance.
- Botón MODE: Press to cycle through display functions: Time, Speed, Distance, Calories, Pulse, and Odometer (ODO). Hold to reset values.
- Botón de ajuste: Used to set target values for Time, Distance, or Calories.
- Botón de reinicio: Presione para borrar los datos del entrenamiento actual.
- Función SCAN: Recorre automáticamente todas las funciones de visualización cada pocos segundos.
- Sensores de pulso: Grip the metal plates on the handlebars to measure your heart rate. Your pulse will be displayed on the console.
Comenzar un entrenamiento:
- Sit on the saddle and place your feet securely in the pedal straps.
- Adjust the resistance to your desired level using the tension control knob.
- Begin pedaling. The console will automatically activate and start tracking your workout.
- Utilice el botón MODO para view different metrics or the SCAN function for automatic cycling.
- To measure pulse, firmly grip the pulse sensors on the handlebars.

Figure 7: Integrated mobile device holder for convenience.
Mantenimiento
Regular maintenance ensures the longevity and safe operation of your fitness bike:
- Limpieza: Limpie la bicicleta con un anuncioamp Limpie el paño después de cada uso para eliminar el sudor y el polvo. No utilice limpiadores abrasivos.
- Inspecciones: Revise periódicamente el apriete de todos los pernos, tuercas y piezas móviles. Apriete cualquier componente suelto.
- Lubricación: The magnetic resistance system is generally maintenance-free. However, if you notice any squeaking from moving parts, apply a small amount of silicone-based lubricant.
- Almacenamiento: Guarde la bicicleta en un lugar seco y fresco, alejado de la luz solar directa y de temperaturas extremas. Las ruedas de transporte integradas facilitan su traslado.

Figura 8: Ruedas de transporte para facilitar el movimiento y almacenamiento.
Solución de problemas
| Problema | Posible causa | Solución |
|---|---|---|
| La consola no muestra datos. | Las baterías están agotadas o mal instaladas. Conexión suelta. | Replace batteries (2x AAA). Check all cable connections to the console. |
| Ruido chirriante o rechinante. | Loose bolts. Parts need lubrication. | Tighten all visible bolts. Apply silicone lubricant to moving joints if necessary. |
| La resistencia no cambia. | Cable de resistencia desconectado o dañado. | Check the connection of the resistance cable to the knob and the main unit. Contact support if damaged. |
| Inestable durante el uso. | Bike not on a level surface. Stabilizer caps not adjusted. | Ensure the bike is on a flat surface. Adjust the leveling caps on the stabilizers until stable. |
Presupuesto
| Característica | Detalle |
|---|---|
| Marca | ZIPRO |
| Nombre del modelo | zipro (Model Number: 5941659) |
| Mecanismo de resistencia | Magnético |
| Número de niveles de resistencia | 8 |
| Recomendación de peso máximo | 110 kg (242 libras) |
| Dimensiones del producto (Pr. x An. x Al.) | 35.04" x 17.32" x 43.31" (89cm D x 44cm W x 110cm H) |
| Peso del artículo | 16.5 kg (36.3 libras) |
| Material | Acero carbono |
| Fuente de poder | Alimentado por batería (para consola) |
| Uso recomendado | Interior |
| Características especiales | Monitor de distancia recorrida |
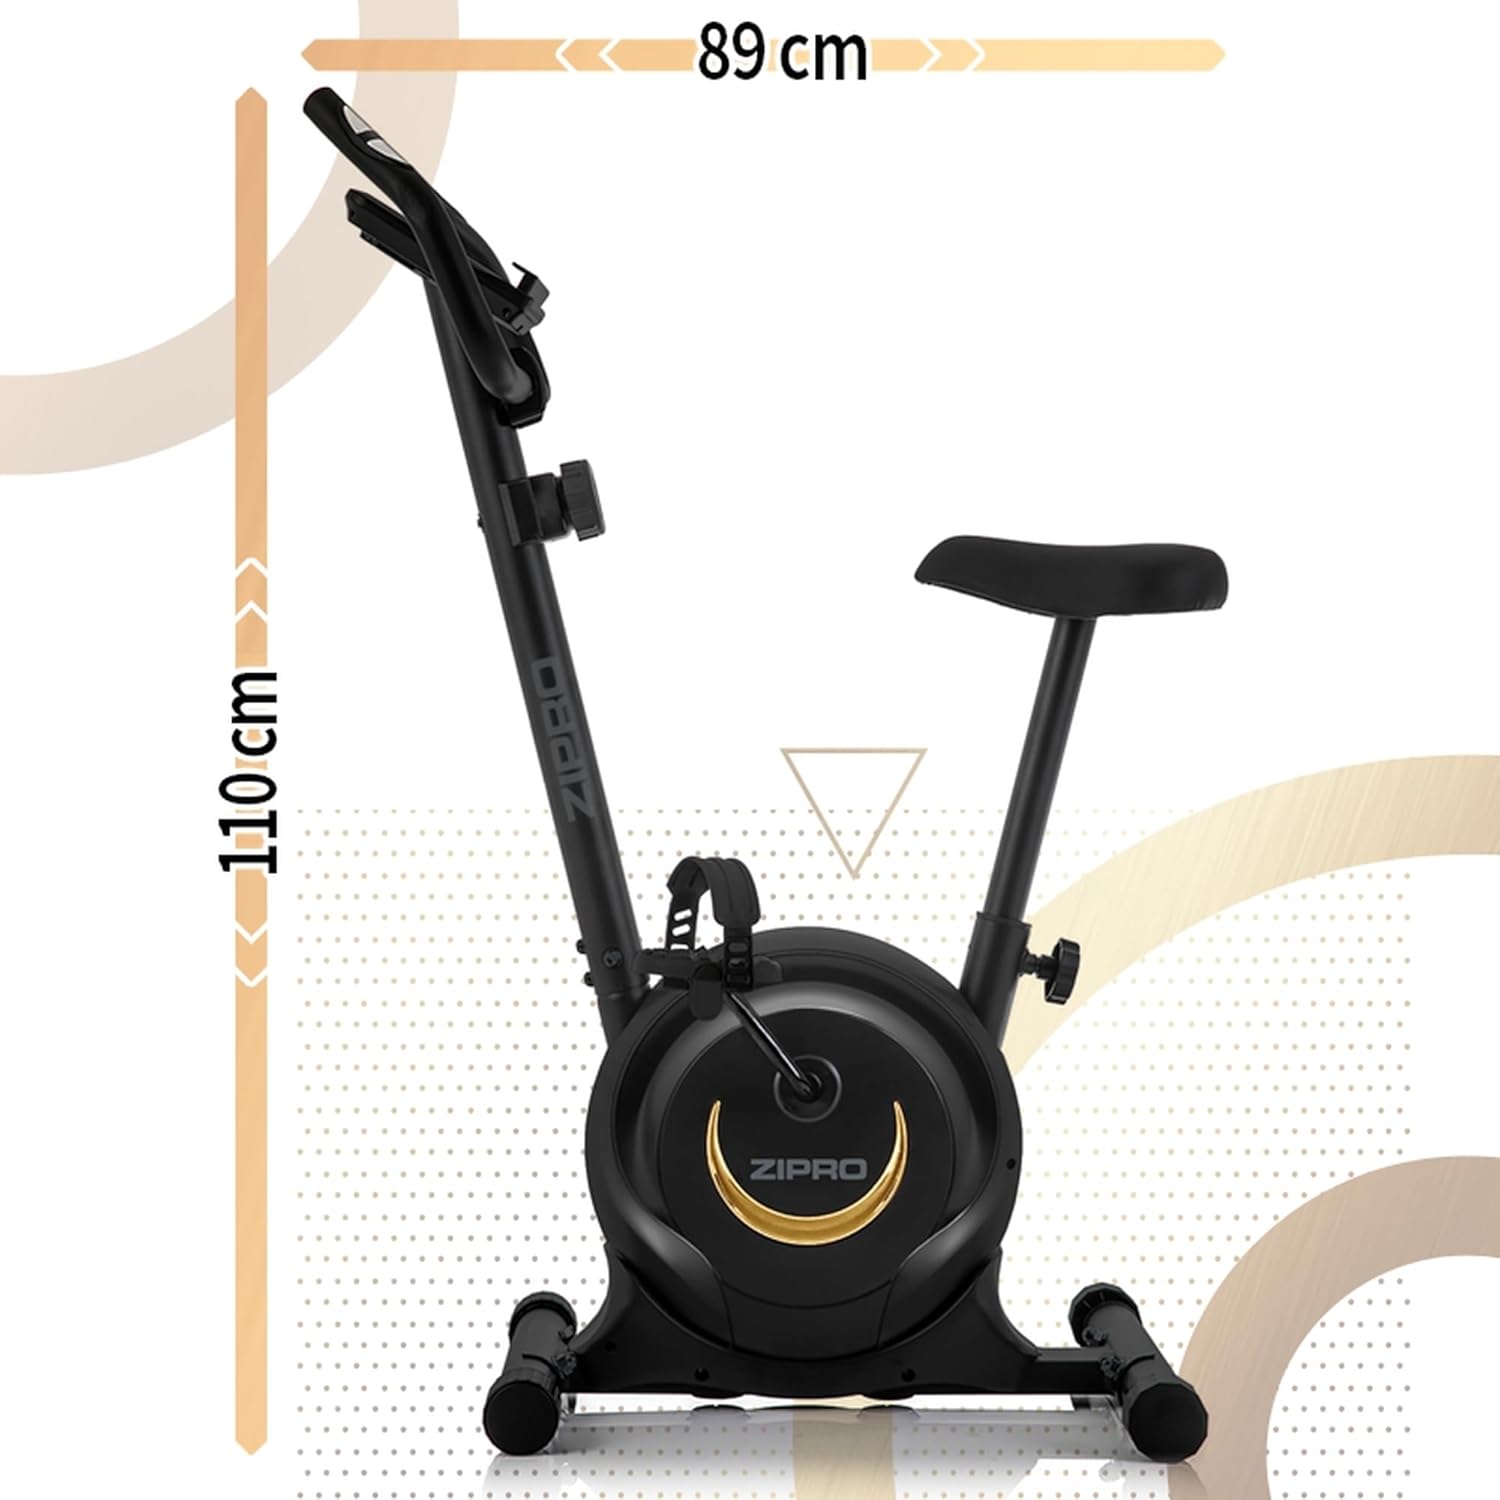
Figura 9: Dimensiones del producto para la planificación del espacio.
Garantía y soporte
For warranty information, technical support, or to order replacement parts, please refer to the warranty card included with your product or visit the official ZIPRO webSitio. Conserve su recibo de compra como comprobante de compra.
Ask a question about this manual
Ask about setup, troubleshooting, compatibility, parts, safety, or missing instructions. Manuals+ will review the question and use this page’s manual context to help answer it.