
1. Introducción
This manual provides detailed instructions for the installation, operation, and maintenance of the DEWIN G2R 63A 2P Automatic Transfer Switch (ATS). This device is designed to automatically switch between two power sources, ensuring continuous power supply to your load.
The DEWIN G2R 63A 2P ATS features a compact structure, small size, and supports 35mm DIN rail installation, making it suitable for household distribution boxes. It offers extremely fast switching speed, resolving power outage issues efficiently.
2. Información de seguridad
ADVERTENCIA: Peligro de descarga eléctrica. La instalación y el mantenimiento solo deben ser realizados por personal cualificado.
- Desconecte siempre la alimentación antes de instalar o realizar mantenimiento al ATS.
- Asegúrese de que todas las conexiones del cableado sean seguras y cumplan con los códigos eléctricos locales.
- Do not operate the device if it is damaged or appears to be malfunctioning.
- The operating environment temperature range is -5°C to +40°C.
- The installation altitude must be below 2000 meters.
- The enclosure protection class of the ATS is IP30.
3. Producto terminadoview
3.1 Características principales
- Rendimiento alto: Electromagnetically driven for extremely fast switching, less than 50ms conversion time.
- Alta calidad: Flame-retardant shell for resistance to extreme environments, strong adaptability, and reliable operation.
- Transferencia Automática: Designed with common power supply, backup power supply, load power-on indicator, and clear switch status.
- Arc Extinction System: Internal arc extinction system for rapid cooling and arc suppression.
- Fácil de usar: Modular structure, same-side wire entry for convenient wiring, compact size, supports 35mm DIN rail installation.
3.2 Componentes y dimensiones del producto
The DEWIN G2R 63A 2P ATS is a compact unit designed for efficient power management.

Figura 1: Frente view of the DEWIN G2R 63A 2P Automatic Transfer Switch.

Figure 2: Dimensions of the DEWIN G2R 63A 2P Automatic Transfer Switch. The device measures approximately 45mm wide, 70mm high, and 105mm deep, with a 35mm DIN rail mounting width.
3.3 Panel Analysis
Understanding the control panel is crucial for proper operation.

Figure 3: Panel analysis showing common power supply indicator light (I), standby power indicator light (II), common power hand/automatic switch, commonly used power supply closing mechanical indication, operating handle, backup power closing mechanical indication, and load power indicator light.
3.4 Especificaciones
| Especificación | Valor |
|---|---|
| Modo de funcionamiento | ENCENDIDO-ENCENDIDO |
| Corriente nominal | 63 A |
| Vol de funcionamientotage | 220 voltios |
| Tipo de contacto | Normalmente abierto |
| Tipo de conector | Engarce |
| Tipo de interruptor | Interruptor de transferencia automático |
| Tipo de terminal | Tornillo |
| Material | Polycarbonate and Copper |
| Tipo de circuito | 2-pole common circuit and auxiliary compatible |
| Tipo de montaje | Montaje en carril DIN |
| Tipo de actuador | Electroimán |
| Número de posiciones | 2 |
| Temperatura nominal superior | 40 grados centígrados |
| Control Device Type | Botón mecánico |
| Método de control | Tocar |
| Protocolo de conectividad | ESTRUENDO |
| Fuerza | 13.86 vatios |
| Dispositivos compatibles | Household electrical appliances, electronic equipment, 220V AC powered devices |
| Calificación de protección internacional | IP30 |
| Especificación compatible | CCC, IEC 60669-2-1:2002 |
| Peso del artículo | 380 gramos |
4. Configuración e instalación
4.1 Montaje
The ATS is designed for 35mm DIN rail mounting. Ensure the DIN rail is securely fastened within your distribution box or electrical panel.

Figure 4: The image illustrates the 35mm DIN rail installation method and the robust terminals for wiring.
4.2 Diagrama de cableado
Proper wiring is essential for safe and correct operation. Refer to the diagram below for connecting the common power (I), backup power (II), and load output.
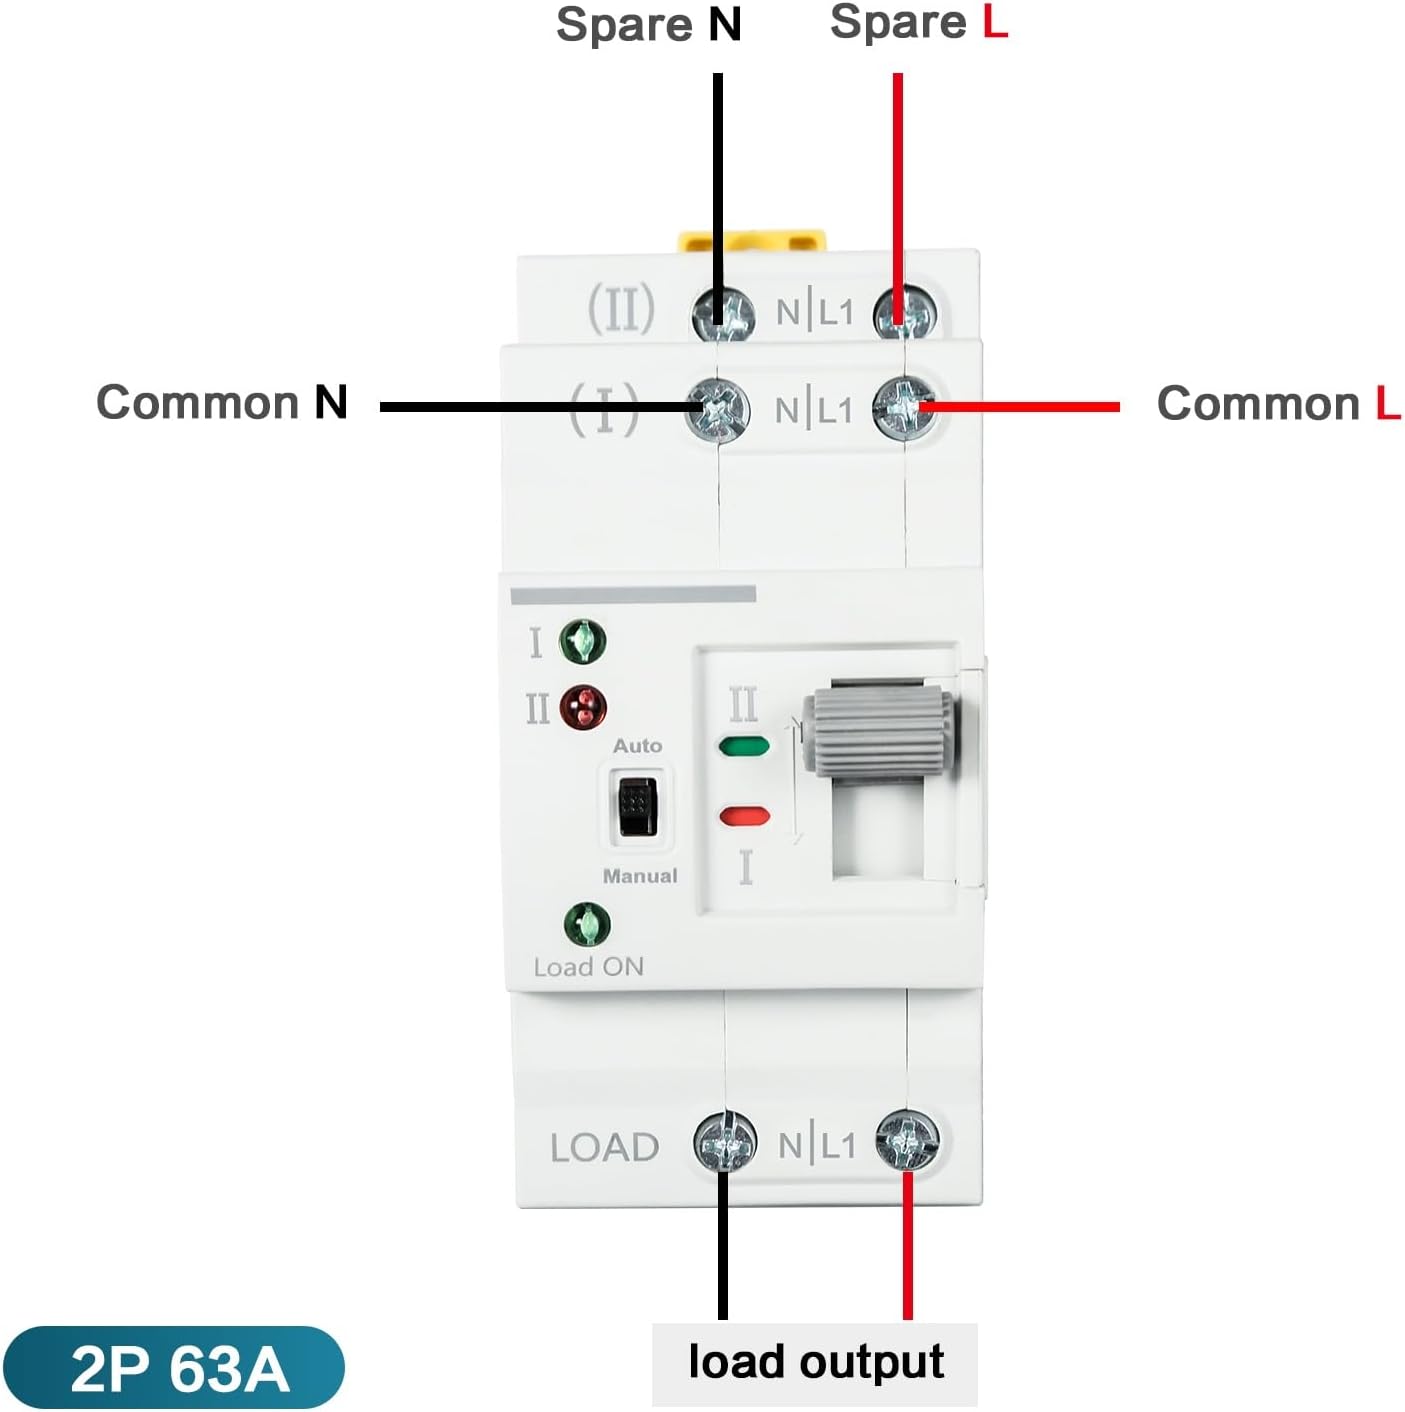
Figure 5: Wiring diagram showing connections for Common N, Common L, Spare N, Spare L, and Load Output. Ensure the input power supply is connected in the correct phase sequence.
5. Instrucciones de funcionamiento
The DEWIN G2R 63A 2P ATS supports both automatic and manual operation modes.
5.1 Modo automático
In automatic mode, the switch will detect the presence of the common power supply (I) and the backup power supply (II). If the common power fails, the switch will automatically transfer the load to the backup power supply. When common power is restored, it will switch back.
- Set the 'Auto/Manual' switch to 'Auto'.
- The indicator lights (I and II) will show which power source is active.
- The 'Load ON' indicator will illuminate when power is supplied to the load.
5.2 Modo manual
To manually switch between power sources:
- Set the 'Auto/Manual' switch to 'Manual'.
- Use the operating handle to physically switch between position I (Common Power) and position II (Backup Power).
- Ensure the desired power source is selected and the corresponding indicator light is on.
6. Mantenimiento
The DEWIN G2R 63A 2P ATS is designed for reliable operation with minimal maintenance. However, periodic checks are recommended:
- Inspección visual: Inspeccione periódicamente el dispositivo para detectar cualquier signo de daño físico, conexiones sueltas o sobrecalentamiento.
- Limpieza: Keep the device free from dust and debris. Use a dry, soft cloth for cleaning. Do not use liquids or abrasive cleaners.
- Comprobación de terminal: Periodically verify that all terminal screws are tight to prevent arcing and ensure good electrical contact.
Desconecte siempre la alimentación antes de realizar cualquier mantenimiento.
7. Solución de problemas
If you encounter issues with your ATS, consider the following common problems and solutions:
- No hay energía para cargar:
- Check if both common and backup power sources are active.
- Verify the 'Load ON' indicator is illuminated.
- Ensure the ATS is in 'Auto' mode or manually switched to an active power source. - Failure to Transfer Automatically:
- Confirm the 'Auto/Manual' switch is set to 'Auto'.
- Check the status of both power sources using their respective indicator lights.
- If the issue persists, consult a qualified electrician. - Overheating or Unusual Noises:
- Immediately disconnect power.
- This could indicate a serious electrical fault. Do not attempt to repair it yourself. Contact a qualified electrician.
8. Garantía y soporte
Para obtener información sobre la garantía y asistencia técnica, consulte el embalaje del producto o póngase en contacto con su vendedor. Conserve el recibo de compra como comprobante.