
1. Instrucciones de seguridad importantes
Please read and understand all safety instructions before operating this product. Keep this manual for future reference.
- No exponga la unidad a la lluvia, la humedad o temperaturas extremas.
- Evite colocar la unidad cerca de fuentes de calor como radiadores, rejillas de calefacción, estufas u otros aparatos que produzcan calor.
- Utilice únicamente accesorios especificados por el fabricante.
- Desenchufe esta unidad durante tormentas eléctricas o cuando no la utilice durante períodos prolongados.
- Refiera todo el servicio a personal de servicio calificado. Se requiere servicio cuando el aparato ha sido dañado de alguna manera.
- Asegúrese de que haya una ventilación adecuada alrededor de la unidad. No bloquee ninguna abertura de ventilación.
- Proteja el cable de alimentación para que no sea pisado ni aplastado.
2. Contenido del paquete
Verifique que todos los artículos enumerados a continuación estén incluidos en su paquete:
- 1x syitren PARON II Record Player
- 1x Manual de usuario
- 1x Funda antipolvo
- 1x 12V AC Power Adapter

3. Producto terminadoview
Familiarize yourself with the main components of your syitren PARON II Record Player.


4. Configuración
- Desembalaje de la unidad: Retire con cuidado el tocadiscos y todos los accesorios del embalaje.
- Place the Dust Cover: Position the dust cover onto the hinges at the back of the unit.
- Conecte la electricidad: Plug the 12V AC power adapter into the DC IN port on the back of the record player, then plug the adapter into a wall outlet.
- Ajustar el contrapeso: The tonearm features an adjustable counterweight. Carefully balance the tonearm so it floats horizontally. Then, rotate the counterweight to the recommended tracking force (refer to cartridge specifications, typically around 2.5g for the AT3600L). This ensures optimal sound quality and prevents record damage.
- Ajuste anti-patinaje: The anti-skating system helps prevent the stylus from skipping. Adjust this setting according to the instructions provided with the cartridge or by testing with a blank record.

5. Instrucciones de funcionamiento
5.1 Reproducción de un disco de vinilo
- Encendido: Gire la perilla de encendido para encender la unidad.
- Seleccionar velocidad: Choose the appropriate speed (33 or 45 RPM) for your vinyl record using the speed selector switch.
- Registro de lugar: Carefully place your vinyl record on the platter. If playing a 45 RPM single, use the included adapter.
- Brazo elevador: Use la palanca de elevación del brazo fonocaptor para levantar el brazo fonocaptor.
- Posición del lápiz: Mueva suavemente el brazo sobre el surco inicial deseado del disco.
- Brazo inferior: Baje lentamente el brazo fonocaptor usando la palanca de elevación. La aguja hará contacto con el disco y comenzará la reproducción.
- Ajustar el volumen: Use the volume knob to set the desired listening level.
The record player features an auto-stop function that will stop the platter approximately three minutes after the record ends. The tonearm will not auto-return.

5.2 Conectividad Bluetooth
The syitren PARON II Record Player can receive audio wirelessly from Bluetooth-enabled devices.
- Habilitar Bluetooth: Switch the function selector to Bluetooth mode. The indicator light will flash, indicating it's in pairing mode.
- Emparejar dispositivo: On your smartphone, tablet, or other Bluetooth device, enable Bluetooth and search for available devices. Select "syitren PARON II" (or similar name) from the list.
- Confirmación: Once paired, the indicator light on the record player will stop flashing and remain solid. You can now stream audio from your device to the record player's built-in speakers.
5.3 Conexiones de audio externas
The unit supports both Aux-in and RCA output for versatile audio connections.
- Entrada auxiliar: Connect an external audio source (e.g., MP3 player, CD player) to the AUX IN port using a 3.5mm audio cable. Select AUX mode on the record player to play audio from the connected device.
- Salida RCA: Connect the RCA output jacks on the back of the record player to an external amplifier or powered speakers using RCA cables. This allows you to use the record player as a source for a larger audio system.
6. Mantenimiento
6.1 Limpieza del lápiz óptico
A clean stylus ensures optimal sound quality and extends the life of your records. Use a soft brush designed for stylus cleaning, brushing gently from back to front.
6.2 Limpieza de la unidad
Wipe the unit with a soft, dry cloth. For stubborn marks, a slightly damp Se puede usar un paño limpio y luego un paño seco. Evite limpiadores abrasivos o disolventes.
6.3 Cuidado de la cubierta antipolvo
The dust cover protects your turntable. Clean it with a soft, lint-free cloth. Avoid harsh chemicals that may scratch or cloud the plastic.
7. Solución de problemas
Si encuentra problemas, consulte los siguientes problemas y soluciones comunes:
| Problema | Posible solución |
|---|---|
| Sin poder | Asegúrese de que el adaptador de corriente esté conectado de forma segura a la unidad y a una toma de corriente que funcione. |
| No hay sonido de los altavoces | Check volume level. Ensure correct input mode (Phono, Aux, Bluetooth) is selected. |
| Sonido saltado o distorsionado | Clean the record and stylus. Re-adjust the tonearm counterweight and anti-skating. Ensure the record player is on a stable, level surface. |
| Bluetooth no emparejado | Ensure the record player is in Bluetooth pairing mode. Disable and re-enable Bluetooth on your device. Move closer to the record player. |
Si los problemas persisten, comuníquese con el servicio de atención al cliente para obtener ayuda.
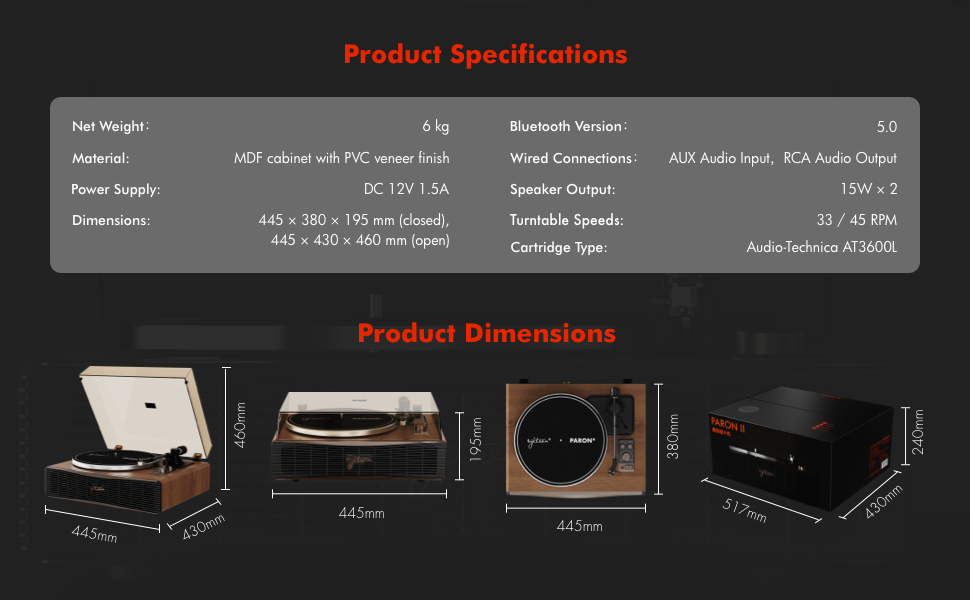
8. Especificaciones
| Característica | Detalle |
|---|---|
| Nombre del modelo | PARON II |
| Número de modelo del artículo | SN13 |
| Dimensiones del producto | 17.4 x 14.96 x 7.48 inches (445 x 380 x 195 mm closed) |
| Peso del artículo | 16 libras (6 kg) |
| Material | MDF cabinet with PVC veneer finish (Wood, Metal, Plastic) |
| Velocidades de la plataforma giratoria | 33 1/3, 45 RPM |
| Tipo de cartucho | Audio-Technica AT3600L (Magnet-type) |
| Versión de Bluetooth | 5.0 |
| Conexiones cableadas | AUX Audio Input, RCA Audio Output |
| Salida de altavoz | 15W x 2 (Built-in 2.5" woofer and 2" tweeter) |
| Fuente de alimentación | 12 V CC, 1.5 A |
| Características especiales | Adjustable Counterweight, Built-In Speaker, Built-In Bluetooth Receiver, RCA Output, Suspension Shock Absorption System, S5 Motor System |
9. Garantía y soporte
The syitren PARON II Record Player is designed for reliable performance. For warranty information or technical support, please refer to the contact details provided with your purchase documentation or visit the official syitren websitio.
Conserve su comprobante de compra para cualquier reclamo de garantía.