
1. Introducción
Thank you for choosing the Zapco ST-1000XM III Monoblock Class D Ampmás duradero. Esta amplifier is designed to deliver high-quality audio performance for your vehicle's sound system. Please read this manual thoroughly before installation and operation to ensure proper use and to maximize the amppotencial del lificador.
The ST-1000XM III is a single-channel, Class D bass amplifier featuring a new aluminum chassis, variable input gain control, variable electronic crossover, variable subsonic filter, variable bass boost control, variable center frequency for bass boost, and variable phase control. It is also strappable for use with a second amplifier on a single voice coil and includes a dash-mount remote gain control.
2. Información de seguridad
Observe siempre las siguientes precauciones de seguridad durante la instalación y el funcionamiento:
- Desconecte el terminal negativo de la batería del vehículo antes de comenzar cualquier instalación.
- Asegúrese de que todo el cableado esté correctamente enrutado y asegurado para evitar daños o cortocircuitos.
- Utilice cableado de calibre apropiado para las conexiones de alimentación, tierra y altavoces según lo especificado.
- Instalar el amplifier in a dry, well-ventilated location, away from direct sunlight, heat sources, and moisture.
- No opere el ampSi el dispositivo de mantenimiento está dañado o no funciona correctamente, consulte a personal cualificado.
- High sound pressure levels can cause permanent hearing loss. Adjust volume levels responsibly.
3. Configuración e instalación
Una instalación correcta es crucial para un rendimiento y una seguridad óptimos. Si tiene alguna duda sobre algún paso del proceso de instalación, consulte con un instalador profesional.
3.1 Montaje del Ampmás vivaz
Elija un lugar seguro, seco y bien ventilado para montar el amplifier. Ensure there is sufficient airflow around the heatsink. Use the provided mounting hardware to secure the ampSujete firmemente el elevador a una superficie sólida de su vehículo.
3.2 conexiones de cableado
Refer to the diagram below for proper wiring connections.
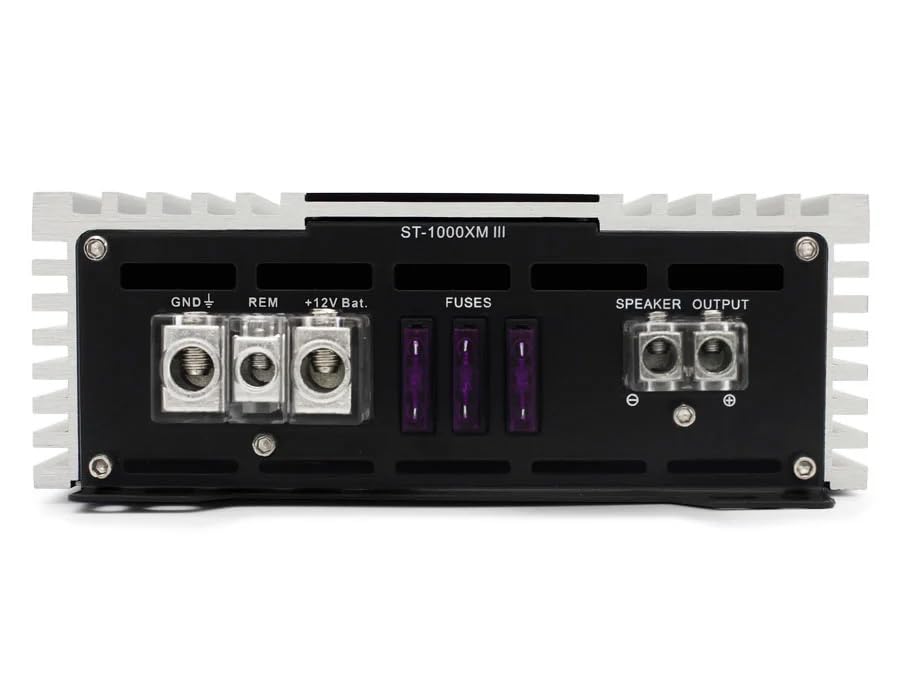
Figure 1: Rear panel connections for power, ground, remote, fuses, and speaker output.
- Potencia (BATT +12V): Connect a heavy-gauge wire (e.g., 4 AWG or larger, depending on cable length) directly from the vehicle's positive battery terminal to the +12V terminal on the amplificador. Instale un portafusibles apropiado (no suministrado) a menos de 45 cm (18 pulgadas) de la batería.
- Tierra (GND): Connect a heavy-gauge wire of the same size as the power wire from the GND terminal on the ampConecte el cable a una superficie metálica limpia y sin pintar del chasis del vehículo. Asegúrese de que la conexión eléctrica sea correcta.
- Remoto (REM): Connect a smaller gauge wire (e.g., 18 AWG) from the REM terminal on the ampEl cable se conecta a la salida de encendido remoto de la unidad principal. Este cable activa el... ampEnciende y apaga el amplificador con tu estéreo.
- Fusibles: El amplifier is equipped with internal fuses. Ensure these are correctly rated (refer to specifications). Do not replace with higher-rated fuses.
- Salida del altavoz: Connect your subwoofer(s) to the SPEAKER OUTPUT terminals. Observe correct polarity (+ to + and - to -). This is a monoblock amplificador, diseñado para una salida de un solo canal.
- Entrada (RCA): Connect RCA cables from your head unit's subwoofer or full-range pre-out to the IN (RCA) terminals on the ampmás duradero.
- Control remoto de ganancia: Connect the included remote gain control to the 'REMOTE' port on the amplifier's front panel. This allows for convenient bass level adjustment from the driver's seat.
4. Controles operativos y ajustes
The Zapco ST-1000XM III features several controls to fine-tune your audio system. Refer to the diagram below for control locations.
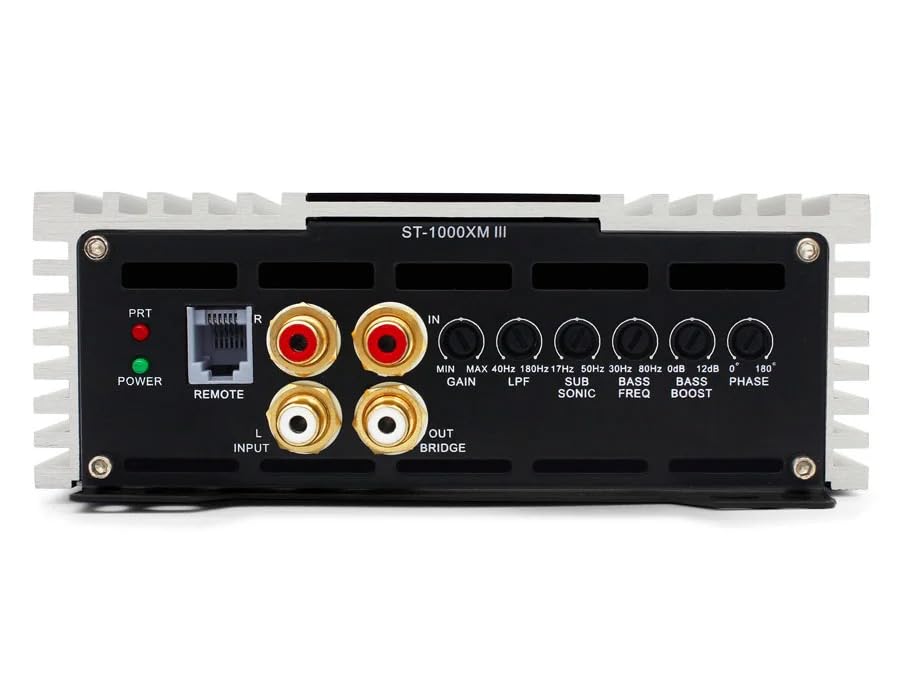
Figure 2: Front panel controls for audio adjustments.
- POWER/PRT Indicators: The POWER LED indicates the amplifier is on. The PRT (Protection) LED illuminates if the amplifier enters protection mode due to overheating, low impedance, or other faults.
- GANANCIA (Sensibilidad de entrada): Ajusta el amplifier's input sensitivity to match the output voltage of your head unit. Start with the gain at minimum and slowly increase until desired volume is achieved without distortion. Range: 0.25V to 5V.
- LPF (filtro de paso bajo): Este control establece el límite de frecuencia superior para el amplifier's output. Only frequencies below the set point will pass through. Typically set between 50Hz and 200Hz for subwoofers.
- SUB SONIC (Filtro subsónico): Filters out extremely low frequencies that are inaudible and can damage subwoofers. Typically set below the port tuning frequency of a ported enclosure, or around 20-30Hz for sealed enclosures. Range: 17Hz to 50Hz.
- REFUERZO DE GRAVES: Increases the output level at a specific bass frequency. Use sparingly to avoid distortion. Range: 0dB to 12dB.
- BASS FREQ (Bass Boost Frequency): Selects the center frequency for the bass boost control.
- FASE: Adjusts the phase of the subwoofer output relative to the main speakers. This helps to ensure all sound waves arrive at the listener's ears in sync, improving bass impact and clarity. Adjustable from 0° to 180°.
5. Mantenimiento
The Zapco ST-1000XM III ampEl elevador requiere un mantenimiento mínimo. Siga estas pautas para garantizar su longevidad:
- Mantener el ampLimpie el dispositivo sin polvo ni residuos. Utilice un paño suave y seco para limpiarlo.
- Asegúrese de que haya una ventilación adecuada alrededor del ampEl ventilador está siempre encendido. No bloquee las aletas de refrigeración.
- Revise periódicamente todas las conexiones del cableado para verificar que estén bien apretadas y no presenten corrosión.
- Evite exponer el ampresistente a temperaturas extremas o humedad.
6. Solución de problemas
Si tiene problemas con su amplifier, consulte la siguiente guía de solución de problemas antes de contactar al soporte.
- Sin energía:
- Verifique el fusible en línea cerca de la batería y los fusibles en el ampmás duradero.
- Verify all power, ground, and remote turn-on connections are secure and have proper voltage.
- Asegúrese de que la unidad principal esté encendida y enviando una señal remota.
- Sin sonido:
- Verifique los cables de entrada RCA para verificar que la conexión sea correcta y no presenten daños.
- Verify speaker wires are correctly connected and not shorted.
- Adjust the GAIN control.
- Check head unit settings (e.g., subwoofer output enabled, volume up).
- Sonido distorsionado:
- Reducir el ajuste GAIN.
- Check speaker impedance; ensure it is within the amplímites nominales del limitador.
- Adjust LPF, Subsonic, and Bass Boost settings.
- Ensure speaker wires are not shorted or damaged.
- Amplifier Goes into Protection Mode (PRT LED on):
- Check for speaker wire shorts or impedance too low.
- Asegúrese de que haya una ventilación adecuada para evitar el sobrecalentamiento.
- Check for proper power and ground connections.
7. Especificaciones
| Característica | Especificación |
|---|---|
| Amptipo de vida | Single channel, Class D, Bass Ampmás vivaz |
| Power @ 1Ω | 1 x 1050 vatios RMS |
| Power @ 2Ω | 1 x 750 vatios RMS |
| Power @ 4Ω | 1 x 450 vatios RMS |
| THD a potencia nominal | <0.2% |
| Relación señal/ruido | > 100 dB |
| THD + ruido | <0.1% |
| Eficiencia | > 85% |
| Respuesta de frecuencia | 10Hz to 200Hz ±1dB |
| Sensibilidad de entrada | 0.25 V a 5 V |
| Dimensiones (A x H x L) | 160 mm x 58 mm x 300 mm (chasis) |
| Overall Dimensions (W x H x L) | 160 mm x 58 mm x 325 mm |
| Peso del artículo | 8 libras |
| Tipo de montaje | Montaje en superficie |
| Especificación cumplida | Comisión Federal de Comunicaciones (FCC) |
8. Garantía y soporte
The Zapco ST-1000XM III ampEl amplificador viene con un Garantía de 1 años Desde la fecha de compra, cubre defectos de materiales y mano de obra en condiciones normales de uso. Esta garantía no cubre daños causados por instalación incorrecta, accidentes, mal uso, abuso, negligencia o modificaciones no autorizadas.
For technical support or warranty claims, please contact your authorized Zapco dealer or visit the official Zapco website for contact information. Please have your product model number and proof of purchase ready.