
1. Introducción
Thank you for choosing the Brilliant Palmero Ceiling Fan with RGB Function. This product combines efficient LED lighting with a powerful fan to provide both illumination and comfortable air circulation. Designed for indoor use, it features remote control operation for convenience and an RGB function for customizable ambiance. Please read this manual thoroughly before installation and operation to ensure safe and correct use.

Image 1: The Brilliant Palmero Ceiling Fan offers dual functionality, combining cooling and lighting. It is energy-efficient, improves air circulation, provides comfort, saves space, and can be used year-round.
2. Características principales
The Brilliant Palmero Ceiling Fan is equipped with several features designed for comfort and convenience:
- LED integrado de 40 W: Energy-efficient and cost-effective ceiling lamp.
- Ventilator Function: Provides pleasant air circulation.
- Mando a distancia incluido: Allows for easy adjustment of light intensity, light color, and fan speed from a distance.
- Función RGB: Offers dynamic color lighting options for various moods.
- Iluminación regulable: Adjust brightness and color temperature from warm white to cool white.
- Aspas de ventilador reversibles: Supports both summer (cooling) and winter (heat circulation) modes.

Imagen 2: Másview of key features: integrated LED, fan, and remote control for ease of use.
3. Instrucciones de seguridad
Siga siempre las precauciones básicas de seguridad al instalar y operar aparatos eléctricos para reducir el riesgo de incendio, descarga eléctrica y lesiones personales.
- Instalación profesional: La instalación debe ser realizada por un electricista calificado de acuerdo con todos los códigos eléctricos locales y nacionales.
- Desconexión de energía: Asegúrese de que la fuente de alimentación esté desconectada del disyuntor principal antes de realizar la instalación, el mantenimiento o la limpieza.
- Montaje seguro: The ceiling fan must be securely mounted to a structural ceiling joist or a suitable support system capable of holding the fan's weight.
- Espacio libre de la hoja: Asegúrese de que haya suficiente espacio libre entre las aspas del ventilador y cualquier obstáculo (paredes, muebles) para evitar lesiones o daños.
- Exposición al agua: This product is designed for indoor use only and is not water-resistant. Do not expose to water or high humidity.
- Niños y mascotas: Mantenga a los niños y las mascotas alejados del ventilador durante el funcionamiento y la instalación.
- Mando a distancia: Keep the remote control away from moisture and extreme temperatures.
4. Contenido del paquete
Verifique que todos los componentes estén presentes y sin daños antes de proceder con la instalación. Si alguna pieza falta o está dañada, contacte con su distribuidor.
- Brilliant Palmero Ceiling Fan Unit
- Mando a distancia
- E27 Tuya Light Bulb
- Hardware de montaje (tornillos, anclajes, etc.)
- Manual de usuario (este documento)
5. Configuración e instalación
Importante: Installation should only be carried out by a qualified electrician. Ensure the main power supply is switched off before beginning installation. The fan unit is largely pre-assembled, but professional installation to the ceiling and electrical wiring is required.
- Prepare la ubicación de montaje:
Identify a suitable location on the ceiling that can support the fan's weight (approximately 1.87 kg) and allows for proper blade clearance. Ensure there is an existing electrical junction box or prepare one according to local codes.
- Monte el soporte:
Attach the mounting bracket securely to the ceiling joist or support structure using the provided hardware. Ensure it is firmly fixed and stable.
- Conexiones de cableado:
Connect the fan's electrical wires to the household wiring according to the wiring diagram provided in the separate installation guide (if applicable) or by a qualified electrician. Pay close attention to live, neutral, and ground connections. Ensure all connections are secure and insulated.
- Conecte la unidad del ventilador:
Carefully lift the fan unit and attach it to the mounting bracket. Secure it with the screws or locking mechanism as per the specific design. Ensure the fan is stable and does not wobble.
- Instalar la bombilla:
Insert the provided E27 Tuya light bulb into the lamp fitting. Ensure it is screwed in firmly but do not overtighten.
- Comprobaciones finales:
Double-check all connections and ensure no wires are pinched. Restore power at the main circuit breaker.

Image 3: Product dimensions and weight for installation planning.
6. Instrucciones de funcionamiento
The Brilliant Palmero Ceiling Fan is operated primarily via the included remote control. The E27 Tuya bulb also allows for smart control via a compatible app (refer to Tuya bulb instructions for app setup).
6.1 Funciones de control remoto

Image 4: The remote control provides convenient operation of both lighting and fan functions.
- Encendido/apagado: Presione el botón de encendido para encender o apagar el ventilador y la luz.
- Control de velocidad del ventilador: Use the fan speed buttons to adjust the airflow (typically multiple speed settings).
- Luz encendida / apagada: Separate button for controlling the light independently.
- Light Brightness (Dimming): Adjust the light intensity using the dimming buttons.
- Temperatura de color de la luz: Change the light color from warm white to cool white.
- Función RGB: Activate and cycle through various RGB colors or modes.
- Función de temporizador: Set a timer for the fan or light to turn off automatically (if available on remote).

Image 5: Detail of the fan blades and dynamic RGB lighting.
6.2 Seasonal Operation (Summer/Winter Mode)
The fan features a reversible motor function to optimize air circulation for different seasons. This function is typically controlled via a switch on the fan body or the remote control (refer to specific remote instructions).
- Modo Verano (rotación en sentido antihorario): Crea un flujo de aire descendente, produciendo un efecto refrescante.
- Modo invierno (rotación en sentido horario): Creates an upward airflow, circulating warm air near the ceiling throughout the room.

Image 6: Enjoy a gentle breeze on warm days or ensure optimal air circulation in the room, all from your favorite spot.
6.3 Dimmable Lighting
The integrated LED lighting is dimmable and allows for adjustment of color temperature to suit your preference and mood.
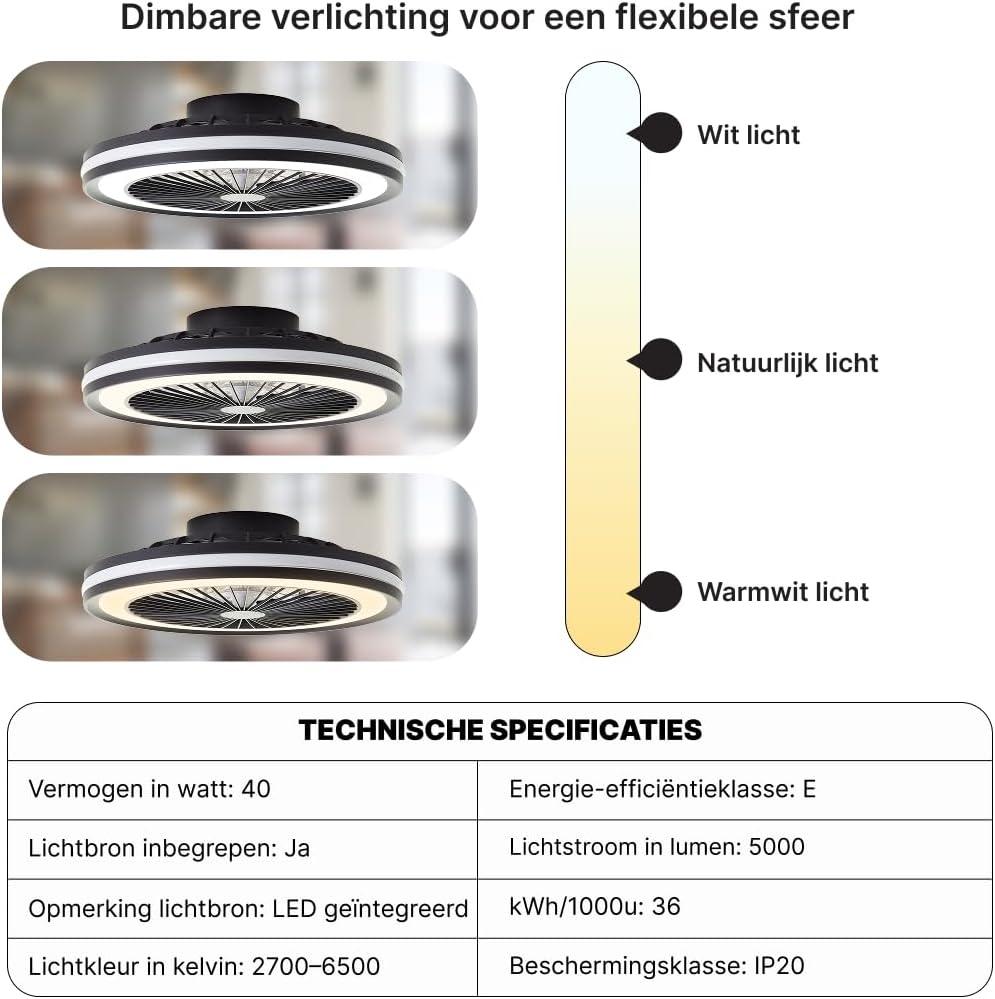
Image 7: Dimmable lighting for a flexible atmosphere, offering white, natural, and warm white light options.
7. Mantenimiento
El mantenimiento regular garantiza la durabilidad y el rendimiento óptimo de su ventilador de techo. Desconecte siempre la alimentación antes de realizar cualquier mantenimiento.
- Limpieza:
Wipe the fan blades and housing with a soft, damp cloth. Do not use abrasive cleaners or solvents, as these can damage the finish. Ensure the fan is completely dry before restoring power.
- Reemplazo de bombilla:
If the E27 Tuya bulb needs replacement, ensure the power is off. Unscrew the old bulb and replace it with a new E27 LED bulb of compatible wattage (max 40W). Refer to the Tuya bulb's specific instructions for smart functionality setup if replacing with a new smart bulb.
- Apretar los sujetadores:
Periodically check all screws and fasteners on the mounting bracket and fan housing to ensure they are secure. Tighten if necessary.
8. Solución de problemas
If you encounter issues with your Brilliant Palmero Ceiling Fan, refer to the following common problems and solutions:
| Problema | Posible causa | Solución |
|---|---|---|
| El ventilador no arranca | Sin fuente de alimentación; cableado suelto; batería del control remoto agotada. | Check circuit breaker; Verify wiring connections (consult electrician); Replace remote control batteries. |
| La luz no enciende | Bulb loose or faulty; No power supply; Remote control issue. | Check bulb connection or replace bulb; Check circuit breaker; Replace remote control batteries. |
| El ventilador se bambolea | Tornillos de montaje sueltos; Cuchillas desequilibradas. | Tighten all mounting screws; Ensure blades are securely attached and balanced (balancing kit may be needed). |
| El control remoto no funciona | Dead batteries; Obstruction; Remote not paired. | Replace batteries; Remove obstructions between remote and fan; Re-pair remote if necessary (refer to remote instructions). |
Si el problema persiste después de intentar estas soluciones, comuníquese con el servicio de atención al cliente.
9. Especificaciones
The following table details the technical specifications of the Brilliant Palmero Ceiling Fan (Model G96460/75).
| Característica | Detalle |
|---|---|
| Número de modelo | G96460/75 |
| Marca | Brillante |
| Dimensiones del producto (L x An x Al) | 13 largo x 46 ancho x 13 alto cm |
| Peso | 1.875 kilogramos |
| Material | Metal |
| Color | Multi-colored (Warm White to Cool White) |
| Estilo | Modern/Design |
| Tipo de habitación | Bathroom (Note: Product is not water-resistant, suitable for dry indoor environments) |
| Uso interior/exterior | Interior |
| Fuente de poder | Eléctrico con cable |
| Características especiales | Remote control, Incl. E27 Tuya lamp, Energy-saving LED, Multifunctional (light + fan), RGB-function |
| Método de control | Mando a distancia |
| Fuente de luz | LED integrado |
| Número de fuentes de luz | 1 |
| Temperatura del color de la luz | 2700-6500 Kelvin (Warm White to Cool White) |
| Quétage | 40 vatio |
| Lamp Adecuado | E27 (for included Tuya bulb) |
| Tipo de interruptor | Touch (via remote) |
| Nivel de resistencia al agua | No resistente al agua |
| Protocolo de conectividad | Wifi (for Tuya bulb) |
| Flujo luminoso | 5000 lúmenes |
| Clase de eficiencia energética | E |
| Consumo de energía | 36 kWh/1000 horas |
| Clase de protección | IP20 |
| Tipo de montaje | Ceiling mounting, Recessed mounting |
| Requiere ensamblaje | No (unit is pre-assembled, but installation is required) |
Nota: Algunas especificaciones pueden variar ligeramente. Consulte el embalaje del producto para obtener la información más precisa.
10. Garantía y soporte
Garantía: The manufacturer provides a 1-year availability duration for spare parts within the EU. For specific warranty terms and conditions, please refer to the documentation provided with your purchase or contact your retailer.
Atención al cliente: If you have any questions, require technical assistance, or need to report a problem that cannot be resolved using the troubleshooting guide, please contact the retailer or the manufacturer's customer service department. Keep your purchase receipt and model number (G96460/75) handy when contacting support.