
1. Introducción
Thank you for choosing the RESTMO 2-Zone Programmable Watering Timer. This device is designed to automate your garden irrigation, providing convenience and efficiency. Featuring durable brass inlet and outlet threads, independent dual zones, and multiple programming options, it ensures reliable and precise watering for your lawn, garden, or greenhouse.
Please read this manual thoroughly before installation and operation to ensure proper use and longevity of your watering timer.
2. Características principales
- Reliable and Leak-Proof Design: Equipped with pure brass inlet and outlet threads for enhanced durability and resistance to high working pressure (up to 120 psi). The robust, weather-resistant, and UV-resistant casing is ideal for outdoor use.
- Zonas duales independientes: Features two separate outlets, allowing you to manage watering for two distinct areas simultaneously or independently.
- Múltiples opciones de programación: Each zone supports up to 3 distinct watering programs (P1, P2, P3), providing a total of 6 customizable schedules.
- Flexible Watering Frequency and Duration: Set watering frequency from 1 to 23 hours or 1 to 30 days, and duration from 1 minute to 299 minutes.
- Interfaz fácil de usar: Large 3.2-inch LCD screen for easy readability and an oversized dial for intuitive setting adjustments.
- Función de riego manual: Allows for immediate, temporary watering without interrupting preset programs.
- Rain Delay Feature: Conserve water by pausing scheduled watering for 24, 48, or 72 hours during rainy periods.
- Funciona con pilas: Operates on 2 AA alkaline batteries (not included), providing approximately one year of battery life.
3. Guía de configuración
3.1. Instalación de la batería
- Localice el compartimento de la batería en la parte posterior del temporizador.
- Abra la tapa de la batería.
- Inserte 2 pilas alcalinas AA nuevas, asegurándose de la polaridad correcta (+/-).
- Close the battery cover securely. The LCD screen will light up.
3.2. Conexión del temporizador
The RESTMO watering timer features a 3/4" NH Female brass inlet and 3/4" NH Male brass outlets.

Image: The RESTMO watering timer connected to a faucet, illustrating the durable pure brass inlet and outlet threads for leak-proof performance.
- Screw the timer's brass inlet directly onto your outdoor faucet (3/4" NH standard). Ensure a tight, leak-free connection.
- Attach your garden hoses to the two brass outlets at the bottom of the timer. Hand-tighten for a secure fit.
3.3. Ajuste inicial del reloj

Imagen: Frente view of the RESTMO watering timer, showing the large LCD display, control dial, and buttons for easy operation.
- Turn the main dial to AJUSTAR RELOJ.
- Utilice el + y - Botones para ajustar la hora actual.
- Prensa OK to confirm and move to the next setting (e.g., AM/PM).
- Once the clock is set, turn the dial to the next desired function or to ON Para activar.
4. Instrucciones de funcionamiento
4.1. Programación de horarios de riego (P1, P2, P3)
The timer allows you to set up to three independent programs (P1, P2, P3) for each of the two zones (Left and Right).

Image: Visual guide for setting up three distinct watering programs (P1, P2, P3), demonstrating options for start time, duration, and frequency.
- Seleccionar Zona: Presione brevemente el ZN/P button to toggle between Zone Left (L) and Zone Right (R). The selected zone will be indicated on the LCD.
- Seleccionar programa: Mantenga pulsado el ZN/P button to cycle through P1, P2, and P3 for the selected zone. Release the button when your desired program (e.g., P1) is displayed.
- Establecer hora de inicio: Turn the main dial to HORA DE INICIO. Usar + y - para ajustar la hora de inicio. Prensa OK Para confirmar.
- Establecer cuánto tiempo (duración): Turn the main dial to CUÁNTO TIEMPO. Usar + y - to set the watering duration (1 min to 299 min). Press OK Para confirmar.
- Establecer la frecuencia: Turn the main dial to CON QUÉ FRECUENCIA. Usar + y - to set the watering frequency (1-23 hours or 1-30 days). Press OK Para confirmar.
- Repeat steps 1-5 for P2 and P3 if needed for the current zone, and then for the other zone.
- Once all programs are set, turn the main dial to ON to activate the schedules.
4.2. Riego manual
The manual watering function allows you to water immediately without affecting your programmed schedules.
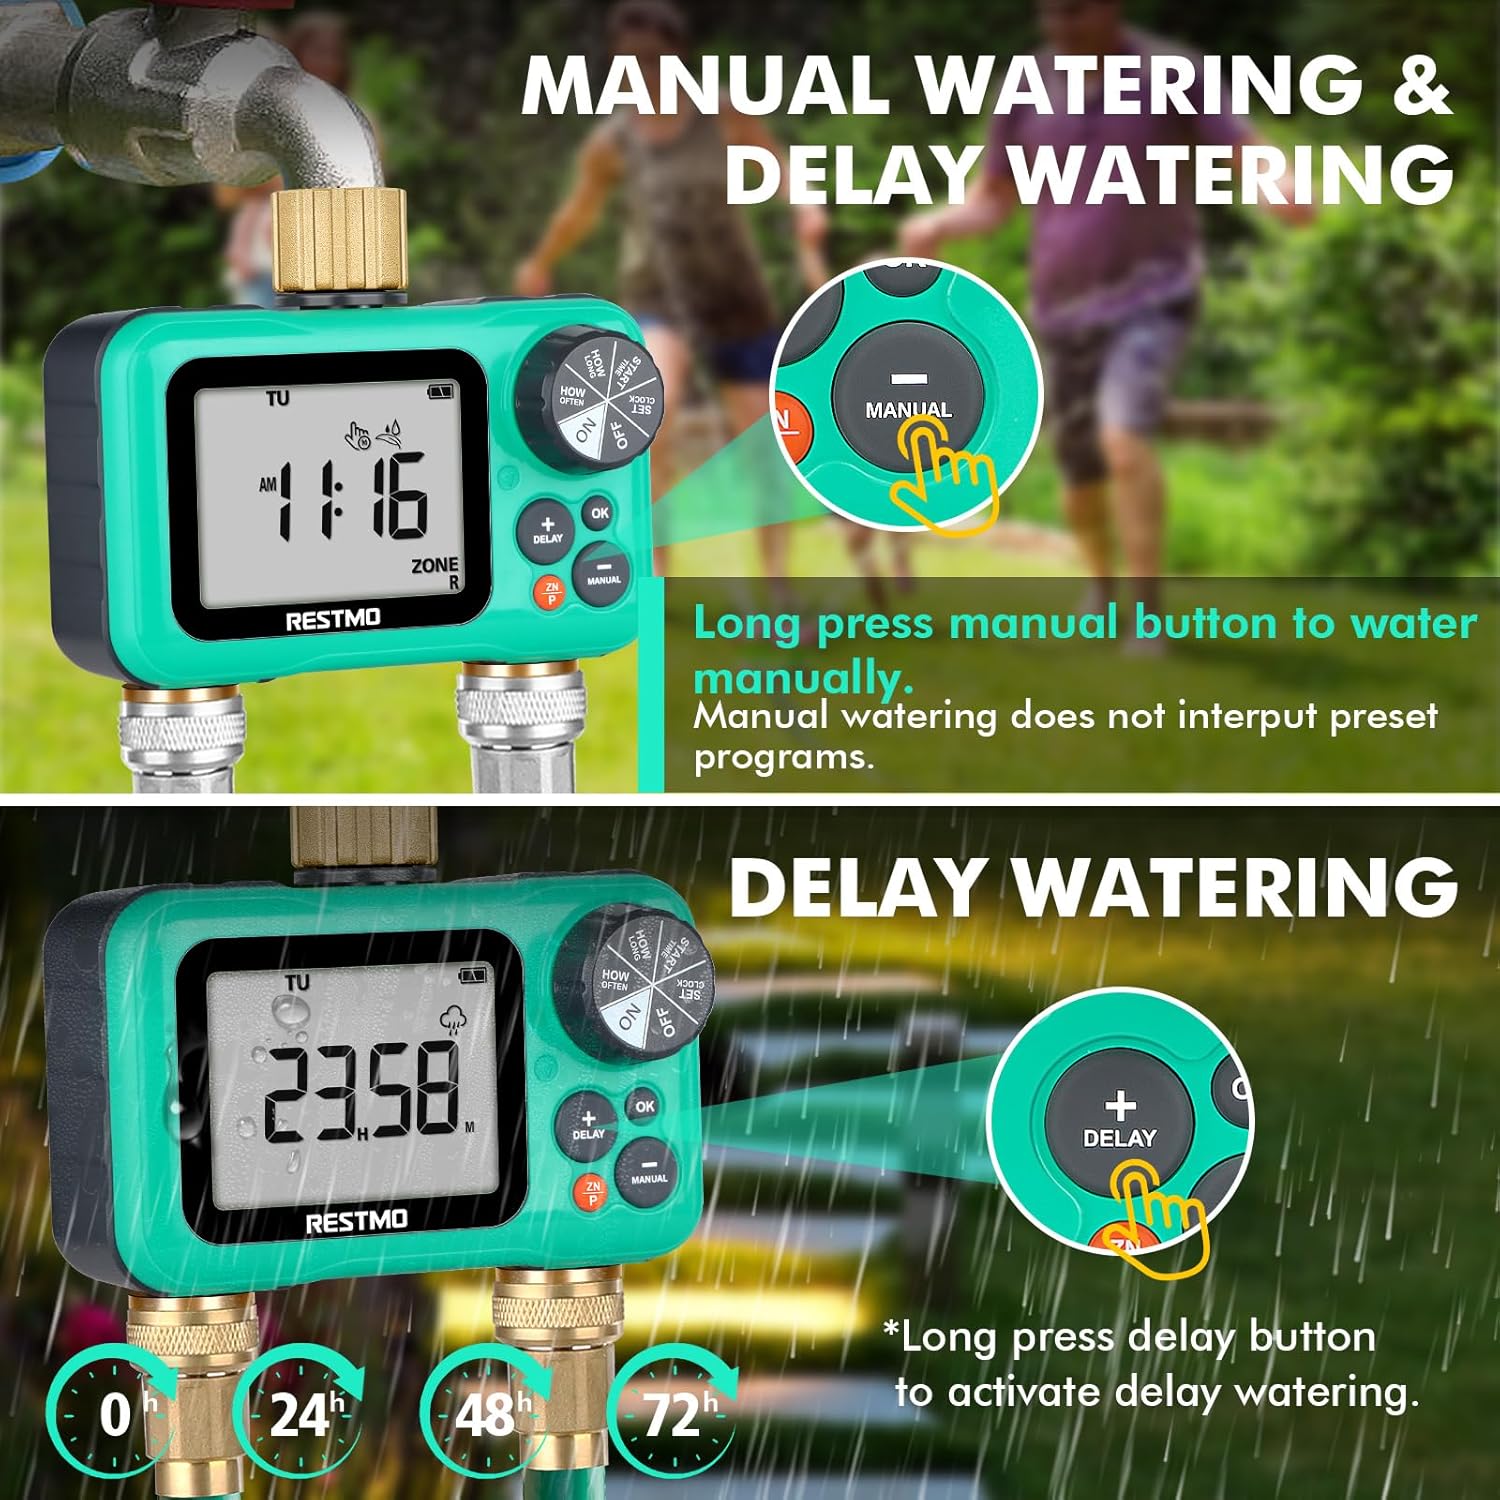
Imagen: Detallada view of the timer's buttons, illustrating how to activate manual watering and rain delay functions.
- Ensure the main dial is set to ON.
- Mantenga pulsado el MANUAL Botón. La pantalla mostrará la duración del riego manual.
- Utilice el + y - Botones para ajustar la duración de riego manual deseada.
- Prensa OK to start manual watering. The timer will automatically revert to its programmed schedule after the manual watering is complete.
4.3. Función de retraso por lluvia
Pause your watering schedule for a set period to conserve water during rainfall.
- Ensure the main dial is set to ON.
- Mantenga pulsado el DEMORA button. The display will show the delay options (24H, 48H, 72H).
- Utilice el + y - buttons to select the desired delay duration.
- Prensa OK to activate the rain delay. The timer will resume its programmed schedule after the delay period ends.
4.4. Selección de zona
Easily switch between the left and right zones for programming or manual control.
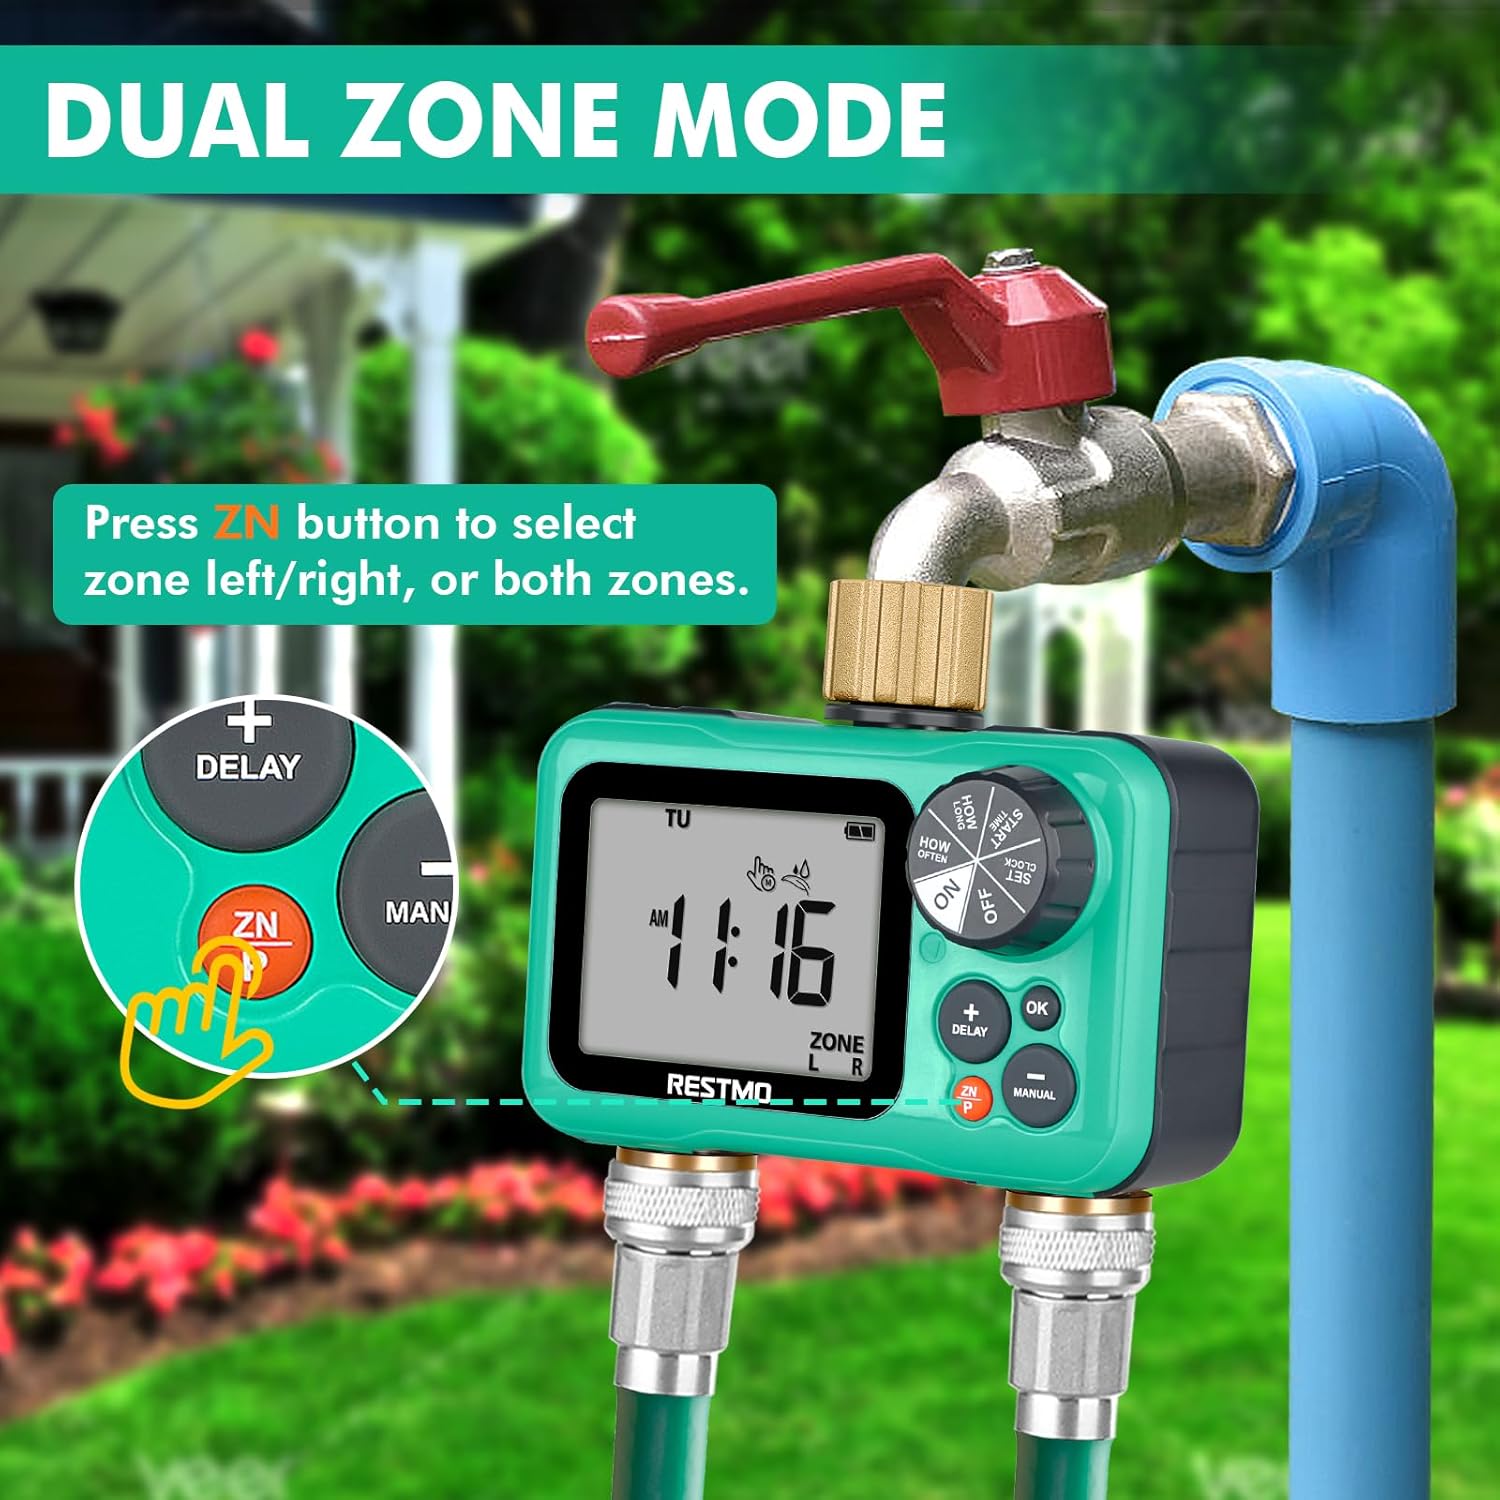
Image: The timer connected to a faucet and hoses, with an emphasis on the 'ZN' button used for selecting between the left and right watering zones.
- Presione brevemente el ZN/P button to switch between Zone Left (L), Zone Right (R), or Both Zones (L+R). The active zone(s) will be displayed on the LCD.
5. Mantenimiento
- Reemplazo de batería: Replace batteries annually or when the low battery indicator appears on the LCD. Always use new AA alkaline batteries.
- Limpieza de filtros: Periodically check the filter washer located in the inlet connection. If debris is present, remove and rinse it under running water. This prevents clogging and ensures proper water flow.
- Winterización: Before the first frost, disconnect the timer from the faucet and hoses. Drain any remaining water from the unit. Store the timer indoors in a dry, frost-free location to prevent damage from freezing water.
- Limpieza general: Limpia el temporizador con un anuncioamp cloth to remove dirt. Do not use abrasive cleaners or immerse the unit in water.
6. Solución de problemas
| Problema | Posible causa | Solución |
|---|---|---|
| Timer not turning on / LCD blank | Baterías muertas o instaladas incorrectamente. | Reemplace con nuevas baterías alcalinas AA, asegurándose de la polaridad correcta. |
| No hay flujo de agua | Faucet is off; low water pressure; clogged filter; program not set correctly; manual override active. | Ensure faucet is fully open. Check water pressure (min 8 psi). Clean inlet filter. Verify program settings (start time, duration, frequency). Check if manual watering is active. |
| Fugas de agua en las conexiones | Conexiones sueltas; arandela desgastada; roscas dañadas. | Ensure all connections are hand-tight. Check rubber washers for wear and replace if necessary. Inspect brass threads for damage. |
| Program not running at scheduled time | Timer dial not set to ON; incorrect clock time; rain delay active; program OFF. | Turn dial to ON. Verify current time is accurate. Check if rain delay is active. Ensure program (P1/P2/P3) is not set to OFF. |
| One zone not working | Zone not selected; program for that zone is OFF or incorrectly set. | Press ZN/P button to ensure the correct zone (L or R) is selected. Verify the program settings for the affected zone. |
7. Especificaciones

Image: Technical diagram of the RESTMO watering timer, showing its dimensions, components, and key operational specifications.
| Característica | Detalle |
|---|---|
| Número de modelo | O-HT-2B-GN |
| Rosca de entrada | 3/4" NH Female (Pure Brass) |
| Rosca de salida | 3/4" NH Male (Pure Brass) |
| Independent Zones | 2 |
| Distinct Programs per Zone | Hasta 3 |
| Frecuencia de riego | 1-23 hours, 1-30 days |
| Duración del riego | 1 minute to 299 minutes (4 hours 59 minutes) |
| Presión de trabajo | 8 - 120 PSI (0.5 - 8 bares) |
| Caudal máximo | 35 L/min (approx. 10 GPM) |
| Temperatura de trabajo | 3 - 50 °C (38 - 120 °F) |
| Fuente de poder | 2 pilas alcalinas AA (no incluidas) |
| Duración de la batería | Aproximadamente 1 año |
| Dimensiones (L x An x Al) | 7.62 x 12.7 x 7.62 cm (3 x 5 x 3 pulgadas) |
| Peso | 472 g (1.04 libras) |
| Tamaño de la pantalla LCD | 3.2 pulgadas |
8. Garantía y soporte
RESTMO stands behind the quality of its products. Your watering timer comes with the following:
- Garantía de devolución de dinero de 45 días: If you are not completely satisfied with your purchase, you may return it within 45 days for a full refund.
- 18-Month Worry-Free Replacement Service: In the event of a defect or malfunction within 18 months of purchase, RESTMO offers a free replacement.
For technical support, warranty claims, or any questions regarding your RESTMO watering timer, please contact our customer service team. (Contact information not provided in original data, please refer to product packaging or seller's websitio para más detalles).