1. Introducción
This manual provides instructions for the proper use and maintenance of the SUNMI V2SE Smart Mobile Terminal. The V2SE is a versatile device designed for various business applications, featuring an integrated 58mm thermal printer, 1D/2D barcode recognition, NFC capabilities, and running on Android 12.0.
Las características principales incluyen:
- Integrated 58mm thermal printer with 80mm/s print speed.
- 1D/2D Barcode recognition for efficient scanning.
- NFC for contactless transactions.
- Android 12.0 operating system with a Quad Core 2.0 GHz CPU.
- 2 GB RAM and 8 GB ROM for smooth operation.
- Connectivity: 4G/3G/2G, 2.4G/5G Wi-Fi, Bluetooth 2.1/3.0/4.2.
- Removable Lithium Ion battery.
2. Componentes del dispositivo
Familiarize yourself with the main components of your SUNMI V2SE terminal.
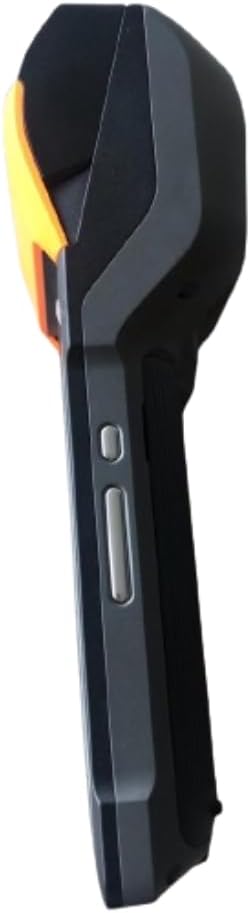
Figura 2.1: Frontal y lateral View. This image displays the device's screen, the integrated barcode scanner at the top, and the power and volume buttons located on the side.

Figura 2.2: Lado View. Esta imagen muestra el perfil lateral.file of the terminal, including the cover for the SIM card slot and additional buttons.

Figura 2.3: Atrás View. This image illustrates the rear of the device, featuring the thermal printer cover, the 0.3 MP camera, and the charging contact points.
Lista de componentes:
- Pantalla de visualización: Touch-sensitive LCD for user interaction.
- Escáner de código de barras: Integrated 1D/2D scanner for data capture.
- Impresora térmica: For printing receipts and other documents.
- Botón de encendido: Para encender/apagar o activar/suspender el dispositivo.
- Botones de volumen: Para ajustar los niveles de audio.
- Cámara: 0.3 MP front photo sensor.
- Ranura para tarjeta SIM: Supports 1 Nano SIM.
- Compartimento de la batería: Houses the removable Lithium Ion battery.
- Charging Port/Contacts: Para cargar el dispositivo.
3. Configuración inicial
3.1. Instalación de la batería
- Asegúrese de que el dispositivo esté apagado.
- Localice la tapa del compartimiento de la batería en la parte posterior del dispositivo (consulte la Figura 2.3).
- Retire la cubierta deslizándola o levantándola según las marcas.
- Insert the provided Lithium Ion battery, ensuring the contacts align correctly.
- Vuelva a colocar la tapa del compartimiento de la batería de forma segura.
3.2. Instalación de la tarjeta SIM
- Ensure the device is powered off and the battery is installed.
- Locate the SIM card slot cover on the side of the device (refer to Figure 2.2).
- Abra la tapa.
- Insert a Nano SIM card into the designated slot with the gold contacts facing down and the notched corner aligned.
- Close the SIM card slot cover firmly.
3.3. Thermal Paper Loading
- Locate the printer cover release latch, typically on the top or side of the printer compartment (refer to Figure 2.3).
- Abra la cubierta de la impresora.
- Insert a 58mm thermal paper roll into the compartment, ensuring the paper feeds from the bottom and the leading edge extends out of the printer slot.
- Close the printer cover firmly until it clicks into place. Ensure there is no slack in the paper roll.
3.4. Carga inicial y encendido
- Conecte el adaptador de corriente provisto al puerto de carga del dispositivo.
- Plug the adapter into a power outlet. Allow the device to charge fully before first use.
- To power on, press and hold the Power button (refer to Figure 2.1) until the SUNMI logo appears on the screen.
4. Instrucciones de funcionamiento
4.1. Encendido/apagado y modo de suspensión
- Encendido: Mantenga presionado el botón de encendido hasta que el dispositivo vibre y la pantalla se ilumine.
- Apagado: Press and hold the Power button until a power menu appears. Select "Power Off" and confirm.
- Estela del sueño: Presione brevemente el botón de encendido para poner el dispositivo en modo de suspensión o activarlo.
4.2. Using the Thermal Printer
The integrated 58mm thermal printer can be used to print receipts, tickets, and other documents.
- Ensure thermal paper is correctly loaded (refer to Section 3.3).
- Open the application that requires printing (e.g., POS software).
- Initiate the print command within the application. The device will automatically print the content.
- Tear off the printed paper against the serrated edge.
4.3. Escaneo de códigos de barras
The V2SE supports 1D and 2D barcode recognition.
- Open an application that requires barcode input.
- Point the scanner window (located at the top of the device, refer to Figure 2.1) at the barcode.
- Press the dedicated scan button (if available) or trigger the scan function within the application.
- Asegúrese de que el código de barras esté dentro del campo de lectura del escáner. view and well-lit for optimal performance.
4.4. Funcionalidad NFC
The device supports Near Field Communication (NFC) for contactless operations.
- Ensure NFC is enabled in the device settings (Settings > Connected devices > NFC).
- Open an application that utilizes NFC (e.g., payment app, data transfer app).
- Hold the NFC-enabled card or device close to the NFC detection area on your terminal (typically near the top or back of the device).
- Follow the on-screen prompts to complete the transaction or data transfer.
4.5. Conectividad de red
- Wifi: Vaya a Configuración > Red e Internet > Wi-Fi para conectarse a las redes inalámbricas disponibles.
- Datos móviles (4G/3G/2G): Ensure a valid SIM card is installed and mobile data is enabled in Settings > Network & internet > Mobile network.
- Bluetooth: Vaya a Configuración > Dispositivos conectados > Bluetooth para emparejar con otros dispositivos Bluetooth.
5. Mantenimiento
5.1. Limpieza del dispositivo
- Apague el dispositivo antes de limpiarlo.
- Utilice un paño suave y sin pelusa ligeramente seco.ampLimpie con agua o un limpiador suave, no abrasivo, el exterior.
- Para la pantalla, utilice un limpiador específico para pantallas y un paño de microfibra.
- Do not use harsh chemicals, solvents, or abrasive materials. Avoid spraying liquids directly onto the device.
5.2. Cuidado de la batería
- Charge the battery regularly, avoiding complete discharge whenever possible.
- No exponga la batería a temperaturas extremas.
- Si el dispositivo no se utilizará durante un período prolongado, cargue la batería hasta aproximadamente el 50 % y guárdela en un lugar fresco y seco.
- Utilice únicamente el cargador y la batería originales o aprobados.
5.3. Printer Head Cleaning
Regular cleaning of the printer head can prevent print quality issues.
- Power off the device and open the printer cover.
- Utilice un hisopo de algodón suavementeampened with isopropyl alcohol to gently wipe the thermal print head.
- Allow the print head to dry completely before closing the cover and powering on the device.
6. Solución de problemas
| Problema | Posible causa | Solución |
|---|---|---|
| El dispositivo no enciende | Low battery; Faulty battery; Power button issue | Charge the device for at least 30 minutes. Ensure battery is correctly installed. Try a different charger. |
| La impresora no imprime | No paper; Paper jammed; Printer head dirty; Application error | Check and load paper. Clear any paper jams. Clean the printer head (Section 5.3). Restart the application or device. |
| El escáner de código de barras no funciona | Scanner window obstructed; Barcode damaged; Application error | Ensure scanner window is clean. Try scanning a different barcode. Restart the application or device. |
| Sin conexión wifi | Wi-Fi off; Incorrect password; Out of range | Enable Wi-Fi in settings. Re-enter password. Move closer to the Wi-Fi router. |
| Sin datos móviles | SIM card not installed; Mobile data off; No network coverage | Check SIM card installation. Enable mobile data in settings. Check for network coverage in your area. |
7. Especificaciones
| Característica | Detalle |
|---|---|
| Modelo | V2SE |
| Sistema operativo | Androide 12.0 |
| UPC | Cuatro núcleos a 2.0 GHz |
| RAM | 2 GB |
| memoria de sólo lectura | 8 GB |
| Mostrar | LCD, 1920 x 1080 resolution, 16:9 Aspect Ratio |
| Impresora | 58 mm thermal printer, 80 mm/s print speed |
| Barcode Recognition | 1D / 2D Barcode recognition |
| Cámara | 0.3 MP Front Photo Sensor |
| Ranura SIM | 1 Nano SIM (Dual SIM support) |
| Conectividad | 4G/3G/2G Cellular, Wi-Fi (2.4G/5G), Bluetooth 2.1/3.0/4.2, NFC |
| GPS | True, Supports GPS satellite navigation system |
| Batería | 1 batería de iones de litio (extraíble, incluida) |
| Dimensiones | 22 x 9 x 9 cm |
| Peso | 400 gramos |
| Fabricante | Sunmi-san |
8. Garantía y soporte
For warranty information and technical support, please refer to the documentation provided with your purchase or contact your vendor. Keep your proof of purchase for warranty claims.