
1. Producto terminadoview
The LIORQUE Digital Kitchen Timer Model YGH5249 is a multi-functional device designed to assist with various timing needs. It features a large LCD display, adjustable alarm volume, and multiple placement options. This timer can function as a countdown timer, a count-up stopwatch, and a digital clock.

Imagen 1.1: Frente view of the LIORQUE Digital Kitchen Timer, highlighting its large LCD screen and control buttons.
Características principales:
- Funcionalidad 3 en 1: Timer, Stopwatch, and Clock modes.
- Gran pantalla LCD: Ensures clear readability of time.
- Volumen de alarma ajustable: Three levels (Mute, Low, High) to suit different environments.
- Modo personalizado: Save frequently used countdown times for quick access.
- Colocación versátil: Magnetic back, foldable stand, and lanyard hole for flexible use.
- Recordatorio de retraso: Automatically starts counting up after countdown finishes.
- Restauración automática: Remembers the last set countdown time.

Image 1.2: Visual representation of the timer's main features and functions.
2. Configuración e instalación de la batería
The timer requires 2 AAA batteries (included) for operation. Follow these steps to install them:
- Localice la tapa del compartimiento de la batería en la parte posterior del temporizador.
- Deslice la tapa para abrirla.
- Inserte dos pilas AAA, asegurándose de la polaridad correcta (+ y -) como se indica dentro del compartimento.
- Cierre bien la tapa del compartimento de la batería.
The timer will power on automatically once batteries are installed.
3. Instrucciones de funcionamiento
3.1 Switching Modes (Timer/Stopwatch/Clock)
The LIORQUE timer offers three modes: Timer (countdown), Stopwatch (count-up), and Clock. To switch between Timer mode and Clock mode, press and hold the ST/ES button for 2 seconds. The timer will display the current time in Clock mode or the timer interface in Timer mode.

Image 3.1: Switching between Counting Mode and Clock Mode.
3.2 Configuración del temporizador de cuenta regresiva
- Ensure the timer is in Timer mode (displaying H:M:S).
- Utilice el 1H, 5M, 1M, y 5S buttons to set the desired countdown time. Each press adds the corresponding time increment.
- Presione el ST/ES Botón para iniciar la cuenta regresiva.
- Para pausar la cuenta regresiva, presione ST/ES de nuevo. Presiónelo una vez más para reanudar.
- Para restablecer el temporizador a cero, presione el botón REINICIAR botón.
- When the countdown reaches zero, the alarm will sound for 1 minute.
3.3 Using Stopwatch (Count-Up)
- Ensure the timer is in Timer mode and reset to 00:00:00.
- Presione el ST/ES Botón para iniciar el conteo ascendente.
- Para pausar el cronómetro, presione ST/ES de nuevo. Presiónelo una vez más para reanudar.
- Para poner a cero el cronómetro, pulse el botón REINICIAR botón.

Image 3.2: Illustration of Count-up and Countdown modes.
3.4 Shortcut Setting
The timer allows for quick setting of common intervals:
- Prensa 1H por 1 hora.
- Prensa 5M por 5 minutos.
- Prensa 1M por 1 minuto.
- Prensa 5S durante 5 segundos.

Imagen 3.3: Examples of using shortcut buttons for quick time setting.
3.5 Modo personalizado
The Custom Mode allows you to save a frequently used countdown time for instant recall.
- En el modo Temporizador, configure el tiempo de cuenta regresiva deseado usando el 1H, 5M, 1M, y 5S botones.
- Mantenga pulsado el COSTUMBRE button for 2 seconds. The timer will remember this setting.
- Each subsequent short press of the COSTUMBRE button will automatically load the saved time.

Image 3.4: Setting and recalling a custom timer value.
3.6 Ajuste del volumen de la alarma
The timer features a 3-level alarm volume adjustment (Mute, Low, High). A switch on the side of the timer allows you to select the desired volume level.

Image 3.5: Volume adjustment switch and its three settings.
3.7 Opciones de colocación
El temporizador LIORQUE ofrece opciones de ubicación flexibles:
- Magnético: Attach the timer to metal surfaces like refrigerators using its strong magnetic back.
- Pararse: Use the integrated foldable stand to place the timer on any flat surface, such as a countertop or desk.
- Agujero de cordón: Hang the timer using a rope through the designated lanyard hole.
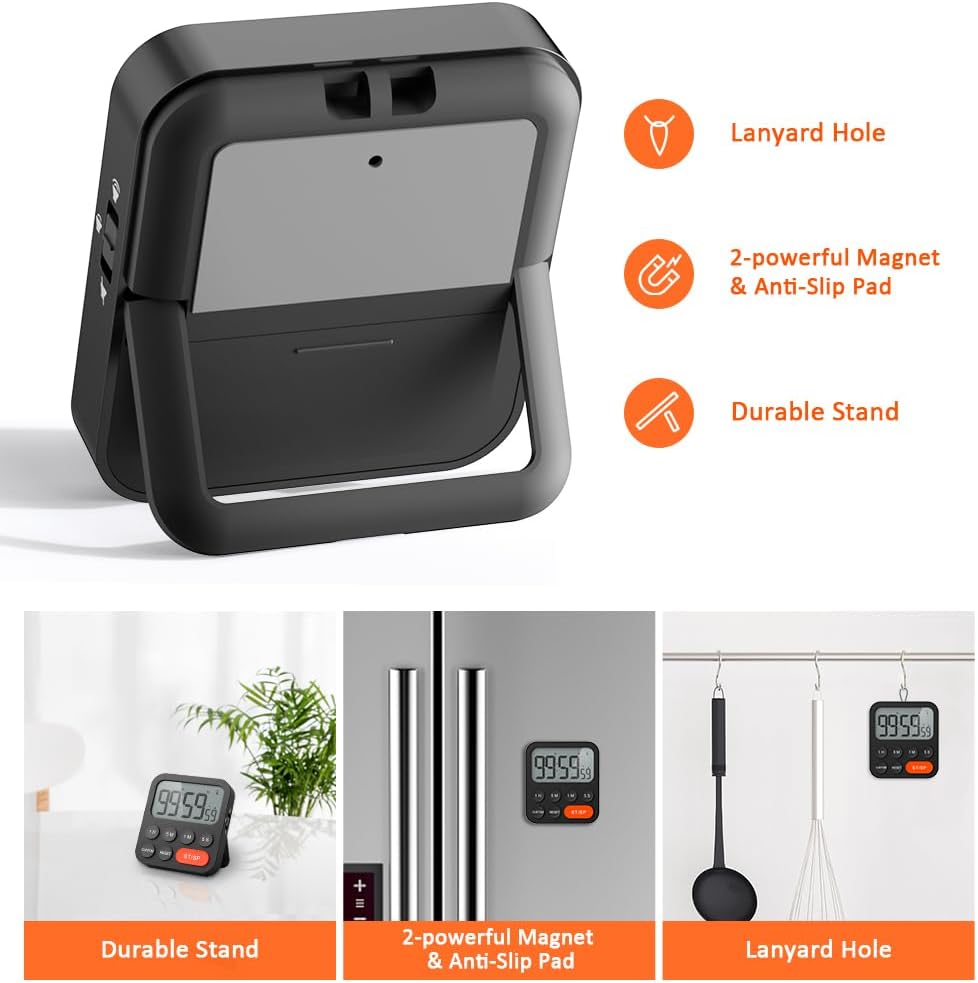
Image 3.6: Various ways to place and use the timer.
3.8 funciones adicionales
- Recordatorio de retraso: After a countdown finishes, the timer will automatically start counting up, indicating the elapsed time since the alarm.
- Restauración automática: Once a countdown is complete and the alarm has sounded, pressing the ST/ES button will restore the timer to the last set countdown time, making it convenient for repetitive tasks.

Image 3.7: Explanation of Delay Reminder and Auto-restore features.
4. Mantenimiento
- Limpie el temporizador con un paño suave y seco. No utilice limpiadores abrasivos ni lo sumerja en agua.
- Reemplace las baterías cuando la pantalla se oscurezca o el temporizador funcione de manera errática.
- Guarde el temporizador en un lugar fresco y seco cuando no lo utilice durante períodos prolongados.
5. Solución de problemas
- El temporizador no responde: Compruebe que las baterías estén correctamente instaladas y tengan suficiente carga. Reemplácelas si es necesario.
- Alarma demasiado baja/fuerte: Adjust the volume switch on the side of the timer to your preferred level.
- La pantalla está en blanco: Ensure batteries are installed and functional. If the issue persists, contact customer support.
6. Especificaciones
| Característica | Detalle |
|---|---|
| Marca | LIORQUE |
| Número de modelo | YGH5249 |
| Color | Negro |
| Dimensiones del producto | 0.94" de profundidad x 0.94" de alto |
| Peso del artículo | 4.2 onzas |
| Fuente de poder | 2 pilas AAA (incluidas) |
| Número de configuraciones | 3 (volumen) |
| Tamaño de pantalla | 1E+1 centímetros |
7. Garantía y soporte
For warranty information or technical support, please refer to the product packaging or contact LIORQUE customer service through their official webSitio web o tienda donde se compró el producto. Conserve el recibo de compra para reclamaciones de garantía.