
1. Producto terminadoview
The Alphacool Core 1 is a high-performance CPU water block designed for efficient heat dissipation from modern desktop processors. It features a newly developed 3D jet plate and a robust all-metal construction. The design prioritizes both functionality and aesthetics, with nickel-plated connections and a high-quality brass housing.
Características principales:
- CPU water block compatible with Intel and AMD sockets.
- Supports Intel LGA 1700 and AMD AM4/AM5 platforms.
- Dimensiones: 72 x 72 x 26.50mm.
- Constructed with a nickel-plated copper cooler and brass housing.
- Features a new 3D jet plate for optimized cooling performance.
- Revised mounting system for simplified installation.
1.1 Componentes y diseño
The Core 1 water block is engineered with a multi-layered internal structure, including a new 3D jet plate that enhances coolant flow and heat transfer efficiency. The exterior features a durable brass housing and nickel-plated brass connections.
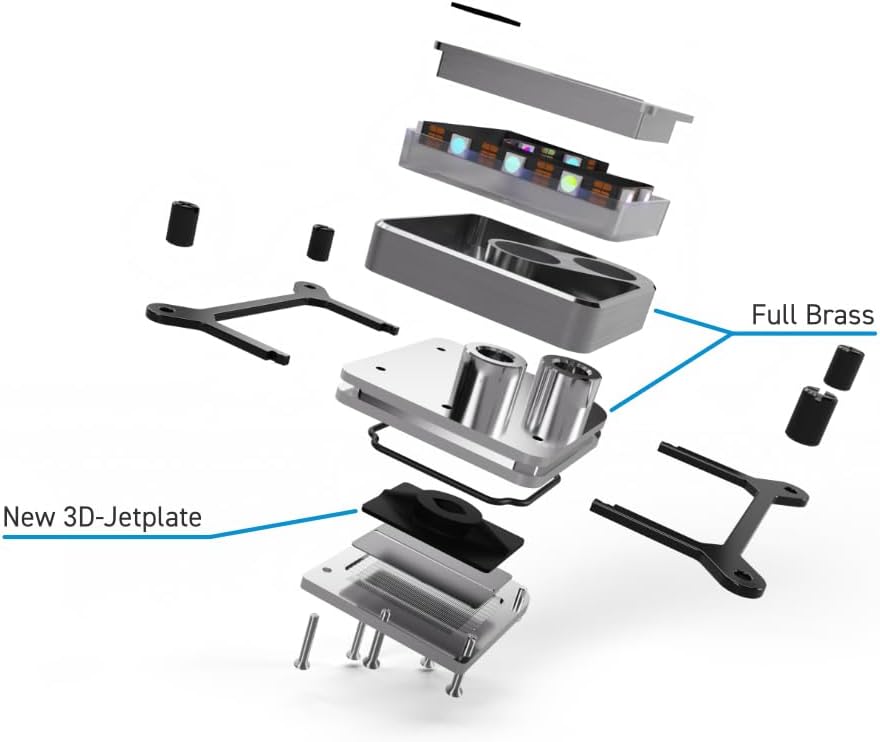
Imagen 1.1: Explotó view illustrating the internal components of the Alphacool Core 1 CPU Water Block, including the new 3D-Jetplate and full brass construction.
2. Contenido del paquete
Antes de comenzar la instalación, verifique que todos los componentes estén presentes en el paquete:

Imagen 2.1: All included parts for the Alphacool Core 1 CPU Water Block, including mounting hardware for Intel and AMD, thermal paste, and a spatula.
- Alphacool Core 1 CPU Water Block
- Intel Mounting Kit (backplate, spacers, screws, nuts)
- AMD Mounting Kit (spacers, screws, nuts)
- Pasta térmica
- Spatula for thermal paste application
- Manual de instalación (este documento)
3. Guía de instalación
This section provides detailed instructions for installing the Alphacool Core 1 CPU Water Block on compatible Intel and AMD motherboards. Ensure your system is powered off and disconnected from the mains before proceeding.
3.1 Preparación
- Gather all necessary tools (screwdriver, cleaning supplies for old thermal paste).
- Ensure your CPU socket is clean and free of debris.
- Identify the correct mounting hardware for your CPU socket (Intel LGA 1700 or AMD AM4/AM5).
3.2 Intel LGA 1700 Installation
- Coloque la placa posterior Intel en la parte trasera de la placa base, alineando los orificios con los orificios de montaje del zócalo de la CPU.
- Insert the four Intel spacers through the motherboard from the front, securing them into the backplate.
- Apply a thin, even layer of thermal paste to the center of your CPU's integrated heat spreader (IHS). Use the provided spatula for even distribution.
- Select the appropriate Intel mounting frame and place it onto the CPU water block.
- Carefully place the CPU water block onto the CPU, aligning the mounting frame holes with the spacers.
- Secure the water block by tightening the four nuts onto the spacers in a cross pattern until finger-tight. Avoid over-tightening.

Imagen 3.1: Example of the Alphacool Core 1 CPU Water Block installed with the Intel mounting kit, shown with hard tubes connected.
3.3 Instalación de AMD AM4/AM5
- Asegúrese de que la placa posterior AMD original esté instalada en su placa base.
- Screw the four AMD spacers into the existing backplate threads around the CPU socket.
- Apply a thin, even layer of thermal paste to the center of your CPU's integrated heat spreader (IHS). Use the provided spatula for even distribution.
- Select the appropriate AMD mounting frame and place it onto the CPU water block.
- Carefully place the CPU water block onto the CPU, aligning the mounting frame holes with the spacers.
- Secure the water block by tightening the four nuts onto the spacers in a cross pattern until finger-tight. Avoid over-tightening.

Imagen 3.2: The Alphacool Core 1 CPU Water Block with the AMD mounting kit attached.
3.4 Connecting to the Cooling Loop
Once the water block is securely mounted, connect it to your custom water cooling loop using G1/4" fittings (not included). Ensure all fittings are tightened properly to prevent leaks. It is recommended to perform a leak test before powering on your system.

Imagen 3.3: Un example of the Alphacool Core 1 CPU Water Block installed on a motherboard with clear tubing connected, demonstrating a complete installation.

Imagen 3.4: Un example of the Alphacool Core 1 CPU Water Block installed on a motherboard, prior to tubing connection.
4. Operación
The Alphacool Core 1 CPU Water Block is a passive component within a liquid cooling loop. Its operation is dependent on the proper functioning of the entire cooling system, which includes a pump, radiator, and reservoir.
- Flujo de refrigerante: Ensure the pump provides adequate flow rate through the water block and the entire loop.
- Monitoreo de temperatura: Regularly monitor CPU temperatures using system monitoring software to ensure optimal cooling performance.
- Prueba de fugas: Before initial power-on, perform a thorough leak test of the entire loop for at least 24 hours using only the pump, without powering other PC components.
5. Mantenimiento
Regular maintenance of your liquid cooling system, including the CPU water block, is crucial for long-term performance and reliability.
- Reemplazo de refrigerante: Replace the coolant in your loop every 6-12 months, or as recommended by your coolant manufacturer, to prevent buildup and maintain performance.
- Limpieza del sistema: Periodically inspect the water block and other loop components for signs of particulate buildup or corrosion. If necessary, disassemble the water block and clean it with distilled water and a soft brush. Avoid abrasive cleaners.
- Comprobación de accesorios: Ensure all fittings remain securely tightened.
6. Solución de problemas
This section addresses common issues that may arise with your CPU water block.
6.1 Altas temperaturas de la CPU
- Comprobar la pasta térmica: Asegúrese de que la pasta térmica se haya aplicado correcta y uniformemente. Vuelva a aplicarla si es necesario.
- Water Block Mounting: Verify the water block is securely mounted and making full contact with the CPU IHS.
- Flujo de refrigerante: Confirm the pump is operating correctly and there are no obstructions in the loop. Check for air bubbles trapped in the water block.
- Radiator Performance: Ensure the radiator fans are functioning and the radiator fins are clean.
6.2 fugas
- Guarniciones: Inspect all fittings for tightness. Do not overtighten, but ensure they are snug.
- Tubería: Check tubing for cuts, cracks, or improper seating on barbs/fittings.
- Juntas tóricas: If disassembling the water block, ensure all O-rings are properly seated and not damaged.
- Prueba de fugas: Always perform a leak test before powering on the system after any changes to the loop.
7. Especificaciones
Detailed technical specifications for the Alphacool Core 1 CPU Water Block.
| Característica | Especificación |
|---|---|
| Número de modelo | 13443 |
| Dimensiones (L x An x Al) | 72 x 72 x 26.50 mm (2.83" de largo x 2.83" de ancho x 1.04" de alto) |
| Material (Cooler) | Nickel-plated Copper |
| Material (carcasa) | Latón |
| Material (Connections) | Nickel-plated Brass |
| Conexiones | 2 x G1/4" |
| Enchufes compatibles | Intel LGA 1700, AMD AM4, AMD AM5 |
| Método de enfriamiento | Agua |
| Peso del artículo | 1.19 libras |
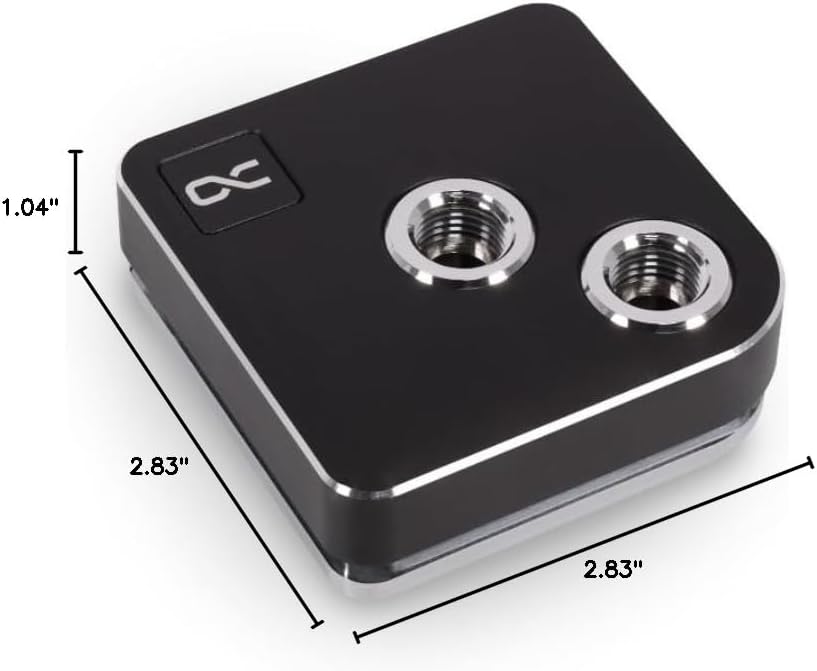
Imagen 7.1: Diagram showing the dimensions of the Alphacool Core 1 CPU Water Block.
8. Información de seguridad
Lea y siga estas pautas de seguridad para evitar dañar el producto o lesionarse usted mismo:
- Always disconnect power from your computer before installing or performing maintenance on the water block or any other PC component.
- Handle the water block and other components with care to avoid damage.
- Ensure all connections in the liquid cooling loop are secure to prevent leaks.
- Use only approved coolants for liquid cooling systems. Do not use tap water.
- Mantener fuera del alcance de los niños.


